All about the crankshaft sensor VAZ 2110, VAZ 2111 and VAZ 2112
| The crankshaft position sensor (CPS) provides the ECU (electronic engine control unit) with information about the angular position of the crankshaft and the moment the pistons of the 1st and 4th cylinders pass TDC. If the sensor malfunctions, problems with engine operation occur. Let's consider the appointment, testing and replacement of DPKV. |
What does the crankshaft sensor do?
Symptoms of a faulty crankshaft sensor
Where is the crankshaft sensor located?
Replacing the crankshaft position sensor VAZ 2110
How to check the crankshaft position sensor yourself
Have you encountered DPKV malfunctions?
Keywords:
Add a comment
Examination
Before you can check it, you first need to get to it. And the device is located in a not very convenient place on the engine. So be prepared to spend some time on this.
In general, the sensor we are looking for is located on the oil pump cover. You need to look for it directly near the generator pulley.
Now to the question of how to check it. Let's look at the two most common situations, but first, let's remove the element.
- The sensor is removed with a 10 mm wrench;
- Be sure to make special marks on the crankcase and sensor before removing. This will allow you to return it to its original place, or install a new regulator in the correct position;
- If there is no external, visible damage to the crankshaft sensor, then you need to use a multimeter;
- Don't forget to measure the distance between the sensor and the timing disk. In the normal position, the gap ranges from 0.6 to 1.5 millimeters.
First way to check
In this case, you will need an ohmmeter , which you will use to replace the resistance on the winding. According to the manufacturer's standards, the indicator ranges from 550 to 750 Ohms.
It's okay if your numbers are slightly different from the norm. If the deviations are serious, you will definitely have to replace the sensor.
It should be noted in fairness that the crankshaft position sensor on VAZ 2110 models rarely breaks down. Among the main reasons for its failure to function normally is the accumulation of dirt, mechanical damage, as well as banal factory defects.
Second method
Here you will need a voltmeter, a transformer and an inductance meter. It is advisable to measure resistance under compact temperature conditions.
Article on the topic: Choosing high-quality covers for the VAZ 2110
Once the ohmmeter readings are obtained, arm yourself with an inductance measuring device. Normally, the device should show from 200 to 4000 units (millihenry).
A megger measures the resistance when the crankshaft position sensor winding is powered at 500 volts. Under normal conditions, the readings will be no more than 20 MΩ.
VAZ 2110 crankshaft sensor chip
All about the crankshaft sensor VAZ 2110, VAZ 2111 and VAZ 2112
| The crankshaft position sensor (CPS) provides the ECU (electronic engine control unit) with information about the angular position of the crankshaft and the moment the pistons of the 1st and 4th cylinders pass TDC. If the sensor malfunctions, problems with engine operation occur. Let's consider the appointment, testing and replacement of DPKV. |
What does the crankshaft sensor do?
Symptoms of a faulty crankshaft sensor
Where is the crankshaft sensor located?
Replacing the crankshaft position sensor VAZ 2110
Signs of a malfunction of the crankshaft sensor VAZ 2110 and 2112. Accurate diagnosis
Description of the crankshaft sensor
So what is this controller and what is its purpose? Where can I find the device in order to replace it? What are the main signs of a device malfunction? We will give answers to these questions below.
Functions and purpose
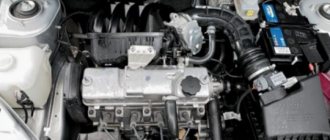
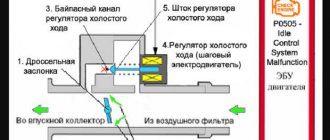
On an engine with 8 or 16 valves, the DPKV is designed to perform not control options, but to implement phase synchronization for gasoline injection. Also, the crankshaft sensor on the VAZ 2110 transmits an impulse to ignite the air-fuel mixture in the combustion chambers of the power unit. Therefore, if the controller breaks down, this can lead to various vehicle systems not functioning coherently. This means that normal operation of the engine will be impossible.
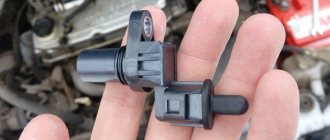
VAZ 2112 crankshaft sensor
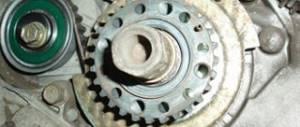
The VAZ 2110 crankshaft sensor itself is an inductive type device; this controller must respond to the passage of teeth on the master disk. This disk is mounted on the generator drive pulley, and the controller itself is installed next to it. There are 58 teeth on the pulley, between which there is a cavity the size of 2 teeth. This cavity allows synchronization with the top dead center of the engine pistons. The moment the depression passes the controller, a corresponding signal is sent to the engine control unit.
There are quite a few designs of devices of this type; the principle of their operation is based on a regulator such as the VAZ 2110 Hall sensor. In the latter case, the regulator also responds to a rotating shaft, but its operation is carried out as a result of the passage of a permanent magnet.
Where is?
If malfunctions are noticed in the operation of the engine, then before you begin to identify the breakdown and signs of malfunction, you need to find out where the regulator is located. Where is the crankshaft position sensor located on an 8- or 16-valve “ten”? If you open the hood, you will notice that the regulator can be found directly on the oil pump cover. As you can see, the location of the regulator is not particularly convenient. VAZ engineers thought through this point, thinking about the convenience of replacing the controller, so they equipped the DPKV with a long 80 cm wire.
Location of the DPKV under the hood of the car
Signs of trouble
If the controller located on the oil pump fails, the driver will not be able to start the engine. In the event of a breakdown, only replacing the regulator will solve the problem of the inability to start the motor. It should be noted that on 8- or 16-valve engines the problem of complete failure of the controller does not often occur; as practice shows, in most cases the problems accumulate.
So, what are the signs of a faulty DPKV:
- Reduced engine power when driving. When the driver presses hard on the gas, power loss may be felt. Note that in carburetor engines this can occur if the accelerator pump does not operate correctly.
- In some cases, engine detonation may occur, especially if it operates at high speeds. Sometimes this problem can be caused by the poor quality of the fuel used.
- It may be difficult to start the engine.
- Another sign of a malfunction that requires replacing the crankshaft sensor on the “ten” is increased gasoline consumption (the author of the video about replacing the crankshaft sensor on the domestic Lada is the IZO channel)))LENTA).
On which tooth should the crankshaft sensor be located on a VAZ 2110
Signs of a malfunction of the crankshaft sensor VAZ 2110 and 2112. Accurate diagnosis
All about the crankshaft sensor VAZ 2110, VAZ 2111 and VAZ 2112
| The crankshaft position sensor (CPS) provides the ECU (electronic engine control unit) with information about the angular position of the crankshaft and the moment the pistons of the 1st and 4th cylinders pass TDC. If the sensor malfunctions, problems with engine operation occur. Let's consider the appointment, testing and replacement of DPKV. |
What does the crankshaft sensor do?
Symptoms of a faulty crankshaft sensor
Where is the crankshaft sensor located?
Replacing the crankshaft position sensor VAZ 2110
How to check the crankshaft position sensor yourself
Malfunction of the phase sensor on the VAZ 2112 16 valves. Knowledge will not be superfluous
Repair of wiring connector of the Crankshaft Position Sensor (CPS) VAZ.
Quite often, the cause of the car jerking and its complete stop is an open circuit of the DPKV (error P0335 or P0336)
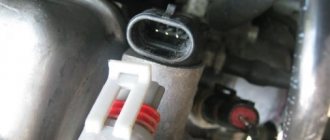
A wire break most often occurs at the base of the sensor connector. The connector needs to be replaced with a new one. In the article we will look at how to do this most correctly, and you will also learn how you can repair the old sensor connector if you suddenly cannot purchase a new one.
Everything was done indoors, so the part with attaching the restored connector to the car wiring is for demonstration, that is, you need to do everything the same, only not on the table, but on the car).
We cut off the connector from the car wiring at a distance of 3-5 cm from the connector. We remove the plastic wire retainer (to be honest, it doesn’t really prevent the wires from breaking at the root - so you don’t have to put it back if you’re too lazy...)
Using a wire with a diameter of 0.8 mm (we used a piece of welding wire from a Kempy semi-automatic machine) we press the fixing stops of the contacts through a special groove (it’s enough just to insert the wire until it stops).
Use the remaining wires to pull the contacts out of the connector. They come out quite tightly due to the rubber seals. We open the contact petals around the rubber seals and break off the old wires at the root.
We find a couple of pieces of wire 10-15 cm long, suitable in cross-section and color. Don't forget to put rubber seals on the wires.
We strip the ends of the wires by 3-4 mm and carefully solder them to the contacts. We used a 25-watt soldering iron, POS-61 solder and active flux based on zinc chloride.
We clamp the rubber seals with the contact petals, slightly bend the contact latches....
We insert the contacts with the wires into the connector until the latch lightly clicks. We put the plastic wire clamp on the back of the connector. The connector has been restored!
Next, let's move on to the car. We strip the DPKV wire - no more than 5 cm. We bend the screen back, strip the white and green wires by 15 mm.
We put heat-shrinkable tubes on the connector wires and twist the corresponding wires with electrical twist.
We stretch the heat shrink onto the twists and heat it with whatever comes to hand - we came across a lighter. But if you have a hairdryer on hand, it will be better... at least according to Feng Shui, that’s how it’s supposed to be.
We twist the restored wires slightly together and wrap them with electrical tape, starting from the connector. We wrap the electrical tape with an overlap of at least 50% over the previous layer. The result is in the picture below - the twisting area is quite well protected from moisture and looks neat. All that remains is to connect the connector to the sensor and ALWAYS fix the DPKV wire on a special bracket on the lower bolt of the timing belt cover.
Of course, the reliability is lower than that of solid wires - but such a connection has worked for years - it has been tested. Not a single return in 5 years.
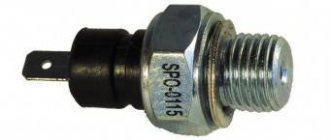
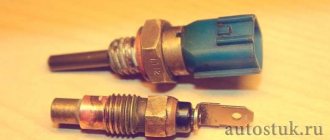
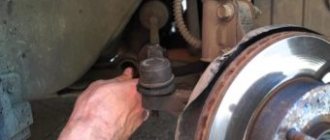
It's no secret that if the crankshaft position sensor fails, the car will only go further on a tow truck or in tow. The engine will simply be impossible to start, and the sensor cannot be repaired, only replacement. The sensor is not cheap, so before buying a new one, I recommend making sure that the cause of the malfunction is the DPKV, and not something else, or just a jamb in the wiring and connection chip of the sensor. If the diagnostics show that it is he who is to blame, we go to the nearest auto parts store and purchase a sensor, it looks like this:
To replace the DPKV on VAZ-2110, 2111 and 2112 we will need the following tool:
Socket wrench at "10".
A set of feeler gauges to set the gap.
Well, the new crankshaft sensor itself.
The sensor is located in close proximity to the crankshaft pulley. So, remove the block from the sensor by prying it with a screwdriver or any other handy tool. (you can just use your hands).
Then we take the prepared 10mm socket or open-end wrench and use it to unscrew the bolt that secures the DPKV to the engine.
Then we put the removed sensor aside, take a new one and install it in place of the old one, it is impossible to make a mistake during installation, it is installed in only one position. We screw back the sensor mounting bolt and take our set of probes. We will use them to adjust or simply check whether we have the required gap for the new sensor. The correct distance from the crankshaft pulley teeth to the sensor is 1 mm. plus or minus 0.41 mm.
If everything is correct, put the chip back in place and try to start the engine. If the distance is greater, we look where the jamb is and what got under the sensor, maybe just dirt. I have not yet encountered problems with the fact that the distance is less. Usually everything becomes normal right away.
Reference information: The CRANKSHAFT POSITION SENSOR (CPSE) supplies the controller with a signal of the rotation speed and position of the crankshaft. This signal is a series of repeating electrical voltage pulses generated by the sensor as the crankshaft rotates. Based on these pulses, the controller controls the injectors and the ignition system. The DPKV is installed on the oil pump cover at a distance of about 1+0.4 mm from the crankshaft drive disk (pulley). The crankshaft pulley has 58 teeth arranged around its circumference. The teeth are equidistant and spaced at 6° intervals. To generate a “synchronization pulse,” two teeth on the pulley are missing. As the crankshaft rotates, the teeth of the disc change the magnetic field of the sensor, creating induced voltage pulses. Based on the synchronization pulse from the crankshaft position sensor, the controller determines the position and speed of the crankshaft and calculates the moment of activation of the injectors and the ignition module. The DPKV wire is protected from interference by a screen connected to ground through the controller. DPKV is the most important of all sensors; if it is faulty, the engine will not work. It is recommended to always carry this sensor with you. Diagnosis of DPKV is described here. The PCV sensor is a polar device - if the wiring is broken, it should be connected observing the polarity. In reverse mode, the engine will not start.
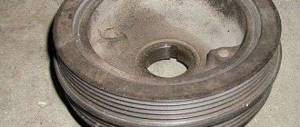
Possible faults
Removal and, if necessary, replacement of the pulley may be required in the following cases:
- If the hub has turned. It must be said that most often this happens due to previous inept repairs. The fact is that the VAZ 2110 has a fixing sleeve in the seat for the damper, pressed into the gear. It tends to fall out of the gear, causing the hub to rotate;
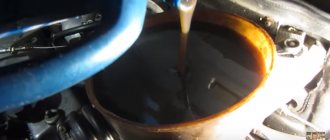
- Oil leaked from under the front crankshaft oil seal;
- The lightweight crankshaft began to resonate strongly;
- The old-style pulley or damper is loose;
- The damper seat broke. In case of such a breakdown, a replacement is needed, preferably together with the crankshaft gear;
- If it is necessary to remove the crankshaft - for repairs, replacement of liners, half rings, converting it into a lightweight one, etc.
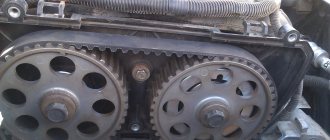
Removing the damper
On a VAZ 2110, the damper is removed in the following sequence:
- Disconnect the ground from the battery;
- Remove the radiator fan and fluid coupling;
- After loosening the bolts securing the fan pulley, remove the belt;
- It is advisable to remove the radiator, but if it does not interfere, you can leave it, protecting it from damage from the engine compartment with a sheet of plywood or cardboard;
- Remove the pulley from the radiator fan;
- We gain access to the damper, unscrew the bolts, dismantle it;
- When removing the hub, you need to secure it from turning (for which there is a special tool).
Next we proceed depending on the purpose of the analysis. If you only need to replace the damper, we do it and assemble everything in the reverse order.
You should know that replacing the liners on a VAZ 2110 can be done either with or without removing the crankshaft. But this requires a special device, and besides, it is better to entrust such work to an experienced mechanic - a mechanic.
If the crankshaft was dismantled to replace the liners or half rings, then we continue:
- Remove the lightweight or regular crankshaft;
- We remove the half rings;
- We evaluate the condition of the liners, and if they do not need replacement yet, then be sure to remove them and mark each of them;
- But, unfortunately, no matter how carefully the owner treats his VAZ 2110, sooner or later the time for physical wear comes for the liners - they need replacement.
You should know:
- Four repair kits of inserts are produced for the VAZ 2110. You need to buy them only as a set, and only in a strict sequence of sizes. Sometimes, however, situations are possible when you have to purchase them “through size”;
- thus, the crankshaft only lasts for four (and sometimes even three) overhauls;
- replacement of liners cannot occur without grinding the crankshaft. The only exception is if it is replaced with a new one. At the same time, an experienced craftsman can turn the crankshaft into a lightweight one.
But if replacing the crankshaft pulley is not such a difficult task, and almost any home craftsman can do it, then grinding and tuning the crankshaft should be entrusted only to experienced motorists.
When reassembling, please note that the groove on the hub must be aligned with the segment key. In addition, the bolt holding the hub requires a torque wrench. Its tightening torque should be 400 N/m.