2163-11-02-02-06
...and remove the headlight bulb from the headlight housing.
...and remove the headlight bulb from the headlight housing.
...and remove the headlight bulb from the headlight housing.
Attention! The headlight lamp is halogen. Do not touch its glass bulb, as fingerprints will cause the lamp to darken when heated. You can remove dirt from the flask with a clean rag soaked in alcohol.
Install the new H4 headlight bulb in the reverse order.
Replacing the turn signal lamp
Tired of orange
| Author: Kiryukha Published: 2559 days ago (October 29, 2013) Logbook: Operation of my Largus Category: Uncategorized Edited: 10 times - last December 21, 2014 | +5↑ Votes: 9 |
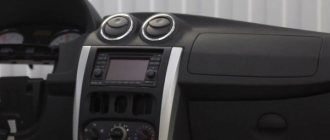
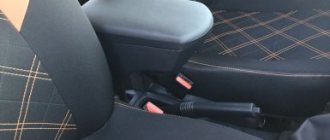
Hello everybody! I decided to share my modification of Largus. The orange backlight on the instrument panel has always bothered me. I've read a lot of Logan forums, there are a lot of these topics there. After replacement, the instrument panel began to look like this.
Important - you need to be able to work with a soldering iron at least a little. The procedure itself took 2 hours with smoke breaks. The installation process is not very difficult. The biggest problem was finding the right LEDs. More on this below. Installation itself: Remove the instrument panel. To do this, remove the panel with buttons under the radio, the panel with the air duct on the left, and the protective panel on the right. Everything is latched and can be removed easily. Next, use a Torx 25 screwdriver to unscrew the two screws of the steering column cover, lower the steering wheel down and remove the top cover. Remove the top cover of the instrument panel. It consists of two parts, first remove the top one and then the bottom one. Unscrew the 4 screws of the instrument panel and pull in the panel itself. Here, in theory, you need to turn off the mass, but I ignored this place and did everything for profit. Disconnect two instrument panel connectors. Using a 15 (or 10 – I don’t remember) Torx screwdriver, unscrew the 7 panel screws. Remove the transparent protective glass; it is secured with clips. We pull out the arrows... It’s hard to pull out, I was afraid to break it, but I didn’t break anything. We remove the panel board itself. Here it is important not to lose the conductive rubber band going to the BC display (inserted into the plastic mount). So we got to the board we need. I only changed the LEDs for the scale backlight (to blue) and the BC backlight (to white). The first ones are located at the pins of the indicator motors - 2 pieces on each, the second ones under the on-board computer display - 4 pieces. Remember the location of the negative terminals of the LEDs; this is a terminal with a cut corner. I marked “-” directly on the board with a marker. We unsolder the LEDs and solder new ones in their place. Now about the LEDs. Marking ka-3528, voltage 3.2 V. Can be found in radio parts stores, you can buy LED strip on these diodes in electrical goods stores. Usually the LED brand is in the name. It’s easier to find tape, but they also need to be desoldered from the tape, and they sell tape for at least a meter. The tape should not be filled with polymer; it is very difficult to remove the LED from there without damaging it. There are different colors, depending on what you like. After everything is soldered, we assemble in the reverse order. The arrows are placed like this... They will most likely move when removed. We push the arrow a little, carefully move it down until it locks, and remove it. The tachometer is set to “0”, the speedometer is set lower at the same distance as from the value “20” to the mark below it. Then we check it in test mode. The tachometer goes through all the divisions, the speedometer goes through the divisions like “50” “70” “90”. If, when connecting the power, the arrow goes below zero, it means it was not returned to its place. Carefully remove it and put it in place. Do not press the arrows too hard; they may get caught on the scoreboard itself. We collect everything, check it, enjoy it. PS After installation, one peculiarity became clear. The arrow itself is painted red on the bottom and is illuminated by the same LEDs, and since I chose a blue LED, it does not shine on the red paint... I was thinking about how to do it. There are 2 options - either remove the red paint from the arrow and tint it with a different color, or cover the place where the LEDs illuminate the arrow and put an LED of a different color there. The second is more difficult to implement but will turn out prettier. I'll try both options and report back... Finally got around to writing. I painted the hands with an ordinary paper corrector, having previously removed the red paint with nail polish remover, and this is how it turned out.
The image has been reduced. Click to see original.
31000 and the first troubles →
Create your own logbook, and you will be able to share with forum members your opinion about Largus, useful developments, installed additional information. equipment and tuning, trips and travel! To create a logbook, you must register on the site.
Tags: changing the instrument panel backlight
Popular in in-flight magazines
DRL Traveling on Largus Fuel consumption Armrest Mileage Discs Radio To1 First impressions Buying Largus Electrics Covers for Largus Bumper net Modifications HBO Speakers Rear view camera Wipers Interior lighting Brake light Tuning Tires and wheels Check valve Tuning lights Noise insulation Winter tires Rugs Largus DVR Rki-19 Winter operation Roof box PTF Tail lights Izhevsk Car audio Injectors Mudguards Washer reservoir Hood stops Low beam lamp Installing a cabin filter Parking sensors Thresholds Lada Largus LED Carpet covers Floating idle speed Trunk lighting Tinting Trunk shelf Trip to the sea Hood seal Accident Owner's review Fender liners Walkie Talkie Additional Socket Eyeglass case Replacement 5th gear
Comments (17)
| sanyok October 30, 2013 at 04:38 0 | |
|
| Shepherd October 30, 2013 at 04:58 +1 | |
|
| Kiryukha October 30, 2013 at 7:29 pm 0 | |
|
| Ваdemus October 30, 2013 at 09:34 0 | |
|
| Kiryukha October 30, 2013 at 07:31 pm +1 | |
|
| MihPuch October 30, 2013 at 09:45 0 | |
|
| Kiryukha October 30, 2013 at 7:33 pm 0 | |
|
| alexei October 30, 2013 at 6:23 pm +1 | |
|
| aleksey October 30, 2013 at 6:50 pm 0 | |
|
| Shepherd October 30, 2013 at 7:01 pm 0 | |
|
| yu-gra March 22, 2014 at 10:54 pm 0 | |
|
 That’s why the backlight is made “in the base” redder - so that you can see clearly. If the brightness of the blue is high enough, you will get an analogue of a “welding bunny” - it will hurt your eyes... Although yes, it’s beautiful. If I change mine, I’ll look for more noble “red” colors.
 | Dr-Evil-CIA November 2, 2013 at 7:20 pm 0 | |
|
| Dr-Evil-CIA November 2, 2013 at 7:26 pm 0 | |
|
| Dmitry November 10, 2013 at 6:25 pm +1 | |
|
| VictoR November 13, 2013 at 10:57 am 0 | |
|
| Shprot November 15, 2013 at 06:38 0 | |
|
| sergsap October 7, 2020 at 09:11 pm 0 | |
|
| Add a comment | RSS comments feed |
Additional comments:
2163-5-13-12-05
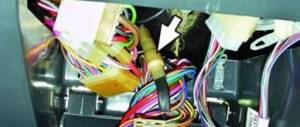
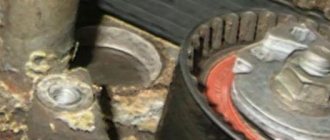
Turn the lamp socket clockwise (for the right headlight - counterclockwise) and remove the socket together with the lamp.
Turn the lamp socket clockwise (for the right headlight - counterclockwise) and remove the socket together with the lamp.
Turn the lamp socket clockwise (for the right headlight - counterclockwise) and remove the socket together with the lamp.
2163-5-13-12-07
By pressing the lamp, turn it counterclockwise and remove it from the socket.
By pressing the lamp, turn it counterclockwise and remove it from the socket.
By pressing the lamp, turn it counterclockwise and remove it from the socket.
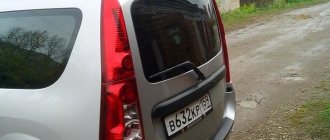
We replace the burnt-out PY21W turn signal lamp with a new one.
Replacing the side light bulb
Before replacing the side light bulb, it is more convenient to first disconnect the wire block from the turn signal lamp socket (see above).
How to make the right choice
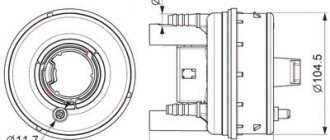
To begin with, let us draw your attention to the fact that the low beam bulb on the Lada Largus is a standard H4 halogen. It has two threads inside and performs two functions: it provides both low and high beam. They do not require dismantling or any other parts, so replacement and installation are very simple. The only thing you need is to purchase new lamps in advance, maybe also fuses and other elements, you also need to study the instructions.
We can recommend brands that have proven themselves as reliable manufacturers of high-quality lamps suitable for Lada Largus:
- Bosh;
- Osram;
- Philips;
- Narva;
- also Russian, whose products are also perfect for your car. These lamps are cheap, but very high quality.
Buy lamps in special stores so as not to come across a Chinese low-quality fake that will not last long for you.
Read
Light bulbs must have the following properties:
- brightness – up to 1550 lm;
- service life – from 2000 to 4000 hours;
- power – 45-60 W.
Halogen lamps have a yellow glow, but at the moment there is also pseudo-xenon, which glows bluish. But the bluish glow has disadvantages: they are only good in dry weather. When it's raining or foggy, a standard halogen lamp is ideal. It even bypasses xenon and LEDs, although they are stronger. It's just that halogen rays don't have enough penetration.
Repair of Largus - Replacing the H4 lamp in the headlights on a LADA Largus (practice)
Tuning for your Largus Evgeniy's lamp
in the right headlight, type .
Replacing low and high beam lamps for Renault Logan and Lada Largus
Video description of the replacement
all
the lamps
in the Renault Logan headlight unit with your own hands. A good example is Renault.
Many car enthusiasts prefer LED bulbs because they are powerful and retain energy for a long time.
2163-5-13-12-02
...and remove the lamp socket from the headlight housing.
...and remove the lamp socket from the headlight housing.
...and remove the lamp socket from the headlight housing.
We remove the baseless W5W side light lamp from the socket and replace it with a new one.
[How to save on maintenance of Lada Largus] [Maintenance of Lada Largus at 15,000/45,000/75,000/105,000 km] [Maintenance of Lada Largus at 30 thousand km] [Maintenance of Lada Largus at 60 thousand km of run] [Maintenance of Lada Largus for 90 thousand km of run] [Maintenance of Lada Largus for 120 thousand km of run] [Independent maintenance - general recommendations] [Safety rules for self-carrying out maintenance] [Tools required for carrying out maintenance Lada Largus maintenance] [Lamps used in the Lada Largus car]
Changing the lamps in the Lada Largus headlight
Main conclusions
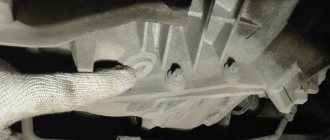
Replacing low beam lamps on the Lada Largus is carried out according to the usual method for most cars. No special preliminary steps are required other than temporarily removing the battery that prevents access to the left headlight. When choosing a replacement lamp, you should carefully study its parameters and select models with the most successful characteristics for a given region or operating conditions. The best option would be models produced by well-known companies; the pursuit of a low price will not live up to expectations and may result in unnecessary expenses.
It is for reasons of safety of drivers and pedestrians that the Traffic Rules and the Technical Regulations on the Safety of Wheeled Vehicles prohibit the operation of vehicles with external lighting devices that do not meet the design requirements of the vehicle.
After all, on the one hand, it is necessary that the car is clearly visible on the road, and on the other hand, it is dangerous to blind other drivers or pedestrians with too bright or incorrectly adjusted headlights. Working brake lights will allow drivers moving behind you to keep a safe distance. There are many such nuances, and everyone can save not only money and nerves, but often also health.
Lamps used in the Lada Largus car
Name EEC designation Power, W Position in the photo Headlamp
high/low beam lamp H4 60/55 1 front turn signal lamp PY21W 21 5 side light lamp W5W 5 7 Fog lamp lamp H11 55 2 Side turn signal lamp WY5W 5 6 Rear lamp
Turn signal lamp PY21W 21 5 Brake and side light lamp P21/5W 21/5 3 Fog light lamp P21W 21 4 Reversing light lamp P21W 21 4 Additional brake signal lamp P21W 21 4 License plate lamp lamp W5W 5 7 Courtesy lamp lamp trunk W5W 5 7 Interior lamp lamp W5W 5 7 Individual lighting lamp W5W 5 7 Glove box lamp lamp W5W 5 7 Illumination lamp for the hazard warning switch and cigarette lighter W1.2W 1.2 8 Illumination lamp for the ventilation, heating and air conditioning control unit W1, 2W 1.2 9