Lada Largus. Removing the instrument panel
We carry out the work when dismantling the heater, radiator and heater fan, air conditioner evaporator or when replacing the wiring harness.
We show the operations on a car equipped with two airbags.
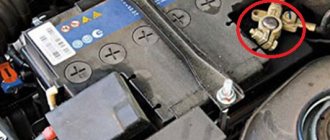
Disconnect the wire terminal from the negative terminal of the battery.
Remove the steering wheel (see “Removing the steering wheel”, p. 175).
We remove the steering column switches together with the connector (see “Removing the steering column switches and the switch connector with the spiral cable drum device,” p. 220).
We remove the instrument cluster (see “Removing the instrument cluster”, p. 229).
We disconnect the wire blocks from the ignition switch and the immobilizer coil (see “Replacing the immobilizer coil and the ignition switch contact group,” p. 206). We remove the floor tunnel lining (see “Removing the floor tunnel lining”, p. 255).
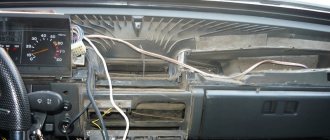
Location of the front passenger airbag wiring harness blocks in the vehicle interior.
Using the Torx T-20 key, unscrew the two self-tapping screws securing the headlight beam direction regulator.
. and push the regulator inside the instrument panel.
Overcoming the resistance of the plastic latches, we wring out the upholstery
left front pillar.
. remove the lower clamps from the holes in the instrument panel and remove the upholstery of the left front pillar. Similarly, remove the upholstery of the right front pillar.
. Use a screwdriver to tighten the lock.
. and push the diagnostic connector out of the glove box socket.
We move the instrument panel away from the cross beam.
. and remove the instrument panel from the car interior.
Before installing the instrument panel, insert the diagnostic connector into the glove box socket.
We perform the remaining operations for installing the instrument panel in reverse order.
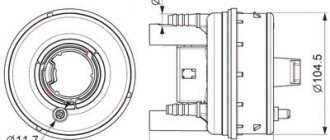
Instrument panel mounting points: A - outer side of the instrument panel; B - inner side of the instrument panel; 1 — lower side fastening; 2 - top mount; 3 - central fastening; 4 - lower mount
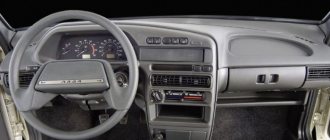
The interior design of the Lada Largus is similar to the interior of the Renault Logan. They have the same buttons and air ducts, similar to the dashboard. The central part is almost the same in the two cars.
Largus dashboard
The Largus instrument panel consists of a frame and a decorative trim. The frame is made of steel; it holds all the blocks and wires of electrical equipment installed in the cabin. Steering elements are also attached to it. The frame is part of the vehicle's power structure; it is attached to the base of the body and the A-pillars.
A decorative trim is a molded plastic part. It is screwed to the frame using screws. The steering wheel and the interior heating and air conditioning system are mounted on the decorative panel. It is also equipped with control instruments, linings and a glove box.
Removing the dashboard
Important elements of the car are hidden under the dashboard in Largus. To repair or replace them, you need to remove the dashboard. This is easy to do on your own; it is not necessary to involve specialists. Before you begin, read the instructions and make sure you understand everything in them.
- Phillips screwdriver;
- flat screwdriver;
- torx key t50;
- torx t20 key.
Stages of dismantling the Lada Largus instrument panel:
- Remove the negative cable from the battery.
- Lock the airbag control module.
- Remove the steering wheel.
- Disconnect the switch under the steering wheel with the driver's airbag.
- Unplug all appliances and set them aside.
Pull out the floor mats and unscrew the floor tunnel lining.
- Remove the boot from the gear shift lever. Disconnect the wires to the cigarette lighter.
- Remove the trim from the side pillars of the body.
- The central trim cover is held on by spring clips. To remove it, you need to carefully pry it off with a flat-head screwdriver. Proceed carefully to avoid damaging parts.
- Disconnect the wires from the central locking, alarm system, heated windows, and front power windows.
- Remove the audio system.
- There is a screw under the audio system head unit that holds the Largus decorative panel in place. Unscrew it.
- Remove the headlight control knob. After this, unscrew the two bolts and push the regulator itself down.
- At the bottom left and right, find and remove the decorative plugs for the instrument panel mounting screws.
- Unscrew these fasteners from the frame on the body.
- Unscrew the side fastenings on the left and right.
- Remove the steering wheel adjustment levers.
- Pull out the fastenings of the left lower trim panel.
- Remove the dashboard. In the glove box, disconnect the wiring harness.
Unscrew the screws securing the heating unit and push the devices inside.
Installation of the instrument panel
You can reinstall the instrument panel in reverse order. After this, do not forget to unlock the driver's airbag. To ensure you don’t forget anything, keep these instructions nearby:
- Install the nozzles and interior ventilation housing.
- Put the Largus instrument panel in place and connect the wiring harness in the glove compartment.
- Tighten the top mounting screws near the windshield.
- Reinstall the heater instrument panel and tighten the screws.
- Tighten the screws in the space behind the radio.
- Screw in the lower fasteners.
- Reinstall the headlight range control and its handle.
- Connect the wires of the devices and install them in place.
- Place the instrument visor.
- Install the radio and connect all the wires.
- Place the decorative trim on the center trim and snap it into place.
- Connect the cigarette lighter wires and replace the floor tunnel cover. Tighten the screws at the front and back.
- Install paddle shifters, airbag, steering wheel and steering wheel adjustment system.
- Place the negative terminal on the battery.
Device panel Lada Largus (removal and installation)
Lada Largus car is equipped with a prefabricated device panel, consisting of a decorative panel and a panel frame. The decorative panel is a molded plastic piece that is screwed to the frame. Attached to the decorative panel are control instruments, vehicle controls, heating (air conditioning) and ventilation systems, as well as linings that cover components located under the device panel, or serve to install devices and controls; air duct nozzles, glove box. The panel frame consists of metal fittings to which control elements, wiring harnesses and vehicle electrical system units are attached. The frame is attached to the front pillars, the front panel, the base of the body and extends into its power structure. In this article we will tell you about the procedure for removing the instrument panel from a Lada Largus . Here are step-by-step photos and a description of them.
Where is this button
So, we present to your attention the most difficult to reach buttons in this car, some of which will be very difficult to find without instructions.
First of all, let's press the familiar horn button on the steering wheel. However, the machine is stubbornly silent, and in general, to be honest, nothing was pressed. There is no need to rush back to the dealer and scold him for the defective product that he, such a “scoundrel,” nevertheless slipped to us. The horn button is actually located on the steering column switch and, of course, this location is extremely inconvenient and unusual.
Let's go further, the button for heating the driver's seat turned out to be somewhere unknown, by the way, why it was there is also a mystery shrouded in darkness. And it is located next to the seat height adjustment lever between the chair and the door. Getting it will be problematic, especially in winter, if you are also wearing a jacket. Imagine the situation - winter, minus thirty outside, slippery road and speed around eighty. In such a situation, you can say goodbye to life, trying to find and press this ill-fated button by touch.
Largus was not offended by the presence of a power window on the front and rear doors. However, the window lift buttons were also not where we would like. Instead of installing them directly on the doors, the designers made a completely inexplicable layout. The front window lift control system is located on the front panel directly under the audio system and, while this is more or less convenient for the driver and front passenger, the rear passengers had a very hard time. For them, the window lift buttons were made between the front seats almost on the floor of the car.
Given the decent amount of space in the cabin, people sitting in the back seat will have to stretch hard for a breath of fresh air. It will also be difficult for the driver if he is alone in the car and needs to lower or raise the windows of the rear doors; not everyone will be able to twist his hand so skillfully and feel these same buttons. The rear window lock button is also not pleasing, since it was made directly under the handbrake lever and, if you suddenly reach for it, you can hit the lever, it’s good if your fingers remain intact.
The electric drive of side mirrors is an excellent and very useful thing, it is especially convenient to use it while driving, but not in the Lada Largus. The mirror adjustment button was also located under the handbrake lever and was extremely inconvenient to use.
To summarize, I would like to note that VAZ does not have as much experience in producing its own cars as its foreign competitors have. Initially, the Italian Fiat was copied, which in Russia was called Zhiguli, but now the French Renault has been used. So maybe we shouldn’t scold our people for what is not ours, and give the auto industry a chance to release something of its own?
Buyers of the first Lada cars experienced similar feelings: a domestic car, but so similar to a foreign car! In the distant 1970s, they didn’t even dream about foreign cars, and compared the new model only with “Cossacks” and “Muscovites”. Today's buyer is much more sophisticated, and therefore we assessed the domestic Largus to the fullest extent.
LADA > Largus
Operations for removing the Lada Largus instrument panel
1. Disconnect the wire from the negative terminal of the battery.
2...and remove from the bracket glued to the windshield.
3. Remove the steering column switches as an assembly with the driver’s airbag contact ring (see “Replacing the steering column switches on Lada Largus”).
5. Remove the floor tunnel lining.
Video instructions for installing the speedometer winder for Largus, Logan, Sandero, Duster, Almera
Video instructions for installing the Speedometer Rotary for Lada Largus
into the OBDII diagnostic connector. Pays off less...
Read:
How to remove the instrument panel of a Lada Largus 2020, how to check the mileage yourself at home
— How to independently check the mileage on a Renault Logan 2013, at home How...
6. Remove the trims of both front pillars.
7. Pry up the edge of the central trim of the instrument panel and, overcoming the resistance of its spring clips, disconnect the trim from the instrument panel .
Proceed with caution, as the clamps are very rigid and if too much force is applied, the appearance of the trim or instrument panel may be damaged.
8. Squeezing the clamps, disconnect the wiring harness connectors from the front door power window switches, central locking, heated tailgate glass, and hazard warning lights and remove the central trim of the instrument panel .
9. Remove the audio system head unit.
10. Through the opening that opened after removing the audio system head unit, remove the central screw of the top fastening of the decorative panel.
11. Remove the heating (air conditioning) and ventilation control unit
12. By pulling along the axis, remove the headlight range control knob.
13. Remove the two screws securing the adjuster to the panel and push the adjuster shaft toward the panel and push the adjuster shaft into the panel.
14. Pry open the decorative plugs for the screws of the lower mounting of the instrument panel on the left and right.
15. Remove the two screws securing the console to the bracket on the base of the body.
16. Remove the two lower side mounting screws located on the left
Read:
18. . as well as two upper screws of the side toruses into the panel. fasteners located on the left.
20. Remove the fastening screw.
21. Remove the steering wheel adjustment lever
22. Take out the right...
23. . and front pistons securing the left lower panel flap.
24. Remove the instrument panel, removing the diagnostic connector from the glove box socket during removal.
25. Install the instrument panel in the reverse order of removal.
How to disassemble the panel on Largus
Sooo! After Laura tried to kill us, namely freeze us, refusing to turn on the stove in the frosty winter, it was decided not to put off finding the problem. After reading Drive2, just some information on the Internet, I just wanted to remove the motor, because this simple method through the Kama Sutra solved the problem for many, but something inside me said that the motor was working and the problem was before it. Yes, and they changed it for me under warranty, and I can’t believe that 2 motors have the same malfunction in the form of a self-correcting defect, but I called everything before the motor three years ago, the resistor and control unit are normal. Taking the electrical circuit, I found an electric motor on it, which is connected through a kind of extension cord
which cannot be checked without removing the panel. The conclusion suggests itself: remove the panel. As soon as two events coincided, namely: it warmed up to an acceptable -2 and it was a day off, I went looking for a bad contact. Previously, I made 2 mistakes. The first - on Friday evening, after work, I headed to, where would you think? No, not to the bar, to the gym! The first time in half a year... But after the gym (second mistake), at night, to the bar... In general, on Saturday I could not only think, but also move, so I postponed the repairs to Sunday. On Sunday, the brain worked, but the muscles did not. Overcoming the pain all over my body, I still took my wife to work and when I returned I began to remove the panel.
There, in the depths, behind the radio, there is a self-tapping screw securing the torpedo to the body, down with it. Then it was the turn of the steering wheel, the removal of which begins with the removal of the airbag
There is a very convenient groove in the steering wheel that guides the screwdriver directly to the airbag retaining spring.
Then there was the turn of the steering column switches, everything is simple here, there is a bolt at the bottom that ensures fixation
And of course, you need to dismantle the instrument panel. To do this, tear off the visor, decorative trims to the left and right of the column, unscrew 2 screws and remove the inside of the visor, and then unscrew 4 screws
Having disconnected 2 pads, remove the instrument panel. Next, as it is written in the book, “Overcoming resistance” and having cut your finger, remove the side pillar trim, then
We unscrew the screw. The same one below, under the decorative plug. And two similar ones on the right. Let's go to the tunnel
One self-tapping screw at the end under the plug. With a shurik and a slight upward movement, we almost break a piece of the interior decoration, because there’s no need to forget about the handbrake. Next is the second part of the tunnel, which is attached with a nut... With a slight movement of the hand, we will convert Shurik into a low-power impact wrench. Whack! And they removed the nut. Next are two self-tapping screws in the cup holders and two on the sides (So that’s where there are 2 more left after assembly! I’ll have to tighten them today). Congratulations to my beloved self, the tunnel has been dismantled, by the way, don’t try to break out the upholstery of the gearshift knob, there is a lock on the “forward direction” side, so you need to press it and it will come out freely, and don’t forget to disconnect the cigarette lighter. By the way, having looked at the flimsy wiring of the cigarette lighter, I think I should plug something into it now.
Next, in the glove compartment, press the latch of the computer connector and push it there, behind the glove compartment.
Let's pull, let's pull! Horseradish was floating there, who will unscrew the headlight range control for you? Ivan Fedorovich Krusenstern? We pull the twister towards ourselves, two whimpers, and try number two. Let's pull, let's pull!
A torpedo in the trunk. It’s so good that you don’t have to leave the car to do this! Glory to the Largus trunk! Well, here it is:
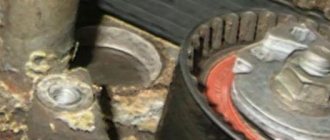
If you look closely, you can see that the green wire even managed to burn out. And all because the contact stop inside the plug was torn off. I put on the negative terminal, screwed it around, the motor started working, beauty! I pressed it in, inserted it, everything works, tugged it, it sits securely. At the same time, I found an alarm unit so that I would know where to go next time, otherwise it began to rosin the brain, then yell out of nowhere, or something even worse. Well, that's where the fun ends. Disconnected the negative terminal. Swish, swish, swish and put everything back together in the reverse order, naturally mixing up several screws in places and now I don’t have it attached to the radio, but the steering column switches no longer play. And the spare parts, as always, remained, today by the way I remembered where they came from, I’ll get them in the evening. I didn’t remove the motor itself, because it doesn’t vibrate or glitch. And the ancient auto mechanic wisdom says “Does it work? Don't climb! That's all guys, it took two and a half hours to do everything. Clean roads to everyone and not a nail or a rod!
Place the car in the workplace, apply the parking brake, and turn off the ignition. Raise the hood, disconnect the earth wire terminal from the battery (10mm wrench).
Remove the central trim 1, Figure 15-1, instrument panel, overcoming the force of the clamps..
Figure 15-1 — Removing switches and switches on the center console of the instrument panel:
1 — central trim of the instrument panel;
2 — power window switch of the left front door;
3 — rear window heating switch;
4 — alarm switch;
5 — door lock switch;
6 — right front door power window switch
Figure 15-2 — Switch blocks and switches on the center console of the instrument panel:
1 — wiring harness block to the left front door power window switch;
2 — block of the wiring harness to the rear window heating switch;
3 — block of the wiring harness to the hazard warning switch;
4 — wiring harness block to the door lock switch;
5 - wiring harness block to the right front door power window switch
Disconnect the connectors 1. 5, Figure 15-2, of the instrument panel wiring harness from the rear window heating switches, hazard warning lights, door locks, and right and left front door power window switches by pressing the spring clips.
Squeeze the clips and remove the switches and switches from the central trim of the instrument panel.
Install switches and switches in the reverse order of removal.
Place the car in the workplace. Raise the hood, disconnect the earth wire terminal from the battery
.
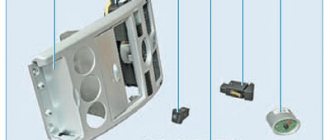
1 — left wind window pillar trim: 2 — instrument cluster; 3 — instrument panel; 4 — passenger airbag module; 5 — upholstery of the wind window pillar, right 6 — ventilation nozzle; 7 — floor tunnel lining; 8 — central trim of the instrument panel; 9 — steering wheel; 10 — driver’s MNPB
Lock the airbag computer using the diagnostic tool
Remove the driver air bag module (DIA).
Remove the steering wheel, steering wheel covers, shift paddles, steering column adjustment knob and transponder ring.
Having overcome the resistance of the clamps, fold back the decorative plug 1, Figure 122, unscrew screw 2 and remove the rear part of the floor tunnel lining 3 (flat screwdriver, replaceable Torx T20 head, wrench).
1 — decorative plug; 2 — screw securing the rear part of the floor tunnel lining; 3 - rear part of the floor tunnel lining
Unscrew two screws 1, Figure 12-3, securing the front part of the floor tunnel lining (replaceable Torx T20 head, knob).
1 — screw securing the front part of the floor tunnel lining; 2 - front part of the floor tunnel lining
Unscrew nut 4, Figure 12-4, and two screws 1. Remove cover 5 of the gear shift lever. Disconnect the wiring harness block from the cigarette lighter 2 and remove the front part of the floor tunnel lining 3 (replaceable head 10, replaceable head Torx T20, extension, wrench).
1 — screw securing the front part of the floor tunnel lining; 2 — cigarette lighter; 3 — front part of the floor tunnel lining; 4 — nut securing the front part of the floor tunnel lining; 5 — gear shift lever cover
Remove the central trim 1, Figure 12-5, instrument panel, overcoming the force of the clamps. Disconnect the wiring harness connectors from the switches and remove the trim.
Remove the plug from the center console of the instrument panel or the radio with CD player 2, disconnect the wiring harness connectors and the antenna (radio and CD player puller).
1 — central trim of the instrument panel; 2 - radio and CD player
Remove decorative trims 1 and 3, Figure 12-6, overcoming the force of the clamps.
Unscrew the two screws 2 securing the visor of the instrument cluster and remove it, overcoming the force of the clamps (replaceable Torx T20 head, knob)
1 — left overlay; 2 — screw securing the visor of the instrument cluster; 3 - right pad
Unscrew the four screws 1, Figure 12-7, securing the instrument cluster 2. Disconnect the two wiring harness blocks and remove the instrument cluster (replaceable Torx T20 head, knob).
1 — screw for fastening the instrument cluster; 2 - instrument cluster
Remove the left 1 and right 5 wind window pillar trims (see Figure 12-1), overcoming the force of the clamps.
Remove handle 4, Figure 12-8. Unscrew the two screws 3 securing the headlight range control regulator 2, remove it from the hole in the instrument panel (replaceable Torx T20 head, knob).
Having overcome the force of the clamps, fold back the decorative plugs 5 and unscrew one screw 1 of the lower fastening of the instrument panel on the left and right (replaceable Torx T20 head, knob).
1 — screw for the lower fastening of the instrument panel; 2 — headlight level control; 3 — screw for fastening the headlight corrector; 4 — handle for headlight adjustment; 5 - decorative plug
Unscrew screw 1, Figure 12-9, securing the instrument panel through the window that opened after removing the radio and CD player (replaceable Torx T20 head, extension, wrench).
1 — screw for the central fastening of the instrument panel; 2 - instrument panel
Unscrew two screws 1, Figure 12-10, securing the heating, air conditioning and ventilation control unit 3 to the instrument panel, squeeze the clamps 2 and push the unit inside the instrument panel (replaceable Torx T20 head, knob).
1 — screw securing the heating, air conditioning and ventilation control unit; 2 — clamps; 3 - control unit for heating, air conditioning and ventilation
Unscrew two screws 2, Figure 12-11, securing the instrument panel 1 to the heater body (replaceable Torx T20 head, extension, knob).
1 — instrument panel; 2 — screw securing the instrument panel to the heater body
Unscrew one screw 1 from the right and left sides, Figure 12-12, of the upper fastening of the instrument panel 2 (replaceable Torx T20 head, knob).
1 — screw for the upper fastening of the instrument panel; 2 - instrument panel
Instrument panel mounting points : A - outer side of the instrument panel; B — inner side of the instrument panel; 1 — lower side fastening; 2 - top mount; 3 - central fastening; 4 - lower mount
Remove the instrument panel. When removing, remove the diagnostic connector from the socket in the glove box and disconnect block 1, Figure 12-13 (remove with an assistant).
1 — wiring harness block; 2 - instrument panel
Unscrew four nuts 2, Figure 12-14, securing the passenger airbag module 1, disconnect the wiring harness block 3 and remove the passenger airbag (replaceable head 10, knob).
1—passenger's airbag; 2 — nut securing the passenger airbag; 3 — wiring harness block
Remove outer ring 1, Figure 12-15, ventilation nozzles.
Remove the inner ring 2 of the ventilation nozzle and, pressing the three clamps 3, remove the housing 4 of the ventilation nozzle from the instrument panel.
| Figure 12-15 — Ventilation nozzle: |
1 — outer ring of the ventilation nozzle; 2 — inner ring of the ventilation nozzle; 3 — clamp; 4 — ventilation nozzle housing
Install the removed parts in the reverse order of removal.
Unlock the airbag computer using the diagnostic tool
Video