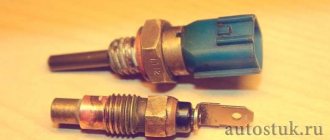
Replacing brake fluid yourself
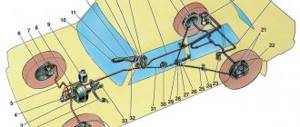
As you know, modern cars have a hydraulic braking system. This helps make her more empathetic. However, the working chemical elixir ages as it is used. Therefore, a mandatory replacement of the brake fluid is necessary. To make it clearer why this is so necessary, we will simply list what exactly happens to an obsolete chemical.
- It fills with dirt particles from the friction of parts.
- Absorbs air pockets.
- The components absorb moisture through compensation holes, the composition is replenished with water, which noticeably deteriorates its quality.
- Additives lose their chemical properties.
All this leads to a sharp decrease in braking efficiency.
Next, we will consider several important issues related to the hydraulic drives of the mentioned systems. Namely, let’s figure out what the frequency of brake fluid replacement is. We will also study the process of replacing it on a car.
As for the period after which it is necessary to update the working environment, its average value ranges from 40 to 60 thousand kilometers. In general, it depends on the make of the car. However, in many cases, manufacturers prescribe that the brake fluid should be replaced after two years - if this period occurs earlier than the specified mileage.
Now let's talk about how to replace brake fluid with your own hands. For example, let's take several different brands. First, let's look at VAZ cars, and then at foreign cars.
Changing Brake Fluid - Step-by-Step Guide
!!!Caution : drops of fuel oil may drip from the lid and float.
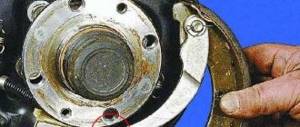
2. With the rear wheels lifted, unlock the rear brake pressure regulator by placing a screwdriver between the piston and the plate. After finishing work, do not forget to remove it from there.
4. After this, install the rubber hose on the valve fitting (it is advisable to find a transparent hose, this will allow you to monitor the condition of the fuel fluid), then lower the end of the hose into a clean transparent container.
5. The assistant’s task is to sit in the cabin, with sharp presses at intervals of 1-2 seconds. press the brake pedal 4-5 times. After pressing the pedal for the 5th time, you need to lock it in the pressed position.
At this point, the replacement of the VAZ 2110 brake fluid is considered complete! All the best!
You will need: brake fluid, a clean rag.
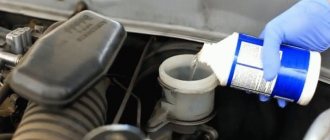
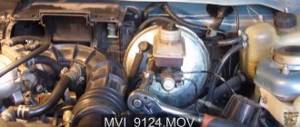
The reservoir is installed on the master cylinder in front of the engine compartment trim (to the right of the expansion tank).
1. Check the brake fluid level in the reservoir. It should be located between the “MIN” and “MAX” marks marked on the tank body.
4. Check the operation of the brake warning light sensor. Turn on the ignition, then press the button in the tank cap. The warning light in the instrument cluster should light up. If the lamp does not light up, contact a specialist, as most likely the sensor is faulty.
Our brand
General recommendations in all cases of work when changing the fluid on a car with your own hands:
- Do not allow the chemical to come into contact with your hands, inside the body, or on wires or paintwork;
- it is necessary to use exactly the chemical specified by the manufacturer of the car brand;
- Store leftovers in containers tightly closed.
So, let’s take an example of the operation of replacing the brake fluid on a VAZ 2110 car. We will describe what you need to have on hand below:
How much fluid we need is indicated by the car’s passport. For VAZ 2110 this is 0.55 liters. Let's get started.
- Open the system reservoir.
- We lift the rear of the car, unlock the rear brake pressure regulator - insert a screwdriver between the piston and the plate.
- We release the air release valve of the right rear brake from the rubber cap, insert a hose, the end of which is connected to a container.
- The partner must sharply press the pedal 5 times, and leave it pressed the last time.
- At the same time, we unscrew the valve with a wrench - just make three quarters of a turn, the spent medium should begin to flow out. After the leak stops, tighten the valve, and your partner should not release the pedal until the fitting is tightened.
- It is necessary to add new medium as soon as the tank is empty to the bottom mark. When clear liquid flows out, the operation stops.
- We repeat everything completely on the left front brake mechanism.
- Then we repeat the manipulations again for the second circuit - first we move to the left rear mechanism, and at the end - to the right front.
- We install the caps back, remove the screwdriver from the pressure regulator, and check the efficiency of the system.
This is how the brake fluid is replaced on a VAZ 2110. Dividing the system into two independent circuits for greater safety should not be a surprise - just remember the driving school lessons.
Replacement for the VAZ 2114 is carried out in exactly the same way. If we talk about the Lada Kalina, then there are no differences either. Changing Kalina's fluid is done according to the same instructions. The only thing worth paying attention to is how much brake fluid Kalina needs for a complete replacement. The volume here is 0.45 liters.
On the Lada Priora we act identically. Replacing Priora also does not cause any particular difficulties. The volume of the new medium is also 0.45 liters. For all these cars, it is recommended to use DOT 3. The replacement frequency for front-wheel drive VAZs is from 2 to 3 years or from 50 to 60 thousand km. mileage
Not our brand
Now let's move on to foreign cars. To replace the brake fluid in a Ford Focus 2, we will prepare the following:
- set of wrenches;
- rubber hose;
- capacity.
Also find out why oil appears in the air filter of the VAZ 2109 and the oil pressure lamp on the VAZ 2114 is on.
We proceed as follows.
- Unscrew the cap of the system reservoir.
- Remove the cap from the valve of the working cylinder of the right rear wheel. We put on the hose. The end of the hose is connected to the container.
- The assistant presses the pedal 5 times, holding it pressed for the 5th time. At the same time, unscrew the valve - three quarters of a turn is enough. The spent medium begins to flow from the hose. After the leak stops, immediately close the valve.
- We top up the tank as soon as the old chemical reaches the bottom mark.
- We continue the operation until a clean new medium flows from the valve.
- We repeat the manipulations for the left front wheel, as well as for the second circuit, similar to how it was described earlier.
Next, let's see how the replacement is made in the Skoda Octavia A5.
Here, however, as in the previous case, the manufacturer recommends the following period - 2 years or 30 thousand kilometers. To carry out the procedure, exactly the same things are used - keys, a hose and a container. The instructions for this car will completely repeat the previous instructions. Therefore, we will not focus on it here.
Let's move straight to another popular foreign car. For owners of Renault Logan, the manufacturer allows them to avoid updating the brake operating environment for a long time. The period here is as much as 90 thousand kilometers or 6 years. Renault Logan brake fluid is changed according to the same scenario, with the same tools. We will just add a few additions to it.
After point 1 of the instructions for Ford, many masters recommend inserting another point, let’s call it this:
- We pump out the old chemical from the tank with a syringe until the level drops to the bottom mark, then we replenish the tank with new medium.
- Next, remove the cap from the cylinder valve of the right rear wheel.
We repeat the rest according to the instructions for Ford.
If we recall another popular car - Chevrolet, we are unlikely to find any differences in its braking system from the described cars. Replacement for the Chevrolet Lacetti is also carried out according to the previously described path. Let's repeat it briefly.
But here for work we take in addition to wrenches:
- We open the hydraulic drive reservoir, use a bulb to pump out the old preparation to the bottom mark, then fill the reservoir to the top with the new medium.
- Remove the bleeder fitting from the rear right mechanism from the cap and insert the hose with a container.
- With the help of a partner, we pump the system with the pedal, unscrew the fitting, according to the previous instructions, and drain the liquid.
- In this car - this is how all cars are designed - the contours are located exactly as in the previously described cases. We repeat the operations at all four points.
Don't forget to put the caps back in place.
We noticed that the contours are always located in the same way, so another car under the Chevrolet brand, the well-known Chevrolet Niva, has work done in the same way. However, there is one caveat. You need to refer to the very first instructions we described for the VAZ 2110. You need to be guided by it. The only change is indicated below.
It's in the second paragraph.
- We unlock the brake pressure regulator. To do this, insert a screwdriver between the bracket and the screw.
- Next, we repeat everything as for the VAZ 2110.
We looked at several different car models. There is only one conclusion - everywhere this repair is done according to the same principle. As for systems equipped with ABS, more on that below.
Service price
Note that there is a special device for completely replacing the brake fluid. It is used by car service technicians. It is also extremely necessary when there is an ABS system! It is not profitable to buy it for independent work, although if you ask someone... The operating principle is as follows.
Why is replacement needed?
Varieties
The loss of the original quality and original characteristics of the brake fluid is caused by long-term operation under increased loads on the brake system.
This happens in the following way: when braking, the solution contracts, its viscosity is lost, and its consistency becomes more liquid. In addition, TJ is hygroscopic, that is, during the operational period it is saturated with moisture and water. As a result, the boiling point of the solution decreases and the liquid loses its properties.
Do not forget about mechanical damage and malfunctions that occur in the brake system. They also require a mandatory replacement of the hydraulic solution. Defects lead to leaks and air entering the system. Air locks are unacceptable because they cause the brakes to lose their effectiveness.
Plus, the liquid poses a potential danger to wiring, since it corrodes its protective casings without any problems. If it was not possible to avoid contact with car parts, immediately try to wipe the liquid off with rags. There is no need to rinse with water. If skin burns occur, wash with water and go to hospital immediately.
Let's hope that there will be no problems with your safety issues and that you will work carefully. And to work you will need a set of tools:
- Spanners;
- Durable rubber hose;
- Any transparent container with a volume of 3 liters or more.
Well, now you can proceed directly to the procedure for replacing the brake fluid on your VAZ 2110.
- Unscrew the brake fluid reservoir cap. It is located on the left on the domestic “ten”.
- Place the cap on a clean rag as there may be particles of brake fluid on it. Be sure to wear gloves.
- Drain the fluid from the hydraulic cylinders located behind. This is due to the distribution pattern of brake fluid throughout the vehicle. The front wheels are connected first, so if the car is in a normal position, the fuel fluid will not drain from the rear cylinders.
- For convenience, lift the rear wheels with a jack and turn off the locking regulator, that is, the sorcerer in the people. A screwdriver is inserted between the sorcerer's piston and the plate, which will not allow the element to move.
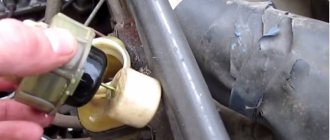
- Clean off any dirt that has accumulated on the hydraulic cylinder valves at the rear and remove the cap from one of them. It is made of rubber.
- This will release the fitting onto which the pre-prepared hose is attached. It is recommended to use a transparent rubber hose, as this will allow you to monitor the drainage of the liquid.
- The other end of the hose is placed in a transparent container.
- Have someone in your garage do the bleeding while you hold the brake fluid container.
- Bleeding is done by sharply pressing the brake pedal. The pedal should be pressed all the way about 6 times in a row. After 6 presses, the pedal rests on the floor and is held.
- Now unscrew the cylinder air valve half a turn. Due to this, the liquid will begin to be squeezed out of the container and enter the container through the hose.
- As soon as the entire circuit is cleared of brake fluid, the brake pedal itself will fall to the lower position.
- Wait until the liquid has completely drained, then be sure to tighten the outlet valve.
- A similar process is repeated on the second rear wheel, after which the front wheels are pumped out.
- The procedure for draining the hydraulic solution from the front wheels is similar to working with the rear wheels. At the same time, check the condition of the hydraulic cylinders. They may need repairs.
- Determining the serviceability of a hydraulic cylinder is not difficult. If the working stroke of the rod is smooth, there are no distortions or sudden jumps, then everything works well and replacement is not needed.
- If there are problems with the hydraulic cylinder, the easiest way is to replace them with new ones. But it can be repaired. Act according to the situation.
- Filling with new hydraulic solution is carried out by pumping each wheel separately.
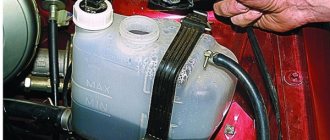
- Once you have filled and bled all 4 wheels, be sure to fill the brake fluid reservoir to the maximum level. For this purpose, the corresponding MAX symbol is marked on the body.
- The last step is to check the functionality of the new brake fluid inside the system. If the replacement of the hydraulic solution was carried out correctly and without disturbances, the braking force will be distributed evenly, the pedal will clearly respond to pressing without delay and without increased sensitivity.
- If the pads do not respond to braking at the same time, you will simply skid when you press the brake pedal. Therefore, this should not be allowed under any circumstances.
Replacing brake fluid on a domestic VAZ 2110 car is not difficult, even without the help of specialized service stations.
For a successful DIY procedure, you will need:
- Compliance with personal safety rules;
- Availability of an assistant;
- High-quality brake fluid;
- Actions according to the instructions and operating instructions for the VAZ 2110.
Put all this together, and you can easily change the hydraulic fluid in your car's brake system yourself.
How much brake fluid do you need to change?
Maintaining the required level of brake fluid is necessary for the proper operation of the vehicle's braking system. How much is needed can always be found in the service book, but often car owners are not used to looking into it, but act empirically or look for the answer on the Internet. It is these users that we will try to help figure out the question of how much brake fluid is needed for replacement and which one should be poured.
Brake fluid is the working fluid of the brake system, with its help the force created in the master cylinder is transmitted to the wheel pairs.
If the brake fluid level is below the minimum mark (by the way, this will be indicated by the corresponding icon on the instrument panel - a red circle with waves inside), then you need to top it up. It also doesn’t hurt to check the brake system, since a decrease in the brake fluid level may indicate a malfunction or wear of the master cylinder gaskets. As a rule, the brake system of a passenger car contains from 0.55 to 1.0 liters of brake fluid. And its specification can very often be indicated on the body of the expansion tank or its cover.
When checking, do not forget to pay attention to the color of the liquid . The new TJ is transparent with a yellowish tint. During operation, it changes its color and becomes dark, this is mainly due to the accumulation of various impurities. If the fluid has darkened, this may mean that a complete replacement is necessary and simple topping up is not enough. Experts recommend replacing brake fluid approximately every 2-3 years , this is the optimal interval in accordance with hygroscopicity and exposure to temperature loads. For the brake mechanisms to function properly, the fluid must have a number of properties and also meet a certain standard.
Recommendations before changing brake fluid
- Brake fluid is toxic, so safety precautions must be observed.
- Do not allow the liquid to come into contact with the insulation of wires made of plastic, as well as the paintwork of the body, as this will negatively affect these surfaces. Before starting work, you need to cover areas susceptible to penetration of brake fluid. If liquid does get on them during operation, immediately wipe it with a cloth.
- Brake fluid must be replaced in strict accordance with the manufacturer's recommendations.
- The drained brake fluid is no longer usable.
- The brake fluid should be topped up with the exact brand of brake fluid used in the system.
- If not all of the brake fluid is used, the remaining must be stored in a closed container, since, as mentioned earlier, it is hygroscopic.
Types and properties of fuel fluid
Any brake fluid has 93-98% of the main composition and from 2 to 7% of additives, which, in fact, are the key component for imparting the declared characteristics. In general, if you look at it this way, the properties of brake fluid depend on the combination of its components. Depending on the composition of the base, TJ is divided into 3 groups.
Types of brake fluids:
- Mineral (mineral oil LHM) . They consist of alcohol and castor oil.
- Glycolic . Developed on the basis of polyglycols and their esters.
- Silicone . Manufactured from silicon-organic polymer products.
Regardless of the type and composition, all brake fluids are divided into two classifications.
Classification of TJ:
- By viscosity.
- By boiling point:
- for “dry” liquid (without water);
- “wet”, which contains 3.5% water.
If the boiling point exceeds the permissible norm, then there is a risk of a vapor lock forming in the system (as a result of moisture evaporation), which can lead to breakdown and failure of the brake pedal.
Brake fluid standards
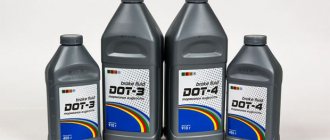
In practice, and in most cases, it is customary to use the American quality standard FMVSS No. 116 (Federal Motor Vehicle Safety Standard), which was developed by the US Department of Transportation (DOT for short). So, often, in modern cars, either DOT 4 is used on a glycol basis, or DOT 5.1 (including glycol and silicone compounds). But in cars manufactured more than 20 years ago, BSK or DOT 3 fluid can be used.
The DOT standard clearly describes such characteristics as:
DOT 4 brake fluid (meets SAE J1703&J1704, FMVSS 116, JIS K2233, ISO 4925)
- degree of viscosity;
- boiling temperature;
- chemical inertness to materials (for example, rubber);
- corrosion resistance;
- constancy of properties within operating temperatures;
- possibility of lubrication of elements working in contact;
- level of moisture absorption from the surrounding atmosphere.
In accordance with FMVSS No. 116, brake fluid options are divided into five classes, each of which is designed for a specific type of operation and even the type of brake mechanisms - disc or drum.
But you shouldn’t think that these are uniform existing standards, because in Europe there will be SAE (Society of Automotive Engineers) J1703/1704 , ISO(DIN) 4925 - International Organization for Standardization, in the Middle Kingdom, Japanese - JIS (Japanese Industrial Standard) K2233 . But in Russia and other CIS countries there is no single standard regulating the quality indicators of brake fluids, so manufacturers work according to their own technical conditions.
Use of DOT brake fluids
Since in many cases everyone is guided specifically by the American DOT standard, let’s take a closer look at all five of its classes:
- DOT 3 – designed for low-speed vehicles with drum and disc front brakes. Boiling point 220° C.
- DOT 4 – is poured into the brake system of high-speed vehicles that have disc brakes on both axles. Boiling occurs at temperatures of 240° and 160° C.
- DOT 4+, DOT 4 SUPER – modifications of DOT 4, their boiling point is 260° C and 180° C.
- DOT 5 is a silicone fluid that cannot be poured into a car with an ABS system, because it does not absorb moisture, but allows it to collect in one place. Due to the fact that the boiling point is 280°C and 180°C (for “dry” and “wet” liquids) while having low viscosity, it is usually used only in racing cars.
- DOT 5.1 – for fast cars whose brakes are often overloaded. It is more high-tech and fluid than DOT 4, but still absorbs moisture. Often recommended for use in systems with ABS and ESP. Operating temperature 270°C and 180°C.
As for the service life of fluids of various classes, it should be noted that brake fluids of class DOT 3 have a service life of approximately 1-2 years , in turn DOT 4 - 2-3 years, and DOT 5.1 needs to be changed every 3-4 years . DOT 5 can be used for up to 5 years .
Replacing brake fluid
Take precautions when working with brake fluid: it is toxic. If brake fluid comes into contact with wires, plastic or painted body parts, they may be damaged. Therefore, always use clean rags when pouring. If liquid gets on parts, wipe them immediately with a clean cloth.
Use only brake fluid recommended by the manufacturer.
Do not reuse the fluid drained from the system: it is contaminated, saturated with air and moisture. Always add only new fluid to the system of the brand that was filled before.
Brake fluid is hygroscopic (absorbs moisture from the surrounding air), so it should not be stored in open containers.
Note: volume and brand of brake fluid can be found here
Volume of fluid in the brake system
Basically, the brake system holds from 0.55 to 1.0 liters of fluid, this depends both on whether the car has an ABS system and on the size of the car. The period for replacing brake fluid in most cars is 2-3 years of use, or 40-60 thousand mileage . To determine a more specific interval, you need to look at a specific fluid standard and driving characteristics. For example, in sports cars the TZ is changed every 5-10 thousand.
But since the question of the required volume of brake fluid in the system and its standard is asked only by owners of ordinary cars, and not premium or business class ones, we will give specific examples for cars popular in the CIS countries.
Replacing brake fluid - important tips before starting work
- Be careful and take precautions when working with TJ, as it is toxic.
- Do not allow brake fluid to come into contact with the plastic insulation of the wires, as well as the paintwork of the body and other parts, as this may damage them. Before you begin, cover the areas that are most susceptible to brake fluid. If TJ gets on the surface, immediately wipe it with a cloth.
- The brake fluid must be replaced in strict accordance with the fluid recommended by the manufacturer.
- Under no circumstances should drained brake fluid be used for the reasons described at the beginning of the article.
- Adding brake fluid to the system is only permitted for the brand that is in the system.
- Store remaining brake fluid in a closed container, as it is hygroscopic (able to absorb moisture from the air).
Before replacing brake fluid, prepare:
- Standard set of keys;
- Transparent rubber hose;
- Clean transparent containers;
- One assistant;
- Clean brake fluid.
labavto.com
Replacing brake fluid (BF) is a routine operation. Manufacturers recommend changing it after 40 thousand kilometers, that is, once every few years. But those who care about traffic safety during technical inspections check the condition of the hydraulic solution and change it as necessary. The process of replacing brake fluid on a VAZ 2110 is simple, so it can be mastered by a novice motorist.
When do we change it and what type of vehicle is better to buy?
Replacing brake fluid is necessary, as it loses its quality over time. When braking, it contracts, its viscosity decreases, and it becomes thinner. In addition, TZ has the property of accumulating moisture - it is hygroscopic, so the longer the car is used without replacement, the harder it is to brake. If the moisture percentage exceeds 3.5, the fuel oil may boil, causing the brakes to fail.
Do not forget about breakdowns and mechanical damage that occur in the brake system. They cause leaks and air in the system. This cannot be allowed, as air locks reduce the effectiveness of the brakes, which can lead to an emergency on the road.
If you evaluate the condition of a hydraulic solution by its appearance, then it should be transparent, without foreign impurities. There is a special device that determines what percentage of water is contained in the total volume of hydraulic solution poured into the tank. It is expensive, but having such a tester is very convenient.
It is important not to skimp when purchasing and purchase a good liquid. The American Step Up Brands (DOT 4) has good characteristics. A worthy analogue is the TJ from the European manufacturer Mobil; its cost is cheaper than the American one. You can save money by using Russian liquid (RosDOT 4.5) and Siburneftekhim. They have good performance characteristics.
Replacing the hydraulic solution
To carry out the procedure, you need to purchase liquid for tomoses in a volume of at least one liter. Although the system will require less of it, it is better to buy it with a reserve in order to wash the parts with it. When working with TJ, you should remember personal safety, as it contains toxic substances that, if they come into contact with the skin, will damage it.
In addition, the solution is dangerous for wiring, since its chemically active components corrode the insulation of the wires. If liquid ends up on the car body, it should be wiped off immediately with a cloth soaked in cold water. The drained liquid cannot be used or poured into the sewer system; there are special points for its disposal.
To replace the solution you will need the following tools and materials:
- a set of keys;
- chemical-resistant transparent rubber hose;
- fresh hydraulic solution;
- protective gloves;
- clean rags;
- transparent containers with a volume of at least three liters.
The procedure for replacing a TJ with a VAZ 2110 consists of a sequence of steps:
We independently change the brake fluid on a VAZ 2110
Replacing brake fluid (BF) is a routine operation. Manufacturers recommend changing it after 40 thousand kilometers, that is, once every few years. But those who care about traffic safety during technical inspections check the condition of the hydraulic solution and change it as necessary. The process of replacing brake fluid on a VAZ 2110 is simple, so it can be mastered by a novice motorist.
When do we change it and what type of vehicle is better to buy?
Replacing brake fluid is necessary, as it loses its quality over time. When braking, it contracts, its viscosity decreases, and it becomes thinner. In addition, TZ has the property of accumulating moisture - it is hygroscopic, so the longer the car is used without replacement, the harder it is to brake. If the moisture percentage exceeds 3.5, the fuel oil may boil, causing the brakes to fail.
Do not forget about breakdowns and mechanical damage that occur in the brake system. They cause leaks and air in the system. This cannot be allowed, as air locks reduce the effectiveness of the brakes, which can lead to an emergency on the road.
If you evaluate the condition of a hydraulic solution by its appearance, then it should be transparent, without foreign impurities. There is a special device that determines what percentage of water is contained in the total volume of hydraulic solution poured into the tank. It is expensive, but having such a tester is very convenient.
It is important not to skimp when purchasing and purchase a good liquid. The American Step Up Brands (DOT 4) has good characteristics. A worthy analogue is the TJ from the European manufacturer Mobil; its cost is cheaper than the American one. You can save money by using Russian liquid (RosDOT 4.5) and Siburneftekhim. They have good performance characteristics.
Replacing the hydraulic solution
To carry out the procedure, you need to purchase liquid for tomoses in a volume of at least one liter. Although the system will require less of it, it is better to buy it with a reserve in order to wash the parts with it. When working with TJ, you should remember personal safety, as it contains toxic substances that, if they come into contact with the skin, will damage it.
In addition, the solution is dangerous for wiring, since its chemically active components corrode the insulation of the wires. If liquid ends up on the car body, it should be wiped off immediately with a cloth soaked in cold water. The drained liquid cannot be used or poured into the sewer system; there are special points for its disposal.
To replace the solution you will need the following tools and materials:
- a set of keys;
- chemical-resistant transparent rubber hose;
- fresh hydraulic solution;
- protective gloves;
- clean rags;
- transparent containers with a volume of at least three liters.
The procedure for replacing a TJ with a VAZ 2110 consists of a sequence of steps:
- First you need to hang the wheels and remove the lock from the pressure regulator installed on the rear brakes. To do this, take a gasket or a flat screwdriver and insert it between the plate of the device and its piston, eliminating the possibility of impact. After finishing the work, you must remember to take them out.
- We clean the system elements from dirt and dust in the accessible area.
- Raise the hood and unscrew the cap on the fuel tank, which is located on the left in the engine compartment on the “ten”.
- Use a syringe to pump out all the liquid from it. Then fill it with clean water to the minimum level. It is impossible to completely remove the TZ, as the brake system will depressurize.
- Next, unscrew and remove the fittings from all wheels. We wait until the liquid drains along with all the debris and various foreign inclusions that have accumulated in the system.
- After the solution has drained from the system, fill the tank with a new fuel fluid of the same brand. Do not tighten the fittings until the liquid flowing out of them stops bubbling. This means that air has been forced out of the system.
- We close the fittings and bleed the system to eliminate air pockets.
We bleed the brake system ourselves
To bleed, you need to call an assistant who will help carry out work in the cabin by pressing the brake pedal to create pressure in the system. We start the procedure with the rear right wheel, it has the longest highway. We free the fitting from the protective cap made of rubber. Next we put on the hose. It should be translucent so that you can observe the color and condition of the drained liquid. Place the other end in a container, which should also be transparent.
An assistant sitting inside the cabin smoothly presses the brake pedal all the way 4-7 times. Pressing the last time leaves the pedal pressed to the floor and keeps it in that state. The participant located under the machine unscrews the fitting a couple of turns, waste fluid will flow out, in which air bubbles may occur. When the hydraulic solution leaves the circuit, the pedal spontaneously goes down all the way. After the liquid has drained, be sure to tighten the outlet valve.
During the pumping procedure, an assistant must constantly monitor the liquid level in the tank. It should not fall below the minimum. Therefore, it is necessary to constantly add fresh fuel oil.
The remaining wheels are pumped in the same way. In this case, you should take into account the specifics of the spacing of contours on the VAZ 2110, it is diagonal. It is necessary to follow a certain sequence during the procedure. First, work is carried out on the fitting of the rear right wheel, then the work is transferred to the front left. Then they bleed the rear left valve and lastly work with the fitting of the front right wheel.
To bleed the brake system, you can purchase a special valve.
You can make a liquid seal with your own hands. It consists of a transparent hose of the required length and diameter, a plastic bottle with a volume of 0.25-0.5 liters. Brake fluid is poured inside. This device works no worse than a commercial valve.
During the process, the condition of the hydraulic cylinders is checked. Perhaps they need repairs. Serviceability is determined by how the rod moves in working condition. If the ride is smooth, does not jump or jerk sharply, then everything is in good condition. It is advisable to replace faulty cylinders, but they can be repaired. You should act according to the situation.
When the brake system is pumped, add hydraulic solution to the reservoir to the maximum level. There is a corresponding mark on the wall of the tank - MAX. At the final stage, we check the quality of the brake system.
If the replacement of the brake fluid and bleeding were carried out correctly, the brake pedal instantly responds to pressure, without delay. If during the braking process the reaction of the pads is not simultaneous, then when you press the brakes the car will skid, which can lead to an emergency on the road.
After pumping, you should check whether the fittings are tight. After cleaning the fitting with a clean rag, ask an assistant to sit in the passenger compartment and press the brake all the way. After this, we check for any leaks. Brake hoses and lines must be dry. After a complete check, we put rubber protection on the fittings.
Bleeding the brakes is an important step, since the presence of air in the hydraulic solution leads to their unreliable operation. When operating a VAZ 2110, air may enter the system due to leaks and corrosion of hydraulic cylinders and lines. Then the brake pedal is pressed tightly, the pads do not press the brake disc with the required force. In this case, the brake system will need to be pumped again.
Replacing brake fluid and bleeding on a VAZ 2110
Did you like the article? Share with friends: