Article number and price for the original ball joint
On the Lada Largus car, two types of ball joints are used. Until June 2013, the knot had a finger with a diameter of 16 mm. An annular groove was made on the support. The article number for the old-style ball is 401604793R. The price of the part ranges from 680 to 850 rubles.
In the 2014 model range, new types of supports began to be used. The diameter of their finger was increased to 18 mm. The groove has also changed. It became lateral, which, according to the designers, increased the reliability of the unit. The catalog number of the new ball is 40160-2523R. The cost of the support is 500-1400 rubles.
Despite the fact that ball joints of different years of manufacture are successfully pressed into seats instead of each other, experienced car owners do not recommend doing this. Using a “foreign” support may cause a knock in the suspension, and a number of difficulties will arise during installation.
The balls are fixed using a bolt with an increased diameter inside. The old and new type support mounts are not interchangeable. When purchasing an unsuitable unit, car owners have to bore a groove for the bolt, which does not have the best effect on the reliability and safety of the suspension.
Parameters of supports for Largus
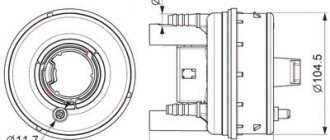
A ball joint has a basic structural unit - its load-bearing element - a special metal pin. Its lower part rotates in a hemisphere, and the upper end of this component is connected to the steering axle bracket. The hemisphere is located in the support body and rotates in a polymer shell, which is designed to dampen vibrations and prevent mutual friction of the metal surfaces of the part (hemisphere and body).
The product body itself is pressed into the suspension arm cage. To prevent dirt and other debris from getting into the working element (hemisphere), there is a rubber boot between the finger and the body.
Regarding Lada Largus. Note that on versions of the model produced before 2013, the ball joint had a pin with a groove and a diameter of 16 mm.
On modern modifications of the station wagon, the support pins have a pin increased to 18 mm in diameter, which has a side groove.
Due to their purpose, supports endure increased loads during operation, so the requirements for their reliability and quality are very high. For example, a finger must withstand the applied external force aimed at tearing it out of the body, reaching 5 tons.
To guide manufacturers in terms of quality indicators of supports, GOST 52433-2005 “Ball joints” was specially developed and implemented. Technical requirements and test methods." The provisions of this regulation must be followed not only by Russian, but also by foreign manufacturers.
Today's spare parts market will delight you with a wide range of support offers, each of which has its own catalog number, among which the following brands are the most profitable and confidence-inspiring:
- "Febi", "Ruville", "Mapco" and "Meyle" (all Germany);
- "Monroe" and "Delphi" (both USA);
- "Tork avto" (Türkiye).
The price of these products can vary by 40% or more, although the quality indicators will be approximately the same level. Here, the particular choice includes the personal preferences of the particular owner of the Lada Largus..
Article number and cost of analogues of original ball joints
There is no clear opinion among car owners about which supports are best to purchase. Some drivers advise purchasing original ball joints. In this case, there is 100% confidence that they will fit optimally into the seat. However, other Largus owners believe that the quality of the originals does not match the cost. For a comparable price you can buy an analogue that will last much longer. The best alternatives for original ball joints are presented in the tables below.
Table - Good analogues of ball 401604793R.
| Manufacturer | vendor code | Approximate cost, ruble |
| Glober | 615127 | 250-300 |
| Rider | RD993529469 | 255-300 |
| Teknorot | R585 | 275-325 |
| Profit | 23010322 | 330-400 |
| Lemforder | 3780901 | 780-900 |
Table - Recommended Support Alternatives 40160-2523R.
| Brand | Catalog number | Approximate price, ruble |
| Renault | 40160-2523R | 500-650 |
| TRT | RS8018 | 330-350 |
| At program | AT 2523-200BJ | 340-350 |
| Quartz | QZ1602523 | 400-420 |
| LYNXauto | C1341LR | 580-600 |
How to change a ball joint on a Lada Largus
The machine must be installed on an inspection hole or use a car lift. If you have the first option, jack up the car and place safety stands. Next, remove the wheel and unscrew the nut securing the lower arm to the subframe. Next steps:
- unscrew the bolt securing the ball joint pin;
- take a chisel or a powerful flat-head screwdriver and wedge the surfaces of the fist;
- lower the lever with the support;
- the fixing hardware will be loosened: it can be removed.
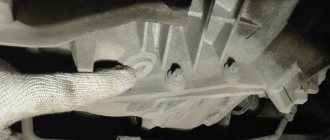
The next step involves pressing the part out of the lever. To do this, you will first have to remove the retaining ring. It is preferable to do the pressing itself using professional equipment (press), but if this is not available, use a hammer and a mandrel of suitable size. The main thing here is to take your time and be careful. Instead of a hammer, it is better to use a small sledgehammer: the blows should be rare, but strong.
Free the lever from dirt and press a new support into it until a groove appears for the retaining ring. Place it in place and lubricate (LITOL 24 is suitable) the place where the pin enters the body of the part. Next, tighten the boot (only a new one!). Further steps for installing the ball joint are similar to those described above, but are performed in the reverse order.
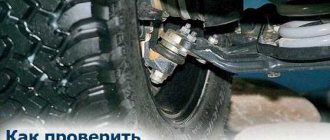
Diagnostics of the ball joint condition
Symptoms of the need to pay attention to the Largus ball joint are:
- there was a need to apply additional force when turning the steering wheel;
- driving over bumps, for example, a speed bump, is accompanied by a knocking sound from the front suspension;
- Uneven tire wear was detected;
- entering a turn is accompanied by extraneous sounds coming from the wheel arches;
- the steering wheel turns with a creaking or grinding sound;
- the car has become less obedient when entering a turn;
- When driving over bumps, controllability partially decreased and the car became unstable.
If you have the above symptoms, it is recommended to use the following algorithm for finding a ball fault.
- Hang it in front of Largus.
- Take the tire from above and below.
- Check that there is no play. To do this, you need to shake the wheel in a vertical plane. It should be borne in mind that the cause of movement may be not only the ball joint, but also worn steering tips or stabilizer links.
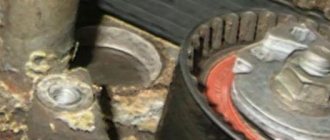
The main load-bearing element of the ball joint is the pin.
It is made of high carbon steel. On one side of the finger there is a sphere, which is located in a metal case. It is filled with polymer or grease. To prevent moisture, dirt and dust from entering, a protective cuff is placed on top. Abrasive particles and water pass through the boot freely if it is damaged. The sphere and its seat are subject to intense wear, and the lubricant dilutes and ceases to perform its functions. Therefore, when diagnosing a ball, it is important to pay attention to the condition of the boot. If cracks, punctures, holes or other holes are found, the support must be replaced.
Replacing the ball joint.
| Author: Nikolai Published: 1614 days ago (May 31, 2016) Logbook: Do it yourself. Category: Uncategorized Edited: 2 times - last June 9, 2016 | +15↑ Votes: 19 |
Hi all! Not even 15 tons of mileage had passed since the ball was replaced under warranty when it started knocking again. I went to the OD for a replacement, but was upset because the warranty had already expired. I have 54t and the warranty is 36 months, or 50t, whichever comes first. I decided to change it myself. I didn’t buy the ball separately, I bought the lever assembly.
The image has been reduced. Click to see original.
The image has been reduced. Click to see original.
I’ll immediately warn those who are planning to change it themselves, you need two non-standard keys, these are for 16 and 18. For 18, two are better, or, like mine, an adjustable one.
The image has been reduced. Click to see original.
You may also need a wedge; I made one from a slotted screwdriver.
The image has been reduced. Click to see original.
There were ball ones with a side groove, I don’t know how they would behave with a circular one, but I installed the original bolt without any modifications.
The image has been reduced. Click to see original.
← Threshold protection | Smooth switching on of low beam. →
Create your own logbook, and you will be able to share with forum members your opinion about Largus, useful developments, installed additional information. equipment and tuning, trips and travel! To create a logbook, you must register on the site.
Tags: ball joints
Popular in in-flight magazines
DRL Traveling on Largus Fuel consumption Armrest Mileage Discs Radio To1 First impressions Buying Largus Electrics Covers for Largus Bumper net Modifications HBO Speakers Rear view camera Wipers Interior lighting Brake light Tuning Tires and wheels Check valve Tuning lights Noise insulation Winter tires Rugs Largus DVR Rki-19 Winter operation Roof box PTF Tail lights Izhevsk Car audio Injectors Mudguards Washer reservoir Hood stops Low beam lamp Installing a cabin filter Parking sensors Thresholds Lada Largus LED Carpet covers Floating idle speed Trunk lighting Tinting Trunk shelf Trip to the sea Hood seal Accident Owner's review Fender liners Walkie Talkie Additional Socket Eyeglass case Replacement 5th gear
Comments (35)
| Molchan May 31, 2020 at 09:17 pm +2 | |
|
| Nikolay May 31, 2020 at 09:29 pm +1 | |
|
| nsv5779-Sergey 1 May 31, 2020 at 09:39 pm 0 | |
|
| Nikolay May 31, 2020 at 09:46 pm +1 | |
|
| nsv5779-Sergey 1 May 31, 2020 at 10:01 pm 0 | |
|
| Alexander June 1, 2020 at 06:05 +1 | |
|
| Nikolay June 1, 2020 at 04:08 pm +1 | |
|
| Alexander June 1, 2020 at 6:09 pm +2 | |
|
| Nikolay June 1, 2020 at 10:16 pm +1 | |
|
| yurii96 June 1, 2020 at 06:45 0 | |
|
| Nikolay June 1, 2020 at 04:11 pm +1 | |
|
| Frol June 1, 2020 at 7:16 pm +2 | |
|
| burnt June 1, 2020 at 07:49 pm +2 | |
|
| Andryukha June 1, 2020 at 09:59 pm +1 | |
|
| Nikolay June 1, 2020 at 11:28 pm +1 | |
|
| Andryukha June 2, 2020 at 12:43 pm +1 | |
|
| Nikolay June 1, 2020 at 10:09 pm +1 | |
|
| Andryukha June 2, 2020 at 12:49 pm 0 | |
|
| Nikolay June 2, 2020 at 1:35 pm 0 | |
|
| Andryukha June 2, 2020 at 6:26 pm +1 | |
|
| burnt June 15, 2020 at 5:51 pm +1 | |
|
| Nikolay June 22, 2020 at 09:41 pm 0 | |
|
| LarqusMen585 June 15, 2020 at 09:02 pm 0 | |
|
| Nikolay June 22, 2020 at 09:33 pm 0 | |
|
| Shofer June 15, 2020 at 5:21 pm 0 | |
|
| burnt June 15, 2020 at 5:46 pm +2 | |
|
| oapv June 16, 2020 at 01:25 pm +1 | |
somewhere OD deceived you |
| Nikolay June 22, 2020 at 09:54 pm +1 | |
|
| Andryukha September 6, 2020 at 03:31 +1 | |
|
| Nikolay September 6, 2020 at 12:38 pm +1 | |
|
| Nikolay September 6, 2020 at 12:45 pm +1 | |
|
| Nikolay February 17, 2020 at 08:29 pm +1 | |
|
| Nikolay April 22, 2020 at 5:14 pm +1 | |
|
| kanvlg April 22, 2020 at 09:51 pm 0 | |
|
| Nikolay April 23, 2020 at 00:42 +1 | |
|
| Add a comment | RSS comments feed |
Additional comments:
Required tools and materials for DIY replacement
To replace the ball joint on Largus with your own hands, you will need the tools that are listed in the table below.
Table - Tools and materials required to replace the ball joint.
| Name | Note |
| Jack | Not required with a lift |
| Shoe | 2 pcs. For placing under the rear wheels. |
| Key and head | It is advisable to have a set |
| Balloon wrench | For mounting and dismantling wheels |
| Screwdriver | With a flat tip and definitely durable. As an alternative, a thin chisel is ideal. |
| Support | It is prohibited to carry out any operations on a car without a wheel, which is held only by a jack. |
| Hammer | Medium or large sizes. You can use a sledgehammer. |
| Vise | Necessary if you don’t have a hydraulic press |
| Mandrels | Two pieces of pipe. The first should have a slightly larger diameter compared to the ball, and the second should have a smaller support. |
| Pliers | Can be replaced with snap ring pliers |
| Penetrating lubricant | To simplify the analysis of stuck joints |
| Grease | Required if there is insufficient amount of lubricant under the boot |
| Rags and wire brush | To remove dirt |
Front suspension arm ball joint - removal and installation (repressing)
Attention. The front suspension arm ball joint can only be replaced once. For this purpose, ball joints from spare parts are marked with the letter “R” and are equipped with a locking spring 4, Figure 6-1. The ball joint, without retaining spring, is a standard part and can be replaced.
Part Numbers: Replacement Ball Joint (R), Arm/Ball Assembly
The ball joint with retaining spring is a replacement part and cannot be replaced. In addition, it should be borne in mind that by the time the second set of ball joints (R) wears out, the silent blocks of the lever will already be worn out. If it is necessary to replace the ball joint again, replace the front suspension arm assembly.
| Figure 6-1 - Distinctive features of the ball joint supplied as spare parts: 1 - marking of the ball joint supplied as spare parts “R”; 2 — ball joint; 3 — front suspension arm; 4 - locking spring |
Removal
Jack up or place the vehicle on a two-post lift, apply the parking brake and turn off the ignition.
Remove the front wheel
Remove the front suspension arm. (see here)
Clean the front suspension arm from dirt (metal brush).
If there is no special equipment for pressing out
Using a powerful slotted screwdriver, evenly (from different sides) pry the support body under the shoulder and, leaning on the edge of the lever...
...press the ball joint out of the hole in the lever.
We inspect the lever eye - there should be no cracks or breaks around the hole.
Before pressing in the new ball joint, thoroughly clean the seating surface of the lever hole from dirt and corrosion.
Place a tool head or a piece of pipe of suitable diameter under the lever and insert a new ball joint into the hole. Applying blows with a hammer to the mandrel (you can use a tool head) resting on the shoulder of the support body... we press the support into the hole of the lever until it stops.
Attention. The lower control arm ball joint is supplied in a protective case. Remove the cover only after pressing the ball joint into the front suspension arm and installing the lock spring 4, Figure 6-1.
If special equipment is available
Remove the ball joint boot clamps and the boot (flat head screwdriver).
Place a stop marked “D1” on the press table, install the front suspension arm on the stop, install a mandrel marked “D2” on the ball joint body for pressing out and press the ball joint out of the front suspension arm (hydraulic press type KS-124 (Kochubeyevsky), stop marked “D1” and mandrel marked “D2” for pressing out from set Tav. 1929).
Installation
Place a stop marked “R1” on the press table, install the front suspension lever on the stop, install a new ball joint in the hole in the lever, install a mandrel marked “R2” on the ball joint body for pressing and press the ball joint into the front suspension arm (hydraulic press type KS-124 (Kochubeyevsky), a stop marked “R1” and a mandrel marked “R2” for pressing out from the Tav. 1929 set).
Other operations
Install the retaining spring into the groove of the ball joint, using the protective boot as a guide.
Remove the transport cover from the ball joint.
Install the front suspension arm.
Install the front wheel
Check and, if necessary, adjust the alignment angles of the front wheels
Video
Lada Largus ball with side groove
Ball joints on Lada Largus before 2014 and after are distinguished by the shape of the side groove on the pin. The ball body is no different, but the fingers differ in the shape of the side groove.
Until 2014, the side groove of the Lada Largus ball had this shape:
After 2014 and to the present time, the ball joints of the Lada Largus (van, crossover, station wagon) have the following side groove:
Accordingly, the Lada Largus ball mounting bolts before and after 2014 are different.