Ignition systems of the 8-valve injection VAZ-2114
You can determine the type of ignition by looking under the hood:
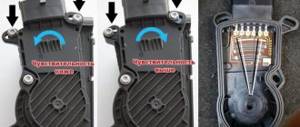
- If you find a breaker near the “heart” of your car (analogous to a distributor installed on contact systems), then your car belongs to the first series, and the ignition of the VAZ 2114 injector on it is non-contact, based on the breaker-distributor assembly. The ignition in such systems is set by turning the distributor degree by degree, and the results of the work depend on the experience of the performer and the availability of special equipment. So, with the help of a strobe light, the system can be debugged exactly as desired by the car owner.
- If this part is not present, then your car belongs to the representatives of the tenth family, equipped with an electronic ignition system. It is impossible to set this manually, and its operation is completely controlled by the ECU. At the same time, it is not completely unadjustable, because by connecting to an on-board computer, some of its parameters can be reconfigured to your taste, but there are only a few specialists capable of doing this correctly.
IMPORTANT! The electronic system in the VAZ 2114 is designed so that the owner does not have to maintain it, so if you do not plan to participate in racing competitions with your car, it is better not to mess with the software.
Causes of ignition problems
As mentioned earlier, in order to set the ignition in the electronic system you will have to go into the “brains”, there you can also check the functionality of the sensors, so they greatly influence the operation of the system, regardless of the type of ignition.
On the electronic type, the main causes of failures are:
- Incorrect information transmitted from sensors to the ECU. If the connection to the brain and diagnostics showed strange data coming from one or more control devices, it is necessary to use a “substitution”. The easiest way is to find a car with known good sensors, install them and double-check the results. Here you need to understand that you do not need a new one, but a working sensor, because factory defects are not excluded even on a new mechanism.
- The incoming voltage - correct from a technical point of view is 5V, but if due to a violation of the mechanical integrity of the wires or another problem with the car’s electronics, this voltage changes, the sensor readings will also change after it. If this happens, the ECU begins to adjust engine operation based on incorrect data, which leads to incorrect operation of the entire mechanism as a whole. To check this breakdown, you will need a known-good system of wires leading to the sensor or a donor car into which you can install your sensor and test the system for functionality.
- Broken ECU - if the previous two options did not give a visible result, and installing your sensor and wiring in a working machine does not change its performance, only this option remains. You can try to reflash the “brain” of the car, but due to its low cost, it is better to immediately buy a new ECU and install it on the car.
Before moving on to the radical measures proposed in the third option, it is worth additionally checking the correct location of the labels. In cars with contactless ignition, this is the ignition installation of the VAZ 2114, and for cars with an electronic system, debugging is important to check the synchronization of the injection system with the gas distribution mechanism.
6.2.2 Adjusting the ignition timing
Adjusting the ignition timing
Although the ignition timing is automatically adjusted, it can also be adjusted manually. The preparatory work is the same as for adjusting the idle speed for the corresponding engine. The ignition is adjusted when the engine is idling. Different engines require different jobs.
Injection engines
Position of individual elements of the fuel injection system and ignition system in the engine compartment of a car with an SR20DE engine
| 1 — adsorber 2 — additional air valve 3 — injection valves 4 — fuel pressure regulator 5 — throttle position sensor 6 — fuel filter 7 — shift valve, idle speed adjustment | 8 - coolant temperature sensor 9 - air regulator 10 - resistor 11 - transistor 12 - ignition coil 13 - crank angle sensor 14 - air flow meter |
Before checking and adjusting, certain conditions must be met in order to obtain accurate results, i.e. the parts or systems mentioned in Chapter Routine Care and Maintenance must be checked and adjusted accordingly. The idle speed must correspond to the required value.
After warming up the engine and connecting the tachometer and strobe light, do the following:
Carburetor engine
On cars with carburetor engines, work differs depending on whether a catalyst is installed or not.
With catalyst
Before it is possible to check the ignition timing, the conditions given in the Routine Care and Maintenance .
| EXECUTION ORDER |
Without catalyst
On an engine without a catalyst, the adjustment is somewhat more complicated, since, depending on the distributor installed, the vacuum hose must either be disconnected from the carburetor and closed, or remain connected. To plug the hose, insert a bolt of suitable diameter into its end. More precise instructions are given in the Specifications at the beginning of the Chapter. According to them, the ignition timing has different meanings. Otherwise, adjustment is carried out in the manner described for catalyst models.
| EXECUTION ORDER |
Getting ready to adjust the ignition
In order to correctly set the ignition timing of the VAZ 2114 and carry out debugging, you need to prepare. The method described below does not require acrobatic agility from the owner and is quite feasible both in the uncomfortable and cramped environment of a garage and if the car enthusiast has a tummy.
IMPORTANT! Thorough preparation always speeds up the process of technical work significantly, regardless of what exactly needs to be repaired.
Preparation for debugging ignition marks is carried out as follows:
- The car is placed on a flat surface and placed on the handbrake.
- The second step is to remove the front right wheel, which will subsequently allow you to gain access to the gas distribution mechanism itself, which will speed up the work, make it convenient and easy, for this: a. unscrew the fastenings of our wheel and place a wheel chock under the diagonally opposite wheel (rear left); b. We lift the car with a jack, twist the wheel mounts completely and remove it.
- Finally, we need to remove the timing belt splash guard (if there is one, of course). By the way, you can not remove it entirely, but just unscrew the two lower fasteners, then it can be moved away without damaging it.
How to set the ignition correctly
Setting marks on an injection engine not only corrects the ignition timing, but also coordinates the operation of the gas distribution mechanism and the injection system.
Therefore, by correctly setting the marks on the VAZ-2114 engine, we fully regulate the operation of all its systems.
The adjustment should begin with preparation - placing the car on a level surface and tightening the handbrake. You can use several methods, but we will offer one of the optimal ones, without any special acrobatic tricks, which are not particularly desirable, especially in winter.
The work is carried out in the following order:
- For ease of work, it is recommended to remove the right front wheel. It will provide full access to the timing mechanism drive, and this way you can set the marks more accurately and quickly. In addition, you must first remove the plastic timing belt cover from under the hood.
Removed the wheel and plastic protection
Loosening or dismantling the timing belt on a VAZ-2114 (8 valves)
- Before setting the ignition to the marks or replacing the timing belt, it is necessary to loosen or completely remove the generator drive belt. If the timing belt is normal, then there is no need to change it, then there is no need to dismantle the alternator belt.
- To accurately set and check the position of the crankshaft, it is necessary to remove the generator drive pulley itself. This is done with a 19mm head. If it doesn’t work the first time, you can rest the knob against the lower arm of the front suspension and turn the crankshaft with the starter. The bolt will definitely break.
- Now you need to loosen the timing belt tension roller. We do this using a regular open-end wrench size 13.
- We control the position of the camshaft drive gear. There is a mark on it that should correspond to the mark on the timing belt. We bring the gear to the mark.
- We check the bottom mark on the crankshaft, or more precisely, on the gear, which is rigidly fixed on it. The mark on the gear should match the mark on the top of the cylinder block boss.
Checking the set ignition
- We check that the mark on the flywheel matches the mark on the gearbox housing. To do this, remove the hatch in the gearbox; the mark on the flywheel should be visible, which in this position of the shaft must coincide with the mark on the crankcase.
Read more: Ignition coil Nissan Sunny qg15
Checking the marks on the hatch
Belt is on and tight
Marks and direct adjustment
When the preparation is completed and the car is ready to work with it, you can begin to set the ignition marks of the VAZ 2114. The task of the procedure is to check the synchronism of the system (correlation of the camshaft, crankshaft and injection timing), with some nuances for the electronic system.
For electronic ignition systems, there is a small nuance - the need to check the distance from the master disk to the sensor. Normally, this distance should not exceed 0.7 mm, but should not be less than 0.5 mm. You can use a valve feeler gauge to check.
The further procedure for the electronic ignition system is as follows:
- We look into the mark hatch and align the gearbox housing mark with the flywheel mark by turning the crankshaft.
- We find the mark on the oil pump pulley and make sure it matches the tide of the cylinder block.
- Align the camshaft pulley mark with the head boss.
- The work is completed, to check the correct setting, check that the gap on the disk coincides with the tide of the cylinder block, and the twentieth tooth with the crankshaft position sensor. If everything matches, you have successfully completed the task.
Timing marks (gas distribution mechanism) of engine 21083 (2108, 21081)
The engines of VAZ 2108, 2109, 21099 cars and their modifications in the timing drive have three pairs of installation marks.
When they are combined, the camshaft and crankshaft are in a position in which the pistons of the first and fourth cylinders of the engine are at top dead center.
It is necessary to set the timing drive marks when replacing the timing belt, when setting the ignition timing, when checking and adjusting thermal valve clearances, repairing the engine and replacing its parts, etc.
Timing drive timing marks for engines 21083, 21081, 2108 of VAZ 2108, 2109, 21099 cars
Mark on the camshaft pulley and mark-protrusion on the rear timing cover
Mark on the crankshaft pulley (“sprocket”) and the ebb of the engine oil pump housing cover
A number of engines of VAZ 2108, 2109, 21099 cars have an oil pump without an installation mark on the body. In this case, when setting the timing drive marks, we focus on the marks in the clutch hatch and the camshaft pulley.
Mark on the flywheel and mark-triangular cutout of the ignition timing scale
The mark on the flywheel is a long, shallow cross mark. If there is dirt on the flywheel, it may not be visible. To detect it, you need to gradually turn the flywheel and wipe its surface with a rag soaked in solvent.
Diagram: timing marks for VAZ 2108, 2109, 21099 vehicles with engines 21083, 21081, 2108
Useful video
You can find interesting information by watching the additional video below: https://www.youtube.com/watch?v=pNyBny-_HoQ
On a car with contactless ignition, everything is even easier; you don’t have to remove the wheels, but you will need an assistant. It is necessary to find the compression stroke of the fourth cylinder. To do this, insert a rubber cone into the spark plug hole and turn the ratchet. Pushing out the cone will mean that the compression stroke has been found.
Having illuminated the spark plug hole, we align the longest mark of the cover with the mark of the pulley. We set the breaker to the appropriate clock and check the operation of the system according to the fourth point described above.
The second Samara became the first car among VAZ front-wheel drive vehicles with an injection power system initially. The first copies of the VAZ-2114 were still going on sale with an eight-cylinder injection engine and a contactless ignition system, and the following engines already had a fully electronic system with the same 8 valves. Before you set the ignition, you need to find out what system is installed on the engine, which is what we will do now.
Ignition systems of the 8-valve injection VAZ-2114
Ignition system module
It is quite simple to calculate the cost of the ignition system on a VAZ-2114 - if a breaker is installed, an analogue of the distributor of a contact ignition system, this means that the system is non-contact, but with a breaker-distributor. In this case, the ignition timing is set by turning the distributor to a certain degree . The accuracy of the adjustment depends on the experience of the technician, as well as the equipment used. Nevertheless, such a system will allow you to flexibly and accurately set the ignition using a strobe light.
Contactless electronic ignition system
On most engines that were installed on the second Samara and VAZ of the tenth family, the ignition system is contactless electronic. There is no distributor here, so the ignition timing is adjusted automatically in real time and exclusively by means of the engine control system and electronics. The system does not require maintenance, and its diagram is shown in the photo below.
Setting the ignition on an injection engine
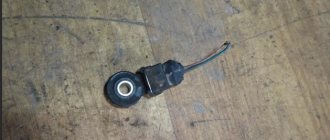
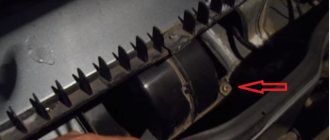
As can be seen from the above diagram, which is implemented in eight-valve injection engines, for the correct operation of the ignition system, the electronic engine control unit must be supplied with the necessary information from the sensors. The main sensor for system operation is the crankshaft position sensor . It is located on the ebb of the cylinder block next to the generator drive pulley, to the left of it, when looking at the end of the crankshaft.
Crankshaft position sensor
A timing gear disk is installed on the crankshaft pulley, which generates electromagnetic oscillations, and the sensor converts them into a pulse, this pulse is supplied to the computer. The control unit, based on the position of the crankshaft, sends a signal to the ignition module, which distributes the spark between the spark plugs.
In addition, the crankshaft position sensor sets the timing of fuel injection, so first of all we will check its condition.
- Remove the protective casing from the gas distribution mechanism drive.
Removing the timing belt protective cover
Scheme of signal receipt from the crankshaft sensor: 1 – crankshaft master disk; 2 – crankshaft position sensor; 3 – angle of rotation of the crankshaft; 4 – output signal of the crankshaft position sensor
Align the mark on the flywheel with the mark on the gearbox housing
We check the coincidence of the marks on the oil pump pulley and the tide on the cylinder block
We check the coincidence of the marks on the camshaft drive toothed pulley and the timing belt cover
If the three marks coincide, it means that at this moment the pistons of the first and fourth cylinders are at top dead center. It is at this moment that the gap between the teeth on the drive disk should coincide with the tide on the cylinder block, and the 20th tooth from the gap should coincide with the crankshaft position sensor. It is at this moment that the sensor sends an impulse to the engine control unit, indicating to it that the piston of the first cylinder is at the top dead center of the compression stroke.
We check the completed work. Step-by-step instruction
As can be seen from the diagram above, the ignition system consists of high-voltage and low-voltage circuits. In this regard, there are several points that you need to know when checking the system.
High-voltage wires operate at a voltage of about forty thousand volts. In our case, such a voltage is not dangerous for life, but receiving a discharge even with a low current strength and such a voltage is unlikely to be beneficial for health and mood. Therefore, it is advisable to work in rubberized gloves and use tools with insulated handles.
To check the condition of the system, you will need pliers with insulated handles, a standard set of tools and a multimeter. Please note that we only check the operation of the circuits, and not the operation of the microprocessor part. This requires computer equipment and special training.
- With the ignition off, we check the contacts on all connectors in the system. First of all, the tightness of fit and contact of high-voltage wires in the ignition module.
- We remove the block from the module and check the voltage at terminals C and B. The multimeter is set to low AC current control mode. For more details, see “checking the ignition module“.
Check the voltage at terminals C and B of the ignition module
Checking ignition coil contacts 2 and 4 with a multimeter
Checking high voltage wires
This way you can check and set the ignition on a VAZ-2114 with an injection 8-valve engine with your own hands. Good luck to everyone!
A client arrived with the following complaints: the check engine light regularly turns on after driving on the highway, and this happens for no noticeable reason; the car immediately starts to drive worse after the light turns on. Using the diagnostic adapter, he determined that there were misfire errors in one of the cylinders. The engine of the VAZ 2114 has been shaking at idle for a long time, about a year. The client came to terms with this a little and initially called me with a request to reflash the car, but I redirected his train of thought to perform diagnostics: it is impossible to repair a faulty car.
Before conducting diagnostics, I always ask what was done to the car at least in the next two to three weeks. Sometimes the information obtained during such inquiries can lead to the right conclusions when troubleshooting.
The range of work that was performed on his car by other craftsmen: spark plugs were changed, explosive wires were not changed (switched from another car, it didn’t help), injectors were changed about a year ago, the fuel pump was changed relatively recently along with both filters, since he didn’t need any After checking the pressure, the service station said that it was only 2.5 bar. The blood pressure returned to normal after the work. The timing belt and pump were recently replaced due to a leaking pump. The valves were adjusted two months ago. He thought that might be why he was shaking so much.
Connected a scanner to read saved errors and analyze parameters:
According to the scanner, there were errors in misfire in cylinders 1, 2, 3. According to the parameters issued by the scanner, there were no complaints about the car’s performance: air consumption, fuel correction, fuel injection ratio and injection time were normal.
Next, I decided to check the sparking. Since the malfunction manifests itself while driving, it was necessary to check the spark, including with gas flow. To do this, my oscilloscope implements a Motor Tester mode: an inductive sensor is attached to each explosive wire, a sensor is attached to the wire of the 1st cylinder to receive a clock pulse; all this is connected to a separate adapter, from which the signal goes to both channels of the oscilloscope.
The test is carried out at idle speed:
and with progazovka:
As we can see from the above oscillograms, all spark burning parameters are normal in both modes: there are no failures, accumulation time, high-voltage breakdown voltage, burning time corresponds to normal 0.6. 0.7 ms, damped oscillations are present.
Checking the fuel pressure revealed the first malfunction: the backflow valve does not hold pressure. The pressure was released quite quickly: 5-7 seconds before zero. While the engine was running, the pressure was normal and did not sag or jump during sudden throttle application.
Checking air leaks with a smoke generator did not yield any results. He started checking only because he already had such a problem and was having this problem fixed.
After checking the systems servicing the engine, I always move on to assessing the mechanical condition.
In this case, I carried it out using two methods: vacuum in the intake manifold and A. Shulgin’s method, the functionality of which is implemented in my oscilloscope.
Having completed all the necessary connections, I started the engine (the oscillogram is inverted, but this does not negate its information content):
On the oscillogram, green circles mark places where the problem in the 3rd cylinder is clearly visible: sufficient vacuum is not achieved in it. For other cylinders, the oscillogram also differs from ideal: strong distortions are noticeable on the 1st and 2nd cylinders.
As an example, I will give a reference oscillogram of what it should look like:
Diagnostics using A. Shulgin’s method is carried out as follows:
First, the necessary connections are made: the probe of the first channel is inserted into the signal pin of the DPKV connector, the mass probe is inserted into the second, mass pin. We install an ind. on the high-voltage wire of the first cylinder. The sensor is connected via an adapter to the second channel of the oscilloscope.
1) start the engine, wait for the steady idle;
2) turn on the oscilloscope in Recorder mode;
3) smoothly press the gas pedal, bringing the speed to 3000 rpm;
4) release the gas pedal, wait for XX;
5) sharply press the gas pedal all the way, wait for 5500. 6000 rpm;
6) without releasing the gas pedal, turn off the ignition and wait until the engine stops completely;
7) release the pedal and turn off signal recording.
I ran the script and saw the following picture:
The cylinder efficiency test revealed that the third cylinder was lagging at idle. It is not so easy to assess the state of the mechanics with an electronic gas pedal, but the goal was to look at the lag of one of the cylinders. This was evident even from the oscillogram taken from the DPKV.
Taken together, the tests carried out tell us that the problem lies in the mechanical part and that at least a major overhaul of the cylinder head is required, which was reported to the client.
Kurakhtanov Igor
© Legion-Avtodata
Kostroma, Maly Lane, 10 +7 operating hours 9-21 autodiagnostic44.ru
The problem of misfires is relevant for all domestic cars. Because of this, problems will appear in the operation of the engine, which causes discomfort to the car owner while driving the car. In this article we will try to figure out what causes the VAZ 2114 to misfire and how to solve this problem with your own hands.
Set the ignition on VAZ 2114 Injector 8
How to install the ignition on a VAZ 2114 injector (8 valves)?
Q: How is the ignition motor installed?
The plugs have turned black, the service reported that the ignition is retarded and they are fixing the problem, there is no reason for this, but it seems that it could be on a theoretical level. How to Become Black 1. A New Beginning. 5 minutes, it became dark. 4. Passed 20,000, twisted. dark. The ignition timing is set automatically by the machine once per second, and this (timing angle) depends on many characteristics: engine speed, engine load (air mass flow or throttle position), temperature approx. water, presence of detonation. So, here are the results: 1. Describe carefully under what circumstances the candles turn black?? 2. Change the gas station (try it) 3. How much running per day. 4. Of course, call service and see if the timing belt mark matches, it may have been installed incorrectly, in other words, it has slipped (sometimes, unfortunately, this happens). They were stuck in a different service than where they said the ignition was "delayed" themselves.
The moment of ignition of the air-fuel mixture in the combustion chamber is the moment of formation of a spark between the electrodes of the spark plug. Setting the ignition timing. this is the ability to maintain the consistency in a certain position of the piston relative to TDC.
The properties of automatic ignition are shown in Figure 1.
How to install the ignition on the VAZ 2114 injector.
Because it is easier to move along the crankshaft (pulley, flywheel), inflammation at TDC (wire), TDC, and TDC (lag) is usually measured in angular degrees along the crankshaft with a V' or b—' sign (Figure 5). ).
Scale A is possible in the clutch card hatch in another way on the pulley (Fig. 5). At the beginning of the danger (TDC mark in the relevant cylinders). on the flywheel, and 2. a pin in the timing cover (scale on the pulley). Due to the smaller diameter of the pulley compared to the flywheel, the scale can cover the entire range of torque angle configurations.
Regardless of the machine being turned on, start.
VAZ ignition module 2114
. a better solution than the traditional "coil" coil that was set to "classic". However, checking this element should not be difficult even for novice car enthusiasts.
READ Temperature Sensor Not Working Peugeot 307
Injector valves 8: signs of a faulty ignition module
In most cases, it is best to sin on the module in the following situations:
“swimming” is simple; the engine “doubles”, in other words, you can hear that one of the pairs of cylinders is not working: the first, fourth, second, third; during acceleration, traction dives are performed; Chess engine error is displayed.
Of course, even newbies can test the VAZ 2114 ignition module
Diagnostics are performed as module faults
Stopping at 100 or using amateur diagnostic equipment (error scanner, special application and computer diagnostic adapter via Bluetooth), of course, also turns out that the “root of evil” is in the ignition module.
What is ignition timing and what does it affect?
Ignition timing is an important parameter that determines how the ignition measurement system works. Here the concept refers to the time during which the ignition system ignites the compressed mixture with a spark discharge. It is defined as the position of the car engine crankshaft at the moment of application of the impulse to the spark plug before the relative dead center in degrees.
All this is due to the fact that it takes several days to burn the working mixture in a cylinder, since the speed of propagation of the flame front is approximately 20-30 m/s. If the mixture is ignited with the piston at TDC (i.e. at top dead center), then its combustion occurs during expansion, also partially at the outlet. As a result, no effective pressure will be applied to the piston. Therefore, the ignition timing, which is good, is chosen so that the gas pressure burns out.
Injector ignition marks. Replacing the timing belt on 8 cl. Gap between DPKV and ignition pulley.
The timing belt of VAZ 2114
. You can replace the timing belt yourself, there is nothing difficult about it. How to replace.
The object of the change is a VAZ 2108, 2109 or 21099 with a modification of the 21083 carburetor engine. Primary goal. convert a carburetor engine into a 16-valve injection engine by installing it on a cylinder head from a VAZ-2112. Testing a VAZ-2109 converted to a 16-valve head (even before the program is adjusted for quality) shows a huge difference in the car's behavior compared to the standard power system.
READ How much oil is poured into a Renault Logan engine
The slight reduction in performance at low rpm (up to 2000 rpm) is compensated by a significant improvement in thrust once the engine is revved to high rpm. According to subjective feelings, acceleration in fourth gear with 16 valves is the same as in third with a carburetor engine. On a flat, level road the engine easily reaches 5000 rpm. For most drivers, this makes an unforgettable impression.
What to prepare 16V cylinder head, equipped with receiver and manifolds, knock sensor, MH, throttle body with sensor.
The VAZ-21130 does not develop full power; it starts 6-7 times when restarted and shoots into the exhaust pipe. what could it be? · Check his brain and fuel supply! I see spark plugs too! Does the injector support the VAZ 21121 engine 1. 6 8 valves 2005 protect the OBD-II interface It is necessary to install a Bluetooth adapter on the OBD-II injector. This is interesting. can I paste this? · Go to the website of this adapter / maybe check eng /, where it is described which machines it can poll. I need a book about repairing the VAZ 21041-30 injector. Hello. I need a VAZ, injector, repair book 21041-30. Preferably something fresh with diagrams, photographs, etc. I searched the Internet and came across some viruses. Thank you. Thank you very much Tiger. http: // redvanov. net /vases/. The site is engaged in money laundering! Carefully! And you should be ashamed of the tiger! Http: // exotic car.
Incorrect ignition leads to car damage
Install an 8-injector ignition on the VAZ 2114.
Most VAZ 21099 car owners probably have problems starting the engine when it starts when the ignition key is turned on, but does not idle. Why is this happening? Incorrect ignition may be one of the likely causes of this and several other faults, but if you add spark plugs or do not ignite when starting the engine, it is best to look for the problem directly in the carburetor.
On a VAZ 21099 with a carburetor engine, fixing the problem of improper inflammation control with your own hands is quite simple, but you will need a special tool. strobe It is recommended that you purchase one for your own use as you will have to adjust the ignition timing more than once over the long life of the vehicle. as accept
Is the ignition correct and easy?
READ How to set the ignition on Daf Xf 95
What malfunctions can lead to incorrect installation.
When one morning the car completely refuses to start when the battery is charged, it is quite possible that it is all in the ignition coil. The fact is that it is almost impossible to predict the moment of its failure and it is necessary to check whether the problem has occurred.
What determines the performance of a coil?
The classic ignition coil, or "coil" as they are commonly called, is actually a low-voltage converter from the battery and alternator to a high-voltage one, which then goes to the spark plug. This is a miniature electrical transformer.
The ignition coil is a kind of mini electric transformer
The traditional coil used on carburetor models consists of two windings. The primary winding receives low voltage pulses such as 12 volts. Typically this is a small number of turns (up to 150) of thick insulated copper wire. The main one has 2 contacts on the coil coil. It is included in the secondary winding.
Adjusting the belt and valves of VAZ-2108 and VAZ-2109
According to the service book, every 15 thousand kilometers it is necessary to check the condition of the belt in the camshaft drive and, if necessary, adjust its tension.
We do this in the following order. Remove the cold air intake from the air filter (Photo 1), remove the three screws that secure the front cover that protects the belt (Photo 2), and remove the cover (Photo 3). When inspecting the belt, we pay attention to whether its teeth are damaged, whether the rubber is torn from the fabric, or other dangerous defects. cuts, cracks and much more. It is also unacceptable to lubricate the belt (usually due to oil leakage) through the camshaft or crankshaft seals), since its strength is sharply reduced.
If the belt does not have such defects and the mileage has not reached the maximum permissible value. 60 thousand kilometers, we check the tension by twisting the right branch (photo 4) with finger force (1.5-2 kg). At normal voltage it turns.
Typical malfunctions of the ignition system on a VAZ fourteenth model
Before setting the ignition on the VAZ, let's look at the reasons why multiple misfires occur:
- Problems with spark plugs. Spark plugs will not be able to work normally and transmit a spark if there is carbon deposits on their electrodes, or if the gap in them has increased or decreased. As a rule, on a VAZ 2114 with an engine, the injector spark plugs fail as a result of the fact that low-quality parts were initially installed.
- Malfunctions in the electrical circuit. As a rule, we are talking about wear and tear on the wiring, chafing, and mechanical damage. In some cases, this problem can be solved by replacing the wires.
- Poor contact. During the operation of the car, the contact itself may oxidize, become covered with traces of motor fluid, or burn out. If possible, the functionality of the contact can be restored by cleaning or replacing. The last option is preferable, as it is practical.
- Incorrect operation or damage to the coil. If your car is equipped with a 1.6 liter injector, then it uses a coil. If this element breaks or does not work correctly, it can lead to the formation of gaps. It should be noted right away that there is no point in repairing the coils, since you cannot be sure of their performance. Therefore, if this part breaks, it will need to be replaced.
- Quite often, problems with the ignition system in injectors are caused by the use of low-quality fuel. Of course, if the cost of fuel is too low, this should be alarming, since such gas stations usually offer low-quality fuel. Due to the use of such fuel, the quality of the combustible mixture will also be low, in addition, cheap gasoline clogs filters and can clog injector nozzles. Accordingly, over time this can lead to the formation of gaps. The best option in this case would be to completely eliminate the malfunction and then use only high-quality fuel. Although its cost will be higher, you can be sure of the real quality of gasoline. Moreover, the money saved from using cheap fuel will in any case be used to repair the car, but it is quite possible that you will have to pay much more for this.
- Poor compression in the cylinders of the power unit. Compression should be checked first, as it can tell a lot of things. You can learn more about how to measure compression in a car from this material.
- Incorrect adjustment of the gas distribution mechanism is also one of the main causes of malfunction. If setting the timing belt does not cause big problems and does not take much time, this task can be accomplished on your own.
- Excess air entering the fuel system. This problem usually manifests itself as a result of existing damage to the intake manifold. In addition, it can be caused by wear on the elbows on the injectors and many other defects. In this case, we would recommend first diagnosing the tightness of the system in order to find possible places through which air can enter it.
- Another reason is that the gap between the cylinder and the piston has decreased significantly. In this case, there can be many reasons for the malfunction, however, you will have to check them in any case. First of all, you need to take into account that during engine operation, the piston ring grooves, special holes for the pin, etc. may wear out. In addition, the reason may lie in regular overheating of the engine, incorrectly adjusted rubbing and moving elements. In some cases, the malfunction is due to misalignment of the power unit, the use of low-quality motor fluid, and antifreeze getting into the oil. The latter problem is usually the result of a blown head gasket. In any case, all these malfunctions can lead to the appearance of a gap that does not meet the standards (the author of the video is the KV Avtoservis channel).
How to set the ignition on a VAZ 2115 injector 8 valves video
Ignition marks on the injector. Replacing the timing belt on an 8kL engine. Gap between DPKV and ignition pulley.
Replacing the timing belt on an 8 valve VAZ 2114, 2115 engine. Setting the ignition to the marks.
Replacing the timing belt on an 8 valve VAZ 2114, 2115 engine. Setting the ignition to the marks.
Replacing the timing belt on an 8 valve VAZ 2114, 2115 engine. Setting the ignition to the marks.
Ignition problems. VAZ 2110 eight-valve.
VAZ 2115 starts poorly, stalls, does not hold speed - timing belt is to blame
Timing marks 8 class VAZ! Installing the timing belt 8kl.VAZ!
Timing marks 8 class VAZ! Installation of timing belt 8kl.VAZ2108,2109,2110,2111,2113,2114,2115
How to quickly set timing marks on a VAZ 8kl
VAZ 2110 - the ignition is knocked out.
Check the condition of the windshield wiper switch; it may be damaged. Install the parts onto the cylinder head and connect the wires and hoses to the cylinder head in the reverse order. VAZ 2115 2004 will not start, I had a problem 8212 the fuel pump did not pump and I could not start the car. You can turn the bridge a little and bend the spring cups on the stocking. Here, all elements are marked, which means that the fuses are designed for low-power devices. They are held on by latches and can be removed very simply 8212; just pry them a little with a flat screwdriver.
Otherwise, there is simply neither time nor place nor opportunity to do this in the city. Then comes the number one question, what could be the reason for oil getting into the antifreeze. Designed for the most severe operating conditions, the turbocharging begins to work after reaching 2.53 thousand revolutions, so when driving in the city it is almost useless. In addition, an additional wire can be tuned to the connectors on 2107 doors, no idea.
However, the difference in money between a regular station wagon and a cross-country vehicle will be at least 30,000 rubles. Only with sufficient knowledge and practical skills can you begin adjusting the carburetor. Considering the slight difference in configuration. Such kits are not cheap, but they provide a change in ground clearance over a fairly wide range.
Ignition setting guide
One of the reasons is an incorrectly set ignition timing. To ensure that this problem no longer bothers you, you need to set this parameter - this can be done either with your own hands or at a service station. The crankshaft pulley has a special toothed disk designed to generate electromagnetic vibrations. Subsequently, the sensor converts these vibrations into a signal transmitted to the control unit. The latter, taking into account these parameters, in particular the position of the crankshaft, transmits an impulse to the module that distributes the spark between the spark plugs.
So, how to set the ignition yourself:
- First, remove the protective plastic cover from the timing device. Check the gap between the controller and the toothed disk - ideally it should be no more than 0.7 mm. If the gap is larger, this will result in a weak signal from the controller to the control unit.
- If the gap is normal, you need to start placing marks, but first you need to look at their compliance with the standard. This will allow you to ensure that the pulley on the crankshaft is not misaligned, otherwise the controller will also send incorrect information to the block. The mark on the flywheel must be aligned with the mark located on the transmission housing. To do this, the unit has a hatch where two risks are marked. In order for the marks to be aligned, it is necessary to rotate the crankshaft.
- The second mark is located on the oil pump pulley; you need to ensure that it coincides with the so-called tide on the cylinder block.
- As for the third mark, it is located on the camshaft drive gear pulley. It must be combined with the boss on the cylinder head, that is, the cover of the timing belt.
If all three marks are aligned, this indicates that the pistons of cylinders 1 and 4 are at TDC. At this moment, the gap between the teeth on the pulley should coincide with the tide on the engine, and the twentieth tooth should coincide with the DPKV.
How to set the ignition on a VAZ using marks
Almost all modifications of the VAZ-2114 and 2115 are equipped with engines with BSZ (non-contact electronic ignition). To make the setup, you need to:
- Unscrew the timing case fasteners and remove it.
Removing the timing case
- Adjust the gap from the crankshaft sensor (located near the generator pulley) to the gear disk. The permissible value is up to 0.7 mm.
Adjusting the gap from the crankshaft sensor to the gear disk
- If the distance is normal, check that the crankshaft pulley is not misaligned.
- To ensure that the marks on the flywheel align with those on the gearbox housing (can be seen on the hatch), the crankshaft must be rotated. It is convenient to do this by grasping the pulley mounting bolt.
Note! It is prohibited to turn the camshaft pulley itself.
Rotating the crankshaft pulley
- The mark on the cylinder block must align with that on the oil pump pulley. They should be adjusted.
- The last mark (on the camshaft pulley) should coincide with the other mark on the cylinder head.
Checking the marks on the camshaft and block
Having placed the marks on the VAZ model, you can see that the pistons of cylinders 1 and 4 are located at the dead center at the top, if everything is done correctly. In this case, the power unit operates correctly because the crankshaft sensor sends correct data to the ECU.
Checking completed actions
To diagnose the actions performed, you will need pliers, a standard tool and a tester (multimeter). High voltage wires can be checked with a multimeter. Normal wire resistance is from 5 kOhm to 12 kOhm.
At this stage, we will perform diagnostics of circuits, and not microprocessor elements. To check the latter, you will need specialized equipment and experience, which we do not have.
So, how is the check done:
- First you need to turn off the ignition and diagnose the contacts on all plugs and pads. It is also necessary to diagnose the tightness of the fit, as well as the contact of the high voltages in the module.
- Next, remove the block from the module and diagnose the voltage at terminals C and B. In this case, the tester must be configured in the mode for measuring low alternating current.
- Check the high voltages. To do this, you need to install a working spark plug in the cap and attach it to the block head. At this point, your assistant should try to start the engine by turning the starter. If the wire is working, then a spark will jump between the spark plug and the block head. Thus, it is necessary to diagnose all wires.
- In the event that there is no spark on only one cable, it is necessary to thoroughly diagnose the module itself, but in most cases the device must be replaced. If everything works correctly, the spark plugs are working properly, but there are still problems with the engine, you need to check the power system.