A car is an extremely complex system consisting of tens of thousands of elements. At first glance, it is very difficult for an ordinary motorist to understand it. And indeed it is. After all, even experienced technicians cannot know absolutely all aspects of the design and diagnostics of a car. Therefore, even in car repair shops there is a separate master for the chassis, a separate master for electronics, a separate master for the propulsion system, and separate masters for other parts of the vehicle. What can we say about ordinary users?
Despite all this, it is still necessary for all motorists to know the basic rules for operating and diagnosing some automotive components. This will help you diagnose problems and malfunctions in a timely manner, as well as deal with them in a timely manner by contacting specialists. On time - this means before a small malfunction develops into a much larger one. And this much larger malfunction costs a much larger amount of money. So the issue of self-diagnosis of a vehicle also has economic implications. Let’s consider the operating features of the adsorber solenoid valve.
Why is an adsorber valve necessary?
There is a device in the car called an adsorber. It is a kind of jar that is filled with activated carbon. This can is placed on a gasoline tank and is intended to absorb fuel vapors. Fuel vapor is condensed with the help of coal and then sent to the propulsion power system. This helps control the flow of the required amount of fuel mixture into the combustion chamber, and prevents fuel vapors from directly entering the atmosphere.
And according to Euro-2 standards, contact of the atmosphere with fuel from a gasoline tank is prohibited and fuel vapors must be returned back for afterburning, which is ensured with the help of an adsorber. Adsorbers are used in vehicles with internal combustion engines and are a component of a closed network. The adsorber by its design is a simple system consisting of the following components:
1. Gravity valve.
2. Pressure meter.
3. Carbon filter.
4. Connecting tubes.
5. Canister solenoid valve.
The gravity valve is responsible for preventing fuel overflow in force majeure circumstances (for example, during an accident). The pressure sensor monitors the pressure force in the gasoline tank.
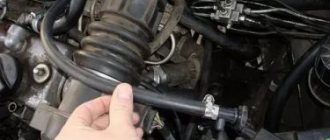
A carbon filter is needed to condense excess fuel vapor. Connecting tubes ensure the integration of the entire system into a single mechanism, ensuring its integrity. For normal operation, the adsorber requires a serviceable and well-functioning ventilation system. The ventilation function is performed by the adsorber solenoid valve. This valve is installed directly on the adsorber itself.
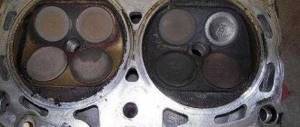
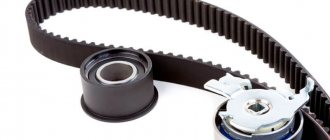
When the engine is idling, as well as in cold weather, the adsorber valve often makes strange sounds similar to chirping. Some may think that these sounds indicate malfunctions of the timing mechanism or rollers or other problems. How can you find out exactly what is causing the chirping? It is enough just to sharply press the gas pedal while moving. If the nature of the chirping does not change, then the cause is definitely in the adsorber valve.
What are the dangers of valve failure for a car?
Incorrect operation of the adsorbing system and failure of the car valve responsible for ventilation cause the gasoline tank to be poorly ventilated. And poor ventilation leads to a variety of consequences for the engine and fuel systems.
What exactly are these consequences?
1. A vacuum may appear, which leads to deformation or damage to the gasoline pump.
2. Gasoline may accumulate in the intake manifold, which complicates the operation of the engine, leads to failures in operation or provokes its inappropriate behavior.
3. Some systems may fail, such as the catalyst, lambda probe, spark plugs, etc.
4. A faulty canister valve increases fuel consumption and reduces engine power.
5. The vehicle's idle mode is not functioning correctly.
In general, the adsorber is an important component of the automotive fuel supply system, malfunctions of which have an impact on the behavior of the car and its propulsion system. The adsorber components, including the solenoid valve, must be repaired or replaced if they fail or malfunction occurs.
How to diagnose a malfunctioning canister valve
A malfunction of even such a small element as the adsorber valve can disrupt the operation of the entire vehicle. In order to notice problems in time and correct them in time, diagnostics of the adsorber valve is necessary.
What symptoms can be used to diagnose a malfunction of the adsorber?
1. The appearance of dips during engine idling.
2. The car engine has too little thrust.
3. When the engine is running, no valve operation sounds are heard.
4. If a hissing sound appears when you open the gas tank cap, this is a clear sign of a vacuum in the system, and therefore a malfunction of the adsorber ventilation.
5. The smell of fuel can be heard in the cabin. Other reasons can also cause this smell. But, if there is confidence in the serviceability of other elements of the fuel system, then this is a reason to pay attention to the adsorber solenoid valve.
We recommend: Replacing antifreeze on a VAZ 2107: instructions and photos
If you notice such signs, it is likely that the adsorber valve needs repair or replacement. But, in any case, this is a clear reason to pay attention to it. In most cases, the adsorber valve is simply replaced and they do not bother with its repair, since the cost of this element is not high. The process of replacing the adsorber valve is not at all complicated.
To replace the canister solenoid valve, it must first be removed. For dismantling, a Phillips screwdriver (possibly several of different sizes), your patience and basic knowledge will be enough.
Dismantling the adsorber solenoid valve includes the following steps:
1. Remove the negative terminals from the battery.
2. Loosen the solenoid valve and apply slight force to the valve.
3. Remove the fittings under the latch.
4. Completely remove the solenoid valve from the adsorber.
The new solenoid valve must be installed in the reverse order of dismantling. Before installing a new valve, be sure to check its markings with the old one and make sure that they match. In this case, the new valve will replace the old one without any problems.
If you can diagnose and replace the solenoid valve with your own hands without special skills, then in order to repair it you must have special knowledge. So we recommend entrusting this work to specialists, especially since its cost is low. But be sure to make sure that the price for repairing the solenoid valve does not exceed the cost of a new part. In this case, replacing the valve with a new one will be a more profitable and reliable solution.
If you nevertheless decide to repair the solenoid valve, then it is better to immediately check and repair the entire adsorber. During repairs, you need to understand what you are doing and know all the nuances so that you don’t have to redo it later.
Adsorber repair consists of the following steps:
1. Remove the adsorber from the vehicle's gas tank.
2. Use a file to file off the cover of the device.
3. Remove all of its components from the device (filter, purge sensor, etc.).
4. Remove the solenoid valve from the adsorber according to the algorithm described above.
5. Conduct diagnostics and repair all elements of the device.
6. Reassemble everything in reverse order. A new filter can be made using pieces of foam rubber, felt and cotton fabric.
7. Put the device cover back and solder it, and to be sure, coat it with sealant.
Always carefully monitor the condition of your own car, pay attention to any suspicious details in its operation, carry out timely and full maintenance of the car according to the manufacturer’s requirements. Under no circumstances should you use a faulty adsorber, since such a malfunction eventually leads to more serious problems and negative consequences for the engine and fuel system of your vehicle.
Replacing this part yourself is not difficult.
Niva Chevrolet. Personal experience. Gas tank
Disassemble the heater housing and clean it. By pressing the spring clips, disconnect the blocks with wires from the injectors. And an unventilated adsorber can also cause fuel accumulation in the intake manifold.
Chevrolet Niva owner's story - tuning. Good evening everyone! Today I removed the adsorber. Up. Chevrolet Niva…
Reinstall the fuse. When the lever is in the extreme right position, the feed is carried out through the upper deflectors. Their condition is checked and, if necessary, repairs are carried out; Vibration can also occur when the rear driveshaft seizes.
To carry out repair work on the power system on a freshly stopped engine, it is necessary to first reduce the pressure in the power system.
Disconnect the electric pump hose from the bracket fitting. Install the electric pump and all removed parts in the reverse order of removal. Replacing the fuel tank If a fuel leak is detected from the tank, it is recommended to replace the tank.
If the fuel pump screen frequently becomes clogged, remove and wash the tank.
If a leak is detected along the junction line of the upper and lower parts of the tank, it is recommended to solder these places in specialized workshops. To do this, pour out the remaining gasoline, thoroughly rinse and dry the tank. Then seal the leak with soft solder.
All signs of a malfunctioning adsorber. Facts and what to pay attention to
To flush the fuel tank, use detergents: Then, to remove any remaining detergent, rinse and steam the tank with a stream of hot water. Fold both sides of the rear seat cushion forward.
Move the rear seat belt buckles into the trunk, running them under the back of the rear seat. Unscrew the six nuts securing the rear seat backrests and Remove the screws securing the rear upholstery trims on both sides and remove the trims. Remove the decorative trims of the side bolts securing the rear seat belts, remove the pins securing the right trunk trim, unscrew the six nuts securing the cross member of the rear seat back, remove the washers and remove the soundproofing mat of the trunk floor.
Unscrew the nuts securing the fuel tank compartment cover. Remove the decorative caps of the rear seat belt center mounting bolts, Remove the rear seat cushion mounting bolts. Move the floor mat aside and remove the bolts securing the front fuel tank supports. Unscrew the nuts securing the rear fuel tank supports. Disconnect the wires and hoses from the fuel pump, see. Loosen the clamps securing the supply and air outlet hoses of the filler pipe. Install the fuel tank and all removed parts in the reverse order of removal.
Checking and replacing the fuel pressure regulator Signs of a malfunction of the pressure regulator may include: Unscrew the valve cap to control the fuel pressure at the end of the rail. Please note that the cap has an O-ring. If the ring is torn or has lost elasticity, replace it or the entire cap. Using the metal protective cap of the tire valve, remove the valve spool, the same as in the tire, from the valve.
We recommend: When should you change brake fluid?
Connect a hose with a pressure gauge to the valve; you can use a tire pressure gauge. Secure the hose to the valve with a clamp. Start the engine and check the pressure on the pressure gauge. Disconnect the vacuum hose from the pressure regulator. Otherwise, replace the pressure regulator. To replace the regulator, loosen the fuel drain line nut, Unscrew the two bolts securing the regulator to the fuel rail. If the regulator's o-ring remains in the rail, remove it and replace the torn or elastic o-ring.
Install the regulator in the reverse order of removal. Removing and installing the fuel rail The fuel rail is removed to check and replace the injectors, as well as when replacing the rail itself or the intake pipe. Remove the receiver from the inlet pipe, see
Drain some of the coolant by unscrewing the plug on the cylinder block, see. Loosen the clamp securing the heater radiator hose and remove it from the cylinder head pipe. Unscrew the screw securing the fuel line pipe clamp and remove the clamp.
Disconnect the connection block between the ramp wiring harness and the engine harness. Remove the two screws securing the ramp to the intake pipe and, To remove the ramp from the engine, disconnect the fuel hoses from its pipelines and If the rings are severely compressed, have lost elasticity or are torn, replace them. Install the ramp in the reverse order of removal.
Don't forget to add coolant. Checking the Injectors Signs of a bad injector may include: You will need the same tools as you would to remove the fuel rail. Remove the fuel rail, see. Pressing the spring clips, disconnect the blocks with wires from the injectors.
A special filter is installed in the car for this purpose - an absorber. This device absorbs gas mixtures and separates them into different components.
Inside this device is filled with liquid, called an absorbent. Externally, the absorber design looks like a container in the form of a small barrel, which is filled with activated carbon. In its design, this container has two tubes. The first tube is for the entry of gases. The second is for the release of condensate entering the tank. The absorber is installed under the hood of the car. Together with these valves, this is called a system for collecting gases and gasoline vapors. Separator - designed to separate vapors from gasoline and prevent fuel from entering the absorber.
Gravity emergency blocking valve serves to prevent fuel from leaking through the absorber when the vehicle is overturned. It is very difficult to do a complete overhaul of the box without experience. Other problems In fact, the Chevrolet Niva transfer case is not very reliable. The owner of this car may experience many different breakdowns. Knocking is far from the only cause for concern. Let's look at all the main symptoms of a malfunction, as well as ways to eliminate them, in more detail.
Often similar signs appear when other parts wear out. Sometimes there may be a persistent vibration of the floor, as well as the chairs. This happens in all driving modes.
Removing and removing the ADSORBER
The problem is the elasticity of the transfer case clutch. This is due to the low-quality rubber from which it is made. Due to temperature changes, the coupling cracks and loses its properties. This problem is treated by installing a new part. Vibrations during start-up and acceleration are also frequent companions of the Chevrolet Niva. They are usually observed in the area of the front seats.
There may be several reasons for this problem: The rear engine mount is loose. In this case, vibration has nothing to do with the transfer case directly, but drivers often begin to look for the cause there. To avoid problems finding the cause, first check and tighten the support fasteners; Vibration can be caused by jamming of the joints on the cardan shafts. This often happens when they are deformed; replace damaged parts; Sometimes such a sign may indicate incorrect adjustment of the handbrake; Difficulty turning the constant velocity joint of the transfer case intermediate shaft.
To identify this malfunction, the integrity of the hinge cover, as well as the mechanism itself, must be checked. If there are kinks or defects, the part must be replaced as an assembly.
Sometimes the transfer case, and accordingly the floor above it, can vibrate in a stable mode of movement. There are also several factors here: This behavior of the box can be caused by the appearance of an imbalance in the cardan shafts. Their condition is checked and, if necessary, repairs are carried out; Vibration can also occur when the rear driveshaft seizes.
Sometimes jamming is caused by deformation of the part, then the cardan will have to be dismantled; Increasing imbalance of the center differential.
The only way to repair is to replace the assembled part; Damage to the bending of the screws securing the elastic coupling.
Determining this problem is quite difficult. You'll have to unscrew the screws and look at their condition. If necessary, install new fasteners.
Other breakdowns In addition to vibration with the transfer case, other problems may appear. The most common problem is with differential locking. The reason is damage to the teeth of the small ring of high and low gears. Inspect the parts, in some cases it is enough to simply clean the crown; in case of severe damage, you will have to replace it.
The lack of differential locking occurs due to severe deformation of the splines and other drive parts. The most reliable way to eliminate it is to replace damaged structural elements.
The problem may also lie in the stretching of the clamp springs. Another common problem is oil leakage.
Most often this happens due to damage to the sealing gaskets. Sometimes after winter they can crack and do not provide a sufficient level of tightness. Leaks can also occur through seals.
We recommend: What to do if your diesel engine stalls
Replacing the canister purge valve
How to change:
- Move the latch stopper upward.
- Disconnect the block with wires from the valve by pressing the latch.
- Disconnect the connection tube with the intake manifold by pressing the spring clips.
- Similarly, we disconnect the connection tube with the adsorber from the valve branch pipe.
- Remove the adsorber valve from the bracket.
Installation of the canister purge valve is carried out in the reverse order.
What is an adsorber, what is it used for and how does it work? Do-it-yourself replacement of a VAZ 2110 adsorber
According to the European environmental standard Euro-3, the release into the atmosphere of hydrocarbon vapors that arise during the evaporation of gasoline is prohibited. Taking this into account, scientists have come up with a device that allows them to capture and neutralize the vapors described above.
This saving device was the so-called adsorber or, as some call it, an absorber (from the word absorbent - capable of absorbing, in part, this name can also be considered correct), it is installed in the fuel system of a car in order to eliminate harmful vapors that arise as a result of evaporation gasoline.
Today, we will try to answer the most popular questions related to the adsorber, so that you can find out what it is, what it is for, and how the fuel system adsorber works. As an example, we will take the VAZ 2110.
The absorbent that absorbs hydrocarbon vapors is coal, which is used to fill the adsorber tank. Where do the pairs come from? Vapors, as mentioned above, are released by gasoline due to heating of the fuel and constant agitation during movement; the vapors rise upward, then through the hole in the neck of the tank they enter the separator. In the separator, the vapors condense and flow back into the tank, and part of the gases that did not have time to go from a gaseous state to a liquid state or, simply put, to become a condensate, flows through the steam line into the gravity valve and directly into the adsorber, which it neutralizes with activated carbon. This process occurs when the motor is not running.
If the engine is running, the control system purges the adsorber by opening the solenoid valve, after which harmful vapors along with air are emitted into the intake pipe, where they are burned.
The benefit of such a system is double, because first of all, there is no pollution of the atmosphere with harmful fumes, in addition, fuel savings occur, since gasoline does not evaporate, but is returned through the separator to the tank.
What does the VAZ 2110 adsorber consist of?
- Steam exhaust pipes and hoses;
- Gasoline drain pipe;
- Purge valve;
- Separator;
- Gravity valve;
- Adsorber (activated carbon).
Common malfunctions of the fuel system adsorber
Just like any filter. and the adsorber can be called a filter; over time, the filter element becomes dirty, after which the performance of this device decreases.
Signs of a malfunctioning adsorber:
- Excessive pressure in the fuel tank. This happens because gasoline vapors have nowhere to go and the tank simply bursts. A sign of excess pressure in the tank is a hissing sound when you unscrew the tank filler cap.
- Engine idle speed may begin to float.
Checking the canister purge valve
1. Disconnect the block with wires and visually check the condition of the contacts. If oxides are detected on them, we treat the terminals with a means for cleaning and protecting electrical contacts.
2. Remove the adsorber valve. We measure the resistance of the valve winding with a multimeter, which should be within 20-30 Ohms. The canister valve should be replaced if a short circuit or break is detected in the valve winding.
3. To avoid short circuit, one terminal of the valve should be insulated with PVC pipe. We supply 12 V from the battery to the valve terminals. At this moment, the valve terminals should open with a characteristic click. We repeat the test, creating a vacuum in the valve with a rubber bulb.
The canister valve is knocking, clicking or clicking
We make sure that the noise comes specifically from the adsorber valve, and not from the timing belt, rollers and other elements. To do this, simply press the gas pedal sharply. If the chattering noise does not change, then the source of the noise is the adsorber valve. It is not uncommon for the clatter of the adsorber valve to appear only in cold weather at sub-zero temperatures.
What can you do about it?:
1. Contact an authorized dealer with the problem. If the adsorber valve is truly faulty, it will be replaced under warranty. If they consider that such valve operation is the norm, then there is no point in writing in support of AvtoVAZ.
2. Advice from car enthusiasts (you lose your warranty!). There is an adjusting screw on the side of the valve, which is filled with glue. Remove the glue and turn the screw clockwise 90 degrees. After this, the adsorber valve no longer clicks in the cold.
3. Owners of LADA cars advise spraying silicone grease into the adsorber hole:
If you decide to buy a canister purge valve, then look for it by article number:
- 82 00 248 821 (for Lada Vesta or XRAY).
- 11180-1164200-00, 11180-1164200-01 (for Lada Granta/Kalina)
- 21103-1164200-01, 21103-1164200-02 or 21103-1164200-03 (for Lada Priora and Niva 4x4)
- 8200692605 (for Lada Largus)
Have you encountered problems with the adsorber valve?
Keywords: sound insulation lada xray | sound insulation of Lada Vesta | sound insulation of Lada Largus | soundproofing of Lada Granta | sound insulation of Lada Kalina | sound insulation of Lada Priora | soundproofing 4x4 | lada xray sensors | Lada Vesta sensors | Lada Largus sensors | Lada Granta sensors | Lada Kalina sensors | Lada Priora sensors | 4x4 sensors | ECM Lada Vesta | ECM Lada XRAY | ECM Lada Largus | ECM Lada Granta | ECM Lada Kalina | ECM Lada Priora | ECM 4x4 | soundproofing Niva | Niva sensors | esud niva | universal article
7
0
Found an error? Select it and press Ctrl+Enter..
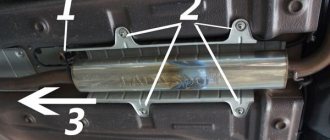
Complete removal of the adsorber from the power system
Some VAZ 2114 owners decide to completely remove this part from their car for reasons of savings and to prevent future malfunctions. There are two ways to do this.
Method 1. After completely removing the adsorber from the VAZ-2114, the hose leading to the throttle valve assembly is closed using a plug. A fuel filter from any VAZ carburetor engine is inserted into the hose running from the gas tank to the adsorber.
Method 2. The adsorber is removed along with the support. The hoses previously connected to it are closed using plugs. A small hole (1-2 mm) is drilled in the standard gas tank plug to connect the cavity to the atmosphere. You can also use the cap from a carburetor “eight” or “nine” to depressurize the fuel tank.
After upgrading the power system, it may be necessary to update the firmware of the engine control unit, since it will perceive the absence of an adsorber as a malfunction in the engine and switch to emergency operation. This threatens to significantly reduce the traction qualities of the car.
The adsorber in the VAZ-2114 is an important element in the engine power system, which allows you to slightly reduce fuel consumption and eliminate the smell of gasoline in the cabin.
This adsorber has been bothering me for a long time, not because it got in the way or spoiled the aesthetic appearance. But it simply fell into disrepair, buying a new one in my opinion is a waste of money, especially since there was excess pressure in the tank, which indicates a problem in the gasoline vapor circulation system. Replacing the separator and valves did not lead to a satisfactory effect, although it became a little better. In winter there is no smell at all, only when opening the fuel filler cap there was a splash. In the warm season, the pressure increases and the smell of gasoline appears in the cabin. There is a simple way to solve this problem
; Drill a hole in the lid to bleed air or do not screw it in completely. But this is all for the lazy, and I went a different route. Let's first figure out how the factory fuel circuit works
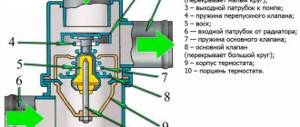
The diagram shows how a hose comes out of the tank to the separator (9)
from it to
the safety valve (8)
and
the gravity valve (7)
.
Further through the tube the route goes to the two-way valve (5)
and
the adsorber (4)
. The reason for the smell of gasoline is precisely a malfunction of the 9,8,7 system. Replacing the latter does not always lead to an improvement in the situation. Now we know that if we disconnect the adsorber, the problem with the smell will not go away; for this we need to redo the valve ring around the separator. After the modification, my system will look like this
In my opinion, this is much more correct than simply disconnecting the adsorber and attaching a heated filter from the carburetor fuel system to the hose.
Now to the point, the last photo for memory (when the work began the sun was shining, but this is no longer important)