A common mistake among car designers is the tight layout of the air conditioning system. As a result, the simplest operation in theory to replace the cabin filter can become many times more difficult than expected.
This problem is especially acute for compact cars, where the entire ventilation system should not take up space from an already small interior. When replacing the cabin filter on a Lada Vesta yourself, you will have to choose one of two options. Either remove the glove compartment and insert the filter in an awkward position, or save time by not removing the glove compartment - the inconvenience will increase slightly.
Stages of replacing the filter element Lada Vesta
Compared to most other cars, replacing the cabin filter in the Lada Vesta, as well as in the Cross version, is relatively simple. Relatively, because the filter is not located in the most convenient place for replacement. Simple - because no special preparation is required for this operation. All you need is the new filter element itself.
It is pointless to dispute the benefits of salon tea, especially when it comes to coal ones. Therefore, it is not surprising that self-installation of filters on cars has become common. This is a routine and fairly simple procedure for periodic maintenance, there is nothing complicated about it
According to the regulations, replacement of the cabin filter is provided every 30,000 km, that is, every 2nd scheduled maintenance. However, depending on the operating conditions of the vehicle, the replacement period can be reduced to 10-15 t.km. mileage The more often you change the filter in the cabin, the cleaner the air will be and the better the air conditioner or heater will work.
Where is
Like most other cars, the cabin filter of the Lada Vesta is located in the passenger compartment on the passenger side. The filter housing is located under the dashboard, so getting it out requires a little fiddling. At a car service center they will charge you about 700 rubles for a replacement, which is quite a lot for a 15-minute procedure.
The cabin filter makes the ride comfortable, so if a plug is installed, it is recommended to remove it and install a cleaning element. Much less dust will accumulate in the cabin. If you use carbon filtration, the air quality inside the car will become even noticeably better.
Removing and installing a new filter element
First, you need to make a reservation that you can use the official instructions for replacement by removing the glove compartment. But this makes no sense other than wasting time. This method is less convenient, but very fast.
Replacing the cabin filter of Lada Vesta is a routine and fairly simple periodic maintenance procedure. There is nothing complicated about it, so replacing it yourself is quite simple. To make the operation easier, you can move the front passenger seat all the way back.
The filter plug can be seen behind the center console when viewed from the glove compartment, and to remove the filter it is enough to:
- Remove the decorative panel. To do this, you need to unscrew the Torx T20 key screw. Next, using a flat-head screwdriver, unclip the latches that secure the panel in 3 places (Fig. 1). Latches often break, so you need to be extremely careful.
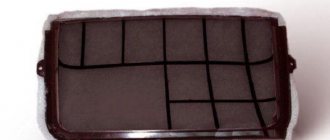
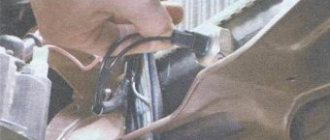
Fig.1 Self-tapping screw for Torx T20 - The filter plug is now accessible. To remove the plug, you need to squeeze the protrusions shown in the photo. The effort required for this is small, they give in easily. After this, simply pull the lid towards you (Fig. 2).
Fig.2 Compressing the protrusions - Pull the filter by the lower part, moving upwards, so that the upper part of the filter disengages. The filter element itself is larger than the hole where it should be inserted. Therefore, it is pulled out according to the accordion principle (Fig. 3).
Fig.3 Pull it out by the bottom part - When the installation cavity is empty, it is advisable to clean it of dust and various contaminants. If you can use a vacuum cleaner with a narrow attachment, this would be the best option. There is a more radical method, turn on the airflow to full. In this case, the inside will be clean, but you will have to remove dust from the interior (Fig. 4).
Fig.4 Niche for installation - Next, install the new cabin filter in the reverse order. First, fully insert the upper part of the filter, and then push the lower part. It seems a little confusing, but the installation process makes it easy.
Fig.5 New filter element - Now all that remains is to install the cover in its place until it clicks. By the way, for some users the latches on the plug break off. In this case, it can be secured with 2 self-tapping screws, for which there are already holes.
When installing, pay attention to the arrows shown on one side of the filter element. They show the direction of air movement, and installation must be done according to them. The arrow should be in the direction from the engine to the passenger compartment.
When removing the filter, as a rule, a large amount of debris spills onto the mat. It is worth vacuuming the inside of the stove body itself - the size of the slot for the filter makes it quite easy to operate with the narrow nozzle of the vacuum cleaner.
On cars with air conditioning, replacing the cabin filter should be combined with cleaning it. On sale you can find many aerosol compositions for cleaning and disinfecting honeycombs. A flexible nozzle is inserted through the filter installation hole.
The composition is evenly sprayed over the entire surface of the air conditioner radiator, after which it quietly flows through the drain. You need to wait about 10 minutes and replace the filter.
If the latches are broken
If, when replacing the cabin filter, the latches on the decorative plug of the central tunnel of the Lada Vesta are broken, then there is a way out:
- We glue Velcro onto the plug itself using double-sided tape (Image 1).
Image 1 Velcro on the plug - We symmetrically glue the other part of the Velcro on the central tunnel, at the attachment point (Image 2).
Image 2 Velcro on the tunnel
In this way, we will not only restore the fastening and tight fit, but also facilitate subsequent removals.
Solving the problem of large accumulation of debris in the filter
Very often, when replacing the interior, you can find tree leaves and other large debris. Which not only spills onto the floor of the Lada Vesta cabin when replaced. But it also prevents normal air circulation.
The culprit is the air intake hole, which is located under the hood, behind the air intake box, or in common parlance, a frill. It is practically not covered by anything. All large particles enter through it. Covering it with a fine mesh will solve the problem.
Let's figure out how to do this:
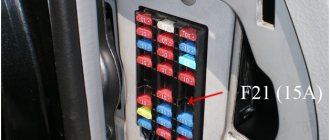
- For this purpose, special meshes with a fine mesh are available for sale. They are attached using strong neodymium magnets (Photo 1).
Photo 1 Fine mesh mesh - Raise the hood and use Torx T20 to unscrew the 3 fastening screws. We remove the wiper mounting plug and use a 16 key to dismantle the wiper itself. We do all the same on the other side (Photo 2). Please note that the screws on the windshield side are slightly longer, so do not mix them up when assembling.
Photo 2 Places for unscrewing fasteners - To avoid confusion with the location of the wipers when replacing the wipers, it is recommended to make marks with a marker (Photo 3).
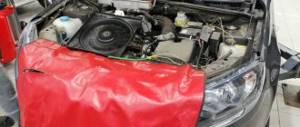
Photo 3 Making marks - Now that all the fasteners have been disconnected, you can pull out the frill. This is done by moving from the windshield and up.
- When everything is dismantled, we see in the center a view of an air intake with a huge cell, which needs to be closed (Photo 4).
Photo 4 Original air intake - We insert our purchased mesh and close the standard hole with it. Now large debris will not enter the cabin, and as a result, the cabin filter will become less clogged (Photo 5).
Photo 5 We rejoice at the modification
We are happy with the modification and put everything back together in reverse order.
Frequency of replacing the oil filter in Lada Vesta
The regulations provide for mandatory periodic replacement of the oil filter, which is changed when the lubricant is changed. It is advisable to simultaneously change the air filter and also check the transmission oil. If the car is under warranty and the owner does not plan to refuse it, then these and other works will have to be performed at a specialized service station. In all other cases, you can do it yourself.
However, even self-repair requires certain preparatory procedures and the availability of tools. You will have to follow the instructions below, but it will make the work much easier. If the recommendations are followed, even a novice car enthusiast can easily replace both the filter and lubricant in the system.
The maintenance schedule involves replacing these consumables at least 15,000 kilometers or after every year of operation. However, during break-in, this procedure is performed earlier - after the first 3 thousand km. This is necessary for better lapping of the rubbing parts of the engine.
Many domestic owners of such a Lada prefer to replace it every 10 thousand km. This is due to difficult climatic conditions in many regions and the quality of the road surface and fuel. In addition, the Russian market is flooded with a large number of counterfeit products that poorly provide normal engine protection.
The need for replacement can be understood if you listen and look closely at the operation of your Lada Vesta car. This may be indicated by one or more of the following signs:
- traces of oil remaining on the asphalt under the bottom of the car;
- on a slight rise the car moves jerkily;
- spontaneous braking occurs;
- consumption of the combustible mixture increases;
- There are difficulties starting the engine.
When to change, what interior to install
According to the technical maintenance regulations, the cabin filter on Lada Vesta is replaced at least once a year. Or when passing every 2nd scheduled maintenance, that is, every 30 thousand kilometers.
However, when used on Russian roads, within the period specified in the regulations, the cabin filter becomes quite clogged and ceases to perform its functions. Therefore, to ensure normal filtration, owners recommend cutting the time frame for replacing the cabin filter by half.
The ideal option is to change the Lada Vesta cabin filter twice a year, once in the winter season, and once before the summer season. In the spring and summer, it is better to install coal, as it copes more effectively with various allergens and unpleasant odors. And in autumn and winter, ordinary dust is enough.
Although the service book indicates specific terms for replacing the filter element, it is often recommended to carry out the replacement earlier, that is, not according to regulations, but as needed. The basis for replacement are signs of filter contamination:
- When the car is used in the summer on dusty road sections, the filter element becomes much more clogged with fine dust, as a result of which replacement may be required earlier.
- With frequent idle time in traffic jams, the element becomes clogged with small particles of exhaust soot, as a result of which it may appear relatively clean in appearance, but at the same time the surface acquires a gray color, indicating severe contamination, and permeability is reduced to almost zero.
- In the fall, leaves can get into the air ducts - even a small amount can become a breeding ground for millions of bacteria that cause an unpleasant odor. It is quite difficult to get rid of it; you will need not only replacing the filter element, but also completely cleaning the box.
- Increased air humidity in the cabin (window fogging).
- Reduced ventilation and heating system power.
- Noise appears when ventilation is turned on to maximum.
Suitable sizes
When choosing a filter element, owners do not always use products recommended by the car manufacturer. Everyone has their own reasons for this, some say that the original is unreasonably expensive. Some people in the region sell only analogues, so there is a need to know the sizes by which you can subsequently make a selection:
- Height: 35 mm
- Width: 200 mm
- Length: 216 mm
As a rule, sometimes analogs for Lada Vesta can be a few millimeters larger or smaller than the original, there is nothing wrong with that. And if the difference is measured in centimeters, then of course it’s worth looking for another option.
Selecting an original cabin filter
The manufacturer recommends using exclusively original consumables, which, in general, is not surprising. They themselves are of good quality and are widely available in car dealerships, but their price may seem overpriced to many car owners.
Regardless of the configuration, on all Lada Vestas, the manufacturer recommends installing a cabin air filter with article number 272773016R (dust) or 272773151R (carbon). They are also known under other articles, there are no differences in them, and they are interchangeable:
- 272770567R
- 272777764R
- 272778214R
- 272779683R
- 272889739R
It is worth noting that sometimes consumables and other spare parts may be supplied to dealerships under different part numbers. Which can sometimes confuse those who want to purchase an original product.
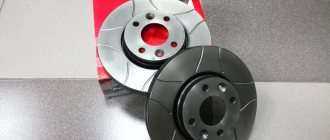
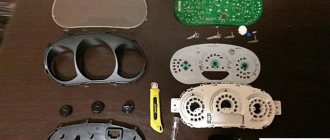
When choosing between a dust and carbon product, car owners are advised to use a carbon filter element. This filter is more expensive, but it cleans the air much better.
It is easy to distinguish - the paper filter accordion is impregnated with a carbon composition, and therefore has a dark gray color. The filter cleans the air flow from dust, fine dirt, germs, bacteria and enhances the protection of your lungs.
Which analogues to choose
In addition to simple cabin filters, there are also carbon filters that filter the air more effectively, but they are more expensive. The advantage of coal SF is that it does not allow foreign odors coming from the road (street) to penetrate into the car interior.
But this filter element also has a drawback - air does not pass through it well. GodWill and Corteco carbon filters are of fairly high quality and are a good replacement for the original.
However, in some retail outlets the price of the original Lada Vesta cabin filter may be greatly inflated. In this case, it makes sense to purchase a non-original consumable item. In particular, cabin filters are considered quite popular:
Conventional dust cabin filters
- MANN-FILTER CU22011 – high-tech consumables from a well-known manufacturer
- BIG FILTER GB-9978 – popular brand, good fine cleaning
- Nevsky filter NF6433 – Russian manufacturer with an affordable price
Carbon cabin filters
- MANN-FILTER CUK22011 – high-quality and thick carbon coating
- BIG FILTER GB-9978/C – activated carbon
- Nevsky filter NF6433C – normal quality, affordable price
It makes sense to take a closer look at the products of other companies - they also specialize in the production of high-quality consumables for passenger cars:
- Corteco
- Filtron
- SCT
- Sakura
- GoodWill
- Fram
- JS Asakashi
- Champion
- Zekkert
- Masuma
- Nipparts
- Purflux
- Knecht Mahle
It is quite possible that sellers may recommend replacing the Vesta cabin filter with non-original cheap substitutes with a much smaller thickness. They are not worth buying, since their filtering characteristics are unlikely to be at the proper level.
Preparing tools and supplies
To replace the oil filter, you will need the filter itself. To select a filter for the Lada Vesta, experts recommend adhering to the following principles:
— purchase an oil filter element for a specific car model;
— purchase spare parts for oil filtration at trusted, reliable points;
- when choosing a product, pay attention to the depth of the folds - the deeper, the better;
- pay attention to the base - the material. The main part must be made of metal;
— make sure that the name and article on the package match.
Replacing the cabin filter of Lada Vesta SV Cross - step-by-step instructions
The cabin filter is changed on the front passenger side, but it is located almost under the central tunnel. There are two ways to replace the cabin filter of the Lada Vesta SV Cross. The first method is difficult, but more correct. It consists of removing the glove compartment and then replacing the filter. The second method is simpler, since the glove compartment does not need to be removed, but in order to install a new cabin filter, you will have to deform it. In this case, there is no guarantee that he will straighten up and stand up as expected. But there is a way.
We'll tell you how to do everything right.
1. It is necessary to remove the decorative plug in the central tunnel. It is secured with one T20 Torx screw and three latches.
2. Next we need to open the glove compartment and dismantle it. This is done quite simply. Using the same T20 Torx wrench, unscrew 3 screws on top and 2 on bottom. Then we move the decorative trim to the side on the right and pull the glove compartment towards us. It should remain completely in your hands.
3. Disconnect the lampshade and move the glove compartment drawer to the side.
4. The cabin filter is located under a plug, which also needs to be removed. Press the two latches and pull the plug towards you.
5. Remove the old cabin filter and install a new filter in its place.
The process of replacing the cabin filter component
Experienced drivers perform the dismantling of the old component and installation of the new element independently. After all, this procedure includes only simple steps.
In order to replace the cabin filter on a Lada Vesta car, the appropriate component is selected. In addition, the following tool is required:
- Phillips and flat head screwdrivers.
- Star key.
To dismantle the decorative cover that comes with the panel, use a star key and an ordinary screwdriver. To prevent damage to the plastic latches, the cover is removed with special care.
Using a flat-head screwdriver, the decorative trim, which is located in the assembly, is also removed.
The glove compartment is secured with self-tapping screws. To remove them, use a torx screwdriver. Initially, the lower screws are removed. After this, the plug on the vest is disconnected, which is used to connect the backlight. After this, the glove compartment is removed and set aside.
How to change the cabin filter on a Lada Vesta without removing the glove compartment - you need to know this
You can install the cleaning element in the Lada Vesta without disconnecting the glove box from the instrument panel. To do this, disassemble the tunnel panel, as described above. In the far right corner there is a filter device cover; after removing it, access to the old part opens. This option requires less time, fewer tools, and allows you to keep the drawer lighting on, but it is recommended to use it with great caution, since the likelihood of damaging the latches becomes higher.
VAZ cars: repair, maintenance, tuning
The cabin filter on the Lada Vesta requires replacement primarily from a hygiene point of view. Comfort in the cabin plays an equally important role, as does the resource of the heating and climate system. The process of replacing the cabin filter takes just a few minutes, despite this, many owners wait until the last minute. Let's figure out how to change the cabin air filter with your own hands and at the same time save time and money on visiting a service station.
| Manufacturer | Cabin filter model |
| Nevsky filter | NF6433 |
| Nevsky filter | NF6433C (carbon) |
| TSN Citron | TSN 97888 |
| TSN Citron | TSN 97888K (coal) |
| SibTEK | AC 43003 |
| SibTEK | AC 0443003 |
Experienced car owners recommend installing a carbon filter in the summer, especially before the plants begin to actively flower. It better protects the air from harmful bacteria and allergens. In winter, you can get by with a regular cabin filter.
According to the Lada Vesta maintenance regulations, the cabin filter is replaced every 15 thousand km. But in fact, replacement may be needed more often. First of all, the service life of the filter depends on the environment. In places with increased gas and dust levels, the filter element needs to be changed 1.5–2 times more often.
The most obvious signs of the need to replace the cabin air filter:
- penetration of unpleasant odors from the street into the cabin (with the windows closed);
- in winter the stove does not work well, and in summer the temperature in the cabin constantly rises;
- fogging of windows;
- Dust quickly accumulates on interior items.
If the above problems occur, you need to replace the cabin filter, regardless of the mileage of the car. On the Lada Vesta, this part is located under the panel, to the left of the glove compartment, under the plastic facing decorative cover. Removing/installing the cabin filter on Vesta is a little difficult, since the seat is slightly smaller, and the installation of the filter element itself is carried out without a mounting cassette.