Tools:
- Socket wrench
- Head for socket wrench 10
- Head for socket wrench 38
- Ratchet wrench
- Flat screwdriver
- Hammer
Parts and consumables:
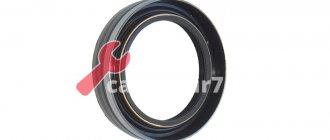
- Engine front crankshaft oil seal
- Sealant
Notes: A sign that the front crankshaft oil seal needs to be replaced is oil leaking around its lip. In this case, oil is sprayed out by the rotating crankshaft pulley, as a result of which the entire front part of the engine and engine compartment becomes oily.
Helpful advice: Before replacing the crankshaft front oil seal if a leak occurs, check the cleanliness of the engine crankcase ventilation system, since if it is clogged, the increased gas pressure in the crankcase causes a leak even with a working oil seal.
1. Remove the oil pan guard and engine compartment splash guard as described here.
2. To avoid damage, remove the crankshaft position sensor as described here.
3. Remove the accessory drive belt as described here:
A. On a vehicle with air conditioning, use the air conditioning compressor drive belt as described here.
b. With the generator located at the bottom: Remove the power steering pump drive belt. Loosen the nut securing the generator to the tension bar and, moving the generator towards the engine, remove its drive belt as described here.
4. By engaging fifth gear in the gearbox and braking the car with the parking brake.
5. Using a 38 socket, unscrew the nut securing the crankshaft pulley.
Useful advice: It is not always convenient to place the knob, then we use a ratchet wrench.
6. On a car with air conditioning, unscrew the nut securing the drive pulleys of the air conditioning compressor and auxiliary units.
A. No air conditioning.
b. With air conditioning.
Helpful Hint: If the nut is tightened too tightly, use a pipe of a suitable diameter as a wrench extension or loosen the nut by hitting the wrench handle with a hammer.
7. Remove the pulleys.
A. No air conditioning.
b. With air conditioning.
8. Prying it with a screwdriver.
9. Remove the oil seal.
10. Lubricate the new oil seal with engine oil and install it into the timing cover, oriented with the working edge towards the inside of the engine.
Note: The working edge is distinguished by the presence of a spring.
11. Press the oil seal into the cover using the old oil seal as a mandrel or with a socket of a suitable size.
Read more: Build a route in Yandex
12. Reinstall the removed parts and adjust the tension of the power steering pump and generator drive belts.
The article is missing:
- High-quality photos of repairs
If the oil seal fails, it is extremely important to promptly replace it in order to avoid serious problems. A faulty front seal can lead to failure of the timing belt, and a faulty rear seal can lead to failure of the clutch disc.
When to replace
During the operation of the Chevrolet Niva, a problem often arises associated with the flow of lubricant through the crankshaft. The reason for this may be various malfunctions, including wear of the element itself that performs the gasket function. If during the diagnostic process it is determined that it will no longer be able to perform its functions, then it needs to be replaced. After the dismantling process, a new product is installed.
This operation will make it possible to eliminate the lubricant leak. There are some peculiarities in replacing the front and rear oil seals, so motorists who want to do these operations themselves should study all the nuances.
Front oil seal: replacement features
Oil leaking from under the crankshaft lip hits the crankshaft pulley and then splashes throughout the engine compartment. One of the reasons for this malfunction may be wear of the front oil seal. Before removing this part, you should make sure that the crankcase ventilation is in good condition, otherwise oil may leak even with a part whose operation has virtually no complaints.
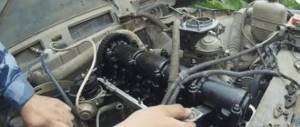
Before the operation to replace the front crankshaft oil seal, you should prepare the appropriate tools. This operation is carried out in a certain sequence:
The oil sump protection is removed, as well as the engine splash guard.
The belt through which the power steering pump operates is removed.
The nut that secures the generator to the adjusting bar is unscrewed; slide it towards the motor to loosen the belt being removed.
Using a socket, the nut that secures the crankshaft pulleys is unscrewed, and then they are removed.
The worn front oil seal is removed from its place by using a flat screwdriver, which is used to slightly pry this part.
The nest is wiped with a clean rag, and then, lubricated with oil, the new product is installed in place using a mandrel of suitable diameter. It should be borne in mind that this product must be placed inside the engine with the working edge forward.
Read more: External CV joint Geely MK Cross
Reassembling the dismantled components is performed in the reverse order.
3.2.12 Replacing crankshaft oil seals
1. Remove the toothed drive belt as described in Section Removal, inspection and installation of toothed drive belt, with the crankshaft gear and intermediate shaft or idler pulley, refer to Section Removal, inspection and installation of the toothed drive belt gear and tension mechanism. Remove the key from the slot in the crankshaft, then unscrew the lower inner drive belt cover from the cylinder block. 2. Unscrew the bolts securing the oil seal casing to the pan. 3. Remove the mounting bolts and carefully separate the oil seal housing, noting the locating pins near the two lower bolt holes. If the pan gasket is damaged (F3R engines), the pan must be removed and the gasket replaced. On engines without an intermediate shaft, note the presence of an oil pump drive chain guide and two locating pins. Check that the guide is fit for further use and replace it if in doubt about its condition. On late model F3R 750 and F3R 751 engines, also note the presence of a separate spacer at the end of the crankshaft. 4. The oil seal should be replaced each time the casing is removed. Note the location of the old oil seal, then use a screwdriver to remove it and wipe off the bearing surface. Lubricate the outer edge of the new oil seal and insert it into the housing with the closed side facing out. Place the casing on a block of wood, then use a socket or metal pipe to drive the seal into place. 5. When installing, clean the mating surfaces of the casing, pan and block from sealant. Make sure the chain guide (where applicable) is installed correctly and the locating pins are in place in the housing.| 6. Apply a bead of sealant with a diameter of 0.6 - 1.0 mm (Renault recommends CAF 4/60 THIXO or Rhodorseal 5661) to the surface of the housing gasket, around the inner edges of the bolt holes, and also to the threads of the two bolts (closest to the oil seal). Make sure that the sealant plugs the lubrication channel at the upper end of the housing (refer to the accompanying illustration). Install the casing onto the cylinder block into the pan, tightening the bolts evenly. |
7. Install a separate spacer (where applicable) as described in paragraph 4 (BELT SIDE SEAL)
higher.
On all engines, install the key into the slot in the crankshaft, then install the lower inner drive belt cover and tighten the mounting bolts securely. 8. Install the crankshaft and countershaft gears or idler pulley. Then install a new toothed drive belt, refer to Sections Removing, inspecting and installing the toothed drive belt gear and tension mechanism and Removing, inspecting and installing the toothed drive belt .
Replacing the rear
A characteristic sign of the need to replace the rear oil seal located on the crankshaft of a Niva Chevrolet car is oil leakage, as happened in the previous case. But in this case, oil gets on the clutch discs, which can cause the unit to slip, and therefore contribute to an emergency situation on the road. In addition, lubricant leaks into the joint between the engine block and the gearbox.
Replacing the rear crankshaft oil seal, by analogy with the front part, is carried out after the crankcase ventilation system has been checked. Carrying out repair work requires the use of special tools:
- Socket wrench
- Head for socket wrench 10
- Flat screwdriver
- Hammer
- Torque wrench
- Crankshaft rear cover oil seal
- Sealant
And the vehicle must be placed on the inspection hole. Actions to replace this part are carried out in compliance with a number of sequential operations:
- Removing the gearbox
- The cardan is removed
- The clutch is dismantled
- Remove flywheel
The flywheel mounted on the engine is removed. Then two nuts are unscrewed, with the help of which the front cover of the clutch housing is attached. Once this operation is completed, the cover can be removed.
The technical condition of the oil seal is studied, and if it is faulty, then you can immediately notice a trace of leaking oil.
At the same time, you need to check the condition of the bearing.
Using a small flat screwdriver, pry up and remove the faulty gasket from the seat.
The seat is thoroughly wiped with a clean cloth.
A new copy is lubricated with engine oil.
After lubrication, it is put on the holder, but you need to pay attention that this part is located inside the motor with the working edge. Then the edge of the product can be tucked onto the crankshaft journal, which is installed in place of the unit that has become unusable.
Using a mandrel that matches the diameter, the new part is completely pressed onto the holder.
Following the above rules will allow you to replace the crankshaft oil seal (both front and rear) properly, and thereby prevent engine oil leakage.
Front Crankshaft Seal Replacement Guide
A sign that the front crankshaft oil seal needs to be replaced is oil leaking through its lip. In this case, oil is sprayed out by the rotating crankshaft pulley, as a result of which the entire front part of the engine and engine compartment becomes oily.
Read more: HBO will 4 generations reviews
HELPFUL ADVICE Before replacing the crankshaft front oil seal if a leak occurs, check the cleanliness of the engine crankcase ventilation system (see “Cleaning the crankcase ventilation system”), since if it is clogged, the increased gas pressure in the crankcase causes a leak even with a working seal.
You will need: 10mm wrenches, a special wrench for the crankshaft pulley nut, a screwdriver, a mounting blade, a hammer, and a bit.
Remove the oil sump protection and the engine compartment mudguard (see “Removing and installing the oil sump protection and the engine mudguard”).
With the generator located at the bottom: Remove the power steering pump drive belt (see “Checking the tension and adjusting the power steering pump drive belt”). Loosen the nut securing the generator to the tension bar and, moving the generator towards the engine, remove its drive belt.
Having engaged the fifth gear in the gearbox and braking the car with the parking brake, use the 38 socket to unscrew the nut securing the crankshaft pulley.
On a car with air conditioning, unscrew the nut securing the drive pulleys of the air conditioning compressor and auxiliary units.
... without air conditioning
...with air conditioning
HELPFUL ADVICE If the nut is tightened too tightly, use a pipe of a suitable diameter as a wrench extension or loosen the nut by hitting the wrench handle with a hammer.
... without air conditioning
...with air conditioning
Using a screwdriver, remove the oil seal.
Lubricate the new oil seal with engine oil and install it into the timing cover, oriented with the working edge towards the inside of the engine.
NOTE The working edge is distinguished by the presence of a spring.
Press the oil seal into the cover using the old oil seal as a mandrel or with a socket of a suitable size.
Reinstall the removed parts and adjust the tension of the power steering pump and generator drive belts (see “Checking the tension and adjusting the power steering pump drive belt” and “4.24.2 Adjusting the tension and replacing the water pump and generator drive belt”).
How to Remove the Crankshaft Pulley on a Chevrolet Niva
Crankshaft for Chevrolet Niva
The design of every car has a crankshaft, which is actually the main part of a gasoline engine and more. The Chevrolet Niva Jeep also has this part that will actually be in question. Let's see what this element is for its intended purpose, as well as the design features and replacement of this part. In general, you will need the VAZ-2123 Niva Chevrolet crossover.
Product purpose and design
The crankshaft, in addition to its own importance and the primacy of all parts, is determined by the price, which sometimes reaches up to 10,000 rubles. The main purpose of this engine element. convert reciprocating movements into torque. The main force that causes the crankshaft to rotate is pressure. More precisely, this is the pressure created by the combustion of fuel in the cylinders. The internal combustion engine creates a mechanical force acting on the pistons. The piston, in turn, is connected to the crankshaft, which drives them. Because of this, torque is created, which is ultimately transmitted to the drive wheels of the Chevrolet Niva.
The crankshaft structure is an integral element, which is made using cast iron or forged steel.
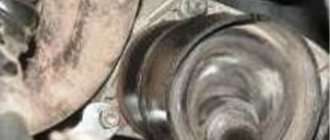
The photo below shows the crankshaft of a Chevrolet Niva jeep removed from the engine.
There are two types of crankshafts: composite and solid, but the Chevrolet Niva has an exceptionally durable element. The main structural elements of the Chevrolet Niva crankshaft are:
- Front end of the shaft (right side in the photo);
- Main and connecting rods;
- Against weight;
- Tail or spin
First, a flywheel is placed on the shaft, through which torque is transmitted from the shaft to the box. You can also find drive camshaft and drive pulley accessories.
The drive pulley is connected to the front end of the crankshaft. All parts connected at the front are bolted. When installing a product into bearings, there should always be space on the front panel for a device that supplies oil to the product itself. Root collars serve to block the product from axial movement. On the flywheel side there are thrust bearings. The main journals are lubricated with oil supplied from a common line. The scales are designed to ensure unloading of the main bearings by centrifugal forces. By design, the crankshaft journals have the smallest diameter if they are radical. Oil is supplied to them through the main throat through holes in the shaft.
The flywheel is mounted on the tail to provide torque transmission. It is secured with bolts, and the holes for its fastening are located asymmetrically, which allows you to install the element in the correct position.
READ How to Remove Ford Focus Rear Drum
Pulley and its purpose
The crankshaft pulley is a rounded disc with teeth, the means of which are carried by a belt drive to the hub units of the car. The pulley is designed for the following operations:
- reduction in crankshaft amplitude;
- rotation of devices involved in engine operation: power steering, pump, etc.;
- reduction of engine noise.
In addition, due to the presence of teeth, the pulley transmits impulses to the computer, which means that the number of revolutions of the crankshaft is calculated. The pulley is also made of high-strength metal steel. On the outside, the pulley has one feature: the presence of grooves. These grooves are designed to secure the belt to the pulley in a stationary position for movement. There are also several holes in the pulley that many people don't think about. These holes are used to cool the drive belt during operation.
With use, even a part such as a pulley can wear out and become unusable. If the pulley has a malfunction, this will affect other parts. To protect yourself from more serious damage, you should remove and replace the pulley.
The pulley is removed in the following order:
- The right front end is on a jack and the wheel is removed.
- The air filter has been removed.
- Now you need to remove the dirty engine compartment cover.
- Next, remove the alternator belt.
- At this point, the flywheel should be locked to prevent it from rotating by unscrewing the pulley bolt. The flywheel gets jammed when a screwdriver is inserted into it.
- Use a number 17 wrench to unscrew the crankshaft pulley and remove it. After disassembly, the product is replaced. Installation is carried out in the reverse order of removal.
Part 2. Piston valve = repair Niva Chevrolet NIVA Chevrolet 44
Complete engine repair Chevrolet NIVA
.
Cool project. What are crankshaft pulley nuts and the pulleys themselves?
We look at old and new designs of nuts, as well as custom ones.
The photo shows what a crankshaft pulley is. Chevrolet Niva car.
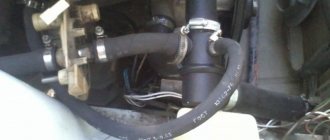
Crankshaft position sensor
It is worth noting that the design of the car has a crankshaft position sensor, with the help of which the electronic unit is synchronized with the position of the shaft. The position sensor is located directly on the timing cover, next to the main disc. This disc has a 58 tooth wheel design. Two teeth are removed to provide a suitable impulse between the ECU and TDC (top dead center).
If the crankshaft rotates, the main disk will rotate accordingly. As the disk rotates, it causes the sensor's magnetic field to change, simultaneously generating alternating current pulses. These pulses determine the position of the ECU shaft.
READ Replacement Steering Gearbox Niva 21213
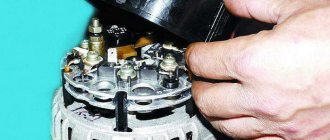
Often the position sensor fails, which makes it impossible to start the engine or stop the car while driving. The position sensor is explained by the timing of the fuel supply along with the ignition timing. The position sensor will fail if you notice a sharp decrease in dynamics when driving the Chevrolet Niva. At the same time, the Check Engine light often comes on. You can also judge the sensor from the pulley and alternator.
The position sensor is first checked and the reason for checking it is to minimize resource consumption. The diagnostic will actually show whether the sensor is working or not. Diagnostics involves disassembling the product and then inspecting it. The sensor is considered to be working if, when connecting an ohmmeter, the latter shows the limit value of 550-750 Ohms.
Crankshaft seals and their replacement
The crankshaft design has special rubber seals that are actually designed to maintain the amount of oil in the engine. At the base of the crankshaft there are two oil seals: rear and front, with corresponding seats. Thus, seals wear out parts that lose their properties when they fail. If there is oil leakage in the flywheel and pulley area, you need to check the front and rear crankshaft oil seals. If a malfunction is detected, they must be replaced in the following order:
Replacing the front crankshaft seal:
- The engine protection and dirt protection have been removed.
- The hydraulic pump drive belt has been removed.
- The generator mounting nut must be unscrewed and located on the left.
- The nut securing the crankshaft pulleys is unscrewed with a wrench. They have been deleted.
- All that remains is to remove the old oil seal with a sharp screwdriver. After removing the front oil seal, clean the seat and treat it with engine oil.
- Now you can replace the new cuff and press it.
Replacing the rear oil seal (it should be noted right away that there is more work here):
- The gearbox has been removed.
- The clutch basket has been removed.
- You will also need to remove the flywheel and then remove the two nuts that secure the crankcase cover. Unscrew the nuts and remove the cover.
- Using a screwdriver, the rear oil seal is pressed out and removed.
- The path has been cleared. Before installation, lubricate the oil seal and hold it in place.
The remaining parts are installed in the reverse order of removal.
Camshaft and crankshaft brands
The compatibility of the crankshaft and camshaft marks allows the valves to be adjusted. Labels must be installed in such a way that during repair work the installation of gas distribution phases is not disturbed. If these phases are disturbed, the engine may not operate properly. The marks on the camshaft sprocket should be set to TDC. Make sure that the marks on the crankshaft pulley and the cover match. If they do not match, it indicates a broken valve. This means that the piston in the fourth cylinder has not reached the TDC position. In this case you should:
- Remove the camshaft sprocket from the sprocket;
- Rotate the shaft until the marks are aligned.
- In this case, rotate the crankshaft to bring the piston to TDC.
READ Which Shock Absorbers to Put on a Chevrolet Niva
To remove it, you must: use a special key that will help in this case. This wrench is used to rotate the pulley nut shaft or the top of the engine compartment. After this, place the gear shift lever in fourth gear and roll the car until the camshaft sprocket mark increases with the risk of the hood popping. bearing housings.
There is another way: engage fourth gear and one of the rear wheels. The wheel is then rotated until the camshaft marks line up.
In the photo below you can see more clearly what the camshaft and crankshaft mean:
Marks on the pulley cover and crankshaft of a Chevrolet Niva car. a) mark on the camshaft sprocket; b) danger to the bearing housing.
Based on the above, it is worth noting that the crankshaft is a fairly important part of the car. Its service life depends on many factors, but periodic and timely replacement of engine oil is considered necessary. If the oil thickens or contains small metal particles, it will seize the crankshaft. To avoid this, you need to monitor the condition of the crankshaft.
Are you still having trouble diagnosing your car?
If you're reading this, then you're interested in doing something yourself in the machine and actually saving it , because you already know this:
- WTO spends a lot of money on simple computer diagnostics
- Contact an expert to find out the error
- Simple keys work in the services, but you can’t find a good specialist
And of course, you are tired of spending money and you don't need to talk about hundreds, then you need a simple ELM327 auto picker that connects to any car and you will always find a problem with your regular smartphone. CHECK and save a lot of money.
We tested this scanner on different machines and it showed excellent results. Now we recommend it to everyone! To avoid being caught by a Chinese counterfeit, we publish here a link to the official Autoscanner website.