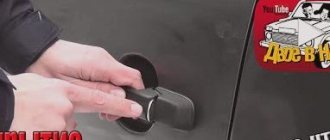
When performing an operation to restore the body, including on a Niva 212 car, the question arises: “how can you pull out the spar?” Is there a need to seek help from service station specialists, or is this “technical treatment” possible at home? Read about this below. But, initially, you should decide and remember what a reinforcing part is, what breakdowns may precede repair.
Common breakdowns
Before considering the question of how to extend the spar on the Niva 212, let's look at the most common part failures:
- Cracks may appear on the spar over time.
- A structural element of the car becomes rusty.
- In the event of a car collision (accident), a complete rupture of the element is possible.
Minor damage can be repaired using a welding machine. If the part bursts, a partial or complete replacement will be needed.
If you are not a specialist or are not confident in your abilities, you need to contact a service station who can restore the structure using special tools.
Many drivers prefer to restore the element themselves. At the same time, they save money and receive moral satisfaction from the work process.
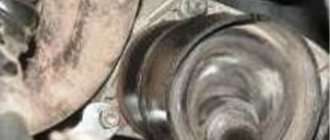
What is a spar
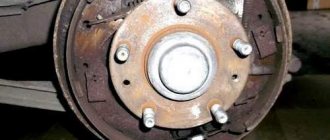
This part is a body element that is needed to strengthen the car body. Suspension elements are attached to it. The spars are located on the sides of the car. These parts account for the lion's share of the body load.
The most common failures of these parts are:
- formation of cracks;
- the appearance of rust;
- complete rupture of the element.
Repair of minor damage is carried out using a welding machine, but if the spar bursts, then its complete or partial replacement is necessary. This part is of great importance for the entire structure of the car, so it is better to entrust its repair to qualified car service employees. Domestic roads leave much to be desired and the side members on the Niva are subject to significant loads, so you should also think about strengthening these elements.
How can you pull out a spar?
Let's find out how to pull out an element at home and what tools are needed for this. In addition, a positive result is associated with the skills of this type of work. Before pulling out the front spar, prepare the tools:
- angle grinder;
- welding machine;
- gas burner;
- stand with grips;
- hammer;
- Tape with a hermetic base;
- Indicators of car body repair parameters.
First of all, you need to free access to the structure. You will need to remove all obstructing body parts, and carry out the extraction carefully so as not to damage the electrical wiring. If it interferes, it should be disconnected.
Next, using the stand mounts, the element needs to be given its initial parameters.
Note!
This process takes a lot of time and requires a lot of effort.
After achieving the desired result, the protruding edges are removed. The process is carried out using a grinder, and the old coating (paint) can be removed without visible effort with the flame of a gas burner.
On a note.
To determine whether the work was carried out correctly, experts advise using the repair table.
Using colored marks you need to mark all control points. Particular attention should be paid to the parallelism of the wheel arches directly with the side members. When the desired parameters have been achieved, you can begin painting. Answering the question “how to stretch the rear spar”, we inform you: the work is carried out by analogy with stretching the front structure. To fully understand the workflow, we recommend watching the video:
Changing the rear spar on Niva
Replacing the rear spar on a Niva is necessary if damage of varying severity is detected, as well as after emergency situations in which the rear parts of the car were damaged. It is, of course, possible to repair and strengthen the old element, but do not forget about the aging of the metal, as a result of which the performance characteristics of the entire car are significantly reduced.
Repairing or strengthening these parts is much more difficult than in the case of the front side members, so it is better to carry it out at a car service center if you are not confident in your own abilities.
- As in the previous case, first you need to study the drawing in order to understand where the parts that interest us are located. After this, you need to lift the rear of the car with jacks and install reliable supports.
It is important to know! When installing supports, you need to take into account the location of the parts that need to be dismantled.
- Now we need to correct the proportions of the car body. To carry out this operation, you should install hydraulic struts under the bottom of the Niva car and install a spacer from the roof. After this, you need to eliminate the deformation of the damaged elements.
- Then you need to remove the wings
- After this, you need to dismantle all parts of the rear suspension on the Niva.
- After dismantling the parts, you need to thoroughly clean the material from dirt and rust.
- The damaged spar should be removed in exactly this way: holes should be drilled along the welding line, areas that could not be treated with a drill should be cut off with a grinder, and all remaining parts should be removed with a chisel. Replacement of the old part occurs only after correcting the deformations of the body and clearing the space for installing a new element.
- Now you should try on the new element in relation to the body of the Niva car and cut off the excess length. Then you need to make three holes in it in the area where the weld will pass, and install the part in place. Now you need to grab it in three prepared places. Then you need to attach metal plates to both sides of the seam to provide reinforcement and prevent the new spar from bursting on the first ride. Only after all these operations can the spar be finally welded.
- Welds should be sanded and coated with epoxy resin.
- Each part must be coated with several layers of primer.
- The last step is to assemble all the suspension elements in reverse order and remove the Niva from the jacks.
After this, the replacement of the side members is completed. If you decide to repair and strengthen a spar that has burst on a Niva yourself, you will need to study the training materials on welding, as well as a drawing of a Niva car.
Features of replacing the rear spar
If the rear structure is replaced, you will need to drive the car onto an overpass or inspection hole. A common car jack is used, but rarely.
At the initial stage, all parts that are present on the spar are removed. Next, a pull-up is performed. It is necessary to give the structure its original shape or get as close to it as possible. The protection is removed, and then the element itself is cut off from the retaining fasteners.
Recommendation.
To perform this operation it is necessary to use special cutting cutters.
Having removed the reinforcing element, you should prepare it: clean it with a grinder. You will need to remove scale and treat areas where corrosion has appeared.
Having successfully completed this task, you can begin preparing the wheel arch. The structure is mounted in the reverse order and is accompanied by welding work. Then you need to check everything carefully. This involves using the point method. Ideally, you need to clean everything with a grinder and cover the treated area with a special sealant.
Replacing the front spar
The main reasons for component failure:
- poor quality of road surface;
- poor quality reinforcement of parts;
- high-speed driving on poor surfaces;
- loose steering and suspension mounts.
Algorithm of actions:
- Before you begin this operation, you must carefully study the drawing. This is necessary for correct replacement of the part and compliance with the geometry of the structure. The drawing is supplied with each car. So, let's get down to action.
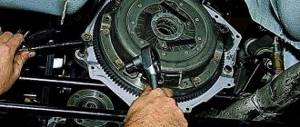
- The first step is to dismantle the door using an impact screwdriver, and then remove the floor mats and sound insulation in the cabin.
- Now you need to remove the wing and secure the front of the car to prevent it from falling. The front axle beam also needs to be fixed. In most cases, it is better to replace the wing with a new one in order to carry out high-quality reinforcement of the spars. Old parts are often corroded.
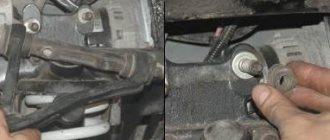
- Then loosen the springs and remove the three bolts from the upper support. After this, you should remove the upper arm.
It is important to know! Sometimes it happens that the mounting bolts become jammed and cannot be removed. In such a situation, you need to cut them off with a grinder.
- Then you need to remove the brace that attaches the beam and spar. After this, you should cut off the engine mudguard with a grinder.
- The next step is to divide the part into two parts and separate it from the body. The spar needs to be cut behind the beam.
- After dismantling the old element, it is necessary to thoroughly clean the fastening points from rust and dirt and install the new part. All mounting bolts must be tightened tightly.
- Now you need to weld the entire lower part and the engine mudguard.
- After this, it is necessary to assemble all the suspension elements in the reverse order according to the drawing diagram.
- The final stage will be the installation of the door and wing.
Front side members 2121 Niva
Replacing the front side member yourself is a rather labor-intensive process that requires qualifications and experience. But if you carry out the repairs yourself, you can significantly save on car service costs. The main thing is to strictly follow the instructions and do not forget about the drawing.
Strengthening the front side members on the Niva
Before welding the repair kit, it is necessary to inspect the fastenings of the beam on which the engine is mounted. It often happens that the nuts that secure the engine mounts are torn out of their seats. In this case, you need to separately hang the engine on a jack and remove the rubber cushions on which it is mounted.
Then you need to cut out a window in the spar with a grinding machine, which will provide access to the nuts. Then the nuts are fixed by welding, the window is closed, and it is also welded.
This must be done before the reinforcement plates are welded, because they will block access to these nuts, which will greatly complicate the repair.
There are two options for strengthening the side members on the Niva 2121:
- Make a plate that follows the shape of the outer part of the spar.
To do this, take a sheet of metal with a thickness of 2 to 4 mm. You can use a sheet of greater thickness, but in this case it will be difficult to fit it to the spar profile. In order to cut it correctly, you first need to make a pattern from thick cardboard. A sheet of cardboard is applied to the spar, and the boundaries of the future part are outlined. All holes are also marked along the way. After the pattern is ready, it is placed on a steel sheet and outlined with a marker. The part is cut out with a grinding machine. After this, you need to drill holes in increments of about 5 cm. They will act as electric rivets, that is, through them the part will be welded to the body.
- Purchase a ready-made kit to strengthen the side members for the Niva.
They are already fully prepared for welding and do not require any modification. These spare parts differ in the different thickness of the metal from which they are made. The price for these amplifiers is about 3 thousand rubles.
Method of strengthening spars
Overlays for strengthening the side members
The main way to strengthen the front side members on a Niva 2121 car is to install a ready-made set of linings. Those available for sale cost between 3000-4000 rubles, they look like semi-handicraft production. Here we simply reproduced a drawing of a part that is freely available. Agree that it’s impossible to think of anything more sophisticated in appearance and price for a budget car for off-road driving. The kit includes a reinforcement in the form of steel sheets (3 mm thick) and shock absorbers for brackets (4 mm thick). If you have excess free time, but no money, then you can make the overlay yourself; the drawing of the Niva 2121 spar overlay for KOMPAS can be freely downloaded on the Internet. But it is better to “cut out” the part based on a cardboard pattern, which can be made based on the existing spar. Then, using a 3mm thick steel sheet, the part is cut out with a grinder. Since you will still need access to them, we present an algorithm for dismantling the surrounding units of the Niva 2121.
Technological features of strengthening Niva side members
Most often, the appearance of cracks, tears or rust on the side members is a consequence of a vehicle accident. However, such defects can occur due to the significant age of the car and wear of parts. Minor cracks and damage to body parts are most often repaired by welding the damaged areas. However, if the product bursts, then its complete replacement is necessary, since it is the main link to which the suspension elements are attached. Most often, when parts are replaced, the side members on the Niva-2121 are also strengthened in parallel to increase their service life and resistance to loads under aggressive operation.
To strengthen an element of the Niva’s body, ready-made linings are most often purchased, or reinforcing parts are made independently by the owners of the car according to drawings. They can be found on the Internet, however, if you have all the technical documentation for the car, then the drawing can be found in the documentation set.
Preparatory stage for the modernization of the Niva's front side members
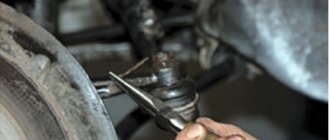
Work on strengthening the Niva's side members must begin by studying the current situation. To do this, you need to open access to the body element. The car must be driven into a pit or overpass, the wheel and caliper must be removed and the ball nut must be unscrewed. It takes longer to disassemble the front suspension components, remove the shock absorbers and the upper arm. After this, you need to unscrew the brace that secures the beam and spar, and the shock absorber house is dismantled.
All elements are cleaned with a grinder to remove rust and deteriorated metal. This procedure is labor-intensive, however, proper cleaning subsequently guarantees high quality welding work. The next step will be the manufacture of a lining to strengthen the body element.