Reasons for accelerated wear
The oil seal is a rubber lining that works when the car is moving. Accelerated wear of a part is observed when :
- adding aggressive additives to transmission oil;
- improper tightening of the nut that secures the cardan flange - with play or increased friction, the process of oil seal wear accelerates;
- clogged gearbox breather - air pressure leads to oil entering the cuff, which provokes the cracking of the internal stiffener.
- using an insufficient amount of lubricant of poor quality - this leads to overheating of the gearbox;
- chemical reagents from the road getting into the oil seal rubber.
in the form of a piece of a retaining ring, a splinter of a gear tooth, or sand gets into the space between the shaft and the oil seal
What tools are needed to replace the oil seal?
To replace the oil seal yourself, you will need:
- pliers;
- hammer;
- large flat screwdriver;
- a powerful wrench for unscrewing and tightening the nut on the shank;
- standard set of wrenches;
- puller;
- torque wrench;
- a universal wrench or tool that secures the shank flange;
- dynamometer;
- durable elastic cord.
The oil seal cannot be replaced without the part itself, which must first be purchased. The key that holds the shank flange can be replaced with a homemade device. These are two M8 bolts and a knob that securely hold the part and eliminate the possibility of it turning. Bolts are inserted into the flange holes, and a knob is placed between them.
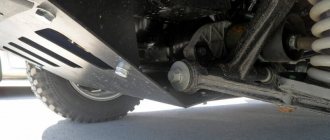
Replacing the axle shaft seal of the rear axle Niva 21213
Removing the axle shaft and replacing the oil seal
We hang and remove the rear wheel. Remove the rear brake pads (see Replacing the rear brake pads).
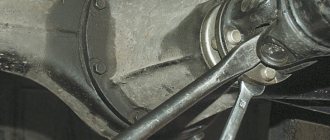
Using a 17mm spanner, unscrew the four nuts on the bolts securing the axle shaft to the beam flange.
Use a slotted screwdriver to bend the locking plates of the axle shaft mounting bolts...
...and remove the bolts.
We fix the wheel with the reverse side on the axle shaft by tightening three nuts several turns.
Holding the wheel, we move it with a jerk...
...and remove the axle shaft assembly with the bearing mounting plate, bearing and locking ring.
We take out the rubber sealing ring of the beam flange.
We insert two bolts into the holes of the brake shield and the rear axle beam so that the shield does not hang on the brake pipe.
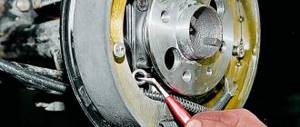
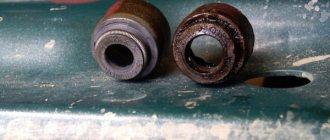
We pry off the oil seal using sliding pliers...
Using a tool head of a suitable size with an extension (or a piece of pipe), we press in a new oil seal.
If the axle shaft is deformed, its splines are worn out, or the bearing is worn out, we replace the axle shaft with a new one complete with bearing and locking ring (it is not recommended to replace the bearing or locking ring yourself). Install the axle shaft in reverse order.
Check the oil level in the rear axle and add if necessary.
Preparing to replace the oil seal
Before carrying out work, the technician is recommended to wear gloves that protect his hands from injury from accidental impacts. To ensure correct and convenient replacement of the oil seal, it is recommended to install the vehicle on an inspection hole . If this is not possible, a lift is used. Its height should be sufficient when supporting the rear axle after removing the wheel and unscrewing the shock absorber. Otherwise, oil will leak from it.
Installing a New Seal
After removing the axle shaft, the metal shield where the brake pads are attached will remain hanging on the copper pipe with the fluid, so it should be fixed by inserting the 2 upper bolts back into the holes. Then follow the instructions:
- Remove the thick rubber gasket from the rear axle flange.
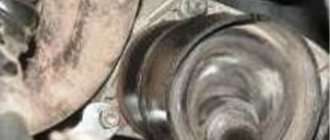
- Pull out the old oil seal by prying it with a screwdriver or pliers. Clean the seat and wipe with a rag.
- Lightly lubricate the new seal with transmission oil and insert it into the socket of the Niva rear axle as evenly as possible.
- Using a round pipe adapter, press the oil seal into the socket with light blows of a hammer. You can use an old seal as an additional attachment.
At the end of the procedure, you must thoroughly wipe all parts free of oil - the brake cylinder, pads, drum and metal shield. Before reassembling, it would be a good idea to check the axle bearing for wear and grease. Wear is indicated by difficulty turning, binding, or slight noise. If you discover a malfunction, take the axle shaft to the nearest car service center; you will not be able to replace the bearing without special equipment.
To check the grease inside the bearing, you need to pry the plastic covering the rollers with an awl and remove it. Then add thick Litol-type lubricant inside and put the plastic in place, and then begin assembly.
At the end, it is important to check the oil level in the rear axle gearbox of the Chevrolet Niva. The test is carried out on a fully assembled car, standing on a level area. The filler plug is unscrewed from the gearbox housing, after which the oil level is determined visually or using a thin wooden stick.
Step-by-step instructions for DIY replacement
After installing the vehicle on the inspection hole, it is secured using anti-recoil devices. It is recommended to disable the handbrake first. To remove the old seal, you must first disassemble the rear hub assembly and remove the axle shaft.
The unit must be disassembled in strict accordance with the instructions:
- The wheel nuts are loosening. After this, jack up the car and remove the wheel.
- There may be rust on the rear axle shoulder that extends past the brake drum that needs to be removed. The part is additionally treated with lubricant.
- There are two fastening bolts on the drum, to unscrew them you will need a 12 mm wrench. The drum is gently tapped with a hammer, which allows it to move.
- You can use 2 methods to remove the drum. It is squeezed out using bolts that are provided for fastening. The drum is knocked down with a hammer. The procedure is performed as carefully as possible to avoid damage to the edges.
- The axle shaft seat is cleaned, which will ensure easy removal of the drum in the future.
The next step is to remove the axle shaft . The Chevrolet Niva has 4 bolts designed to secure the axle. The shock absorber is held in place by a bracket located on the other side of the axle shaft. Once all the bolts are removed, the shock absorber will not hold the rear axle, which is pushed down by the spring.
If oil leaks, you need to jack up the vehicle higher and place a container to collect the fluid under the work area. If the rear axle stocking rests in an inclined position in the other direction, this will eliminate the oil leak.
Removing and replacing the axle shaft seal of the rear axle Niva Chevrolet
Sometimes, it may be necessary to replace the rear axle axle oil seal on a Chevrolet Niva. Such work may be required at any time. Unfortunately, this model has its own problems. Rear axle oil seal leakage is one of these problems. In itself, such a replacement is not difficult. This does not require any special skills. Even a novice driver can cope with such work. Timely replacement will avoid problems with the differential and other axle parts. Therefore, repairs should not be put on the back burner. For greater safety, you should regularly monitor the condition of this element of the car.
Replacing the rear axle axle seal on a Chevrolet Niva
occurs when there is visible transmission fluid leaking from the axle. To do this, after parking, pay attention to the condition of the car’s drums. If there are problems with the seals, small leaks will be noticeable on the wheels. If it is not brake fluid, then most likely the problem is in the oil seal and should be replaced. A transmission fluid leak will cause serious problems with axle components.
Replacing the oil seal
To carry out the work you will need a regular set of tools. The only special tool you will need is a puller for the axle shaft, but if you don’t have one, you can do without it.
Before carrying out work, ensure that the machine is as motionless as possible. To do this, wheel chocks are installed under the front wheels. First gear is engaged. The work is carried out in the following order:
- The wheel fastening becomes loose. The car is raised on a jack. The wheel is completely removed. Supports are placed under the thresholds in case of problems with the jack; ordinary blocks or several wheels folded in a stack will do;
- Before removing the brake drum, make sure the wheel is completely released. In this case, the handbrake lever must be lowered, the wheel rotates freely;
- The decorative cap is removed. To do this, disconnect it by prying up the fasteners with a screwdriver;
- The gap between the flange and the drum is moistened with penetrating lubricant (liquid wrench, WD-40);
- The brake drum is secured with two screws, they must be unscrewed. For this you will need a key “12”;
- Gently tap the drum with a hammer so you can move it relative to the axle shaft;
- In some cases, the drum can be removed quite easily. But sometimes you have to shoot him down. To do this, it is necessary to strike the rim of the drum with a hammer from the back side. Just do this through a block, otherwise you can damage the drum;
- The screws holding the axle shaft and the drum casing are unscrewed;
- The bridge rises slightly;
- The shock absorber bracket should be removed from the axle bearing plate;
- The axle shaft is removed; for this you will need a special puller. If it is not there, then you can do without it. To do this, put the wheel on the axle shaft. Screw on 3 nuts, but so that there is free space between them. We press the wheel against the axle and pull it harder towards us. After several passes, seasoned with strong words, the axle shaft should move. All that remains is to extract it;
- Now you can change the oil seal. Remove it using a screwdriver. Just pry the oil seal in a convenient place and pull it out;
- To install, the new oil seal is pressed back in, and the removed part is used as a mandrel.
We recommend: How and where to fill the brake fluid
Reassembly is in progress. All dismantled parts are installed in place.
Useful tips
Many drivers combine oil seal replacement and transmission oil change. If you decide to do the same, then it makes sense to find out what type of lubricant is used in your case. It is not recommended to mix different types of oils. This will lead to performance problems. If it is necessary to change the type of lubricant, it is recommended to first flush the system.
When removing the axle shaft, oil will begin to flow out. Therefore, it is better to drain it in advance. If you do not want to change the lubricant, then you need to take measures against its leakage. To do this, simply raise the side of the car from which you are changing the oil seal higher. This way you will avoid lubricant leakage. But, in any case, there is a risk of lubricant leakage. Be sure to add a new portion of oil after all work has been completed.
When reinstalling the brake drum, pay attention to its condition. Often there is a development along the shoulder. It should be removed using a regular file. This simple action will significantly improve braking.
In some cases, oil seal wear can be caused by a bent axle shaft. In this case, knocking noises will be heard when moving, and the oil seal will be worn out on only one side. In many cases, you can even visually determine the damage. Such a defect can only be corrected in a workshop on a special stand. If this is not possible, then you will have to buy a new part.
The rear axle on this model is quite weak. Problems with it arise quite often. That is why, replacing the rear axle axle seal on a Chevrolet Niva is familiar to almost all owners of this car. This work is not difficult. If you have even average repair skills, you will only need half an hour on one side. The most important thing is to do the work carefully. It is especially important to ensure that dirt does not get inside the bridge. Even the smallest particle of sand can cause problems with the operation of this part of the machine.