Internal combustion engines are far from perfect, so most of the energy consumed during the operation of such units is released in the form of heat. In the winter season, this “by-product” can be successfully used to maintain optimal air temperature in the cabin, but in the summer this is not necessary, so antifreeze can boil even after a short period of operation of the internal combustion engine. When the coolant heats up to a certain value, the fan automatically turns on and the coolant temperature returns to normal. The VAZ 2110 fan switch-on sensor, with the help of which the forced cooling of the internal combustion engine is timely activated, will be discussed in this article.
Design and principle of operation
The VAZ 2110 fan sensor, both 8 and 16 valves, consists of a sealed housing, inside of which there is a bimetallic plate and electrical contacts. A feature of the working element is the possibility of significant physical expansion when heated. When the temperature changes significantly upward, the plate expands and the thermal relay contacts close.
On the outside of the housing, a thread is cut, which is necessary for reliable fixation of the sensor in the cooling system of the internal combustion engine. On the opposite side of the sensor, terminals are installed that are necessary for connecting the contact wires.
When does the fan turn on on a VAZ 21126 and how does it affect engine performance?
Since the VAZ 21126 engine differs only slightly from the main VAZ 2110 (21124) engine, their operating temperature conditions are the same, this applies to all 16-valve VAZ engines. Another thing is that the driver in real time can assess the operating temperature conditions only by two indicators, and even then they are not very objective - this is the arrow of the liquid temperature indicator on the instrument panel and the moment the cooling system fan turns on.
Obviously, you can’t tell much by looking at the arrow; its readings are more of a symbolic nature. But the fan on Priora and VAZ 2110 operates at a clearly set coolant temperature. The fact is that the engine control system (ECM) has more accurate temperature data than the driver. These are sensors located in the cylinder block, there are two of them.
One performs a purely decorative function and is responsible for reading the temperature indicator on the tidy. The second one is the main one. Visually, it differs in that two wires are connected to it, rather than one, and it is this wire that reports the actual antifreeze temperature to the ECM. It gives the unit accurate information and sends a command to turn on the fan.
At the same time, the engine temperature drops by an average of 5-7 degrees if the Carlson is turned on at half power, and if with full load, the temperature levels out from 105-107 ˚C to a nominal 96-98 degrees, depending on the speed and temperature outside.
Symptoms of a problem
If the engine boils, and the characteristic hum of the cooling system fan is not heard, then with a high degree of probability one can suspect the presence of a malfunction of the internal combustion engine. The opposite situation, when forced cooling operates as long as the ignition is on, will also indicate a problem with the automation. On a VAZ 2110 injector, a constantly switched on fan sensor may indicate problems with the controller. The control unit could “remember” an error that appeared earlier and, as a result, the electric motor is activated every time it is started.
Periodic turning on and off of the fan when the engine is not yet warmed up is also a sure sign of an imminent failure of the combustion engine.
At what temperature does the VAZ 2114 fan turn on?
Many motorists, while using the VAZ-2114, have encountered the fact that the engine cooling fan is turned on. Not everyone here knows at what temperature it should work. This figure is inextricably linked with the design of the cooling system and the built-in computer.
Engine temperature indicator
Before you start looking specifically at the temperature at which the cooling fan turns off, you need to understand the mechanism of operation. This circulates coolant through the system and transfers heat from the engine to the radiator. This element, in turn, naturally cools the water with the opposite flow of air.
If natural cooling is not enough, the fan is switched off. This happens according to certain criteria.
Before looking at all the reasons and fan temperatures, it is important to remember the design of the cooling system and the circulation of cooling water:
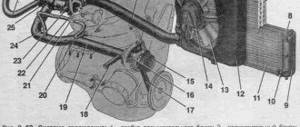
1. element in the form of a plug for the expansion tank; 2. expansion tank; 3. hose for draining water from the pipe; 4. hose passing between the radiator and the expansion tank; 5. hose leading from the radiator; 6. tank to the left of the radiator; 7. duralumin tube; 8. system plugs; 9. tank to the right of the radiator; 10. drain plug; 11. middle of the radiator; 12. housing for electronic fan; 13. plastic wings of the electronic fan; 14. electronic motor; 15. gear pump pulley; 16. pump impeller; 17. camshaft belt drive; 18. engine block; 19. pump pipe; 20. radiator hose with feed function; 21. Heater radiator hose with exhaust function; 22. hose that supplies coolant to the throttle; 23. exhaust pipe; 24. filling hose; 25. Heater radiator hose with supply function; 26. thermostat; 27. water temperature sensor; 28. Water cooling level indicator sensor.
READ Replacing Alternator Bearing Kia Rio 3
In accordance with the International Automobile Convention of December 1, 1992, in which 92 representatives of the automotive industry took part, it was decided to establish a uniform standard for engine operating temperature.
This figure is 90 degrees Celsius with a very tolerance of less than 3 degrees Celsius.
Cooling fan on circuit
But considering the area of work and the ambient temperature, this temperature has the characteristics of increasing. Especially for this, automakers have invented a cooling fan that provides additional water cooling to the system. It is put into operation with a temperature sensor that detects it in the motor and is located specifically on the power section.
According to the decision of the convention and the internal regulations of AvtoVAZ, the maximum values for the temperature of the cooling water are: 85-105 degrees.
Thus, for normal engine operation, the system temperature should not exceed 105 degrees. In particular, this indicator is the starting point for turning on the cooling fan. This data is sent to an electrical control unit, which simply regulates the fan.
The fan switching circuit looks something like this: the engine temperature reaches 105 degrees Celsius, then the sensor sends a signal to the computer, which turns on the fan and stops it when the system temperature reaches 93-99 degrees Celsius.
READ Mazda Cx 5 Which Gasoline to Use
Coolant temperature sensor
In summer and winter, as practice shows, the fan turns off at different temperatures and at different times. In summer, forced cooling will decrease more often as the radiator is cooled by hot air. In winter, the fan is practically switched off or limited for a short time, since natural cooling is sufficient. Therefore, the main failure of the radiator occurs in the warm season.
A simple way to determine a malfunction of the temperature sensor in a VAZ engine
The only aspect of cooling in winter often turns off if the thermostat is faulty (see “Replacing the thermostat on a VAZ-2114”).
It has been established that the normal operating temperature of the cooling water of the VAZ-2114 is 85-105 degrees Celsius.
In this case, the temperature to turn on the cooling fan will be 105 degrees Celsius.
Source
Where is
Drivers who have never encountered a malfunction in forced engine cooling before may not know where the internal combustion engine is located. On a carburetor VAZ 2110, this element of the cooling system is located on the radiator. If the driver finds this part, then he can easily find the fan switch sensor, which is located on the side. A characteristic feature of the product is the electrical wires connected to it. On the injection VAZ 2110, this part can be found on the cylinder block.
The sensor located in this way allows you to respond promptly to changes in coolant temperature. In addition, access to this part is not difficult and you can immediately begin repair or diagnostic measures if there are doubts about its performance.
The design of the cooling system and the principle of turning on the fan
Engine temperature indicator
Before we begin to directly consider the temperature at which the cooling fan turns on, it is worth understanding the operating principle itself. So, coolant circulates through the system and removes heat from the engine to the radiator. This element, in turn, conducts natural cooling of the liquid with a counter flow of air.
If natural cooling is not enough, the fan turns on. This happens under certain conditions.
Before considering all the factors and the temperature at which the fan turns on, it is worth understanding the design of the cooling system and the circulation of coolant:
1 – element in the form of a plug for the expansion tank; 2 – expansion tank; 3 – hose for draining liquid from the pipe; 4 – hose passing between the radiator and the expansion tank; 5 – hose leading from the radiator; 6 – tank to the left of the radiator; 7 – aluminum tube; 8 – plug systems; 9 – tank to the right of the radiator; 10 – drain plug; 11 – middle of the radiator; 12 – casing for electric fan; 13 – plastic wings of the electric fan; 14 – electric motor; 15 – toothed pump pulley; 16 – pump impeller; 17 – camshaft drive belt; 18 – engine block; 19 – pump pipe; 20 – radiator hose with supply function; 21 – heater radiator hose with drain function; 22 – hose supplying coolant to the throttle pipe; 23 – exhaust pipe; 24 – hose for refilling; 25 – heater radiator hose with supply function; 26 – thermostat; 27 – coolant temperature sensor; 28 – coolant level indicator sensor.
What should the engine temperature be?
According to the international automobile convention of December 1, 1992, where 92 representatives of the auto industry gathered, it was decided to establish a single standard for engine operating temperature.
This indicator is 90 degrees Celsius with a maximum permissible deviation of no more than 3 degrees Celsius.
Cooling fan connection diagram
But, given the region of operation and the ambient temperature, this temperature tends to rise. It is for this purpose that automakers came up with a cooling system fan, which provides additional cooling of the fluid in the system. It is driven by a temperature sensor, which detects it in the engine and is located directly on the power unit.
When the fan on the VAZ-2114 turns on
According to the decision of the convention and internal regulatory documents of the AvtoVAZ plant, the limit values for the coolant temperature are 85-105 degrees.
Thus, for normal engine operation, the system temperature should not rise above 105 degrees. This indicator is the starting point for turning on the cooling system fan. This data is stored in an electronic control unit, which regulates the operation of the fan.
The fan switching circuit looks something like this: the engine temperature reaches 105 degrees Celsius, then the sensor sends a signal to the ECU, which turns on the fan and stops it when the temperature in the system reaches 93-99 degrees Celsius.
Cooling temperature sensor
In summer and winter, as practice shows, the fan turns on at different temperatures and for different periods. In summer, forced cooling will turn on more often as the radiator is cooled by the hot air flow. In winter, the fan almost does not turn on or its operation is limited to a short period, since natural cooling is quite sufficient. Therefore, the main radiator breakdowns occur in the warm season.
The only nuance when cooling will often turn on in winter is if the thermostat is faulty (see “replacing the thermostat on a VAZ-2114”).
It was determined that the normal operating temperature of the VAZ-2114 coolant is 85-105 degrees Celsius.
In this case, the temperature at which the cooling fan turns on will be 105 degrees Celsius.
How to replace
The fastest and easiest way to find out the reason for the fan not turning on or running continuously is to replace the DVV with a known good product. To avoid further confusion, it is not recommended to use used products, as well as sensors purchased from unverified retail outlets.
To carry out work on replacing the internal combustion engine, it is necessary to prepare a new part, a set of wrenches, rags and a container for collecting coolant. The process of removing the old part and installing a new sensor is as follows:
- Place the car on a level surface.
- Disconnect the negative terminal of the battery.
- Unscrew the cap of the expansion tank.
- Disconnect the wires from the DVV.
- Place a wide container under the engine to collect coolant.
- Using a 30mm wrench, unscrew the faulty part.
- Install a new DVV.
- Connect wires to the sensor.
- Pour coolant into the expansion tank.
- Close the lid.
- Connect the battery.
After starting the engine, it must be allowed to run for 15–20 minutes. During this time, the coolant temperature will reach a level at which the thermal relay contacts close and the fan will begin to rotate.
Replacement
On an injection engine, which is literally filled with all kinds of sensors, sometimes you need to pay attention to the fan control. If the check shows that the device is faulty, there is nothing left to do but carry out the replacement procedure.
The work requires only a few tools and materials:
- 30 mm socket wrench;
- Container for draining the cooling liquid;
- Dry rags.
Having prepared everything you need, you can start replacing.
The first priority is to let the engine cool. Working on a cold engine is more convenient and safer. If hot coolant comes into contact with your skin, burns will occur.
Dismantling process
- To replace, you do not need an inspection hole or overpass. For such work, these elements are not needed. A simple garage will do.
- Disconnect the negative terminal from the battery.
- Drain all coolant from the radiator. Do not drain the coolant from the cylinder block; this is not necessary.
- Remove the plug from the expansion tank of the cooling system of your injection engine.
- To drain antifreeze or antifreeze, unscrew the drain plug on the radiator. You will find it at the bottom of the radiator, and no tools are required for dismantling. The plug is easily unscrewed by hand.
- Place a pre-prepared container under the drain hole where the coolant will drain. Wait until the fluid flow stops completely.
- If you want to refill the same antifreeze, take a clean container. If the coolant is old enough and needs to be replaced, then the cleanliness of the container does not matter.
- Screw the plug back in.
- Disconnect the contacts from the fan sensor.
- Using a 30 mm wrench, the regulator is unscrewed.
- Twist carefully so as not to damage the plastic radiator container.
- Screw the new regulator in place of the old one. Be sure to insert a copper spacer under the new device.
Copper gasket in place
- Reinstall the fan control wiring.
- Fill the expansion tank with pre-drained antifreeze or antifreeze.
- Purge the system to avoid the formation of air pockets inside the system.
- Replace the negative battery terminal.
- Turn on the power unit and warm it up for a while to make sure the new sensor is working.
- If, when heated to the desired temperature, the sensor does not work again, you should check other elements that may be causing this behavior of the cooling system.
Diagnostics of VDV
If, as a result of replacing the sensor, the functionality of the cooling system is not restored, then the new part may be defective.
To make sure that the DVV is working, you need to perform the following simple steps:
- Remove the sensor from the car.
- Place it in a metal container with water.
- Place the tank on the gas stove.
- Boil.
- Remove the DVV from the container and measure the resistance between the contacts.
You can use an inexpensive multimeter or tester to perform the diagnostic operation. If, as a result of measurements, the presence of insignificant electrical resistance is established, then the sensor is in working order and can be used for its intended purpose. How to check this part is now clear, so if you don’t find an inexpensive used part, you can also install it after a diagnostic operation.
Tips and tricks
During the diagnostic operations and replacement procedure, some difficulties may arise that you should be aware of in advance, for example:
- The sensor may be fully operational and the wiring intact, but the fuse installed in this electrical circuit may fail. It is also recommended to replace this part with a new one in order to exclude it from the list of possible “culprits” for the fact that the VAZ 2110 fan does not turn on.
- You can diagnose the fan switch sensor without a multimeter or tester. It is enough to assemble an elementary circuit with a current source, a light bulb and a series-connected DVR, which will serve as a thermal switch.
The process of replacing the DVV VAZ 2110 is simple, so even if you have no experience in performing such work, you can perfectly perform this operation the first time without outside help.