In order to protect the Priora engine from overheating and boiling during operation, every car enthusiast who values his vehicle must timely replace the coolant - antifreeze.
Most automakers recommend replacing the coolant every 45,000 to 75,000 kilometers traveled by the car. However, car repair specialists recommend not waiting for the indicated number on the speedometer and replacing the antifreeze on the Priora once every 12 months. This approach will avoid the formation of corrosion in the internal part of the radiator.
New, improved coolants will soon go on sale, the service life of which will be 100,000 kilometers, however, when pouring such liquid into the cooling system, it is important to understand: mixing new antifreeze with old is unacceptable.
For the correct and uninterrupted functioning of the car’s cooling system, the additives included in the antifreeze are a fundamentally important factor. As long as they perform their functions properly, there is no need to replace antifreeze. However, the cooling system ceases to cope with its functions as soon as these additives weaken, so replacing antifreeze on Priora should be done in advance.
Establishing the state of the coolant at the current time is not difficult at all. For this, special indicator strips are useful, which can be purchased along with the coolant.
Having the necessary information at his disposal, every car enthusiast can correctly replace antifreeze on a Priora. When preparing to perform such manipulations, it is important to remember that coolant should only be poured into a cold system; there should be no exceptions to this rule.
Replacing antifreeze on Priora video
Antifreeze is replaced in Lada Priora cars every 75,000 km, or after 5 years of operation. It all depends on which limit comes faster. A second replacement is required after 40,000 km, or two years. During maintenance, monitor the color of the coolant. If it changes color to a reddish color, replace the antifreeze, because this indicates a deterioration in the quality of additives and coolant characteristics.
What antifreeze is better to pour into Priora
The car's cooling system requires 7.84 liters of antifreeze, which is worth considering before replacing. For all engines of VAZ cars, including Lada Priora, the use of the following antifreezes is recommended:
- TC-Felix.
- Cool Stream Standard or Premium.
- G-Energy Antefreeze.
- Syntek.
- Antifreeze G-48 and others.
Replacement process
To change antifreeze on a VAZ 2170, prepare the necessary tool - a Phillips screwdriver, the required volume of coolant (buy one 10 liter canister or two 5 liter canisters), a key for “thirteen”, an empty container for draining the old fluid, as well as a clean rag.
Antifreeze drain
Before draining antifreeze from the system, place the car on a lift or inspection hole. Then proceed like this:
- Open the expansion tank.
- Remove the mudguard from the engine. If you don’t want to remove the protection, you don’t have to do this. But in such a situation, it is worth taking a number of actions to avoid drips. If nothing is done, then, during the draining process, the liquid will hit the crankcase protection and splash around.
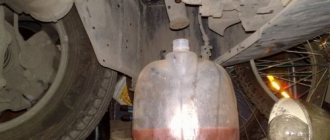
- Place an empty container under the engine in a place where the old antifreeze will approximately drain.
- Open the drain hole on the cylinder block. As soon as the coolant is drained, wipe any marks from the engine surface.
- Place the container under the radiator, then open the drain hole (at the bottom of the radiator).
- Wait until the coolant is completely out of the system.
Remember that the cooling system fluid is extremely toxic. Before draining the antifreeze, prepare a special funnel and use it while draining the coolant from the crankcase and radiator. You can make such a funnel yourself by cutting off the wide part of a plastic bottle.
When removing the plug from the drain hole, be careful. There is a rubber ring installed on it that must be preserved. If there is damage (defects or tears), replace the part.
Filling with new antifreeze
The next stage of replacing antifreeze is filling the cooling system of the Lada Priora. Proceed like this:
- Screw the plug into the radiator and cylinder block.
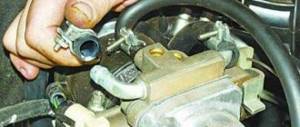
- Loosen the compression of the clamp, then discard the tube to drain the coolant from the throttle heating fitting. This is required so that, during the process of filling the system, foreign air is gradually removed from it. If this work is not done, then there is a high risk of air locks forming, due to which the system itself will not be completely filled.
- Pour coolant into the reservoir until antifreeze runs out of the tube thrown away from the throttle assembly. As soon as this happens, put the hose in place and install the mounting clamp.
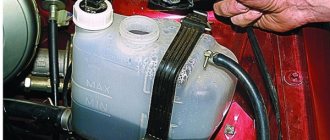
- During the filling process, monitor the volume of coolant in the system. As soon as the working composition reaches the MAX mark (marked on the wall of the expansion tank), stop filling.
Please note that after starting the engine, the antifreeze in the system must release excess air, which will cause the level of the working fluid to drop. At this point, the antifreeze replacement is almost complete. Screw the cap onto the expansion tank tightly. This is important because the coolant is under pressure in the system. If you tighten the cap with little force, a leak may occur.
Now start the engine. Allow it to reach operating temperature until the fan mounted on the radiator activates. As soon as this happens, turn off the engine and check the coolant level again. If necessary, top it up to the required level.
How to remove air from the system
If, after replacing the antifreeze, you notice that the cooling system of the Lada Priora is malfunctioning, the cause may be the presence of an air lock. There are two ways to remove it.
- Option #1. To remove air from the system, loosen the clamp and remove the heating pipe from the throttle assembly. Now unscrew the reservoir cap, cover it with a clean rag and blow into the neck until antifreeze comes out of the discarded tube. As soon as this happens, install the pipe in its original place and tighten the clamp with the required force.
- Option #2. If the option discussed above does not produce results, go another way. Start the engine and let it run to increase the pressure in the cooling system. Now turn off the engine and, without removing the cap from the coolant tank, discard the pipe from the throttle heating. Keep an eye on the tube. As soon as antifreeze begins to come out of it, return the pipe to its place and tighten the hose using a clamp.
When performing the work mentioned, be careful, because the antifreeze in the system may have a high temperature. To avoid the appearance of air locks in the system, during the process of replacing the coolant on the Lada Priora, from time to time, press on the radiator hoses.
If, after replacing the antifreeze, the coolant level constantly decreases, check the condition of the pipes and hose of the cooling system, the quality of their connections, as well as the integrity of the most important components, such as the radiator, reservoir housing and thermostat.
After 5-7 days, check its condition. If the antifreeze has changed color and turned brown, this indicates that a fake has been poured into the system, without corrosion inhibitors. High quality coolant will only darken slightly over time. If you find counterfeit fluid in the cooling system, replace it.
Above we discussed how to drain antifreeze, fill in new coolant and remove plugs from the cooling system in Lada Priora cars. Having such knowledge allows you to independently replace the working fluid and save money on visiting a service station.
Video: How to drain antifreeze on a Priora
If the video does not show, refresh the page or
We carry out the work on a cold engine, placing the car on an inspection ditch or overpass. If the engine is hot, you need to let it cool and then relieve excess pressure in the cooling system.
We place a wide container with a volume of at least 8 liters under the drain hole made in the lower part of the right radiator tank. To reduce the intensity of liquid drainage at the initial moment, the cap of the expansion tank should be tightly screwed on.
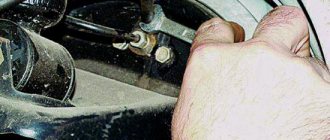
Unscrew the expansion tank cap. To drain the coolant from the engine cooling jacket, place a container under the drain hole located on the front side of the cylinder block, closer to the clutch housing. On a car equipped with a gearbox with control cables, you have to remove the starter.
Disconnect the wire terminal from the negative terminal of the battery.
Remove the protective cap from the nut securing the tip of the wire connected to the positive cable of the battery.
If the gearbox is driven by traction, then the starter should not be removed.
We tighten the drain plugs of the radiator and cylinder block. The connection between the plug and the cylinder block uses a conical thread that does not require additional sealing. Tighten the drain plug of the cylinder block to a torque of 25–30 Nm.
Pour liquid into the engine cooling system through the expansion tank until it is full. Let's start the engine. With the engine running, vigorously compress all the hoses of the cooling system several times in turn - this will help the fluid fill the system and displace air from it. As the coolant level in the expansion tank drops, bring it to normal and screw on the tank cap.
When the engine warms up, the outlet (lower) radiator hose should be cold for some time, and then quickly heat up, which will indicate the beginning of fluid circulation in a large circle. After waiting for the cooling system fan to turn on, stop the engine. Then, after the engine has cooled, we once again check the fluid level in the expansion tank.
Using high-quality coolant in a car allows owners to get rid of the problem of engine overheating. Thanks to the refrigerant, heat from the engine is transferred to the environment and to the interior of the car. In what cases is it necessary to replace antifreeze on a Priora and how to perform this task yourself, we will tell you below.
[Hide]
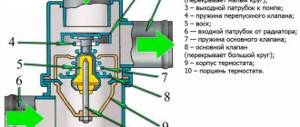
Replacing the thermostat on a Priora
But what if there is a problem with the regulator? The answer is obvious - the internal combustion engine will overheat, and hence a number of serious problems.
Causes of thermostat malfunctions on Priora
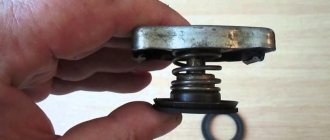
The main element most susceptible to wear is a special sealed cylinder with a movable rod.
The fact is that rust and scale settle on the thermoelement, after which it loses sensitivity and loses the ability to adequately determine the state of the coolant temperature. In addition, external deposits impede the movement of the prior thermostat valve and its rod, resulting in interruptions in the closing or opening of the small and large cooling circle in the car.
Fault Prevention
To avoid aggressive deposits and extend the life of the unit and its components, use only high-quality antifreeze and replace it from time to time. When draining the cooler, take a closer look at the condition of the liquid.
If the drained antifreeze has a cloudy composition, the presence of flakes or other signs of contamination, this indicates that the system needs to be flushed.
Checking functionality manually
To make sure that the thermostat is the cause of engine overheating, do the following:
- Start the engine and wait until it warms up to operating values (85-90 degrees).
- Open the hood of the car and touch the radiator pipe. If its surface is warm or hot, this indicates problems with the cooling system. The fact is that a working thermostat begins to supply coolant in a large circle after the internal combustion engine heats up above 95 degrees. This was done in order to ensure the fastest heating of the engine to operating mode. After the valve begins to operate, the lower pipe heats up.
- If you notice that when the internal combustion engine heats up slightly, the pipe heats up, the reason is a faulty thermostat.
- Please note that in some cases the movement of cooling fluid is hampered by a faulty water pump, which is also a good idea to check.
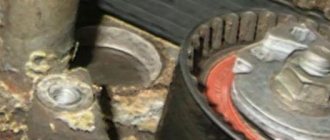
First of all, we install the car on a lift, overpass or over a garage pit. We move under the bottom of the car, remove the engine protection (if installed). On the block we find a drain plug made in the form of a “13” bolt. We prepare and place a deep sealed container under the drainage area. Using a wrench, unscrew the drain nut. We wait until all the liquid has drained. We tighten the bolt back. Let's move on to the engine compartment. We find the unit we need. It is located directly under the air filter pipe. Using a screwdriver, unscrew the screws of the clamps for the two large pipes and pull them off the assembly. We take the hexagon in our hands and unscrew the bolts securing the thermostat housing. We dismantle the product. Installing a new device to replace the old one
When installing, pay attention to the rubber sealing gasket, which should not have cracks or other damage. We put on the pipes and tighten the clamps. Pour coolant into the expansion tank. Let's start the engine. We wait until the engine warms up to operating temperature and check the functionality of the system. The replacement procedure is the same for both 8-valve versions of cars and for 16-valve prior thermostats.
Timing for coolant replacement
In VAZ Priora cars with a 16-valve engine manufactured in 2011 and other years of production, the frequency of antifreeze changes is 75 thousand kilometers. Then the working fluid begins to lose its properties. In addition, the refrigerant that is poured during production is changed every five years, if during this time the car has not traveled 75 thousand km. But this applies to the initial replacement of the fluid that is filled in from the factory. If you use regular antifreeze, then its service life is shorter and is about 30-40 thousand kilometers.
The need to change the working fluid can be determined by the following “symptoms”:
- the antifreeze has become dirtier, black, and traces of deposits have appeared in it;
- a refrigerant leak has occurred, as a result of which more liquid will need to be added to the system, and if you do not know what kind of antifreeze was added, then it will have to be changed;
- the presence of deposits and dirt in the expansion tank, this indicates that the substance has lost its properties;
- foam formation in the reservoir under the hood;
- the stove began to work worse in the winter season;
- the engine began to boil.
How often do you need to change antifreeze on a Priora?
The coolant should be changed for the first time after 75 thousand km or after 5 years. Then replacement is necessary after 40 thousand km or after 2 years. Usually it is indicated on the expansion tanks or in the service book what brand of coolant is filled.
It is not recommended to mix different categories of antifreeze, since manufacturers add different impurities, which, when reacting, can precipitate, which will lead to rapid clogging and failure of the entire system. When changing the brand of coolant, car owners flush the cooling system. Flushing consists of several sequential operations to replace the fluid, but instead of antifreeze, a special flushing agent should be poured. After the fluid has been filled, start the car and let it run. Then drain the liquid and repeat the operation.
The procedure for replacing coolant is similar on all domestic cars and differs only in the volume of liquid and the location of the drain holes.
Coolant selection
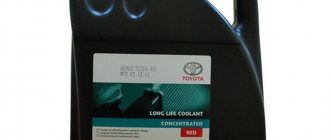
The manufacturer decided that the best way to cool the power unit is with red Felix-40 antifreeze. Cool Stream Standard 40 refrigerant can also be used. You can find out in more detail what is in your car by looking at the sticker on the expansion tank in the engine compartment.
In accordance with the official guidelines, any brand of liquid can be used. The main thing is that you need to pour in those refrigerants that meet the standards of antifreeze poured during production.
Level control and how many liters are needed
To understand how many liters of refrigerant need to be poured into the Priora 16 valves, refer to the car’s operating instructions. The technical manual states that the cooling system capacity is 7.8 liters. Therefore, exactly the same amount of refrigerant is poured into it.
The Prio Dvenar channel published a video in which it showed how the procedure for replacing the coolant in Priora is carried out.
Fluid level diagnostics must be performed on a cold engine. Open the hood and locate the antifreeze expansion tank. You will see two marks on the tank - MIN and MAX, the volume of liquid should be normal between them. If there are no marks on the tank, then it has a horizontal edge that shows the normal level of antifreeze. In order for the system to effectively cool the power unit, it must not be filled with less than the required amount of refrigerant.
How to change it correctly?
Next, we will look at how to correctly replace the working fluid of the cooling system in a Lada Priora car with an electronic pedal or with air conditioning. You can change the refrigerant at a service station, but this task is quite simple and anyone can handle it on their own. For the best effect it is necessary, we will talk about this below.
Preparation
Before you begin the process, prepare the following:
- fresh refrigerant in the required volume;
- seal for the drain cover if the old one is worn out;
- set of wrenches;
- clean rags;
- container for collecting used antifreeze.
The Lada Priora Repair and Maintenance channel provided a video that demonstrated the procedure for draining the working fluid from the cooling system.
Step-by-step instruction
How to replace antifreeze on a Priora:
- Drive the car into a garage with a pit; you will need a flat surface to perform the work. Wait until the engine cools down; the entire process is carried out cold.
- There should not be high pressure in the cooling system. To reset it, open the hood and unscrew the expansion tank cap. If the engine is hot, coolant may spray out of the hole, so use a rag when opening it.
- Dismantle the plastic protection of the power unit. To remove it you need to unscrew two fasteners on the sides. It is not necessary to dismantle the clamps, but removing them will make the task more convenient.
- If your car is equipped with a transmission with control cables, then it is necessary to dismantle the starter device. To do this, disconnect the negative terminal from the car battery. Press the fastening of the connector with the wiring and disconnect the plug from the output of the traction relay. Remove the protective cap from the nut securing the tip of the wire connected to the positive terminal of the battery. Using a 13mm wrench, unscrew the nut and remove the cable tip from the contact screw on the traction relay. Then use the same tool to unscrew the screws and dismantle the starter device. If the car's transmission is controlled by traction, then there is no need to dismantle the starter.
- Find the drain plug; it is located directly on the cylinder block. You need to place an old bucket or basin under it, into which the used refrigerant will be drained. Unscrew the cap and wait until the liquid comes out of the system. Also unscrew the protective valve under the radiator device; some of the substance will also flow out of it. When the draining is complete, you need to tighten both plugs. Don't forget to check the condition of the seal on the drain cap. If it is worn out or there are traces of defects, the ring must be replaced.
- Assess the condition of the refrigerant drained from the refrigeration system. If there are traces of deposits, wear products, or the liquid as a whole is very cloudy and viscous, it is recommended to flush all components. To do this, pour about 7.8 liters of distilled water into the system through the expansion tank. You can add vinegar or citric acid to it to remove dirt. The use of special cleaning agents is allowed. After filling, the engine starts, you can perform a test drive. Then the procedure for draining the refrigerant from the power unit is repeated. If the liquid is still dirty, then the washing is repeated until it comes out clear.
- Assess the condition of all pipes and lines of the cooling system. If there is damage or signs of leaks, the hoses must be replaced.
- The next step is to pour new refrigerant into the system. To prevent an air lock from appearing in the lines and eliminate air entering the system, it is recommended to slightly loosen the clamp of the pipe connected to the throttle assembly. The hose is then disconnected.
- The cooling system is filled with fresh antifreeze through the filler neck in the expansion tank. New refrigerant is poured in until it comes out of the pipe disconnected from the throttle. When this happens, the line is connected into place and the clamp is securely tightened. Then the refrigerant is added to the system to the required level.
- All previously dismantled components are reassembled in reverse order.
- The engine starts and the journey is carried out. Now you need to once again make sure that the fluid level is correct. Make sure there is no leakage from the drain hole.
Remove the cover on the expansion tank Unscrew the drain valve on the radiator cooling device of the engine Remove the starter from the car by disconnecting all fasteners
Company recommendations
Lada Priora
- a machine that is quite unpretentious in maintenance, with a good and reliable engine, resistant to corrosion. Manufacturers managed to remove all design flaws, improve safety, modernize the car's driving performance and improve sound insulation.
What antifreeze to use:
- cool steam standard;
- cool steam premium;
- felix carbox;
- syntek;
- long life;
- energy
If antifreeze leaks on a Priora, you need to find out the problems and causes of the leak. If antifreeze escapes through the connections, this can be corrected by tightening the clamps. You can also install an additional clamp or replace the old one. If the pump fails, diagnosis is necessary by removing the belt cover. If it goes into the oil system, the oil level rises and repairs are necessary. And when it goes into the cylinders, steam appears from the exhaust pipe, which also leads to repairs.
You also need to know how to drain antifreeze from a Priora, observing the necessary conditions. Then it will be easy and feasible for any driver to do. Extreme caution and coordinated actions in the process of such work are recommended.
Replacing the fluid yourself:
- drain antifreeze from the system;
- add new fluid;
- remove air.
Coolant quantity – 7.82 liters
as directed by technical support for normal cooling operation. In some cases, six liters of antifreeze will be enough.
After installing the machine on a flat surface, it takes time for the engine to cool down. Then you need to remove the plastic protection by unscrewing the two fixing clips on the sides and unscrew the cap on the expansion tank. Place a container under the vehicle and drain the liquid by unscrewing the cap on the cylinder block. We also unscrew the protective plug under the radiator and the antifreeze flows out. An important recommendation is to close the existing plugs when the drainage is complete, and you can begin to replace the substance.
After replacing antifreeze on a Priora, you don’t have to worry that the car’s engine will overheat.
On a Priora, the coolant temperature sensor is located between the cylinder head and the thermostat
. It determines the temperature state of the engine, has two contacts, and practically does not break. The only negative is that the wires at the base of the connector often fray.
Consequences of untimely replacement
Over time, the refrigerant loses its original characteristics, as a result of which it will not be able to effectively cool the power unit.
If the antifreeze is not changed on time, this is fraught with serious problems:
- The engine will heat up faster, and regular operation of the machine with an overheated engine can lead to its complete failure.
- The working fluid in the cooling system will freeze and it will be impossible to start the internal combustion engine in the cold season.
- The pressure in the lines may increase. Because of this, the oil seals and seals will be squeezed out, resulting in a refrigerant leak.
Price issue
The cost of one liter of Felix antifreeze today is about 150 rubles. The price of Coolstream refrigerant is approximately the same. A complete replacement will require eight liters, so the cost of changing the coolant is about 900 rubles. If you are rinsing, you will also need to purchase distilled water.
Many car enthusiasts are concerned about the amount of antifreeze in the Priora cooling system. According to the passport, it takes 7.84 liters, but many car owners say that 6 liters is enough.
Both antifreeze and antifreeze can be used as a cooling liquid for the Lada Priora. According to the documentation, antifreeze is replaced every 75,000 kilometers or once every 5 years.
Replacing the coolant on the Lada Priora occurs in several stages, namely:
[Hide]
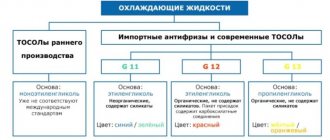
Mixing antifreeze
Antifreeze from different manufacturers cannot be mixed. When mixing liquids of different colors, many believe that nothing bad will happen. Various dyes are added to antifreeze to give it a tint, but it has no effect on the properties. Therefore, the choice of antifreeze should not be based on color, but on the chemical composition
(type) recommended by the car manufacturer. When the liquid is highly concentrated, it must be diluted with distilled water in the correct proportions.
On a Lada Priora car, antifreeze is replaced once every five years, and antifreeze - once every two years or after forty thousand kilometers.
You need to buy coolant only of good quality and after measuring the density with a hydrometer. When mixing carboxylate and traditional additives, it is important to be aware that their chemicals will produce sediment. This leads to clogging of the cooling system itself. An important element of the system is a liquid pump (pump), the purpose of which is to ensure the circulation of antifreeze. The condition of the pump should be checked frequently. If the bearing begins to fail, it will jam. As a result, it will become impossible to maintain the optimal temperature and there will be a risk of the drive belt breaking.
Before replacing the pump, you must prepare:
- container for draining;
- keys for dismantling;
- new water pump;
- sealant;
- inspection hole.
Priora 2014 is now available in three different variations: Standard, Normal and Lux. Its advantages are enhanced anti-corrosion protection using galvanization and a six-year warranty against through corrosion for any type of body. also installed in a number of trim levels.
, heated windows and seats, light and rain sensor. High-level security, equipped with the latest technologies.
The promo website of the Lada Priora claims that when hit at a speed of five kilometers per hour, only the car’s bumper receives damage.
State certification and testing of this vehicle were successfully completed. Braking, stability and handling, electromagnetic compatibility and other measurements (tests) have been completed. The choice always remains with the buyer; the quality of the product is the reputation of the manufacturer.
Removing the airlock on Priora
If, after you have replaced the coolant, you notice that the engine cooling system is not functioning correctly, then it is quite possible that the problem is an air lock.
In order to get rid of it there are the following ways:
First way:
- Loosen the clamp and disconnect the pipe from the heating of the throttle assembly.
- We unscrew the lid of the cooling tank, cover it with a clean rag and blow into the neck until antifreeze starts flowing from the removed pipe.
- As quickly as possible, put the pipe in place and tighten the clamp.
Second way:
- We warm up the engine a little so that the pressure in the cooling system increases slightly, and then turn it off.
- Without removing the coolant tank cap, disconnect the pipe from the throttle body heating.
- After pressure starts to flow out of the tube, immediately put the coupler in its place and tighten it with a clamp.
Attention ! Be careful as the coolant being drained may be very hot at this point.
Replacing coolant Priora instructions
A). Discharge of waste material. 1. Changing the engine cooling fluid is carried out only on a cold car, so after recent use, be sure to give it time to cool down. Place the vehicle on the inspection pit and wait until the engine cools down.
- When the car has cooled down, it is safe for your health to change the fluid. Unscrew the cap of the expansion tank and remove it. This action will reduce the pressure in the system, which will make it easy to drain the used fluid later.
- Under the bottom of the car, unscrew the mudguard and crankcase protection. It is not necessary to do this, but if you do not do this, then it will become difficult to replace the fluid, because these elements may interfere with your further work.
Locate the cooling jacket drain plug on the engine block. Use a suitable wrench to unscrew it, but before completely unscrewing it, do not forget to place a container for waste material. Drain the liquid. Carefully wipe off the mass of liquid that gets on the engine and the surfaces of other elements of the car with a rag. Using exactly the same algorithm of actions, drain the unusable coolant from the car’s radiator.
B). Filling in new fluid 1. After completely draining the old fluid, immediately proceed to pouring new fluid. Do not leave the cooling system to dry out. In the area of the vehicle you are working on, locate the hose indicated by the red arrow and disconnect it from the fitting (indicated by the blue arrow). Also disconnect it from the throttle assembly, then feel free to pour clean coolant into the reservoir. When performing this step, it is important to look at the MAX mark so as not to overfill the liquid. Fill the hose completely with it as well - this will protect the cooling system from excess air and the formation of “air channels”.
- Carefully tighten the hose and plug after filling the liquid. Start the car and allow the engine to warm up to operating temperature. After 20 minutes, turn off the engine and wait until it has completely cooled down. Check the fluid level in the tank. If it decreases, then you did everything correctly and the operation of the car is not affected. Re-adjust (if necessary) the fluid level in the tank to maximum.
Why is it flowing?
If the level of antifreeze in the coolant reservoir continuously decreases, then it is likely that there is a leak in the cooling system. In this case, you need to inspect the entire cooling system, find and repair the damage.
Examine the components and assemblies under the hood, and first of all the condition:
- coolant tank pipes;
- upper and steam exhaust pipe of the radiator;
- heater radiator pipes;
- throttle body hoses;
- thermostat hoses;
- connections of hoses and pipes.
If all connections are in order, then one of the nodes may be faulty, namely:
- coolant tank housing;
- engine radiator;
- heating radiator;
- thermostat;
- connections between the coolant pump (pump) and the cylinder block.
We also look for coolant leaks from the pump drain hole as a result of oil seal wear.
We monitor the antifreeze temperature using the indicator on the sensor.
Replacing coolant on Lada Priora
Today we will talk about replacing the coolant on a Lada Priora with your own hands. The entire replacement process is very simple, the main thing is to follow all the points in our guide and you will succeed.
Lada Priora coolant can be of two types: antifreeze or antifreeze. It is recommended to replace antifreeze once every 5 years or after 75 thousand km, and antifreeze - once every 2 years or after 40 thousand km. The Lada Priora engine cooling system (ECS) holds 7.84 liters of liquid.
Please note that on our website there is already a publication about replacing coolant on VAZ 21099 and VAZ 2115.
Antifreeze on Lada Priora is replaced in several stages:
1. Drain the coolant from the SOD.
2. Fill in new fluid.
3. If necessary, expel the air.
How to drain antifreeze/antifreeze on a Lada Priora
In order to drain the antifreeze, you need a clean rag, a Phillips screwdriver, and a 13mm wrench.
We place the car on a lift or inspection hole. Be sure to check that the engine is cool and there is no excess pressure in the ODS.
1. Open the expansion tank cap to make it easier to remove the engine protection.
2. Place a bucket under the engine and drain the liquid by removing the drain plug on the cylinder block.
3. We also place a bucket under the radiator and drain the liquid by unscrewing the cap on the radiator.
4. Tighten all the plugs as soon as the coolant has been drained.
Filling antifreeze/antifreeze into Lada Priora
To prevent air pockets from forming after the system is filled with liquid, loosen the clamp and disconnect the hose from the throttle assembly heating fitting.
Next, fill the SOD, pour the liquid into the expansion tank, wait until it flows out of the hose, which was disconnected from the throttle assembly. We put the hose in place and tighten the fastening clamp. Add coolant to the “MAX” level.
Removing the airlock in a Lada Priora car
If, after replacing the fluid, you notice that the cooling system is not working stably, you need to identify the cause. Most likely an air lock has formed. The highest point in the cooling system is the throttle assembly, so we will get rid of the air plug through the assembly.
Method number 1:
+ Loosen the clamp, remove the tube from the heating unit. Open the expansion tank, cover the neck of the tank with a rag and blow.
+ When antifreeze begins to flow out of the removed tube, quickly put the tube on the fitting and tighten the clamp.
Coolant is a toxic substance, and if you do not want to blow into the expansion tank, use method No. 2:
Method No. 2
+ Warm up the engine so that the pressure rises in the ODS, and turn it off.
+ Do not unscrew the cap on the tank, remove the tube from the heating of the throttle assembly.
+ When antifreeze begins to flow out of the tube under pressure, put the tube on the fitting and tighten the clamp.
When using the second method, be extremely careful, because... The antifreeze heats up quickly and can be quite hot.
If you notice that the fluid level in the reservoir is decreasing, this indicates that there is a leak in the cooling system. Be sure to check the tightness and eliminate the malfunction. Let me remind you that in the previous article we talked about self-repair of the stove on a VAZ 2110.
The main causes of malfunctions in the engine cooling system and methods for eliminating them
| Cause | Way |
| Motor overheating | |
| Low coolant level in the radiator | Add coolant |
| Thermostat valve stuck in closed position | Make a replacement |
| Coolant does not circulate well | Replace the pump or pump |
| There is a lot of debris in the radiator | Clean the radiator |
| Scale and deposits on radiator tubes, hoses and cooling jacket | After flushing the cooling system, the fluid must be replaced |
| The fan does not work due to a malfunction of the temperature sensor or other components | Check the electrical circuit. If necessary, replace fuses, resistors, relays or fans |
| Crack in the coolant tank plug | Replace the plug |
| The engine overheats and cold air comes out of the heater. | |
| Low coolant level, leaking or worn cylinder head gasket | Add coolant, replace gasket |
| The engine cannot warm up for a long time, the temperature is not stable | |
| Thermostat stuck closed | Replace thermostat |
| The coolant level is constantly decreasing | |
| Radiator depressurized | Repair or replace |
| Heater radiator is depressurized | Repair or replace |
| The coolant tank is depressurized | Replace the coolant |
| Coolant leakage through pipe connections | Replace hoses, pipes and tighten clamps |
| Worn water pump seals | Replace the pump |
| When parked, coolant leaks from the joint between the cylinder head and the cylinder block. | Tighten the bolts. |