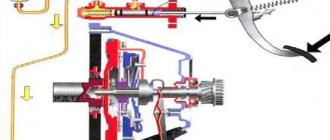
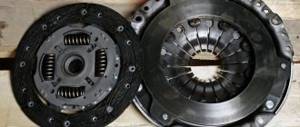
When is it necessary to install a new clutch on a VAZ 2110 car and why?
Restoring a car on your own has always required not only some effort, but also financial investment. It is precisely because of the last factor that car owners try to carry out repairs themselves, thus saving on payments to service station workers. Clutch repair, of course, is not comparable in labor intensity to changing the working cylinder , but even if you have basic skills, it is quite doable in a garage.
To prevent replacing a VAZ 2110 clutch disc from becoming a waste of time and money, it’s a good idea to find out the symptoms indicating the need for repairs; experienced car enthusiasts already know them, but it will be useful for beginners:
- Loss of engine power.
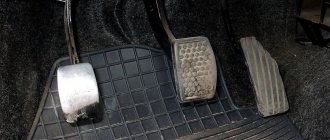
- Vibrations when pressed or a “cotton” pedal.
- Switching on gears occurs with slipping or is accompanied by crunching and jerking.
- Spontaneous gear shutdown.
- Difficulty switching on speeds.
- Friction lining smell.
It is important to clearly identify the source of the problem; for example, a “stuck” pedal may also indicate that drive cable . Experienced motorists regularly check the condition of the friction mechanism every 80,000 km so that the installation of the VAZ 2110 clutch is fully justified.
Replacing the clutch cable of a VAZ-2110
This procedure is simple and will not take much time.
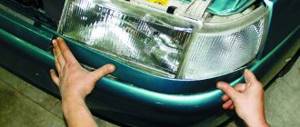
- It is recommended to remove the windshield wiper and frill, this makes access easier, but you can do without it.
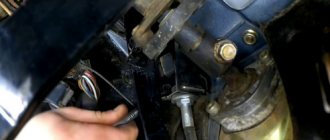
- There is a mounting bracket on the gearbox; you need to pull the cable out of it. To do this, you need 2 “19” keys, which are used to loosen the cable fixing nuts. The tension weakens and the cable can simply be removed from the mount.
This completes the installation.
Adjustment is an important step when replacing the clutch cable. Replacing the cable is a simple procedure; if all stages are performed correctly, gear shifting will occur smoothly and comfortably for the driver.
Replacing the clutch disc of a VAZ 2112 seems to many to be a very complicated process, and therefore they are afraid to do it themselves; they prefer to pay “professionals” to the service station (to tell the truth, not every professional there is). This article will prove the opposite to you and will help you learn step by step how to replace the clutch disc on a VAZ 2112 yourself. What actions to perform in what sequence and what should be taken into account.
Technology for replacing the clutch disc on a VAZ 2110 car on your own
Some zealous car owners are starting to look for an accessible solution, for example, in the form of welding a layer of metal onto the legs of the basket. However, it is difficult to increase the same thickness; misalignment occurs, which again leads to uneven wear of the unit. Therefore, it is more reasonable to immediately install a new part, for which we will consider the procedure for implementing the repair:
- To prevent a short circuit, remove the negative terminal from the battery.
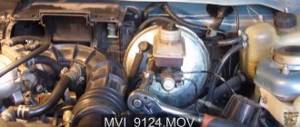
- Disconnect the mass air flow sensor connector, loosen the clamp securing the corrugated pipe and remove the air filter housing to gain access to the gearbox mounting bolts.
- Loosen the left wheel mounting bolts and lift the car on a lift or jack up the front part and install supports.
- Remove the front left wheel and remove the engine protection (if equipped).
- Using two 19mm wrenches, loosen the two cable fastening nuts and remove the cable from the bracket to the gearbox.
- Unscrew the top bolt securing the autostarter to the box using a 17mm wrench, then use a 19mm wrench to unscrew the nearby gearbox mounting bolt.
- Remove the speed sensor connector and disconnect the speedometer drive cable.
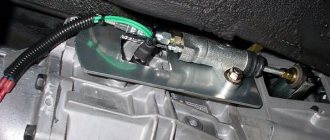
- Remove the torque rod of the gearbox drive, having previously made marks at the place where the clamps are attached, so as not to have to adjust the gear shift lever later.
- Unscrew the second starter mounting bolt and remove it.
- Unscrew the lower bolts securing the left ball joint.
- Before replacing the clutch disc on a VAZ 2110, dismantle the longitudinal extension with the transverse link.
- Using a pry bar, remove the drive from the gearbox, and instead insert some kind of plug (rolled newspaper or old hinge) to prevent rotation of the satellites. Repeat the same operation with another drive. Tie the drive with a rope to the stabilizer.
- To prevent the engine from twisting during repairs, place a support under it.
- Unscrew the remaining bolts securing the box to the engine and remove the gearbox.
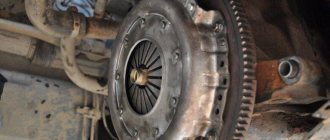
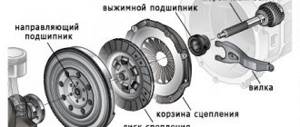
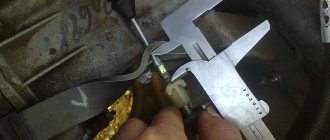
- Unscrew the 6 bolts using an “8” wrench that secure the basket to the flywheel; you need to unscrew it one turn evenly on all sides so as not to deform the drive disk flange.
- In order for the driven disk to be located exactly in the center of the flywheel, a mandrel should be inserted into the driven disk through a new basket.
- Insert the mandrel into the crankshaft and tighten the basket mounting bolts in the same way as described above - each bolt one at a time.
- Remove the mandrel.
- Lubricate the gearbox input shaft, install the bearing on it and reassemble the components in the reverse order.
In the process of installing a new clutch on a VAZ 2110 car, it may turn out that you will have to change not only the friction mechanism, but, for example, the drive fork. In this case, it is necessary torque transmission units
Replacing the VAZ 2110 clutch step by step instructions
1. “Tear off” the left wheel mounting bolts, then jack up the front of the car and place it on the sawhorses.
2. Remove the wheel and unscrew the two lower ball joint bolts.
3. Remove the “-” terminal from the battery.
4. Remove the mass air flow sensor, then loosen the clamp securing the mass air flow sensor corrugation and remove the air filter.
5. Now you need to remove the clutch cable from the clutch fork. Loosen the two mounting nuts that secure the cable to the bracket on the gearbox.
6. Unscrew the bolt securing the starter to the box, then unscrew the first bolt securing the gearbox.
7. Head on “19” amplifier pipe. There is another gearbox mounting bolt nearby.
8. Loosen this nut and the upper starter mounting bolt.
9. Remove the connector from the speed sensor, then unscrew the speedometer cable.
10. Remove the longitudinal brace paired with the lever.
11. Now unscrew the lower starter mounting bolt.
12. Unscrew the 3rd gearbox mounting bolt; in the area of the right CV joint there is another nut that needs to be unscrewed.
13. Unscrew the two torque rod mounting bolts.
14. Loosen the nut located on the clamp of the gearbox control drive rod, then remove this rod from the box.
15. Place a support under the engine, then unscrew the two nuts securing the rear cushion. This is done just in case, so that if the engine lowers too much, your hoses do not break.
16. Carefully move the gearbox away from the engine and lower it to the floor, it will hang on the axle shafts.
17. I recommend replacing the clutch release bearing at the same time.
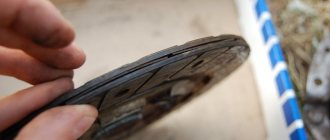
Assess the wear, replace the disc, and if necessary, the clutch basket, check whether the petals are normal.
Further assembly is carried out in reverse order. Thank you all for your attention, this is actually the simple way to replace a VAZ 2110 clutch without removing the box and draining the oil.
Do-it-yourself VAZ 2110 clutch replacement video:
We make acoustic podiums for the VAZ 2110 with our own hands
How to replace the gearbox ball race on a VAZ 2110 with your own hands?
Do-it-yourself installation of the VAZ 2109 armrest
- Comments 30
- Pingbacks 0
And yet the box was removed, even though it hung on the axle shafts.
And the meaning. The box was eventually removed. What has changed for the better? =))) You still have to lift it and put it back in place, but if you do it alone, then it’s a complete ass. This option is in the trash. I would simply screw in other, longer bolts instead of the original box mounting bolts. Then everything was the same, only I moved the box to the side on extended bolts and that’s it. It would remain suspended and at the exact level of the bolts. I replaced the clutch and moved it back with bolts and that's it. The only thing is that you just need to turn the flywheel a little from side to side so that the splines of the shaft and the clutch driven disc bushing coincide so that the box sits in place. That's it, comrades =)))
Results
If there is an overpass or lift, the operation is carried out quickly and efficiently, and when there is a reliable assistant, it is also fun. However, not everyone has such capabilities, and this is where engineering ingenuity comes into play.
Some car enthusiasts practice repairing the clutch without removing the gearbox; for this purpose, instead of the upper standard mounting bolts, they screw in longer bolts. For this, for example, two bolts from the upper arm of the front suspension of the “VAZ classic” are suitable. By screwing them into the upper holes, the box can be moved back by 14-15 cm with a pry bar. In this case, the transverse rod should not be unscrewed, because the rear part of the gearbox will lie on it. These conditions are quite enough to replace faulty parts.
https://youtu.be/Rh382LjE_Xk
If repairs are necessary, experts recommend doing a complete replacement of the entire assembly along with the release bearing, especially since the choice of clutch kits is quite wide. This position is explained simply - an old part left behind threatens to fail at any moment. The procedure, as you yourself saw in the video, is quite labor-intensive, and repeating it over and over again is not a pleasant pleasure, except for real “homemade people.”
Is noise a sign that replacement is needed?
Not really. If noise occurs, this does not mean that you should immediately replace the element. But it is strongly not recommended to delay repairs. Let's just say this is a signal for certain actions, which you will have some time to complete before the consequences become catastrophic.
Article on the topic: Find out how I changed the heater faucet of a VAZ 2114 in 20 minutes
In some cases, the noise occurs when the engine is started, and it persists until the car warms up, after which it disappears. In other cases, the noise returns every time you try to disengage the clutch.
The worst option is a grinding sound. This sound indicates that the element is rubbing against the leaf spring, and wear will form on the petals. If you are “lucky enough” to encounter such a situation, there is no time. Replacement needs to be done quickly.
By the way, there is no point in repairing it. Release bearings cannot be repaired, so the only solution is replacement.