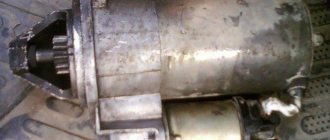
Here, I will directly describe the process of replacing the Bendix starter.
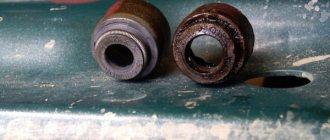
In order to remove the old bendix from the planetary mechanism, you need to remove the ring that limits the movement of the bendix and thereby fixes it. I took it off with a 13mm head, rested it on the ring and knocked it down with a light blow from above.
There is a stopper inside the “limiting” ring.
I removed it using pliers and a screwdriver, after which the bendix can be removed.
Next, we install a new bendix 1 006 209 677, put on the “limiting” ring and install the stopper in place. In order to fix the “limiting” ring on the stopper, I had to rack my brains; I spent 10-15 minutes trying to put it on the stopper using the same pliers and screwdriver, but to no avail. To put the ring in place, an open-end wrench helped me, I turned the planetary mechanism over and rested the shaft against the table, put the open-end wrench on the “limiting” ring and, with a light blow of a hammer, put it in its place!
That's basically it. Now everything works as it should and without any complaints!
In the middle of winter, the starter started to fail... When starting the engine, the starter turned “idling”... and this appeared a long time ago (I didn’t attach any importance), at first very rarely once, then more often... then I had to turn the key several times to get the starter “ I grabbed the flywheel... and then, one morning, I only started it the tenth time. I think that’s enough... it’s time to change the starter bendix. The problem was not new, many similar cases have been described on the Internet, replacing the Bendix solves the problem.
I found a VERY good description of replacing the Bendix starter for my engine, here - www.autocommunity.ru/foru...yota/corolla_2003/t41602/ (this is not an advertisement, everything is just laid out very sensibly with photographs). When replacing, I used exactly this report. The engine is slightly different, but structurally everything is the same (ZZ series engines: 1ZZ-FE, 3ZZ-FE, 4ZZ-FE, identical).
I went to a Toyota store and picked up the original Bendix (I’ll write the number later - the box was left in the garage). I did it myself, in a garage with a pit.
I’ll immediately make some minor adjustments regarding the report I used, because... some actions indicated in the report for removing the starter are unnecessary for us (E-11 body). By the way, the bendix itself for the 4ZZ-FE starter is visually completely the same, BUT! has a larger number of teeth on the gear - 11, and in the report - 9. So, take Bendix specifically for your engine!
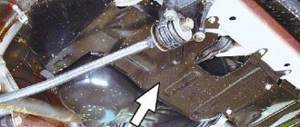
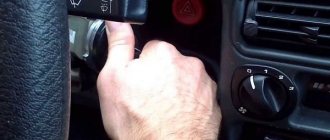
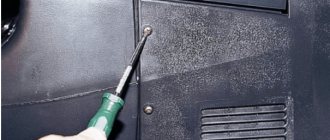
1. Be sure to remove the terminals from the battery. (at first I was lazy - I almost shorted it out when I unscrewed the starter contacts). 2. We climb into the hole, remove the plastic engine protection from below... (there is no need to remove the fans from the radiator and the expansion tank! They don’t bother us!)... we have access to the starter. 3. Unscrew and disconnect all terminal blocks and wires from the starter. 4. We remove the starter from the bottom (in the hole), it is attached to two bolts, the top one is from the side of the box, the bottom one is from the back side... having unscrewed the bolts, the starter is easily detached from its seat... after twisting a little near the coolant pipe and oil filter, we pull out the starter... 5. We disassemble the starter: - unscrew the two long mounting bolts holding the housing together, - unscrew the three “star” bolts that secure the retractor... here was the problem - I was able to properly unscrew only 1 of these three bolts, the other two were completely soured (even with WD-40 didn’t help)… I had to drill out the bolt heads, remove the retractor, the remaining bolts were easily unscrewed with pliers, most likely it was the bolt heads that had soured... I installed different bolts during reassembly, under a regular hex head (only the length of the bolts needs to be chosen correctly). — we take everything apart, slowly and thoroughly clean it. - now we change the bendix itself, it needs to be removed from the axis on which it moves and is limited by a washer with a locking ring... just like in the report - with a long head of 12 we knock the washer down, pick out the locking ring... and remove the bendix. — before installing the new bendix, lightly (no frills) lubricate the axle on which the bendix is mounted with high-temperature grease. - now the most important hemorrhoids! - you need to put the limiting washer on the axle and snap the locking ring into it... as shown in the report - it was not possible, the locking ring is so rigid that simply opening it with open-end wrenches is not realistic! ... it won’t fit into place ... I suffered for about 40 minutes ... then a small clamp was at hand, with great pain I finally pressed the locking ring into place ... the difficulty is that the ring must fit into the groove on the axle and at the same time put the limiting one on the bottom a washer, in which there is also a groove-recess for the retaining ring, and the retaining ring itself is oh-so-very rigid. — then, when everything is cleaned and the bendix is installed, we lightly lubricate all the rubbing parts of the starter with high-temperature grease (including the planetary gears under the bendix), but without fanaticism!, excess lubricant will only interfere with the normal operation of the starter. — I didn’t change the brushes, they still work quite normally. - slowly, carefully assemble the starter, make sure that all the moving parts move/rotate easily... - I coated the body and covers with a small amount of sealant to prevent moisture from getting into the starter (since the retractor had small pockets of rust). — check the tightness of all bolts, check the starter. 6. Install the starter in its place on the engine. 7. Connect all wires and terminal blocks. 8. Connect the terminals to the battery. 10. Start the engine.
Read more: Automatic transmission filter Solaris 2012
Everything works like clockwork. )
We check everything again, put the engine protection in place, there are no unnecessary parts left...)
When starting the engine, the speed jumps sharply. If you use a starter that is rigidly coupled to the engine flywheel, then such jumps will damage the starter. Therefore, an overrunning clutch is required - a unit capable of transmitting torque in only one direction. Then what is Bendix? This is a clutch interlocked in one unit with the drive gear. The mechanism is named after the inventor, Vincent Bendix.
The operating principle of the common roller bendix is simple. Inclined grooves are cut in the outer coupling, rigidly connected to the electric starter shaft. The gear that meshes with the flywheel ring has a cylindrical shank that rotates freely on the shaft. In the grooves of the Bendix coupling there are rollers, the diameter of which is selected so that from the “narrow” edge of the groove they rest against the gear shank, and from the “wide” edge they have a gap with the shank. The springs, which are installed in tandem with the rollers, constantly strive to press them to the “narrow” side.
When the starter cranks the engine, the outer clutch tends to drive the rollers to the “narrow” edge of the grooves. They wedge between the clutch and the gear shank, allowing the electric motor to transmit torque to the flywheel. But, as soon as the engine catches, the flywheel increases speed, and the starter gear tends to rotate faster than the shaft. At the same time, the gear shank pushes the bendix rollers into the “wide” side of the grooves, disengaging the overrunning clutch and allowing the bendix to rotate freely.
Malfunctions of the starter Bendix are associated either with wear or damage, less often due to thickening or contamination of the lubricant. Since Bendix works by wedging the rollers, over time they cause a disruption in the shape of the grooves, causing dents in them. Such a bendix can no longer work normally - it slips or, conversely, jams. The same problems are caused by thickening of the lubricant in the bendix or dirt getting inside, which makes the rollers unable to move easily inside.
Read more: Knitted covers for cars
Since the outer bendix coupling is hardened to increase its service life, breakdowns are possible due to violation of heat treatment conditions (overheating, insufficient tempering after hardening). The cracked housing begins to “diverge” under load, which is why the clutch cannot transfer the load normally, and the bendix slips when trying to start.
A faulty bendix makes itself known by noise if the clutch jams, or by jerking when the crankshaft rotates. As one of the pistons approaches the top dead center of the compression stroke, the rotational resistance increases and the defective bendix slips. In more severe cases, the Bendix slips so much that it cannot move the flywheel: the starter howls, but there is not the slightest reaction from the engine.
Another loaded Bendix unit is the drive gear itself. In an ideal case, voltage is applied to the starter winding after the gear has begun engaging with the flywheel, and tooth-to-tooth impact does not occur. However, over time, the gear wears out, shock loads increase, and the wear rate increases even more. As a result, the gear “licks off” and ceases to engage normally with the flywheel, at the same time rapidly wearing out its crown. When you try to turn on the starter, either a single click occurs (the gear rests against the ring gear), or a loud noise is heard, the crankshaft rotates with jerks, interrupted by the squeal of the gears, if the teeth of the ring gear and gears are worn out so much that they only engage at the edges.
Bendix is a non-separable unit and can be replaced as an assembly. However, an attempt at “reanimation” may also be useful if the car is rare, spare parts are only available to order, and you need to drive it now. Replacing the Bendix is thus postponed until the part arrives, and in the event of a minor malfunction, you can even continue driving with the restored one.
What is a snap ring
Due to the similar name and shape of the ring, many people confuse a locking ring with a lock washer. Despite the similarity in name and appearance, they have fundamentally different functions. A lock washer secures a threaded connection by preventing rotation of the nut or bolt head. A locking ring prevents axial movement of a bearing, shaft, axis of rotation or other structural element.
Retaining rings are made of high-quality spring steel; it has a narrow through cut and two areas along its edges, which are called ears. There are holes made in the platforms, by taking which, the cut can be reduced or enlarged. This changes the circumference of the product. On the mechanism parts that need to be secured against axial movement, a narrow shaft is machined or milled, slightly wider than the height of the ring. The ring, in a compressed or stretched state, is inserted into the groove and released. The part is compressed, enveloping the shaft, or expanded, fixing the bearing in the hole. To remove the fastener, you also need to unclench or close the ears.
Ring locking fasteners are widely used in all branches of mechanical engineering, from watchmaking to mining equipment, from paper machines to bicycles, from household appliances to spacecraft.
Removing the retaining ring
Snap rings are open rings made of carbon steel that are used (as the name suggests) to secure the location of bearings on shafts and axle shafts. They are also used for fixing shafts and rods, in the mechanisms of piston systems, and when securing gears. This is a technologically convenient and most inexpensive method that allows you to save space as much as possible and simplify the installation and dismantling processes.
According to the method of fastening, rings are divided into two groups:
- external – installed on an axle or shaft;
- internal - installed in body holes.
Based on their shape, they are divided into concentric and eccentric. For concentric rings, the centers of the outer and inner contours coincide (like circles on water) and, thus, the part has the same width along the entire perimeter. For eccentric ones, these centers do not coincide (there is an eccentric) and the width varies along the circumference.
To install retaining rings on the shafts and in the housing holes, special grooves are made - grooves for installation. Install and remove stoppers using special pliers, pliers or pullers. If they are missing, they often try to use a screwdriver or an awl, but in this case there is a danger of damaging the surface of the shaft or hole.
To install the outer ring, it is expanded with special pliers (similar to round nose pliers, only they work to expand and have curved jaws) and put on the axle. The ring returns to its original size and fits tightly into the groove. To remove the retaining ring, it is unclenched, moved outside the groove and removed from the shaft.
When installing/removing, it is necessary to very carefully monitor the degree of expansion, since, having exceeded its deformation limit, the steel may not return to its original size. Experts generally do not recommend using the same part twice.
Inner rings, on the contrary, are compressed for installation, making their outer diameter smaller than the inner diameter of the hole. Then they insert it into the hole and fix it in the machined groove. I don’t think it’s worth explaining how to remove the internal retaining ring.
When working with inner rings with a compression force, it is somewhat easier, since the degree of deformation is limited by the configuration of the product itself (the ears will close together).
Retaining ring pliers are available for internal (compressive) and external (expandable) versions of stoppers. They can have straight or curved tips. Curved tips make working in hard-to-reach places much easier.
Types of retaining rings
There are two main types of locking ring connections:
- Internal. Serve to fix parts inside holes. Used for fastening bearings. The ears protrude inward. To install them, you need to compress them so that the length of the outer circumference decreases, insert the part into the inner groove and release the ears. The part will straighten and partially fall into the groove, and partially protrude from it. This protruding part will not allow the bearing resting against it to move in the axial direction. To remove the mount, the ears need to be spread apart.
- External. Used for fastening parts on shafts, axles, rods. They are put on the shaft from the outside, the ears protrude on the outer side of the product, the cut between them is minimal. For installation, the ears are moved apart, the length of the inner circumference of the product increases, and it can be put on a shaft or axle, placed in a machined groove. After this, the ears are released, the part is compressed under the influence of elastic forces, fits tightly into the groove, leaving an annular rim on the outside. It will not allow the part to move in the axial direction. To remove such a part, the ears are brought together.
Retaining rings also differ in size, thickness, deformation force, and the metal from which they are made.
In technology, locking rings without holes and ears are sometimes used. They are simply a partial coil of spring wire placed in a groove in a shaft or hole.
Such designs are used in lightly loaded components with small axial loads, such as starter drives or fastening the pressure gauge glass.
How to disassemble the generator housing?
The first difficulty you will encounter is removing the ridge belt pulley. The shaft rotates freely, even with faulty internal bearings. It is necessary to insert the hexagon into the hole at the end of the shaft and, using a socket head, unscrew the pulley nut.
After this, you need to remove the case halves: you should start with the back cover. The following are possible options:
The outer race stuck to the housing, and the generator bearing remained in the cover
In this case, it is easily pressed out (or carefully knocked out) using a piece of pipe or a socket of a suitable diameter. In practice, this most often happens with the rear bearing.
Advice.
To remove the inner race from the shaft, you need to spray WD-40 on this exact place. Then the node will remain in the housing.
You removed the back cover - the bearing remains on the shaft
According to the law of meanness, this is exactly what happens during urgent repairs. Moreover, both ball bearings may remain on the anchor, and it will not be possible to remove them using a pipe.
If the design allows, you can remove the bearing from the armature without a puller using two powerful slotted screwdrivers. The main thing is to have something to rest against and not damage the contact block or winding.
Of course, before starting work, you should treat the shaft with a penetrating liquid such as WD-40. Then it will be easier to remove the knot. Make sure that the solution does not get on the contact pads or in the winding. Otherwise, over time, the varnish insulation may dissolve and an interturn short circuit will occur. The same method is applied to the armature of an electric motor: for example, on the starter.
Popular: Checking LEDs with a multimeter, available methods
Types of circlip pullers
In order to install and remove retaining ring fasteners, engineers have developed many models of different types of pullers. They all share common design elements:
- handles connected by a hinge;
- working bodies, or jaws, serving as a continuation of the handles on the other side of the hinge.
Read also: How to cut ceramic tiles
Structurally, there are two main types of ring removers:
- For external fastenings. When the handles are brought together, the jaws will diverge, stretching the part and increasing the length of the inner circumference.
- For internal fastenings. When the handles are brought together, the jaws will converge, compressing the part and reducing its outer diameter.
There are also universal pullers, the operating mode of which can be selected using a selector lever. Some devices are equipped with additional functions: a screw stroke, a lock in an extended or compressed state, gear lever mechanisms, etc.
Characteristics of circlip pullers
In order to navigate the variety of ring remover models offered by domestic and foreign manufacturers, it is useful to know the basic parameters that characterize these devices. These include:
- Jaw length. This parameter determines the puller's ability to work with fasteners located in recesses and other hard-to-reach places. It should be remembered that as the jaws lengthen, according to the law of leverage, the compression force decreases (with equal force on the handles)
- Length of handles. Affects the ease of use and the maximum force of compression or expansion of the ears.
- Tip shape. Both straight and curved at a certain angle (from 0 to 90°) are used. Straight ones allow you to develop more force, curved ones are more convenient when working in recesses.
- Diameter of tips. Should be as close as possible to the diameter of the holes in the ears. A tip that is too thick simply will not fit into the hole, and a tip that is too thin may not withstand the load and break. In addition, the ring can slip off from thin tips.
- Reverse bending of tips. Used on external pullers to open the ears. The bend increases the reliability of holding the ring.
These characteristics of circlip pullers are important for traditional designs. There are universal pullers available on the market. Their jaw tips are removable; they can be quickly removed and replaced with another pair that is more suitable for the given case. The selector switches the expansion/compression modes, an additional hinge allows you to change the angle of the jaws from 0 to 90°.
Some models are equipped with a force limiter. This allows you to adjust the maximum opening or closing force without damaging the thin rings.
When using universal pullers, you should be careful when choosing tips. It is permissible to use only those tips that are manufactured by the same manufacturer or indicated by him as compatible.
It is strictly unacceptable to share tips from different pairs that differ in length, angle of inclination or reverse bending. This may damage the device. Another unpleasant consequence is that the fastener may break off the jaws and go off into an unpredictable flight. Since metal stores a large amount of energy when compressed or decompressed, it can damage workshop equipment or cause serious injury to people.
When working with ring fasteners and pullers, it is mandatory to use personal protective equipment - unbreakable work glasses (face shield) and protective gloves.
Removing the retaining rings
Removing locking split washers is carried out using two main methods:
- With partial disassembly of the main mechanism. In this case, the assembly containing the ring is dismantled. It is fixed in a vice or other clamping device on the workbench, and the part can be removed in the comfortable conditions of a warm and well-lit workshop.
- No partial disassembly. The unit to be repaired is not dismantled; its disassembly and replacement of parts occurs in less convenient conditions, conceived in the open air.
In both cases, it is better to remove the locking part using special pullers that match the type and size of the locking fastener.
Read also: How to harden a chainsaw chain
If for some reason they are not at hand, craftsmen adapt one or another universal tool or modify it by making a puller with their own hands. This approach may be justified if you urgently need to remove one or two rings. For large volumes of work, factory-made pullers demonstrate their superiority in a number of ways:
- strength;
- reliability;
- convenience and speed of work;
- safety.
Experienced craftsmen have formulated a number of recommendations on how to remove the lock washer from the front suspension wheel bearing:
- The rack is removed from the car and clamped in a vice.
- The hub is knocked out with a hammer.
- Lightly tapping the side of the inner retaining ring with a small hammer loosens its contact with the groove.
- Next, using a suitable type and size ring remover, you need to remove the ring mount. In the absence of a standard tool, some craftsmen manage to remove the stopper with two thin screwdrivers.
- After pressing out and replacing the bearing, you need to check its position: the front end must be at the level of the far wall of the groove for installing the locking part.
- The ring is compressed with a puller and brought to the groove. After alignment along the entire perimeter, the handles are gradually loosened and the part falls into place.
Recommendations on how to remove the rear wheel bearing and its retaining ring are as follows:
- Remove the wheel and brake drum.
- Using a flat-head screwdriver, carefully pry up and remove the oil seal.
- Remove the ring from the inner diameter with a puller of suitable size and type.
- Remove the inner race of the bearing.
- Knock out the outer ring by lightly tapping it on the beard and remove it.
After lubricating or replacing the bearing, reassemble the assembly in the reverse order.
Bendix replacement
Regardless of whether you are going to replace the bendix or rebuild it, you will first have to remove it from the starter. There are two types of starters:
- With a “beak”, where the front support of the starter shaft is made in its housing.
- And without the “beak” where the front starter support bushing sits in the crankcase.
The most common mechanisms are of the first type, the “beakless” ones are familiar from the VAZ of the “eighth” family.
Since you can change the Bendix on the starter only by removing the starter itself, first the battery ground is disconnected, and the power cable and the solenoid relay control wire are removed from the starter. Having unscrewed the fastenings of the starter to the crankcase, we pull it out.
Read more: BMW x5 f15 configurations
Regardless of the design of the starter, the solenoid relay is first removed, since its plug later interferes. We unscrew the nut on the power terminal of the starter winding, remove the terminal, then unscrew the screws connecting the retractor to the housing. We take out the relay winding, after which the core can be easily disengaged from the Bendix fork.
Then we disassemble the starter. Having unscrewed the longitudinal coupling bolts of the covers, remove the “beak” or front cover of the starter. After this, you can easily remove the fork from the Bendix and pull the rotor towards you.
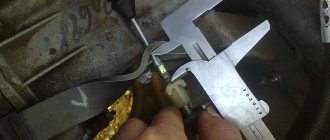
A thrust bushing is installed on the rotor, limiting the stroke of the bendix. Before removing the bendix from the starter, you need to compress this bushing. In garage conditions, an open-end wrench is used, the mouth of which fits onto the rotor shaft, but rests against the bushing with its jaws. Having firmly fixed the key in a vice, we rest the thrust sleeve against its jaws and apply a sharp blow to the end of the shaft through a drift made of durable wood, copper or aluminum, so as not to damage the shaft itself. After this, the retaining ring installed inside the bushing jumps off the groove and releases it. After removing the bushing, pull the retaining ring off the shaft by prying it off with a thin screwdriver.
After this, we take out the Bendix assembly. Installing the Bendix is done in the reverse order, and the main difficulties are caused by pressing the thrust bushing back. It should be taken into account that it is asymmetrical - on one side there is a wide chamfer, which makes it easier to enter the locking ring. When removing the bushing, the retaining ring is deformed; it must be straightened before assembly. The thrust bushing must be seated on the retaining ring without distortion, otherwise the edge may be squeezed out of the groove on the rotor, the ring will bend and will not allow the thrust bushing to be pressed into place.
Something else useful for you:
Video: Replacing the Bendix starter
Basic methods for removing retaining rings
Mechanics distinguish three main methods for installing retaining fasteners:
- Manual. The most common in everyday life.
- Mechanical. In order to install the outer ring, a mounting cone is used, equal in diameter to the shaft and centered on it. Using a special pusher, the part moves along the cone to the installation site, sliding from the cone into the groove.
- Auto. In mass production on automated lines, parts are placed using hydraulic or pneumatic drives.
There are many common methods among craftsmen on how to remove retaining rings without a tool specifically designed for this purpose. Awls, nails, thin Phillips screwdrivers and other improvised means are used.
To remove circlips without a puller, you can modify regular needle nose pliers.
Their ends are turned into a cylinder, with a diameter slightly smaller than the hole in the ears.
The pliers are also modified, in the side surfaces of the jaws, holes are drilled at the very end into which pieces of hardened rod of suitable diameter are inserted. In this way, the split lock washer can be either removed or put back.
The question often arises: how to remove retaining rings without lugs? To do this you will need two screwdrivers. One should open the stopper in its section so that its diameter increases slightly and it partially comes out of the groove. Using a second screwdriver, you need to pick up one of the ends of the ring and pull it out onto the surface of the shaft. Use the first screwdriver to grab this end, preventing it from sliding back into the groove. The second screwdriver needs to be run along the groove to pull out the remaining part of the lock washer from it.
If you find an error, please select a piece of text and press Ctrl+Enter.