Any experienced car enthusiast has more than once encountered the problem of a flat tire on the road. This defect affects not only the comfort of the trip, but also the serviceability of the vehicle. The fact is that the automobile concern itself dictates the required pressure in the cylinder, based on engineering calculations. These data are involved in the operation of shock absorbers, so these indicators must be monitored from time to time and, in case of deviation, promptly corrected. All drivers, especially those who often travel by car on country roads, must have equipment in the trunk that can be used to inflate the wheels.
Signs of loss of tire pressure
In order for the driver to be able to correct the problem of a flat tire in a timely manner during a trip, he must understand that a loss of pressure is not always characterized by driving on the rim. Such situations occur only when hitting a large sharp obstacle, when simple pumping cannot solve the problem. Thus, you can find out about a loss of pressure by the following obvious signs:
Tire inflation
- First of all, on the road the driver feels that the car begins to deviate significantly from a straight trajectory, and this change in direction only increases with increasing speed. This symptom is mainly associated with a puncture or loss of pressure in the front wheel.
- If the problem occurs with the rear tire, the driver, as a rule, does not feel any inconvenience until he hears the beating of the rubber on the road surface. However, when the driver carefully controls and monitors any change in the behavior of his “iron horse,” then when moving in a straight direction he will feel a skew and a slight tilt in exactly the direction where the problem is identified.
- It should be noted that the higher the rubber profile, the more a flat tire is felt in the cabin. And on sports cars with a tire profile height of less than 40 mm, the problem can reach such a scale that the driver will already hear the grinding of the alloy wheel on the asphalt with a completely deflated tire.
Important!
In order to avoid unexpectedly getting into an unpleasant situation on the road, a car owner should check the tire pressure at least once a week using a special portable compressor or at a tire service station. In addition, many gas stations from well-known oil companies often offer a free service for inflating wheels and checking tire pressure, the use of which should not be neglected.
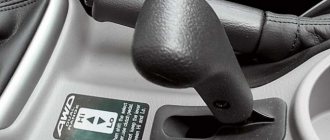
Central wheel inflation system for VAZ 21214
What pressure should Niva tires have?
VAZ, which produces various 4x4 SUV models, which include modifications 2121, 21213, 21214 and 2131, defines one value for all. Thus, the manufacturer recommends pumping the wheels of the front axle of an SUV to 1.9 Bar, and for the rear axle - 1.8-1.7 Bar. However, some parameters depend on the wheel size.
| Size | Front Wheel (Bar) | Rear Wheel (Bar) |
| 175/80/R16 | 2,1 | 1,9 |
| 6,95-16 | 1,8 | 1,7 |
| 175-406 | 1,8 | 1,7 |
In summer
However, the above are standard parameters. Much depends on the time of year and operating conditions of the car. In summer, these conditions are close to factory conditions, so the figure of 1.9 can be considered acceptable. But if you are planning a long trip along the highway, then you can increase the value to 2-2.2 Bar. This approach will improve the car's running speed and save 0.5-1 liter of gasoline per 100 km. However, this only applies to flat roads - if the road under the wheels is far from ideal, it is better to leave the indicator as standard.
How to properly inflate wheels on various cars
Depending on the make, class, size and weight of the car, the technique for inflating wheels does not change, but nuances remain, each of which is characteristic of a specific type of vehicle.
So, inflation of tires for a car looks like this:
- How to pump up a wheel on a VAZ 21213 with a decompressor? If we are talking about the famous “Niva 4x4” or VAZ 21213, then the recommended tire pressure is 0.21 MPa for the front wheels and 0.19 MPa for the rear, which is equivalent to readings on the pressure gauge of 2.1 kgf/cm² and 1.9 kgf /cm² respectively. In order to pump up the wheels with a decompressor, the driver should take the following steps:
- You need to make sure that the car is on a flat, hard surface and that each wheel is under the same load. Otherwise, when driving, there will be an uneven distribution of pressure in the tires, which will lead to vibration.
- First, you need to unscrew the caps on absolutely each nipple in order to gain access to the valve.
- Next, you need to press the decompressor nipple on the nipple, while simultaneously observing the reading of the pressure gauge needle and recording the value for each tire.
- If any of the cylinders does not meet the required pressure, you need to turn on the switch on the hose handle or on the device body itself, depending on the type of its structure, after which air will begin to be automatically pumped into the cylinder.
- As you pump, you need to carefully monitor the readings of the device, and if the tire turns out to be overinflated, you need to urgently turn off the device and simply turn the screw on the compressor handle to bleed off excess air.
- Upon completion of the procedure, the plastic caps must be returned to their place, and the driver can continue driving.
- In cases where the length of the hose is not enough to reach all 4 wheels at once, craftsmen and car enthusiasts often use a special rubber, plastic or metal extension for inflating the inner wheel. It is a tube with a valve design and its own rotating nipple for ease of use on wheels.
You may be interested in this About the wheel size on Honda SRV
Wheel inflation point at a gas station
- Wheel inflation system for KamAZ 43118. When it is necessary to inflate a tire on a truck, for example, on KamAZ 43118, the algorithm of actions should consist of the following steps by the driver:
- On KamAZ trucks, the air pressure should differ depending on the type of terrain where the vehicle is operated and is 0.8 for a swampy road; for dense snow cover – 1.1; for sandy base – 2.0 and for all other types of hard surface – 2.0…2.1 kgf/cm².
- The wheel inflation system is controlled by the driver himself directly from the cab by turning a special switch, which activates the opening of special shut-off valves, and air under pressure is pumped into the truck cylinders through a system of cuffs and pipelines.
- If it is necessary to carry out tire fitting, personal valves are installed on each wheel of the equipment to stop the supply or intake of air. The driver can independently close each of them, thereby disconnecting the automation, which makes it possible to fully engage in replacing the wheel or repairing it.
Tire inflation tubes on KamAZ
Important!
When pumping, there is no need to increase the pressure above the allotted maximum. And vice versa, do not pump an insufficient amount of air into the wheel, as all this will lead to premature wear of the tires and suspension. In addition, you need to ensure that each tire on one axle has strictly the same indicators so that in the future the driver does not experience vibration when driving and the car does not pull to the side.
Features of work on the VAZ-2121 Niva
Changing disks during repairs is as easy as shelling pears.
Required tools:
- Jack. Raise the car and be able to remove the wheels.
- Gloves. Protect your hands from any harmful substances.
- Key. To remove a wheel from a vehicle and loosen the brake caliper.
- Screwdriver. For removing the brake lining and accessing the brake disc.
- Brake cleaner. To protect the new brake disc and remove dirt.
When purchasing new wheels for installation in a car, you may notice that they are covered with a layer of paraffin. Before installation, you need to degrease the discs using a cleaner.
Replacement is required when the minimum wear thickness is reached or when any anomalies are detected (scratches, bends, cracks, breaks). Each mechanism has a predetermined minimum thickness limit below which it must be replaced. This minimum wear limit is indicated on the description sheet. If the side of the brake mechanism is equal to or less than the specified minimum limit, then replacement is necessary.
When installing a flange on a disc contour, it is difficult to accurately measure the residual thickness. To effectively measure brake thickness, you need to measure the thickness at three different heights: first near the outer flange, second at the center, and third near the inner edge. To replace the mechanisms, you will first need to remove them, that is, raise the car with a jack.
Replacement occurs as follows:
- The wheel is removed.
- The bolt at the lower brake flap is turned out.
- Using a screwdriver, bend the screw stoppers.
- Remove the bolts from the guide block.
- The shield and caliper are removed.
- The support is suspended on a wire or rope.
- The protective cap of the hub is removed.
- The hub is held, the nut is unscrewed and removed.
- The disk is removed.
- A new disk and removed parts are installed.
Also interesting: Rear disc brakes on a Niva
Hello everyone, today I’ll tell you how to replace the front brake discs of a Chevrolet Niva with factory ones or ventilated ones from a third-party manufacturer. For any car, the braking system is an important element, since thanks to it it is possible to avoid emergency situations on the road. If this system is faulty in a car, it is prohibited from being allowed on the road.
This article will focus on such an important part of the braking system as the front suspension brake discs. Chevrolet Niva sometimes needs to remove a damaged part and replace it, and therefore you need to know how this is done. So let's get started.
If malfunctions do occur, you will need to remove the damaged part. To do this you will need to use the following tools:
- A set of car wrenches (10, 14, 17 and 27);
- Screwdriver;
- Hammer;
- Pliers;
- And a jack.
So, let's get started - below is the sequence of steps and instructions on how to replace the Niva's front brake discs:
- The machine must be placed on a flat surface and secured with a hand brake, wheel chocks and the front part raised with a jack.
- Unscrew the nuts and remove the front wheel. Often you have to hit it with your foot to loosen a wheel that is tightly seated on a dirty hub.
- Next you need to remove the caliper. If you simply release the wheel caliper, they will hang on the brake hoses, which is very undesirable, because they can tear. To avoid having to replace brake hoses, hang the caliper from the shock absorber or suspension spring using a wire.
- Then remove the brake pads. Mark them before removing them to avoid confusion during reassembly.
- Then remove the disk by unscrewing the casing bolt that is attached to the disk.
- Next, take a screwdriver and bend the locking plate antenna from the upper and lower mounting bolts of the guide block in the places where it is attached to the steering knuckle.
- Then unscrew the upper and lower mounting bolts of the shoe guides.
- Remove the guide block and casing.
- Unscrew the hub nut and remove the brake element along with the hub.
- Then we disconnect the hub from the part. Before doing this, you need to screw the hub nuts back on so as not to damage the threads with a hammer and knock out the studs one by one.
- Then we repair or replace the disk.
- Then, in the reverse order of removal, we put all the elements, including the new or repaired brake disc, in their places. To reinstall the studs, you can use wheel nuts to screw them onto the ends of the studs. You need to tighten these nuts evenly to press the studs evenly back into the disc and hub.
Let's move on to the front mechanisms. On a VAZ-2104 or any other “classic”, the difficulty of operating the front circuit lies in the fact that they have a block brake caliper, that is, each of the two brake pistons is actuated separately.
Therefore, in order to gain access to the external piston fitting in order to bleed the brakes on a VAZ-2105, you will have to remove the wheel. Here, too, the principle of distance between the mechanism and the main cylinder applies, so the left wheel is pumped first. Everything is done like this:
- Jack up the wheel and remove it;
- There is no need to touch the fitting of the internal piston (and it is not always available; instead, there may simply be a plugged hole). Next, pumping is carried out according to the already familiar scheme: pumping - draining - pumping (4-5 times);
- The right front wheel is pumped last. The algorithm of actions is identical;
How to use the tire inflation system at a gas station
As mentioned above, many well-maintained gas stations, among their many services, have tire inflation services using specially installed compressors with hoses. As a rule, these devices are located near the gas station exit, in places where the driver can park without interfering with traffic. In order to properly inflate the wheels, the driver must take the following steps:
- How to pump up a tire at a gas station? First you need to drive as close as possible to the pumping station so that the hose with a special gun can easily reach any wheel of the car.
- To check the tire pressure, you need to remove the plastic tips on the nipples, then bring the gun to the valve and lightly press on it, measuring the pressure gauge.
You might be interested in this About the wheels on the GAZ 66 - their size
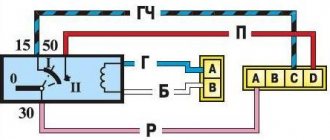
Wheel inflation sensor diagram
- In every car, the permissible tire pressure is indicated on the threshold when you open the driver's door. It is for these purposes that the driver needs to look at these indicators before checking his wheels, remembering each of them. You should be careful, since the pressure on the front and rear axles can be either identical or different due to the uneven distribution of masses in the car.
- If the tire pressure exceeds the permissible values, the driver should bleed some of the air until the needle on the pressure gauge drops to acceptable levels.
- When it is necessary to inflate the wheel, the driver should remember that there is a special lock on the gun, which must be latched in each case of air injection, or its too powerful flow will not allow it to provide normal pressure in the wheel.
- If there is not enough pressure, there is a special button on the gun, by pressing which the driver will hear the compressor operating, and air under pressure will begin to be pumped into the tire, which, again, will be indicated by the indicator on the device.
Important!
If a car enthusiast gets distracted and overinflates the wheel, it may lose plastic deformation, resulting in it bursting or simply not being able to return to its previous position. The structure of the rubber tire will be damaged, and when the deformations are removed, the tire will not be able to regain its original shape.
Carrying out work on rear mechanisms on VAZ classic models
Tools: keys, hammer, screwdriver, etc. Same as replacing front discs.
- The car is placed on a jack and the rear wheel is removed.
- The brake drum mounting bolts are removed.
- The drum is removed.
- Using a screwdriver, remove the tension spring and spacer bar.
- The shank of the front pad strut rotates.
- The front block is retracted and the lower tension spring is removed.
- The support strut of the rear block is removed.
Assembling and installing the pads is performed in the reverse order.
For details of the entire process, watch the video at the end of the article.
First, let's look at how to properly bleed the brakes on a Classic. To perform the operation correctly, it is necessary to take into account that on the VAZ-2106 or any other model, the brakes are dual-circuit. That is, the entire system is divided into two independent parts. This was done so that if one of the circuits depressurizes, the second remains operational and the car can stop.
For all classic models, including the VAZ-2107 brakes, the circuits separate the front and rear wheel drives. This must be taken into account when it is necessary to bleed the brakes of a 2101 or another model.
By the way, if only one circuit is aired, then it is not necessary to bleed the second one, although it would not be superfluous to treat all mechanisms, both front and rear.
So, everything is prepared, and you can get started.
The sequence of actions is as follows:
- It is better to drive the car into a pit to make it easier to get to the fittings. At the same time, he is immobilized using a handbrake or wheel chocks;
- Remove the cap from the brake fluid reservoir, check the level, and if necessary, bring it to the maximum level;
- First, we bleed the rear brakes of the VAZ, since the entire operation is done from the brake mechanism, which is as far as possible from the master cylinder, that is, from the right rear wheel;
- We put the assistant in the driver's seat. We climb under the car ourselves, put the key on the fitting, and then put the prepared tube on it, the second end of which should be lowered into a container with a small amount of liquid poured into it. It is advisable to immediately tear the fitting out of place and immediately screw it back, even before pumping. This is done so that there is no hitch in the process due to a non-unscrewing fitting;
- We ask the assistant to press the brake pedal 5-6 times. At the same time, with each press the failure will be less and less - the drive is pumped with liquid, while air moves to the mechanisms. After downloading the system, the assistant should hold down the pedal - press and hold it;
- Unscrew the fitting half a turn, working fluid will begin to flow out of it. If a transparent tube is used, air bubbles will be clearly visible in it, and the pedal being held will begin to move down until it hits the floor. In this position, the assistant must hold it, at this time the fitting must be screwed back;
- This sequence of actions should be carried out for one mechanism 4-5 times to completely remove air;
- On the “classic”, the left rear wheel is pumped next (since they are combined into one circuit). But before that, you need to check the level of the tank and bring it to the maximum level. The sequence of actions is the same: pump the brakes and hold the pedal - release the fitting to drain the fluid with air (the pedal goes down) - tighten the fitting - pump again. And so 4-5 times;
Note that this sequence of actions is identical for all cars. The difference lies only in some design features of the system itself.
Many car enthusiasts have resorted to a similar method of upgrading their cars. In this case, as a rule, the brake discs were taken from the Sobol, and the calipers were removed from the Oka. It is worth noting that the finished result was often an order of magnitude worse than the expected effect. There were no hydraulics, problems with the handbrake often arose, and other unpleasant situations occurred, so driving such a tuned car did not bring anything good. Yes, and you won’t be able to pass a technical inspection after such an upgrade.
Also interesting: How to adjust the sorcerer Niva Chevrolet
How does the automatic tire inflation system work?
If a vehicle has high cross-country ability and is used to perform strategic tasks, its wheels must always maintain optimal pressure. Such vehicles are equipped with an automatic tire inflation system, which operates according to the following principle:
- In total, there are 2 main companies that install such equipment on cars - Dana (USA) and Syegon (France).
- Automatic tire inflation device. The principle of operation is based on the presence of a valve located on each wheel, and this device automatically serves as a shut-off valve to disconnect a particular cylinder from the system for servicing or replacement.
- There is also a control unit (ECU), which issues commands to the valves, maintaining pressure within preset limits.
- The driver's front monitor has an interface through which he monitors tire pressure, and the system automatically warns him of a malfunction.
- If the tire pressure is outside the established limits, the vehicle owner, by pressing the appropriate button, sends a signal to the control unit, which activates the processor and forces air through the valves into the cylinder.
Important!
To install such equipment, an additional compressor is not required at all, since the system is completely integrated with the air supercharger for the car brakes.
Central wheel inflation system
For professionals whose activities are inextricably linked with special vehicles, for example, military equipment, cars designed to save human lives, as well as in other cases when urgent tire inflation is required, the valve automation has been improved to such an extent that the pressure balance is always maintained , regardless of the time and place of operation of the vehicle. So, this system is structured as follows:
- There is an electronic sensor inside the tire that monitors any change in pressure inside the wheel and, if necessary, notifies the central controller about it. This happens both when the wheel is punctured and when air is released through the nipple, which changes the state of the gas inside the tire and causes uneven tire inflation.
Every car owner should inflate their tires regularly and for their own safety during refueling, regular maintenance, or at a car wash where a similar service is available. In addition, every driver who operates his vehicle away from populated areas should keep a portable compressor or hand pump in the trunk so that he can quickly fix this problem.
If the car is used in extreme places, then it should be equipped with a centralized air pumping system so that a suddenly flat tire does not cause a big problem.