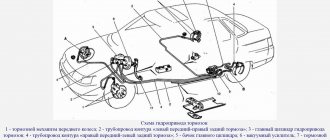
Malfunctions of the vacuum brake booster VAZ 2110
Devices from different manufacturers may vary in characteristics and quality, and the price of the VAZ 2110 vacuum amplifier may also vary. Since the functioning of its mechanism affects the operation of other parts and components, and above all the car engine, it is worth not saving and carefully monitoring its serviceability.
If there is a hissing sound from under the hood, a burnt smell of oil is felt in the cabin, and the brake works like a stopped car only after repeatedly pumping the brake pedal with your foot, then you should immediately contact a car service center for diagnostics and, if necessary, replacement of this device.
Table of dozens of faults in the vacuum brake booster and methods for eliminating them
| Signs | Diagnostics | Conclusion | Elimination method |
| Hissing when braking | The engine is running, press the brake pedal and at the same time detect a hissing sound in the pedal area | The integrity of the diaphragm is compromised | Diaphragm replacement, total VUT |
| Hissing when the engine is running | The engine is running and a hissing sound is heard in the engine compartment. The engine runs unstably; when you press the brake pedal, the speed increases slightly briefly | The integrity of the pipe connecting the VUT and the intake manifold is damaged | Search for air leaks, elimination, replacement of pipe |
| Soft “cotton” brake pedal | When you press the pedal, it steadily, non-stop “goes” to the floor. When braking there is no feeling of stable resistance to pressing force | Depressurization of the hydraulic system, air ingress | Searching for leaks, checking fluid levels, bleeding brakes. |
| The car does not “slow down” | When you press the pedal, the braking is delayed, the pedal travel is not enough to lock the wheels | Large free stroke of the rod | Adjust idle speed |
How to check the vacuum brake booster of a VAZ 2110
You can check the vacuum brake booster “tens” for proper operation yourself. To do this, press the brake pedal repeatedly with the engine off. This method checks the uniformity of pressure in the cavities. Everything is fine. Then, when you hold your foot on the brake pedal, the engine starts. If the pedal is moved forward simultaneously with the foot, then the amplifier is operational. Otherwise, you need to make sure that the problem is this and not a problem with the tip flange or its fastening.
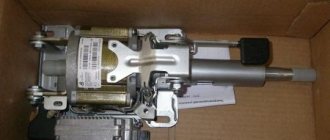
Vacuum brake booster VAZ 2110
The pedal may still not function properly due to a faulty connection of the fitting on the engine exhaust pipe to the hose. This also has a detrimental effect on the performance of the braking system and its efficiency. when the valve body does not stick.
Replacing the vacuum brake booster on a VAZ 2110, VAZ 2111, VAZ 2112
Welcome! Vacuum brake booster - designed to make the brake pedal much easier to press, it only works when the engine is running, but when the engine is turned off, the vacuum booster will not work, all this is due to the fact that when the engine starts, the air filter housing begins to suck in air from the environment and it enters the intake manifold, air is taken from the manifold a little and goes into the vacuum chamber and therefore it starts to work only when the engine starts.
When to change the vacuum brake booster
If the brake booster fails, a hiss may appear when you press the brake pedal, and the speed may also go up and then down, in addition, the brake pedal will become difficult to press (This is equivalent to the fact that the car is turned off) basically this is there are all the symptoms that indicate that the vacuum booster has failed, it does not always happen that they all appear together in the car, but a couple of them will still appear when the vacuum booster becomes unusable (the main ones most likely, namely, tight brake pedal and floating speed).
By the way, the vacuum booster can be checked for serviceability as follows: With the engine off, press the brake pedal 5 times and when the last press is made, hold the pedal to the floor, immediately after which start the car, if the pedal falls a little, this will indicate that that the vacuum booster is fully operational!
When should it be changed?
- When the brake booster fails, you may hear a hissing sound when you press the brake pedal.
- Also, the engine speed will become uneven.
- The brake pedal will also become difficult to press.
All these symptoms indicate that the brake booster needs to be replaced. They may not always appear all together.
You can also check the amplifier as follows: with the car turned off, depress the brake pedal 3-4 times. With the pedal depressed, start the engine. If the pedal sinks a little, this will indicate that the amplifier is working properly.
How to remove the vacuum brake booster of a VAZ 2110
We remove the vacuum booster and brake pedal assembly after removing the engine compartment upholstery, trim and windshield trim.
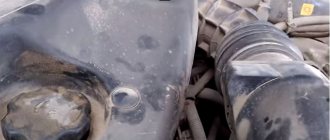
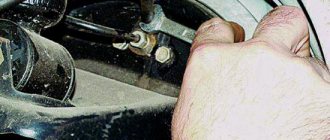
- Replacing the vacuum brake booster on a VAZ 2110. The reason for the replacement was that a hissing sound appeared when pressing the brake pedal, which could cause the engine to stall at any moment, the brake pedal became tight. To replace the vacuum booster, it is necessary to disassemble the rear wall of the engine compartment; remove the rubber seal (1), unscrew the upholstery (2) and remove the frill (3).
- Disconnect the block from the brake fluid level sensor, disconnect the hose from the vacuum booster, and unscrew the two nuts of the brake master cylinder.
- After that, carefully remove the main brake cylinder (without unscrewing the brake pipes) from the vacuum booster to a distance sufficient to remove the vacuum booster.
- Inside the car, under the dashboard (under the instrument panel), unscrew the four nuts and remove the wires from the frog. The most difficult thing in replacing the vacuum booster is unscrewing these four nuts, they are very inconveniently located.
- We remove the vacuum booster along with the pedal assembly.
- Remove the locking plate and push out the vacuum pusher mounting pin.
- Unscrew the vacuum booster from the pedal assembly.
- We install a new vacuum booster, pay attention to the correct installation, the pedal is at the bottom, and the hose fitting is at the top. Next we assemble in reverse order.
Step by step replacement
1. Open the hood and disconnect the connector that goes to the brake fluid float in the reservoir.
2. Now we need to remove the brake master cylinder. There is no need to unscrew the tubes.
Using a wrench and a 17mm socket, unscrew the two nuts securing the cylinder and move it a little to the side.
Be careful not to drop the nuts into the engine compartment. There are also washers installed under the nuts; don’t forget to remove them.
3. Disconnect the hose from the vacuum booster.
4. Next we go to the salon.
5. The studs from the vacuum booster go into the cabin and are screwed in with nuts, of course, in the cabin.
6. Using a wrench and a deep socket, unscrew the four nuts securing the vacuum booster.
7. Remove two wires from the “frog” of the brake light.
8. Remove the vacuum booster along with the bracket and brake pedal.
9. Next, you need to disconnect the vacuum booster rod from the brake pedal. To do this, you need to remove the lock marked below.
To remove the lock, you need to turn it and pull it towards you using pliers.
Slide it down and remove the rod.
10. After removing the rod, you need to unscrew the two nuts from the bracket itself. Don't forget to remove the washers.
11. Remove the bracket with the brake pedal from the vacuum booster.
12. Let's start assembly. We take a new vacuum booster and put it on the bracket mounting studs.
Make sure that the vacuum booster rod is level and without distortions at the place of attachment to the brake pedal.
13. We put on the washers and tighten the two nuts securing the bracket.
14. We insert the pedal fastening rod from below to the vacuum booster rod and lock it with a lock from above.
15. Put everything in place and tighten the four fastening nuts from the interior side.
16. Connect the wires to the “frog” of the brake light.
17. Connect the hose to the vacuum booster.
18. We put it on the studs and screw the main brake cylinder.
Symptoms of malfunction
- When pressing the pedal, too much force must be applied for braking to be effective.
- When you press the pedal, the engine starts to work intermittently and the speed drops.
Adjusting the rod of the vacuum brake booster VAZ 2110
To adjust the brake booster rod we will need: a 3 mm thick plate
Before starting work, you must: Disconnect the wire from the “—” terminal of the battery.
Carry out adjustments with the engine not running.
- The free play of the brake pedal is adjusted by moving the brake signal switch and, if adjusted correctly, should be 3–5 mm.
- With reduced free play of the brake pedal, the wheels may slow down, causing overheating of the brake mechanisms, as a result of which the car accelerates poorly.
- Increased pedal free play does not allow you to accurately calculate the braking force.
- Smoothly press the brake pedal with your hand until you feel resistance. In this position, insert a 3 mm thick plate between the switch buffer and the pedal bracket. If the plate does not fit between the bracket and the buffer or there is a large gap between them (more than 2 mm), adjust the free play of the brake pedal.
- Keeping the pedal pressed, loosen the two nuts securing the brake signal switch and, moving the switch, achieve the required free play of the pedal. After adjustment, the bracket should rest against the switch buffer (with the pedal released). While holding the switch in this position, tighten the fastening nuts. If you cannot adjust the free play of the pedal in this way, be sure to contact a specialist.
Dismantling
To replace the vacuum booster, the following actions are necessary:
- Remove the engine compartment trim;
- Remove the trim from the windshield;
- Unscrew the nuts securing the vacuum booster to the main cylinder with a 17mm wrench;
- Then carefully remove the master cylinder from the studs without damaging the tubes;
- Disconnect the hose from the vacuum tank;
- Disconnect the wiring from the brake light switch from the passenger compartment;
- Unscrew the brake pedal from the body (you will need a 13 key);
- Remove the vacuum brake booster;
- Disconnect the brake light button;
- Using a screwdriver, pry up the locking bracket and remove the pusher pin;
- Unscrew the two nuts securing the vacuum chamber to the bracket and disconnect it. Now it is possible to replace this device with a new one.
The vacuum seal is replaced in the reverse order. Then the brake light button is installed and the free play of the pedal is adjusted, which should be 3 - 5 mm.