Your own well on the property allows you to use running water without any restrictions - you don’t need to choose a specific time to do laundry, take a bath, wash your car, or water the flower beds near the house. Agree, it’s great when water always flows from the tap without interruptions and there is no supply schedule/unscheduled shutdowns.
Problems with water supply may occur if the pump breaks down. Knowing how to disassemble a submersible pump, you can independently identify faults and fix them at home. We will talk about how to correctly diagnose a breakdown in this material. We will also consider in detail the instructions for disassembling the pump with your own hands, providing the article with step-by-step photos and useful video recommendations.
Why does equipment break down?
A submersible well pump provides convenience and ease of use of the well. It lifts water from great depths to the surface, where it flows through communications to water intake points.
Domestic and foreign enterprises produce household submersible pumps. And although the pumping equipment is reliable, breakdowns may occur from time to time during operation.
All elements of submersible pumps are precisely fitted and can be easily disassembled. If during the assembly process the parts do not fit into place freely, then the order of installation of the individual components is incorrect
The smooth and smooth operation of a submersible pump is often disrupted by the following reasons:
- high (more than 50%) concentration of suspended particles in water;
- “dry” operation, when the device operates without touching the water;
- voltage drops above the permissible level that regularly occur in the network;
- poorly secured cable connections;
- the unit cable is not correctly attached in the well head area;
- The submarine cable is not secured correctly.
Malfunctions are caused by the absence of a filter or its excessive contamination, an unstable pressure switch or a poorly functioning accumulator.
In the absence of grounding, electrochemical corrosion affects the metal elements of the equipment. The pump stops pumping water normally and requires immediate maintenance.
If problems arise with a new pump that is under warranty, do not fix them yourself. It is better to take the device to a company service center. There, its functionality will be restored by experienced professional technicians.
Very often, the cause of the malfunction is errors made by users during the installation of the pump and its operation. Manufacturers and service center employees recommend that customers, immediately before connecting devices, carefully read the instructions and strictly follow everything that is written there. This will avoid many problems and extend the life of the pumping equipment.
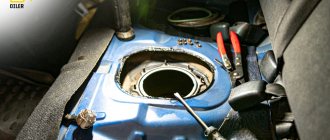
Where is the pump located?
Locating the drain mechanism at the front wall of the machine
The drain mechanism can be located in various places of the household appliance. Its location depends on what brand of washing machine was purchased. The pump can be installed:
- In the back of the car (Electrolux and Zanussi)
- Just behind the front cover (AEG, Bosch and Siemens)
- At the bottom of the machine (Whirpool, Samsung, Ariston, Beko, LG)
Having established the exact location of the drain unit, it is necessary to remove the part for inspection.
Troubleshooting overview and troubleshooting tips
Any changes in the operation of submersible devices clearly indicate problems and malfunctions. Such moments cannot be ignored. Timely repairs extend the life of the device and ensure its normal functioning in a mode convenient for the owners.
You need to think about servicing the pumping unit if the following points are found:
- a pronounced decrease in water pressure;
- increased noise from the well;
- intense vibration of the casing;
- pulsed flow of water from the tap;
- increased energy consumption;
- knocking out plugs when the unit is activated;
- humming of a switched-on engine when there is no bleeding.
In this case, you need to remove the submersible apparatus from the well using a safety cable, disassemble it, identify the area of problems and eliminate them.
When removing the pump from the well, you should act carefully. Damaged or skewed parts of the casing pipe, silt deposits or limescale formed on the walls can interfere with the process if water is taken from artesian formations
Moreover, the same malfunction is eliminated differently for different types of pumping equipment.
So, depending on the design features and operating principle, submersible pumps can be:
- centrifugal - their main element is an impeller (“Aquarius”, “Vodomet”);
- vortex - similar to centrifugal, but they have a high circular velocity of the fluid (“Vortex”);
- vibrating – in vibrating machines the main element is the piston (“Baby”).
Before moving on to popular pump breakdowns, we suggest once again recalling their structure.
The diagram shows the main structural elements of a centrifugal type submersible electric pump. Knowledge of the equipment design will help identify the cause of the malfunction.
Knowledge of the design of a vibration-type submersible pump will help diagnose breakdowns and repair the corresponding element of the electric pump design
Next, we will consider a list of common breakdowns of vibration and centrifugal submersible pumps, as well as recommendations for eliminating them at home.
Problem #1 - the pump does not work
If the device does not function, the electrical protection may have tripped. It is necessary to disconnect the device from the power supply, and then turn on the automatic plug again. Then you need to connect the electric pump to the network.
If a phase is knocked out again, the problem should not be looked for in the submersible equipment, but carefully inspect the cable and fuses. In this situation, it is better not to connect the device to the network until the circumstances of the malfunction are clarified.
Blown fuses must be replaced immediately. If they burn out again, the reason lies in the power cable of the pump or in the area where it is connected to the electrical network. All these elements should be checked and any damage found should be repaired. Only after complete maintenance can the pump be used again.
If the underwater cable is damaged, the pump will not pump liquid. To return the device to functionality, you need to remove it from the well, restore the integrity of the cable, put it back and connect it to the network
Problem #2 - pressure drops
A significantly reduced level of water pressure in centrifugal models clearly indicates excessive wear of the impeller, its silting , or its displacement along the shaft . This situation is also provoked by a clogged mechanical filter located on the suction pipe.
The solution in this situation is to thoroughly check the impeller, clean the impeller and filter, and replace the worn impeller.
A noticeable weakening of the pressure in vibrators is caused by a suction valve that has stopped closing or a deposit of silt and sand that has appeared on it. The same problem occurs when the piston of the vibration mechanism loses its elasticity. The cause may also be a loose piston, shock absorber or solenoid. All these nuances can be eliminated at home without much effort - just tighten the fasteners or replace the valve.
Or the reason for the drop in pressure in vibration and centrifugal pumps may be even simpler - low voltage in the network. In this case, installing a stabilizer will not hurt.
Problem #3 - pulsed water supply, noise and vibration
Increased noise from the well indicates a broken shaft or loosening of the nuts that secure the position of the rod on the shock absorber in the vibration pump. In the first case, the shaft needs to be replaced with a new one, in the second, the loose fasteners must be tightened with a handy tool.
An intermittent, whistling stream in the tap indicates that the water level in the well has dropped below the dynamic level, and the filter element on the suction pipe has become exposed. The situation can be corrected by simply lowering the pump to a greater depth. If the distance to the bottom of the mine provides such an opportunity
the shaft or rod may have failed . The equipment should be removed, disassembled and damaged parts repaired. In case of fatal damage, replace with new ones.
Problem #4 - excessive energy consumption
If you notice an unexpected increase in your electricity bills, you should pay close attention to your submersible equipment. It may be necessary to balance the impellers of a submersible centrifugal electric pump.
Either silt or sand got into the housing and caused mechanical friction . The load increased, and the unit began to consume more electricity to pump a standard volume of water.
The pump will not be able to shut down if the pressure switch is incorrectly adjusted or fails. Installing a new part will quickly solve the problem
Increased consumption could be caused by worn-out cavities of the screw and bushings on the shaft of the screw unit. They must be replaced with new ones as quickly as possible and the pump will return to operation as before.
Problem #5 - constant traffic jams
The protection that always triggers when the submersible vibration pump is turned on (knocking out the plugs) is the result of a violation of the tightness of the engine compartment housing. Moisture that gets inside has a negative effect on the control electronics and interferes with normal operation. The result is often a short circuit, followed by additional problems, even burning out the equipment.
Also, the reason for knocking out the plugs may be a break/short in the cable or coil of the electromagnet, overheating of the electromagnet due to low voltage in the electrical network, or false operation of the plugs. In this situation, you will have to replace the cable or coil (depending on where the fault is found), check the plugs and replace them if necessary, and install a stabilizer.
If the insulation of the power cable is broken for some reason (breakdown), the protection will definitely work. Once the integrity of the layer is restored, the pump will return to normal operation.
The protection of centrifugal pumps is triggered by a short circuit in the stator winding or armature of the electric motor and jamming of the device by various debris particles. To fix the problem, you will need to clean the unit from possible blockages, take it to a service center for rewinding, or install a new coil.
Problem #6 - the pump hums, but does not pump
When a submersible pump hums loudly but does not pump water from the well into the communication system, there may be several reasons. Perhaps the network voltage has dropped and the equipment simply does not have enough power to start normally. If the voltage drop is typical for your region, it makes sense to play it safe and install a stabilizer.
Other possible causes for centrifugal models: wear or silting of the impeller, loosening of the impeller to the shaft, clogged coarse filter, breakage of the key connecting the impeller to the shaft. Also, if the pump has been stored for a long time without water, the impeller may “stick” to the housing. Or dirt accumulates in the housing and the device jams.
To eliminate these breakdowns, you will need to clean all contaminated elements, replace faulty ones with new ones, and tighten the fastenings.
The same problem with the hum of an electric vibration pump can occur due to: wear of the valve or piston, displacement of the electromagnet, crumpling of the shock absorber and loosening of its fastening. Repair work in this case will consist of replacing worn parts, tightening fasteners, installing the electromagnet and shock absorber in place and securing them securely.
To troubleshoot problems, the equipment will have to be removed from the well, carefully inspected and repaired.
Do-it-yourself pump repair
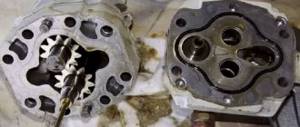
If the drain pump in the washing machine fails due to burnout of the electrical winding, then in this case it is necessary to replace the part. In other cases, it is often possible to restore the device to full functionality, for which you should first clean the impeller and filter. To clean the impeller, you will need to disassemble the device housing. The two halves of the working cavity of this part are usually held together with 3 screws, so it is enough to unscrew the hardware holding the pump parts together to gain access to the impeller.
Disassembling the drainage device
The cause of deterioration in the performance of the drain mechanism, as well as complete jamming of the working shaft, may be threads, hair or long wool. It is necessary to carefully inspect the impeller and shaft and, if such contamination is detected, clean them using a thin screwdriver. The inside of the cochlea also needs to be wiped to remove soap deposits on its walls.
When the parts are cleaned, wash the two halves in water without immersing the engine. Then you need to assemble the housing, connect the pipes and electrical terminals to it and install it in its original place.
When the process of installing the cleaned pump is completed, turn the machine into rinsing mode and check the operation of the drain mechanism. If the device operates in normal mode, then no more
no measures are required; if it was not possible to repair the pump in this way, then it is necessary to replace the electric drain pump in the washing machine.
Typical breakdowns of pumps of different brands
Equipment from popular domestic and foreign brands has its own characteristic failures. Devices from the Danish manufacturer Grundfos , despite their reliability and durability, require regular replacement of mechanical seals . If this is not done in a timely manner, water will penetrate inside and damage the winding.
It is not advisable to service the unit at home. The specific design requires that repairs be carried out by an experienced specialist, ideally an employee of a company service center.
A pronounced hum and pressure that has dropped to a minimum indicate that the impeller in the pump has worn out or has moved along the axis. The device must be disassembled, cleaned of sand, damaged elements replaced and new seals installed.
Gilex units often leak fluid from the electric motor . It can be replaced, but only with a similar composition.
Some craftsmen believe that it is not necessary to buy an expensive substance. You can get by with glycerin or transformer oil. However, this is not the best advice. The equipment does not tolerate filling with alternative means very well and can completely fail after such an operation.
It is better not to repair the device yourself, but to entrust this task to qualified specialists. They are guaranteed to fill the engine with the original composition and do so in strict accordance with the manufacturer’s wishes. After servicing it will work just as well as on the first day of purchase.
Worn seals are indicated by a low oil level in the pump motor. It is better to replace them as quickly as possible. This will protect the motor from overheating
In the “Malysh” coils often fail . Dry work provokes this problem. A strong noise heard when turned on without pumping out water indicates a break in the central axis to which the membranes with the armature are attached. This breakdown is easy to detect after disassembling the unit.
Replacing an axle even at home is not difficult. But finding a part on sale is really a problem.
Aquarius pumps tend to overheat . This drawback is especially active when the equipment operates in shallow wells. Repairs are expensive and sometimes amount to about 50% of the original cost. In such cases, many users prefer to buy a new device, albeit from a different manufacturer.
The same problem is typical for the “Rucheek” . Despite the modern design and compliance with current European standards, they do not tolerate continuous operation .
The manufacturer says that the devices can continuously pump water for no longer than 7 hours. However, almost always such a load leads to overheating. To avoid problems, it is better to take breaks and let the equipment rest every 2-3 hours. In this way, the service life of the pump can be extended.
Do not start water pumping devices with the shut-off valve closed. In the future, this will lead to breakdown of pumping equipment. Before turning on, the valve must be opened
Vodomet pumping equipment is considered to be quite reliable and operationally stable. Most breakdowns here occur due to improper use. Also, when equipment comes into contact with contaminated water, it quickly becomes clogged with silt and sand. In this case, the pump part of the unit requires replacement.
When a problem cannot be solved at home, you should seek help from the professional technicians of a certified service center. They will quickly determine what happened to the equipment and restore its functionality. Or they will recommend purchasing and installing a new pump if the old one cannot be repaired or it is not economically viable.
Disassembling the pump
Before disassembling the pump of the washing machine, it must be disconnected from the pump volute. To do this, you need to unscrew the screws connecting the volute itself to the pump motor.
Before removal, it is recommended to make marks on the engine housing and volute with a pencil or marker in order to install them in their original position during assembly.
After you have removed the pump motor from the volute, pay attention to whether there is any wear on the impeller. If there is, this means that it has rubbed against the body, which may be subject to deformation from the high temperature of the water. In such cases, it is recommended to take ordinary wire cutters and shorten the length of the blades by 1-2 mm. If you cut more, the pump's performance may drop. Most often, the reason that water is not pumped out of the machine is the friction of the impeller against the volute casing.
The impeller should rotate freely. The rotation should be jerky, due to the magnetic field between the stator and rotor. If rotation is difficult, or you notice a beating when the rotor rotates, then disassembling the electric motor itself is necessary.
How to replace the pump
Changing the pump is not at all difficult; just carry out the steps described above to remove the device, then install a new part in its place. Installation of a new device is carried out in compliance with
precautions. All pipes and electrical terminals must be installed in the same way as they were located on the faulty device.
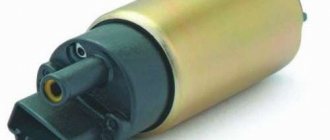
New replacement device
To replace it, it is best to use the original pump for a specific model, but if it is not possible to purchase a branded part, then install a universal model.
Such a pump is suitable for many washing machines, but is sold without a volute, so if this part is damaged, then in the absence of a new model of a branded pump, it is necessary to find a faulty washing machine, which will be used as a donor to remove a known-good drainage device.
When the new drain mechanism is installed in place and connected to electricity and pipes, a test run of the machine is performed in the “rinse” mode. If no disturbances in the drainage of liquid are observed, the household appliance can be used as usual.