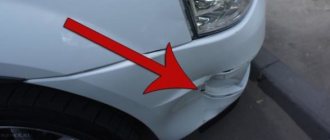
The need to remove and replace the dashboard on a VAZ 2110 car may arise when repairing devices and parts located under its surface. In particular, it is with the removal of the dashboard that the car’s air intakes are inspected. Sometimes they can become clogged and prevent your heating or air conditioning systems from working properly. The process of removing and replacing the dashboard on a VAZ 2110 is not particularly simple. To carry it out, you will need to be patient and master the skills of masterly working with instruments.
In today's article we will tell you how to remove, replace, install, modify and improve the dashboard on a VAZ 2110 with your own hands. In addition to all this, we will give you a photo report of the work done and show you an interesting thematic video.
What should be considered when replacing a torpedo on a VAZ 2110
Replacing the torpedo on a VAZ 2110 will not only add some charm to the car, but can greatly improve the ride comfort not only for the passenger, but also for the driver. After all, you can replace the dashboard with a torpedo. When replacing it, the following points should be taken into account:
- What exactly does the car owner want to achieve with a replacement? This could be an increase in space in the cabin in front of the front seat.
- Just to give, so to speak, an expensive look to the car.
- Organize a place to install additional devices - radios, screens, and so on.
In any case, you can get the most beneficial effect from such an undertaking.
The first thing to consider when selecting a torpedo for a VAZ 2110 is its size and the shape of the car’s interior.
It is also worth considering the category of people, passengers, who will be in the car. This will sometimes improve the safety of the vehicle.
Once the type of torpedo is determined, it is worth thinking about what additional functions it should perform. This could be the installation of additional equipment, space for mobile phones, space for a car audio system - speakers, or a radio.
The next stage is choosing a coating. It is best to get it as universal as possible and try to install torpedoes with the following coatings:
- Plastic. The torpedo is made entirely of plastic without unnecessary inserts.
- Plastic with wooden or leather inserts.
These are the two most popular types of torpedoes for the VAZ 2110, which are the most practical to use and will best suit almost any type of interior.
How to remove the dashboard on a VAZ 2110 with your own hands - step-by-step instructions + photo report
In order to remove a torpedo on a VAZ 2110, you must perform the following procedure:
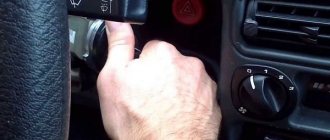
- Unscrew 2 screws on the right and 2 on the left on the central tunnel.
- Next, remove the covers on both sides.
- Remove the plug near the handbrake.
- Unscrew the screws on the left and right of the central tunnel.
- Unscrew the screws at the back of the central tunnel.
- Removing the plastic of the central tunnel.
- Disconnecting the cigarette lighter wires. Mark so as not to get confused when connecting to the assembly.
- Remove the gearshift knob cover.
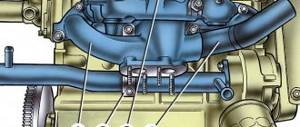
- Using a wrench, unscrew the interior heating air duct.
- Removing the air duct.
- Unscrew the fastenings of the central panel from the front.
- Unscrew the fastenings of the central panel at the back.
- We finally remove the panel.
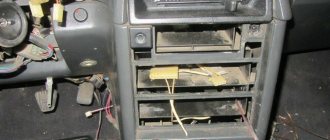
- We unscrew the screws of the glove compartment.
- We remove the glove compartment.
- Disconnect the glove box light wires.
- We unscrew the screws inside the space in place of the glove compartment.
- Unscrew the remaining screws on the sides of the torpedo.
- Unscrew the torpedo bolts as follows as in the photo.
- Removing the air duct.
- Unscrew the nut on the dashboard under the air duct.
- We lower the torpedo from the pins.
- We disconnect the wires from the front panel and mark them so as not to get confused during assembly.
As you noticed, if you follow our instructions, the process becomes much easier. You can remove the VAZ 2110, 2111, 2112 torpedo with your own hands, but it is better to do it with an assistant.
Lada 2112 Dvin4ik › Logbook › Removing the VAZ 2110 2111 2112 torpedo.
HAVE QUESTIONS ? WAITING IN THE COMMENTS
Good day! I couldn’t post the material for a long time for personal reasons) But the time has come, iii) Let’s go, Unfortunately, part of the material was lost forever, so the photo shows a general view, except for the gearbox tannel! for the first time in one mask) I myself relied on the disassembly manuals) Not everything is written there, I want to say. And if it is written, then a lot complicates the work as a whole. Therefore, if possible, rely on my report. The hardest part was removing the torpedo! What we need for this: A 10mm head, preferably with a small ratchet! 24mm socket (socket) or ratchet with extension! Crosshead screwdriver! Flathead screwdriver! Well sharpened! For those who are afraid to disassemble and not reassemble the connectors correctly, Adhesive Band-Aid and Marker! A box is desirable for bolts, screws, etc. Pliers! Scissors!
First, we remove the gearbox panel, otherwise removing the torpedo will turn into a puzzle. Removing the gearbox panel is easy. We unscrew the fastening bolts on the sides (difficulties will arise with the bolts next to the seats, we climb under the saddle or look for a way to get to the bolts) We remove the cover from the handbrake, if it is not clear what I mean, lower the handbrake and the cover will be right under your fist. There we unscrew the bolt. + Remove the gearshift lever cover and unscrew the 3 bolts + Remove the buttons for the beet lifters and other tunnel options. We take hold of the ashtray of the rear passengers (tunnel) and lift the cover of the tunnel to the top and with small jerks we pull it towards the rear sofa. Having gained access to the bottom of the tunnel, unscrew all the bolts securing it to the floor. TUNNEL HAS BEEN REMOVED!
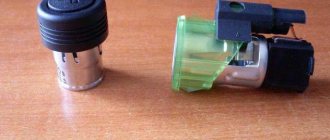
We remove all the air deflectors from the torpedo. We remove the air grille from the top (many have tweeters nearby) Do not pick at it from all sides! it is attached along the narrow edges, find a hole there, insert a sharpened screwdriver and remove the grille. Under the grille, unscrew the 10mm bolt with a head with an extension (on both sides of the torpedo) unscrew it with a pin? I congratulate you, you are a loser like me. We remove the steering wheel panel (the one above and below the ignition switch. We remove the board (we climb under it if we can’t find the 2 bolts and unscrew it) hold it or it will fall off and break the lamp wires. When disconnecting the wires, NOT SURE, WIND IT IN A BAND-AID! AND WRITE WHAT’S WHAT’S WHAT! AND WHERE! Having removed the control panel, we see from the top the bolt securing the torpedo + twist it. Twist the self-tapping screw + closer to the door at the very bottom of the control panel. Remove the cover of the mounting block by analogy with the control panel. Unscrew (mounting block with fuses) 1 bolt on the cover + Similar to On the side of the mounting block, closer to the right side, we see a self-tapping screw + (you will have to bend over to see it) Remove the protective panels under the feet of the passenger and driver on each side, 2 bolts + On both (passenger and driver) under the removed covers, closer to the end, we see self-tapping screws , on the driver's side there is a mass attached to them! Or we twist with the mass or twist it by analogy with the passenger side. Why am I saying this? There are slight differences in the torpedoes. Most likely, after all the manipulations, you will sit in the driver’s seat =) Look next to the hood opening lever there will be a self-tapping screw +, twist it. We remove the speedometer. Remove the 4 bolts of the speedometer mask 2 top 2 bottom Remove the speedometer by unscrewing the 2 bolts on its sides + Mark with an adhesive plaster if you are not sure about the reassembly.
Well, that's it, you can smoke =) Don't smoke? Then let's continue)
We remove all electronics from the console. Don't forget about the emobilizer sensor! If it doesn’t work or is disabled, we cut it off; if you don’t want to put a start button in its place, you can rewind it, or put it on for show off. There aren't many wires there, we'll clean 2 of them. Also, don’t forget about the headlight range control. As a rule, problems arise only with pulling out the radio, we work with a sharpened screwdriver, it is advisable to have disposable pullers. Everything except the radio can be removed quite easily. Don't forget to mark all connectors if you are not sure! We remove the horn cover on the steering wheel (((gudyps) fafakolki) horns) by unscrewing the plastic LADA cover with a 24-mm wrench, using the HEAD or end, we unscrew the steering wheel fastening nut. We mark the spline connection with a marker so that we can then put the steering wheel in the correct position, and with sharp movements from left to right we tear out the steering wheel. Release the steering wheel position lever. We disconnect the covers on the racks (from the left and from the right) For those who do not understand what I mean, these are the covers on which the tweeters are often located or next to them, by the way, did you remember to disconnect them? =) Since many of us are losers who have unscrewed the top bolts along with the studs, either the torpedo has already crashed on you or you need to pull it a little towards the top and towards you, it will not come out completely! Don't wait any longer! We take a good flashlight and look behind the moved panel on the driver’s side. We take good scissors and cut off all the bundles that secure the bundles of wires, disconnect everything that can be disconnected and mark and mark. The panel still won't come out? Look carefully, not everything has been disconnected, not all the harnesses have been cut off. As the wires are disconnected, the panel will move away more. When removing the panel, it is better to immediately disconnect the Christmas tree from the stove or from the panel, otherwise it will no longer be necessary to lift it) Why don’t you remove it! I WILL GIVE ADVICE TO CLEAN THE PANEL! Seal all the cracks in the air tunnels and modify the Christmas tree! (information in the next post) and install at least the worst Shumka shield for the interior and engine. Kill 2 or 3 birds with one stone in one go! That's it, the panel is removed! Tin...
How to put on the panel? In reverse order! But there are features, details in the next post! (Post above)
It will be useful: Transmission diagnostics: manual transmission and automatic transmission
HAVE QUESTIONS ? WAITING IN THE COMMENTS
Installing a torpedo on a VAZ 2110 - step-by-step instructions
In order to install the instrument panel of a VAZ 2110 (torpedo), you must perform the following steps:
- Install the instrument panel so that the guide pins fit into the holes on the instrument panel.
- At the same time, move the steering column adjustment knob into the hole on the instrument panel.
- Using a screwdriver, drive the threaded rods into the holes on both sides of the panel.
- Install the foot warmer air duct so that the air duct fits into the hole in the air distributor housing.
- Connect all terminals to wires in reverse order. Secure the panel and reinstall all components that were removed during disassembly. After completing the work, check the operation of all devices.
Improvement and tuning of the dashboard on the VAZ 2110
One of the most popular ways to improve the dashboard on a VAZ 2110 is its sound insulation. In order to do this, you must perform the following steps:
- We remove the tidy, I already told you how to do this earlier
- Next we foam, but under no circumstances should you pile up a huge pile of foam at once, it won’t dry out in a week.
- Don’t forget to try it on so that later it doesn’t turn out that your steering wheel touches it, or it’s just too high.
- In principle, all the work consists of two things, you cut, foam, cut again and so on many times.
- Next, we apply the cheapest putty we could find.
- Next we cover the dashboard with Shumka.
- We install the torpedo back.
You can modify the dashboard of a VAZ 2110 in different ways, someone covers it with leather, someone inserts an LCD monitor into it, in tuning a car it all depends on you and your fantasies and desires.
Lada 2112 “IraFastBack” › Logbook › Vacations. Part 5. Removing and soundproofing the front panel of the VAZ 2112
Cheers to everyone again)
As soon as the touch-up of the body was finished (THANK THE GODS), I got to the global alterations in the interior. For as long as I can remember, the most hellish nightmare
for me it was removing the front panel on absolutely any car. If you took it off, it means you have balls dude... This is how a boy becomes a man, this is how character is tested, this is how nerve cells are tempered)))
Why remove it at all and is there any point in it? The work is not easy
I answer: - yes there is! There is, and what kind of one! I’ll write a little more at the end!
The reason I don’t like basins is because of their disgusting interiors. Not so much for the interior itself, but for the noises, squeaks and rattles... The interior is built on snot. When driving on our roads, all the plastic becomes loose and the interior begins to be held together by snot and with God's help. And on old cars that have already seen life and these roads with God's help on old dried up snot. I was always bothered by extraneous sounds in a car, rattling, clanging. This is how you drive with friends or with a girl in a car - such a roar is as if we were driving a cart in a harness. I endured it. But when my eye began to twitch and my hair turned gray, I realized that I'm ready. I understood perfectly well that it would never be a foreign car, no matter what you do with it...But! The goal of all this in general is to assemble a VERY NON-STUPID TAN, in which it would be PLEASANT to be in, so that it would not look like a wreck and in general would clearly demonstrate that even a Lada can be quite a pleasant car if you put your hands on it, I wanted to assemble a beautiful, thoughtful and well-organized car, to collect for it all the best that I could, so that I AND MY PASSENGERS WOULD LIKE IT
...
My salon was already half spread out. It was a matter of little things... a matter of courage... I had no idea what could be waiting for me there... Cockroaches, 6 kilograms of wires, plugs, twists... A corpse.