Torpedo Priora 2 on VAZ 2110: On-site installation, wiring
Hello everyone who is interested in how the installation of the Priora 2 torpedo on the VAZ 2110 is going
There will be a lot of letters, since the entry is aimed at those who decide or have already decided to install a torpedo from Priora or Priora 2 on the tenth family
Meanwhile in the garage...
I turn on the stove and move on
I’m taking off the torpedo after the preliminary fitting, now it’s time for me to put it on and take it off, how to put on a shirt, I’ve lost count of how many times I’ve done this.
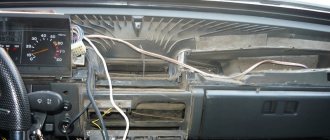
Next in line is laying the under-panel native tenth wiring. I remind you that I am leaving the tenth wiring, due to the inexpediency of switching to the wiring of Priora 2. On the Priora, the differences are: 1) From the fuse block to the center, the wiring runs above the steering column, at 2110 below it. Without extending a single centimeter of the wiring, it was easily possible lay it over the steering column, everything is real. 2) The wiring is held in place by its original clamps, which in turn are attached to the dashboard through iron brackets. I make my own:
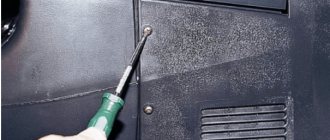
Drilling holes
I install the same clamps on which the tenth sub-panel wiring was attached
As a result we get
I repeat that nothing was extended, except for the wiring to the backlight button and the glove compartment lighting itself + there are Prior connectors.
I untangled and separated the wires of the rear PTF buttons and the heated rear window (now they are not neighbors)
Preparing the installation site
For those who still doubt that the Priora torpedo may not fit the seats for the tenth family, I declare! fits perfectly!
If there are fewer fastening points, the load on the remaining fastenings increases accordingly. I welded the plates to the upper brackets (this is a rough version, maybe I’ll weld them and paint them), I’ll strengthen the lower ones later And then a surprise awaited me...
The bracket cracked and I didn’t notice it when I was welding the plate, or maybe the crack appeared after... in general, for welding
Central frame
I’ll say right away that you don’t need to buy a Priorovskaya one
No comments. The only thing that surprised me was the factory hole; the designers of AvtoVAZ foresaw that someday in the future they would invent the Priora and this hole would do its job.
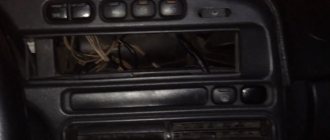
The wiring is packed, everything is convenient, in order
I made it so that the entire torpedo could be removed with the under-panel wiring; a dozen additional connectors were added, most of which went to the alarm system (like a spider’s web connected the torpedo to the wiring and did not let go)
There are cracks, no matter how you look at them
Priorovodov, please respond, how is your situation with the cracks around the edges?
Some of the ground wires moved to the upper part, in my case to the steering column
That's all! The torpedo is installed, the wiring is laid out, the connectors are removed for further alteration, and you still have to remove it at least twice, but there are no problems, it has been done in such a way that all difficulties are reduced to a minimum.
To date
About R16
A small digression. A little more and the shesnari will delight the new owner, and I will move on - Be a hen!
WHAT'S NEXT?
In the following posts I will tell you how to install the tenth fuse block and make the emergency button work without a comfort block.
A thumbs up and repost are welcome as proof that the post is useful and it was not in vain that I sat and spent time sharing my experience with you.
Good luck!
Removing and installing the instrument panel on VAZ 2110, 2111 and 2112
Before you begin this repair, you must do the following:
After this, you can proceed to further actions. We immediately remove and remove all the elements of the panel, such as: the standard clock, the heater control unit, the display unit, as well as the central deflector, and do not forget about the buttons with the radio. As a result, we get approximately the following picture:
Next, using a screwdriver, pry up and remove the plugs at the upper corners of the instrument panel mounting. In reality it looks like this.
On the other side, we do the same, after which, using a socket and an extension, we unscrew the nuts securing the instrument panel in the upper part.
Now let's move on to the remaining attachment points. At the bottom, in the left and right parts of the panel - in the corners, there is also one screw that needs to be unscrewed. The first one is shown below.
The second one is located on the right side of the panel in the same place - at the bottom in the corner. Also, immediately unscrew the self-tapping screw that secures the diagnostic block:
Now we move on to the side fastening points of the frame, which are located in the center on each side - the photo below shows the left side:
On the right everything will be the same. Next we move on to the internal frame fastenings, which are located in the following places. The first one is under the fuse mounting block, to get there we open the cover and look inside the panel:
The second one on the right is visible when the glove compartment lid is open:
Of course, the mounting block will also have to be removed so that it remains intact with the sub-panel wiring.
We thread it inside with the instrument panel pulled back; you will also have to cut off some of the wiring fastening clamps, for example, in this place, which is shown in the photo:
Now we are trying to remove the VAZ 2110 panel, moving it to the side on both sides, evenly, without much effort or sudden movements.
In the photo above you can see that the headlight hydraulic corrector tubes were cut off, since in my case they were simply not needed. If you need to save them, do everything carefully and remove them by pulling the control unit out of the instrument panel. Next, we finally remove the panel, of course, after first disconnecting all the wires that will interfere with this.
Installation occurs in the reverse order, connecting all wires and connectors to their places, blocks and switches, as well as other elements that were removed as a result of this procedure.
Torpedo for VAZ 2110 from Priors for VAZ
result!
Today my story is about installing a “torpedo” panel from a Lada Priora. All of you (who drive VAZ 2110,2111,2112)
Do you know what advantages this panel has, how convenient, practical and technologically sophisticated it is (possibly), someone just wants to install it, someone installs it and is happy, someone modifies it, and someone immediately installs the panel from “ Priors No. 2.”
But due to the pricing of our valiant “showdowns” as well as Avito users and the not particularly high availability of purchasing the panel
Priora 2,
it was decided to purchase a panel from
Priora 1.
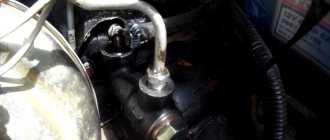
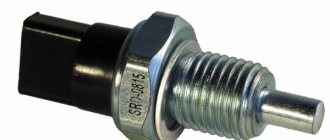
04/26/2018 After searching, I found the right option and made an appointment. The path was not easy, I had to go to another city “Perm - Kungur” 115 km. from my location to the city. Well, okay, on the road - the road! As always happens on the road, strange things happen that you don’t even expect. More precisely, on the road, my engine temperature gauge began to jump spontaneously, up and down! ! ! I’m alone, I’ve already driven more than half the way, I don’t know what to do. I stopped to look under the hood, opened it - everything is in order, there is fluid in the barrel, there are no fluid leaks, the connector on the sensor is in place, in order to make sure that everything is in order, I removed the connector - put it in place, checked the instrument panel
— everything is in order, the arrow is at 90* degrees.
We close the hood, get into the car and drive on, BUT! The arrow starts jumping again!
We “forget” this and move on, but we don’t put the problem off for a long time, we will look into it, most likely the “sensor” of the engine coolant temperature has failed - we need to replace it.
An hour's journey and we are there. Meeting, we look at the product, we discuss the terms and price, handshakes and I become the owner of the “Prior 1” panel
, Hurray, comrades, Hurray.
The kit consisted of - the panel itself, the tidy, a tunnel, a harness under the panel, fastening screws and bolts, a ceiling lamp + a pocket for glasses, a ceiling harness, a central (passenger) lamp, rear windows (left-right), door trims (front-rear) ) + accessories for them.
We pack everything into the car and hit the road to work.
I went to work, laid everything out and went home. 04/27/2018 The next day I collected the material I needed, tools, installation instructions, as well as electrical diagrams. I set myself up to collect it day and night, or rather, I’ll start on Friday, continue on Saturday, and most likely on Sunday I’ll try to go home by car! And so the end of the shift is 17:00.
I decided to wash the whole thing since everything was covered in dust and a little dirt. Let's put it in order
While everything dries after washing, we go to disassemble the car.
Let's begin!
What chaos and a lot of dirt!
It’s so dirty, you’ll need to vacuum everything!
After tidying up the cabin, I began to remove the panel. This turned out to be not particularly quick and pleasant; a lot of bad and unkind words were said, BUT!
Things went as they should, time flew
sooooo
fast!
I didn’t take much pictures of how I took off the panel, it wasn’t that convenient and I most likely forgot. After I took it off I started fiddling with the wires and circuits.
This miracle without a panel)
We cut, implement, merge. We are waiting for a miracle!
At some point I decided to take a break with coffee and a snack, collect some information from the Internet and hit the road again.
Om nom nom
Let's sketch out the panel from the Priora.
fitting.
replacement
replacement
wire layout.
At some point I started to get bored with everything, since this whole process is still long and tedious, laughter-wire-scheme-wire and so on. I no longer took pictures of what I did and how I did it, how I connected the devices, the stove control, the alarm system and everything else. I was very exhausted, my head was hard to think, there were problems with starting, but I quickly solved them because I thought that I had mixed up the wires, but no, I just forgot to connect one contact from the alarm system, because of this contact I got blocked, but everything worked out and after a while At that time, I threw on the seat, screwed what was needed, went home and only on the way I remembered that I had to at least somehow show that the panel was standing, the instruments were working, I took a photo on the way.
Left the workshop.
All that remains is to install various types of plastic, put the interior back together and resolve the issue of some light bulbs on the dashboard.
And so, of course, it’s good that everything worked out, but without experience, everything took a very long time to assemble and install, there were difficulties and all sorts of nuances,
BUT! everything is decided - everything is established.
Ideas for tuning and modifying the shield
How can you improve the tidy in the “Ten”:
- By installing a new trim on the console. This type of tuning is the simplest, since you just need to install a trim on top. However, it will not improve the dashboard itself in any way, only its upper part.
- In the VAZ 2110 you can install a dashboard from Priora; in general, the selection of tuned, ready-to-use dashboards is quite large. When installing a device in 2110 from another car, you will have to partially redo some connectors and connect new devices. But in general there is nothing difficult about this.
- Installation of new scales on sensors. Scales can be downloaded from the Internet, found in a store, or developed independently. The alteration procedure in this case will be more complicated - you will have to remove the shield and disconnect the arrows from the instruments, this will take time. After installing the new scales, the arrows must be correctly installed, otherwise the speedometer and other sensors may malfunction.
- Installation of LED lighting in the tidy. You can simply replace standard light bulbs with LED ones, or purchase a diode strip and solder it into the shield. But keep in mind that if the light bulb fails, it can be replaced without any problems, which cannot be said about the LED strip. If it burns out, you will have to unsolder the tape and install a new one in its place. Although the service life of the LED strip is quite long.
- If you install diode lamps, then you can additionally paint the numbers on the scales, as well as the arrows of the sensors, with fluorescent paint. The fact is that combining these two types of tuning will allow you to achieve a truly high-quality and beautiful result. Under LED lighting, arrows painted with luminescent paint will glow much brighter.
Photo gallery “Tuned devices of VAZ 2110”
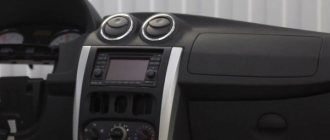
Installing a Priora panel on a VAZ 2110
Replacing the entire torpedo or its lining may be necessary not only because you don’t like it, and that’s that. Although this option is not the last one on the list of reasons, since the designers did not show too much imagination when developing the instrument panel.
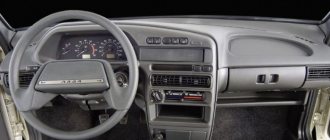
Panel trim for old VAZ 2110
But not all car owners know how to do the replacement themselves, and also how to make the dashboard on a VAZ 2110 look cooler and more modern, and not squeak like an old cart, although they would certainly like to learn this. Let's start with the question: why might this be needed at all?
Panel trim VAZ 2110 Kashtan
Improvement and tuning of the dashboard on the VAZ 2110
One of the most popular ways to improve the dashboard on a VAZ 2110 is its sound insulation. In order to do this, you must perform the following steps:
- We remove the tidy, I already told you how to do this earlier
- Next we foam, but under no circumstances should you pile up a huge pile of foam at once, it won’t dry out in a week.
- Don’t forget to try it on so that later it doesn’t turn out that your steering wheel touches it, or it’s just too high.
- In principle, all the work consists of two things, you cut, foam, cut again and so on many times.
- Next, we apply the cheapest putty we could find.
- Next we cover the dashboard with Shumka.
- We install the torpedo back.
You can modify the dashboard of a VAZ 2110 in different ways, someone covers it with leather, someone inserts an LCD monitor into it, in tuning a car it all depends on you and your fantasies and desires.
Reasons for disassembly
So, we have already almost indicated the first reason - I don’t like it. This may also be necessary in the following cases:
- For tuning. That is, when we try with all possible forces to correct the “face” of the car, which everyone sitting in the cabin is staring at, that is, the torpedo. To improve comfort and overall aesthetic appearance, you can install new linings, of which there are quite a few types today. The following linings are perfect for the VAZ 2110: • Euro 1, also known as Caprice. It looks nice, but it doesn't have a shelf on the passenger side;
Panel trim VAZ 2110 Euro-1• Euro 2 – similar to the previous one, but with a passenger shelf;
Panel trim VAZ 2110 Euro-2
• There are trims that are installed directly on top of the instrument panel. Installing them yourself is not at all difficult. Among these, one of the most popular is Chestnut;
Panel trim VAZ 2110 Kashtan
Panel trim VAZ 2110 Kashtan
Panel trim VAZ 2110 Kashtan• In addition, you can order an exclusive trim that makes the interior similar to that of the Nissan Primera, with the instrument panel in the center.
Trim Chestnut panel VAZ 2110 (dashboard in the center)
Trim Chestnut panel VAZ 2110 (dashboard in the center) - In order to get to the wiring, change some wire in it, or maybe a complete replacement of the entire wiring harness is necessary;
- To install a new stereo or video system, as well as supply other equipment that is necessary, but not provided for by the designers;
- Replace, fix or clean air ducts;
- When you need wind and noise insulation, since the standard one on the VAZ 2110 leaves much to be desired. Let’s not argue that tens of them are always making noise and rattling, and I really want to get rid of it.
Interior sizing Bimast Bomb
Sizing with Splen on top of Bimast
Interior sizing Bimast Bomb
Perhaps car owners will also find other reasons to replace the dashboard.
Installation of Europanel instead of the usual one on VAZ 2110, 2111 and 2112
Many owners who have owned a VAZ 2110 for a long time would like to change the boring panel to a more modern one. In this case, you can install a new type of panel from cars manufactured after 2006, or from the “Bogdan” versions, which are analogues of the tenth family, except that they were assembled in Ukraine.
With such alterations, basically you won’t have to change anything, but it’s worth considering that in this case you need to buy a complete Europanel:
- instrument panel frame assembly with trim
- instrument panel (combination)
- buttons and switches
- heater deflectors
- New heater control unit
- sub-panel wiring
- steering wheel, cover and switches
Only in this case everything becomes without any problems with minimal labor costs.
If disassembly is needed
Let us immediately note that if you have to replace the lining with a new one (the one you choose), then a complete disassembly may not be necessary for this.
1. The pad itself
2. Inserts for buttons, air ducts, instrument panel trim
But if noise insulation is planned due to the fact that the dashboard rattles when driving, then this cannot be avoided.
Disassembly work requires a lot of time and special scrupulousness. After all, if some fastening is spoiled or broken, then the new or tuned torpedo will not work as it should, it will creak and rattle unhappily while driving, spoiling the mood of the careless disassembler.
Dismantling algorithm
So, let's begin:
- We remove and remove the front seats from the interior so that they do not interfere with the disassembly;
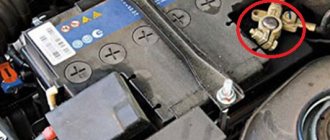
- Disconnect power from the battery;
- We lower the steering wheel of the VAZ 2110 to the lower position;
- Unscrew the screws that secure the panel covers. These are two screws on both sides of the tunnel. Now you can remove the shield;
- We remove the plug on the tunnel in the center by prying it off with a screwdriver;
- We unscrew the screws of the central tunnel to remove it. Before doing this, disconnect the wires from the cigarette lighter;
- We remove the air duct for heating the interior of the VAZ 2110. To do this, having disconnected the cover from the gearbox, you need to pry off the latches with a screwdriver, then remove the air duct;
- We remove the central panel by unscrewing it from the floor;
- Now it is possible to disassemble the torpedo. First, unscrew the mount that holds the glove compartment, disconnect it from the backlight, and take it out;
- In the hole where the glove compartment was located, we remove the screws on both sides, as well as directly behind the glove compartment;
- We unscrew the VAZ 2110 torpedo mount with a key and a screwdriver;
- Near the left pillar we pull out the air duct by prying it with a screwdriver;
- With special care you need to remove the torpedo, supporting it with your hands while unscrewing the nut with a spanner. Then, lifting it up, remove it from the pins;
- Now you need to remove all the wires, marking them with a marker as you go so that you don’t get confused when reinstalling them;
- It is possible to replace the lining and carry out noise insulation work.
Unscrew the two self-tapping screws securing the right flap of the floor tunnel lining
and disconnect it from the air distributor housing
Remove the shield (Left is similar)
Noise Removal
Basically, the panel rattles both due to improper installation and because the three parts that make it up touch each other, which causes creaks and rattles in the cabin.
That is why sound insulation is necessary, which the manufacturers did not take care of properly, and it is up to the owner to finalize it. Modelin can be used as sound insulation. They can paste over:
- All places where three parts of the panel touch;
- Those parts of the panel where it comes into contact with the radio, on-board computer, etc.;
- All bolt holes are also covered with modelling. It won’t hurt to screw them in, but there will be additional sound insulation, as well as protection against heat loss;
- Sides of the glove compartment;
- "Black box" in those places where it comes into contact with the panel.
Sources
- vazweb.ru/desyatka/salon/torpeda.html
- drive2.com/l/525053636976313571/
- drive2.ru/l/8335986/
- drive2.ru/l/452409453484966614/