To remove the rear door trim we will need the following tools: a Phillips screwdriver and a sharp tool (I use a knife). We need to remove the following elements: door lock button, glass lift handle, door opening and closing handle.
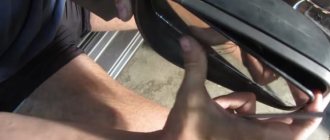
To remove the glass lift handle, you need to slightly move the fixing ring with a sharp tool to release it from the hook.
Pull out the retaining ring as shown in the picture. After removing it, remove the handle.
Unscrew and remove the rear door opening handle.
Using a sharp tool, remove the plugs securing the door closing handle.
Unscrew the 2 bolts securing the handle.
Unscrew the door lock handle counterclockwise.
This is what the completely removed elements on the door look like.
Now the door trim is held in place only by clips; without fanaticism, we begin to tear off the trim from below. And we remove it completely.
Assembly is carried out in the reverse order; it is advisable to replace the door fixing clips.
Removing and installing the rear window regulator on Kalina
Before starting this procedure, the first step will be to remove the rear door trim, since the entire mechanism is located directly under it. After this, all the nuts securing the window regulator to the inside of the door are clearly visible.
- two nuts on the bottom
- one on top
- three on the side - mounting the coil of the lift mechanism
- two screws securing to the glass
The upper and lower nuts must be unscrewed with a 10 mm wrench:
And the side ones with an 8 mm wrench:
The glass is attached to the lift frame using bolts that are unscrewed with an 8 mm wrench. Of course, you first need to fix the glass by placing something under it, or placing something between it and the door.
The main point is that before removal it is necessary that the pins securing the mechanism go inside the door. To do this, press on them with a little force, adjusting the structure from the inside, if necessary, and thread the pins inside.
It is necessary to achieve such a position of the lift inside so that all its pins are removed from the holes in the door. This is clearly shown in the photo below.
Now you can remove the window regulator from the rear door of Kalina, turning it in the desired position so that it can easily come out through the lower right technological hole.
And the final result of this repair is demonstrated below.
Installing a new one occurs in the reverse order of removal. It is worth noting that the price of a new one, even if it is mechanical, is quite a lot, namely, its price can be from 500 to 650 rubles. Of course, this will be far from factory quality, even if the manufacturer is AvtoVAZ. I talk about this very often, since many people know the quality of conveyor parts and the quality of spare parts supplied to stores.
You can buy a real original with low mileage at a car dismantling center from Lada Kalina Blog: https://vk.com/razborkaavtostaryjoskol. You can arrange delivery to any city or town in Russia by mail or transport company at the buyer’s expense. There are a lot of really new cars with mileages up to 50 thousand km; there have already been cars from 2007 to 2012.
If you have anything to add to the material, leave your comments below.
How to replace the door window lifter on a VAZ 2113-VAZ 2115?
Note! The window lifter on both the rear door and the front door is replaced almost identically, although there are small nuances, but you don’t even have to pay attention to this, and therefore if you learn how to replace the window lifter at the front, then you can also replace it on the back door and vice versa, but there is just one But! The window lifter can be replaced both with the glass removed from the door and with the glass installed (How you do it is up to you, if you don’t want to remove the glass, then in this case you can simply fix it with a screwdriver, but if suddenly the door moves a lot, then the glass may fall and break, but this won’t happen to you with the glass removed), if you still want to remove it, then in this case read the article entitled: “Replacing glass on a VAZ”, if you don’t want to remove the glass and are sure that it will not fall, then start reading the article; in it we just described the process of replacing a window lifter with the glass installed on the car door!
Removal: 1) Let's start with the front doors, but even if you replace the power windows only on the rear doors (And this is point 2), then still study point 1, because they are interconnected and from all these points you will understand more than you read only one of them, in general, before replacing, it doesn’t matter which door, but you will need to remove the trim from it, because the mechanism is located inside the door and without removing the trim you simply won’t get to it (For information on how to remove the trim, read the article: “Replacing the front door on a car” points 1-8), after the trim is removed, disconnect the wire block and the connector that go to the window regulator (see photo 1), then remove all the nuts (there are only three) that secure it mechanism to the door (see photo 2) and then unscrew the two bolts securing the window lifter slider to the glass frame itself (see photo 3), when the bolts are unscrewed, lift the glass to the very top if you have not removed it and fix it in this position (You can fix it using a screwdriver, see photo 4, or you can ask an assistant to hold the glass in the upper position).
Note! So that the window lifter mechanism can be removed from the door and thereby completely removed, unscrew the two screws that secure the door opening handle to the car (see photo 1), after unscrewing the screws, remove the handle by pushing it into the inside of the door and through remove the cutout in the door (see photo 2), then using thin pliers or pliers or simply by hand, disconnect the rubber holder that holds the rod on the handles (see photo 3) and after that disconnect the rod from the handle and you you can completely remove it from the car in this way (see photo 4) and therefore, when the handle is removed, remove the window lift mechanism itself through the same cutout in the car door!
2) As for the rear door and window lifter, in order to remove it, take a wrench in your hands and use it to unscrew the three nuts that secure the mechanism to the door (see photo 1), as soon as the nuts are unscrewed, unscrew the two bolts that The slider with the glass is attached to the window lifter holder (see photo 2), then fix the glass in the same way as described in the first paragraph (see photo 3) and finally, when the glass is already stationary, unscrew the three nuts securing the mechanism to the door (see photo 4) and, also grabbing it with your hand, remove it from the door and thereby completely remove it.
Installation: Everything is installed in its place in the reverse order, or, to put it simply, everything is put in its place in the reverse order of removal.
Additional video: An interesting video on repairing the front door window lifter, you can see in the video that is attached to our website just below:
How to remove the Priora window lifter handle
The work of dismantling the handle includes several steps:
- insert a thin flat screwdriver between the handle washer and the handle lock on the side opposite the handle;
- Carefully press the latch and remove it;
- pull the window lifter handle towards you and remove it from the slots;
- Remove the window handle washer.
Installing the window handle
Installation is done as follows:
- put the washer of the window lifter handle on the axle;
- Holding the washer with your hand, place the window lifter handle onto the slots;
- raise and lower the glass once or twice, rotating the handle so that it fits tightly onto the slots;
- insert the clamp between the handle and the washer.
Reasons for handle breakage
Often, replacing the power window handle will only temporarily fix the problem. Soon the new handle also fails. The reason is that the glass goes down and up too tightly, so you have to put excessive stress on the rather fragile plastic part. In this case, you must first eliminate the cause of the stuck glass or window regulator, and then change the handle.
It’s easy to check the operation of the mechanism - just raise and lower the window.
There are several reasons for the mechanism to jam:
- twisted drive cable;
- glass distortion;
- poor lubrication in the mechanism;
- freezing of ice (in winter).
If the window regulator works hard, you need to remove the door trim, find and eliminate the cause: change the lubricant, melt the ice or replace the faulty mechanism.
Another reason for handle breakage is worn-out window drive splines. In this case, it is necessary to replace the window lifter mechanism with a new one and only then change the handle.
Replacing the window lifter handle with your own hands
Over time, the power window handle may break. If this happens to you, do not rush to contact a car service. This work can be done independently without difficulty and a lot of time. As an example, I will look at how to replace the window lifter handle on a VAZ 2108.
To replace the window lifter handle you will need:
1. Flat head screwdriver. 2. A new handle, which will come with a washer.
So let's get started. First we need to remove the old window handle. To do this, insert a screwdriver between the handle and its washer. Hook up the handle and pull it towards you. The handle will easily “come out” of its seat. Also remove the handle washer. Install the new handle in reverse order. Before installing the handle, hit the window regulator splines. After you have placed the handle on the slots of the window regulator, secure the handle with the latch. Check the operation of the handle.
This happens when the glass goes down and up with force. In this case, simply replacing the handle will not help. If the window does not go down well, this means that the window lift cable has worked, or the window lift itself will soon break. The window regulator will need to be replaced. To replace the window regulator, you will need to disassemble the door. Remove the door trim and window handle.
You now have full access to the window regulator. Unscrew the two bolts with a 10 mm wrench that hold the glass. Lift the glass up and unscrew the bolts securing the window lift mechanism. For this you will also need a 10 mm wrench. Remove the old window regulator. Install the new window regulator in reverse order.
Read more on the topic >>>
Design and types of window lifters
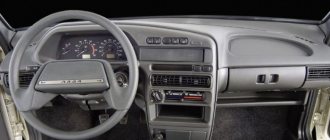
Kalina front window lift
Window regulators are a device designed to raise or lower car windows.
At the moment, there are a huge number of options for these devices, but the design, despite the differences in component parts for different models, is similar, it includes:
- grooves that hold the glass by the side edges
- so-called “rails” that ensure the movement of glass
- Seal and damper, glass movement limiters in the up and down direction.
A window regulator of any design consists of two main elements:
- drive unit
- lifting mechanism - transmitting vibrations of the drive movement to the glass, and thereby ensuring its movement.
The drive is divided into two types:
- Mechanical, known to us from Soviet cars, where in order to lower or raise the window, you need to turn the window lifter handle.
- Electric, typical of modern cars, where to move the glass you just need to press the window button. The electric drive consists of a reversible electric motor with a worm-type gearbox.
In addition, window regulators differ depending on the mechanism of glass movement:
Each option has its pros and cons and technical features. All these device options have one thing in common: one day they fail; this problem especially often occurs in a model that is so popular today as the Lada Kalina.
There can be dozens of reasons why power windows malfunction, but the most common are the following:
- The commutator brushes of the electric motor, which is responsible for the glass movement process, freeze. This happens, as a rule, due to overheating of fragile graphite brushes, unstable to sudden temperature fluctuations, and this factor starts a chain reaction: overheating of the brushes begins to melt the nest, which is made of plastic in all Kalinas, and not of the best quality. For this reason, the brushes lose mobility, and the device can only be brought into working condition using a hammer. At the initial stage of the breakdown, it is enough to give a good knock or two on the door trim , but after a couple of weeks, this method stops working, and then you will have to disassemble the window regulator to repair it.
- Another cause of failure, typical of the Lada Kalina, as well as many other VAZ models, is the ill-conceived electrical circuit. The contacts cannot withstand the load placed on them, there is no unloading relay, which is why all the window regulators fail at once, and then it is necessary to repair not only the window regulators themselves, but also the remote control.
When it is impossible or too problematic to repair the device, it is more advisable to replace it with a new one. are suitable for the Lada Kalina :
- electric window lifter Garnet VAZ – 530 rub.
- electric window regulator Ningbo – RUB 1,699
- electric window lift AUTO-GEO – RUB 3,300.
Of course, the price is directly related to quality, but if the budget is limited, then the domestic option is not bad.
Now let's talk about how to install window regulators yourself.
Removing the power windows
Let's start with the front mechanisms
Before proceeding with repairs, it is necessary to dismantle the defective device. But in order to remove the window regulator, you will first have to remove the door trim.
So, for work we need:
Now let's get down to business.
- The first step is to lift the glass all the way and secure it at the highest point with tape.
- Then, using a wrench, remove the two bolts that hold the glass in place (1 in the picture). Also, you need to unscrew the bolt of the inner handle of the lock.
- The next step is to disconnect the device motor and wires (2 in the figure).
- We unscrew all the nuts on the device (there are 11 of them in total) and remove the window regulator (2 in the figure).
The front window lifters have been removed, let's proceed to dismantling the rear ones (if the problem lies in them too).
Here we need:
- two keys, 10 and 8
- masking tape.
- Just as in the case of the front window lifters, raise the glass all the way and secure it with tape.
- Using a size 8 wrench, unscrew the three nuts securing the mechanism.
- Take a 10mm wrench and remove 2 bolts and 3 nuts.
- Now it will be easy to pull the device out through the hole at the bottom of the rear door.
Dismantling has been completed. Carefully examine the condition of the device; if it cannot be repaired, replace it with a new one.
Glass replacement
It is better to buy glass and a glass holder as a set for replacement.
To replace, you need an extension, a wrench, an 8 and 10 mm socket and an assistant.
The side glass is blocked with a screwdriver to prevent it from falling out. The door trim is removed. A felt-tip pen marks the places where the glass frame is attached to the door on the frame and on the door. The bolts securing the glass frame to the window regulator are turned out.
The window regulator bar must be fully raised. The cable on the roller from the bottom of the glass is dismantled. Then the seals (velvet covers) are carefully removed.
Hold the glass during this time so that it does not fall out. After removing the seals, the glass is lowered down about 10 cm, tilted to the side and removed from the groove.
The new glass is installed in the reverse order. Apply WD-40 or a similar lubricant to the glass frame, insert the glass and leave to dry. After the grease has dried, the glass is installed in the door. New glass is installed in the seals.
If the seals have become unusable, new ones are cut out of rubber, while the old ones are used as patterns.
The glass with seals is inserted into the groove, aligned and lowered into the stopper. The window lifter handle is lowered to its lowest position. The glass is fixed with bolts and the cable is installed in its original place.
The operation of the window regulator is checked and, if necessary, the cable tension and the position of the seals are changed.
Installation
As you can already guess, installing the window regulator is carried out in exactly the reverse order of dismantling it; the only thing is that you first need to treat the guide of the device with lubricant.
The installation procedure for the front lifts is as follows:
- We fasten the new device with nuts (11 pieces);
- We connect the wires and the motor;
- We find the bolt securing the inner handle of the lock and tighten it, using a key, tighten the glass fasteners.
- We remove the now unnecessary tape and check the work.
You need to look at how the window opens and closes, whether there are any distortions, whether all the screws are tightened well. If a mistake was made, what to do, you will have to repeat the work again. If everything goes well, you can praise yourself for a job well done.
The rear window lifters are installed in the same way, in the reverse order.
- Through the niche at the bottom of the back door, we put the device in place of the old one.
- Using a 10mm wrench, tighten the bolts and nuts.
- Using a size 8 wrench, secure the mechanism with three nuts.
- We remove the tape.
Why is the door trim removed?
Most often, the trim of the rear or front doors is dismantled in order to get to the internal cavities where the window lift mechanisms are installed. Although during the entire period of operation of the car there are other situations when it is necessary to remove the trim:
- for installing acoustic speakers built into door cards;
- in case of failure of the electric window lift buttons;
- for dismantling glass for the purpose of tinting or replacement;
- to repair or lubricate window lift mechanisms;
- to replace facing panels that have become worn or scratched over the years of use of the machine.
Front door cards Lada Kalina
It is also necessary to remove the trim during body work, when it is necessary to weld rotten elements, renew the car’s paintwork, or carry out anti-corrosion treatment.
Note. Many motorists remove the upholstery to make additional vibration and sound insulation of the body themselves.
Lada Kalina rear door trim
Preparation for dismantling
To unscrew the fasteners and remove the door trim, you need to prepare a simple set of tools:
- screwdriver with cross slots;
- long flat screwdriver;
- a pointed tool, such as an awl.
Door disassembly tool
Since the door card of the Lada Kalina car is held on by plastic fasteners (otherwise known as clips, pistons), there is a warning regarding the working conditions. It is strictly not recommended to dismantle door trim in the cold, when the plastic becomes brittle and easily destroyed. Hence, there is a risk of breaking all the clips during the process of removing the decorative panel. Therefore, in winter, perform this operation in a heated garage or box.
This is interesting: Wiring diagram for VAZ 2107 carburetor
In the summer, there are no requirements for premises; remove the casing even in the open air. There is only one recommendation: in windy weather it is better to drive the car into the garage, otherwise a lot of dust will be brought into the interior when the doors are open.
This is what the door card lock looks like
Advice. In cars that are 5 years old or more, the plastic from which the retainers are made dries out and becomes brittle. When separating the trim from the door of such a car, you will probably ruin some of the clips. So it’s worth buying new ones in advance, there are 8 pieces in the front door, and 10 pieces in the back door.
Removing the front door trim
Plastic spikes or “herringbones” for fastening may break during the process of removing the skin. We purchase in advance a quantity sufficient for the update. It is better to buy double white-orange or transparent clips.
- Open the door and remove the 3 screws securing the podium. The screws are unscrewed with a Phillips screwdriver. The podium carefully turns down and detaches from the body.
Do not remove the casing with jerks or sudden movements. The sockets that attach the trim to the door can be damaged.
- We remove the wires from the locking mechanism from under the top of the casing. We remove the door trim of the VAZ 2114, evenly moving it away from the door.
- After removing the trim, you can replace the glass, the trim itself, repair window regulators, install acoustics, etc.
If you are planning to replace the trim, before purchasing it, compare the dimensions of the trim installed in your car with the new one in the store. The location and diameter of the holes for the handle and for fastening may not be the same.
Installation of the casing occurs in the reverse order.
Instructions for removing the cladding on Kalina
The first three operations are performed the same way for all Lada Kalina doors. The exception is the trunk hatches of hatchback and station wagon cars, where the disassembly procedure is much simpler. Here's what to do:
- By hand, unscrew and pull out the cap of the latch designed to lock the door lock from the inside.
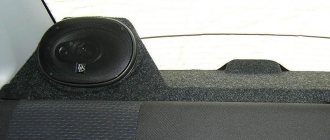
- Using a Phillips screwdriver, remove the 4 screws holding the music system speaker.
- Remove the speaker and disconnect the wires from it.
Unscrewing the blocker and acoustics
Advice. The acoustics can be attached either to the door card itself or to the metal door frame. If, after removing the speaker, you observe the first option, then during assembly it is better to redo the fasteners by drilling holes for self-tapping screws. The acoustics should be mounted to the door, not to the upholstery.
Attaching the speaker to the casing is wrong
The further procedure of work differs depending on the location of the door that you are disassembling.
Front passenger door
Here the decorative panel is held on by 8 clips, 2 screws securing the internal handle and two self-tapping screws located under the plastic pocket. The algorithm for dismantling it is as follows:
- Using an awl, carefully pry the edge of the plastic plug hiding the screw in the door handle and remove it. Remove the second screw cover in the same way.
- Remove both handle screws.
- Pull the door opening handle towards you, unscrew the fastening screw and remove the lever. After which you will be able to remove the entire handle.
- Unscrew the 2 screws at the bottom of the door card, under the plastic pocket.
- Take a flat head screwdriver and pry the top right corner of the trim panel to disengage the first tab. Grab the casing with your fingers and release the remaining pistons manually.
- After separating the panel from the door, disconnect the wires coming from the power window button. To do this, pry the connector tab with a screwdriver and pull the block out of the button block. Dismantling of the cladding has been completed.
Passenger side panel removed
Advice. When prying up the edge of the door card with a flat-head screwdriver, you should place a rag under it so as not to scratch the paintwork on the inside.
Photo instructions for disassembling the door trim on a Lada
Video: How to properly remove the trim
Nuances of disassembling the driver's door
On this side, the decorative panel is removed in the same order as on the passenger side. But due to small differences in the design, it is necessary to take into account the following nuances:
- To make the trim easier to remove, you need to remove the plastic panel covering the rear-view mirror adjustment lever;
- the first screw for securing the armrest is located under the plug, and the second is in the recess of the handle;
- the door opening handle is located on top of the armrest and is removed after unscrewing the fastening screw.
The plastic socket for the mirror drive can be easily removed by hand
The panel on the rear view mirror adjustment is removed using a flat screwdriver, which is used to pry it off from below. On vehicles equipped with electrically controlled mirrors, there is no adjustment lever, and instead there is a plug on the panel.
On the driver's side, the screw is hidden in the armrest
Reference. Some drivers unknowingly try to pick out this plug to disconnect the panel. The action is useless, since the element is easily removed by hand, but unsuccessful attempts leave unsightly scratches on it.
Screw securing the lever for opening the door
Removing the driver's side trim - video
Rear door trim
Here the upholstery is pressed to the door by 10 plastic clips and 2 screws securing the handle. The disassembly technology is as follows:
- The first step is to remove the mechanical window lifter handle. Use an awl to pry up the plastic half-ring that secures the lever to the axle. Pull it out and remove the handle.
- Pull out the 2 plastic plugs on the door handle and remove the fastening screws. After this, the element will be easily removed.
- Using a flat-head screwdriver, pull out the lower far corner of the decorative panel and snap out the first piston.
- Grab the door card with your hand and remove it, releasing the remaining clips along the contour. The casing has been successfully dismantled.
Scheme for dismantling the decorative panel
Note. Please note that the opening handle lever on Kalina 1 will have to be unscrewed and removed, but on Kalina 2 there is no need to remove it, since it is screwed directly to the door and is not connected in any way to the decorative panel.
To remove the window lifter handle, you need to pull out the half ring
Otherwise, the upholstery on the doors of the second generation Lada Kalina car is removed in the same way, there are no differences.
How to remove rear door panels - video
Replacing the door window lifter on a VAZ 2113, VAZ 2114, VAZ 2115
Welcome! Window lifter - this mechanism is found in almost any car, depending on the car, it can be either a mechanical type (With a handle for adjusting the position of the glass) or an electric one (In this case, the handle is removed and a button is placed together with it), in addition, we immediately note the fact that the window lifter and the glass itself are two different things (some people just confuse it) and thanks to it you can adjust the position of the glass in the car (raise it higher or lower it).
Note! To carry out the procedure for replacing the window lifter on the door, you will have to stock up on: Various types of screwdrivers, as well as a set of wrenches, if you have an extension cord with union heads, then you can use it, and thin pliers or pliers may also be needed, and if you have them If you have one, be sure to take them!
This is interesting: Wiring diagram for VAZ 21213 carburetor
Summary:
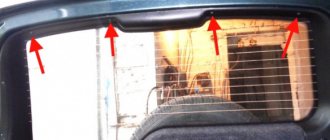
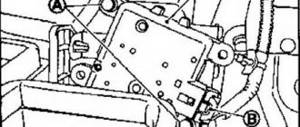
Where is the door window lift located? On cars of the Samara 2 family, different types of window lifters are installed, namely, there are electric ones in the front, and mechanical ones in the back (If the car is in a top configuration, then there are electric ones in the back), both types are hidden in the door itself and you won’t see them without removing the trim, so for For clarity, in the photo below, the trim was removed from the front door of the car, and the window regulator itself is indicated by a red arrow in this photo.
When should you replace your door window regulator? If we are talking about an electric window lifter, then as a rule, when it fails, the glass stops going up and down when you press the corresponding button, in addition, on some cars (you most likely have already paid attention to this) it happens that the glass somehow goes down (Slowly ) and almost does not rise (you have to help with your hand), this also indicates that the window lifter has become unusable and requires replacement, but by the way, in some cases, due to the fact that the glass does not rise and fall poorly, it may not even be the window lifter itself that is to blame glass, it’s just that over time its fastening weakens and thus the glass becomes skewed, which is why problems occur with lowering and raising the glass on the car, but as for mechanical window lifters, everything is simple here, if by rotating the handle the glass has ceased to be adjusted, then the window regulator itself has failed and requires replacement.