If the VAZ-2107 is not charging, then the entire on-board network is powered from the battery. In this case, the generator will not work at all. But the disadvantage of a rechargeable battery is that it does not last long. And if a breakdown of the generator or its charging circuit suddenly occurs, the malfunction must be repaired as quickly as possible. Otherwise, you risk continuing to drive on a tow truck or tow truck. In order to understand the reason for the lack of charging, you need to know at least the theory of how the generator set on a car works.
What is a generator
In order to start the engine and ensure its proper operation, the entire electrical system must be provided with constant voltage. If we talk specifically about the reasons why there is no charging on the VAZ-2107, then you need to take into account that this car requires a voltage of 12 V. The car is started by a starter - this is a high-power electric motor that spins the crankshaft. The generator does not work when the engine is idle.
As soon as the crankshaft begins to rotate, voltage from the battery is applied to the excitation winding of the generator. The generator can only operate if there is a rotational movement of the magnetic field. And if there is no charging on the VAZ-2107, then there is either no voltage on the rotor winding or no rotation. The magnetic field is created by the field winding, which is located on the rotor. There is a pulley on it, which is connected to the crankshaft by a ridge belt (on injection cars) and a V-belt (on carburetor cars) to the crankshaft.
VAZ 2107 generator and reasons for lack of charging
To start the engine and proper operation of the ignition system and other electrical circuits of the VAZ 2107, it is necessary to have DC voltage in the on-board network. When the engine is not started, the battery maintains the proper voltage. After the engine starts, the car's generator charges the battery and maintains the on-board voltage at 13.6-14.2 V. Regardless of engine speed, the output voltage at the generator remains constant. A relay-regulator is responsible for this, which changes the voltage of the generator excitation circuit. If the voltage rises above the permissible level, the winding current decreases, reducing the output voltage. And vice versa.
Voltage regulator
And most importantly, the VAZ-2107 charging lamp is connected to the excitation winding through a voltage regulator. The latter allows you to maintain the voltage at the same level - within 13.6-14.2 V. The design of the regulator can be absolutely any, the following designs are distinguished:
- Mechanical - work on electromagnetic relays.
- Electromechanical - work on electromagnetic relays and transistor switches. A kind of combined scheme.
- Electronic regulators - consist of a single crystal on which a switching circuit is made. Essentially, this is one large power switch that allows switching to maintain the required voltage level.
Trouble-shooting
- The sensor (on-board voltmeter) shows the presence of charge, the battery light does not light up, and the battery is dead, it is not charging, and a check with a multimeter shows only 12 V voltage at the battery terminals when the engine is running.
First you need to clean the battery terminals and the inner surfaces of the wire terminals on the battery. If this does not produce results, the voltage at the generator output (terminal “30”) is measured relative to “ground” with the engine running (crankshaft speed 1000-1200 rpm). If the voltage is noticeably different, the contact between terminal “30” and the wire is cleaned, and the wire itself from the generator to the battery is called. As a last resort, this wire should be changed.
- The warning lamp and sensor (on-board voltmeter) show the presence of a charge, and the battery is flat, but checking with a multimeter shows a normal voltage of 13.6-14.2 V at the battery terminals. When a large load is turned on (for example, high beam headlights), the gauge arrow turns white scale sector.
Such symptoms may occur when the alternator belt tension is weak. It is necessary to measure the tension (with a force on the belt of 10 kgf, the deflection should not be more than 12-17 mm), and if the tension is weak, the belt is tightened or replaced.
Breakdowns leading to loss of charge
But now let's figure out why the generator may lose charging. The VAZ-2107 has a simple design; there is nothing complicated in the power supply system.
Major breakdowns:
- Voltage regulator failure.
- Broken generator drive belt.
- Poor contact or break in the wires supplying the field winding.
In order to restore the functionality of the generator set, you need to understand what the causes of the breakdown may be. If there is no charging on the VAZ-2107, you need to carefully carry out diagnostics.
How to understand that there is no charging
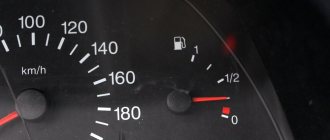
The first sign that charging has failed is that the lamp on the instrument panel lights up. The voltmeter needle may not respond (if, of course, the car has one). But the most reliable way to determine a breakdown is to check the voltage directly at the generator terminals.
When the engine is running, the voltage should be 13.6-14.2 V. If the battery is not charging, the voltage will be 12 V or lower. In order to avoid damage to the voltage regulator, do not remove the terminals from the battery while the engine is running.
It should be noted that too high or low voltage is harmful to the battery. It is either completely discharged (this leads to the fact that it is impossible to start the engine, since the starter does not rotate), or it is overcharged (at the same time, the electrolyte boils away from the cans). Of course, all these negative phenomena will lead to the battery failing.
Battery charging circuit
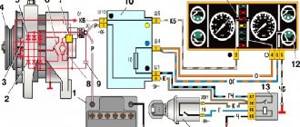
The same scheme is used not only on the VAZ 2107; a similar one is used in any other car. The only difference is in the components - they are designed for different currents and operating modes. Charging circuit:
- the negative terminal of the battery is connected to the metal body by a thick copper bus;
- the entire electrical system of the car is connected to the positive terminal - there are two buses: to the starter and the generator (“30” terminal);
- from the positive terminal of the generator, voltage goes to the fuse box and ignition switch;
- from the ignition switch the voltage goes to the mounting block with fuses;
- only after it is power supplied (protected by fuse F10) to the control lamp, signaling insufficient charging, as well as to the voltmeter - a device that measures voltage;
- After this, power is supplied to the fuse box and goes to the “61” terminal of the generator set - to the brush assembly.
The circuit is not simple, it has a lot of elements that can fail. The contact may even break, causing the alternator to not charge the battery well. And all this affects your nerves - panic immediately begins.
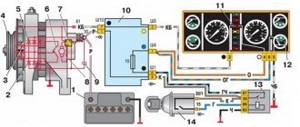
1 - battery; 2 — Generator impeller; 3 - Protection diodes; 4 - Drive pulley; 5 - Rectifier diodes; 6 - Stator winding; 7 - Voltage regulator; 8 - Excitation winding; 9 - Filter capacitor; 10 - Fuse block; 11 - Indicator lamp on the dashboard; 12 - Voltmeter; 13 - Ignition switch relay; 14 - Ignition switch.
But there is no need to panic, it is enough just to diagnose the condition of all elements of the system. And even if you have an injector installed on a VAZ 2107, the car will be able to withstand the journey to the nearest service station or auto parts store. If the battery is in good condition, of course.
What is needed for repair?
In the event that the VAZ-2107 has lost its charge, you need to start repairs as quickly as possible. It is impossible to carry all the tools and equipment with you, but it is still worth having a minimum set in the glove compartment or trunk.
More specifically, you need to have the following set of tools:
- Voltage measuring device (multimeter).
- Lamp 12 volts and power no more than 3 W.
- Screwdrivers - flat and Phillips.
- Stationery knife for cleaning wires.
- Pliers.
- Sandpaper.
Having this entire set of tools, you can begin to carry out repairs. Fortunately, on a VAZ-2107 it’s quite easy to do this with your own hands.
How to determine if the VAZ 2107 battery is not charging
The first sign of a lack of charging is a burning indicator lamp on the instrument panel or a voltmeter needle that is not in the green sector when the engine is running. A more reliable way is to check the voltage on the battery using the will class=”aligncenter” width=”600″ height=”450″[/img]
When the engine is running, the normal voltage on the battery is 13.9±0.3 V. When the battery is not charging, the voltage on it is approximately 12 V.
Important: to avoid failure of the regulator relay and the electronic engine control unit, it is prohibited to remove the battery terminals while checking the on-board voltage while the engine is running.
Low and high voltage of the on-board network harms the battery. In the first case, it is discharged, in the second, the electrolyte boils away, which leads to battery failure.
What is needed to repair VAZ 2107 battery charging
To identify and troubleshoot problems, the following devices and tools are needed:
- multimeter;
- control lamp 12 V;
- flat screwdriver;
- knife;
- pliers;
- sandpaper.
Troubleshooting
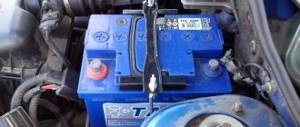
The first thing to do is check the tension of the alternator drive belt. Let's look at the main reasons why charging on a VAZ-2107 may fail. The reasons can actually be anything - even a simple broken belt. Over time, it wears out and becomes unusable. On the "sevens" the belt also drives the coolant pump. And if the belt suddenly breaks, this can be seen by the fact that the temperature of the antifreeze in the engine block will instantly increase.
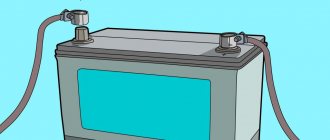
If the control light in the dashboard does not light up, and the voltage in the on-board network is at a normal level, but there is still no charging, you can look for the cause of this phenomenon in the terminals and contacts that connect the wires. Remove the terminals from the battery to clean them. Very often they are covered with a layer of oxides that interfere with the conduction of current. The result is a large voltage drop. Quite often, the fault lies not even in the charging wires themselves, but in the bus that connects the body, the engine block and the negative terminal of the battery.
What reasons can cause the charging relay to fail?
To start the engine and proper operation of the ignition system and other electrical circuits of the VAZ 2107, it is necessary to have DC voltage in the on-board network. When the engine is not started, the battery maintains the proper voltage. After the engine starts, the car's generator charges the battery and maintains the on-board voltage at 13.6-14.2 V.
If the VAZ 2107 has lost charging, the reasons may be as follows:
- malfunction of the relay regulator;
- break or poor contact in the excitation network or generator output voltage;
- broken generator belt.
Restoring normal operation of the generator should begin by determining the reason for the lack of battery charge.
First, you should check the serviceability of the alternator belt - it is this that causes the alternator to rotate and generate current. This belt drives the coolant pump, so this malfunction also manifests itself in engine overheating.
If the charge indicator lamp does not light up, and the voltmeter shows normal voltage of the on-board network, and the battery does not charge, the reason is in the contacts at the terminals.
You should remove the wires from the battery and clean the battery terminals and wires with emery cloth. If the charge does not appear, it is necessary to measure the voltage at terminal “30” (generator output) with the engine running. If the voltage at this terminal and the battery is very different, you need to clean the contacts and ring the wire going from the generator to the battery. The faulty wire must be replaced.
If, when the engine is running, the voltage in the on-board network is within normal limits, but when a load (headlights) is connected, it drops, the reason lies in the weak tension of the alternator belt. As the load increases, the weakened belt slips. A correctly tensioned belt should bend by 12-17 mm with a force of 10 kgf. A loose belt must be tightened or replaced.
Important: if the belt is over-tensioned, excessive load occurs on the bearings of the generator and pump, which can lead to their failure.
Other reasons for the lack of charge may be a broken rectifier diode on the generator, an open or shorted rotor or stator winding.
Diodes can be checked using a multimeter or a test lamp. Using a multimeter, you can check the resistance of the diodes in the direction in which they should be locked. To check with a test lamp, you must remove the “ ” terminals from the battery and connect the test lamp. The wire of the test lamp must be touched in succession to the three bolts of the rectifier devices. Then perform the same operation, only disconnecting the “-” terminal. If the lamp lights up, the diode being tested is broken.
If one of the diodes malfunctions, the diode rectifier assembly must be replaced.
A break in the stator winding is determined with a multimeter by measuring the resistance between the rectifier unit mounting bolts. Lack of contact between the winding and the other indicates its breakage. In this case, it is necessary to replace the winding or generator assembly.
A common cause of generator failure is brush wear. To check them, you need to dismantle the brush assembly. The length of the brushes must be more than 5 mm, otherwise they need to be replaced. Also, the brushes may become warped or “stick” in the wells. Therefore, it is necessary to check the condition of their side surface.
Note: the VAZ 2107 generator (carburetor) is no different from the unit for the injection version of the “Seven”. Therefore, all tips for checking and repairing the generator are relevant for both modifications of the car.
If the warning lamp does not light up and other devices do not work when the engine is running, and the battery is not charging, the reason is a blown fuse or a breakdown of the ignition switch (relay).
The reason for the lack of battery charging may be a breakdown of the relay regulator. To check it, you need to connect “ ” from the battery to the top contact, and “-” to the left one and check the voltage on the brushes, which should be equal to 12 V. If the voltage is lower, the relay regulator must be replaced.
Only two, not counting severe damage to the generator housing:
- “planned” wear of brushes, which are graphite electrodes. In this case, the contact is gradually broken and disappears completely. As a result, no current is supplied to the excitation winding of the generator, and it does not work;
- A short circuit has occurred in the electrical circuit itself, while there is an output current on the generator and battery, but it is higher than 14.8 V.
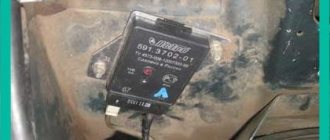
The charging relay is located on the generator, on its back cover, and, no matter what shape and color the “tablet” is, a yellow wire comes out of the generator body to it. The relay is located so that it can be replaced without removing the generator. But for convenience, the pictures show work on a removed generator.
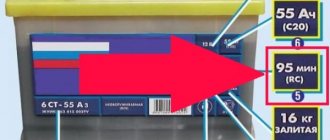
Experts suggest that on a VAZ-2107 with an injector, the standard generator is 5142.3771 (eight). It has one very important feature: it produces more current - not 55A per hour, like other generators, but about 80-90 A. This is due to the properties of the injector, which requires more electricity (but also has a higher power density).
Experts advise checking the generator for malfunctions in the following order:
- inspect the diodes that supply electricity to the excitation winding of the generator (if they are burned out, they should be replaced with new ones);
- use a tester to measure the voltage level in the current-carrying circuit (if its value is less than 12 V, then there may be a short circuit, which means the wiring is overheating).
The rotor is stored in a ball bearing only in the front shield; on the side of the flange screen it is connected by means of a disk and planes to the flywheel of the internal combustion engine. The generator and exciter rotor are aligned and include a rotating rectifier. The front bearing shield and terminal box are made of aluminum alloy, the rear bearing shield is made of cast iron. Impregnation of all windings is a double vacuum. At the request of the customer, a generator with different voltages or different frequencies can be manufactured.
The generator has a main winding, an auxiliary winding and a double-wound winding. From the main winding we take electric power. This winding is connected to the primary winding of the compass transformer, and the first winding of the coextruder transformer is fed to the first winding depending on the load of the generator. The auxiliary winding also supplies the first part of the winding winding and detects its voltage free of charge. The auxiliary winding is additionally connected to a regulator, which powers the second part of the field coil and acts as a voltage corrector.
The only source of current during the vehicle ignition start is the battery. With its help it is possible to start the engine. After this, the load falls on the generator, and the battery goes into electricity consumption mode.
This is a contactless generator with a silicon rectifier, voltage and current regulator. The generator is located on the chassis frame, to which it is attached by a foot. The generator is driven by a short high-speed driveshaft from a gearbox located on the bogie bearing chamber. The alternating current from the generator is regulated by a silicon rectifier. The rectified current charges the vehicle's battery over the appropriate fuse. The generator voltage and current controller is non-contact and is located in the car body.
The generator itself is welded steel. A six-pole stator bundle is compressed inside, the quiver oscillates in the stator bundle. The wheel rim shaft is mounted in ball bearings. The bearing area on both sides is blocked by bearing caps. The windings are connected to the terminal block, which is located on the stator housing. Cooling of the generator is the flow of air while driving.
However, this is what happens with a fully functional electrical system in a vehicle. When problems arise, you have to look for the reasons, finding out why the battery is not charging and how to restore functionality.
The absence of a charging process may be indicated by a light indicator located on the dashboard. It is often depicted as a battery icon, and when the electrics are working satisfactorily with the motor running, it does not light up. You can see it on the dashboard after turning the ignition key to the first position. If the icon continues to glow, this indicates that the battery is not being charged from the generator.
More complex breakdowns
If, when the engine is running, the voltage in the on-board network is in the normal range, but when the load increases, it immediately drops, then we can say that the alternator belt is very loosely tensioned. Quite often, at low speeds, the belt even begins to whistle. It should be noted that with normal belt tension, the sag should be no more than 17 mm. Moreover, the force should be no more than 10 kgf. If the belt is very loose, it needs to be tightened. If tension cannot be achieved, a new one should be installed.
But you cannot tighten the belt too much - this will cause excessive load to be applied to the bearings. This will lead to damage to the bearings of the pump and generator. Quite often, the cause of loss of charging is a breakdown of one or more diodes of the rectifier bridge. It also happens that the rotor or stator winding breaks through. To check these elements, you need to completely disassemble the generator set.
Generator diagnostics
In order to check the diodes, you need to use a multimeter or a test lamp. Using a multimeter, you can measure the on-state resistance of semiconductors. In order to diagnose devices using a lamp, you need to disconnect the positive terminal from the battery. One wire must be connected to the positive terminal of the battery, and the second to the three bolts of the rectifier diodes.
Afterwards you need to perform a similar operation with the negative terminal turned off (and the positive terminal turned on). If the lamp starts to light up, this may indicate that the corresponding diodes are broken. The best option is to install a new diode block. But in order to save money, you can replace only those that are faulty.
The main condition for repairs is to do everything carefully. The current flows in this node is large, so weak insulation will lead to the formation of a spark gap, which will cause failure of not only the semiconductors, but also the generator windings. If the charging light is on on a VAZ-2107, this may indicate that one of several components has failed.
Generator check
Disassembly is carried out in the following order:
- Unscrew the voltage regulator and rectifier block.
- Using the “8” key, we disassemble the case and remove the back cover. The generator is divided into several parts.
- We dismantle the brush assembly and bearing. If the length of the brushes is less than 5 mm, then they need to be replaced.
- Remove the pulley from the rotor by holding it in a vice.
- After all this, remove the shaft from the bearing and check it.
We use a multimeter in resistance testing mode. It is necessary to check that there are no breaks in the rotor and stator windings, and also that there is no interturn short circuit. Next, we check the voltage regulator of the VAZ 2107 generator for serviceability.
If you have identified a large number of faults, eliminating them does not make sense; it is cheaper to buy a new one.