How to change the trapezoid wipers on a Priora
Removing the Priora windshield wiper trapezoid, as well as dismantling and replacing the motor that drives this windshield wiper trapezoid, is slightly different from cars of the tenth family (VAZ 2110-12), since on the Priora the fastening of the frill is different, and the fastening of the sound insulation is also slightly different, so performing this procedure will be a little more difficult .
So if you are the owner of a Lada Priora and need to remove the windshield wiper drive trapezoid to repair or replace the motor, then you should still use the visual video instructions so that unexpected difficulties do not arise when removing and installing the windshield wiper trapezoid on your Priora. And so, to remove the Priora trapezium, first of all we remove the windshield wipers themselves, then unscrew the fastenings of the frill and the fastenings of the sound insulation in the hood compartment. You also need to remove the expansion tank. Afterwards it will be possible to remove the sound insulation to gain access to the trapezium of the Priora wipers. But in order to dismantle the trapezoid with the motor assembly, you will have to remove the barrel platform.
We clearly see the entire procedure in the video.
Subscribe
to our channel in
Index.Zen
Even more useful tips in a convenient format
Priora's wipers don't work
The wiper stopped working after a bird strike while driving on a VAZ Priora
Good day everyone. If you are tired of the dull work of janitors when the cold weather arrives, then this is the place for you. I have a Priora with air conditioning, and I worked alone, so everything unreal is real. But I’ll say right away, a couple of points, namely the removal and installation of the trapezoid made me a little angry, and I remembered the designer with all the “good” words. and now in detail. -Priora with air conditioning - I took pictures without disconnecting the engine; I didn’t take my own photos, so I’ll take them from the Internet.
Replacing the Priora wiper motor
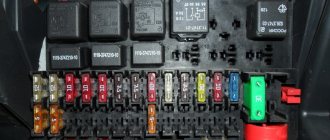
In general, another sore prior. In the summer everything was still fine, but with the onset of cold weather the wipers began to live their own lives, that is, I turned them on and off they went - they clean the glass until they want to stop, and if they stop, they will definitely stop in the middle of the glass. I had to flip the switch a lot and every 20-30 times they would stop in the right place. Or if you turn on the wipers and turn off the ignition, they continue to work for an indefinite period of time. Having studied the articles on this subject, there were two options:
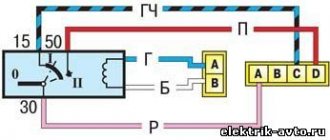
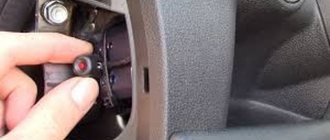
1. Replacing the regulator relay which is located under the steering wheel 2. Replacing the wiper motor lubricant
In general, I changed both relays, but this did not fix my problem:
It was decided to remove the motor and trapeze to change the lubricant. I used this video as a tutorial on how to unscrew it all:
On my own behalf I would like to add that the trapezoid with the motor cannot be removed easily and simply
To get them you cannot do without a spell and a huge amount of swearing. Even in the video, the wipers are in their standard position, but I read a lot where the wipers are turned on and left in the upper position (vertical) by turning off the ignition, which is what I actually did.
In general, after 5-6 times I still got it right and my joy knew no bounds. And one more thing: before putting the wipers in place, turn on the ignition and let the engine idle, this way it will make a full swing and get into its working position and you can put the wipers not vertically, but horizontally. Regarding removal and installation, that seems to be all, now about the motor itself and the trapezoid:
Removing the windshield wiper trapezoid assembly with the motor on a Priora
The first step is to remove the wiper arms, as well as the rubber seal on the top of the hood. After this, using a thin knife, we pry off the decorative plugs, under which there are screws securing the frill.
Under these plugs we unscrew the screws securing the frill.
Now, again, on the left side, unscrew several screws securing the insulation to the frill, as shown in the photo below.
After which you can remove one part of the frill:
Also, loosen the clamp bolt on the thin hose of the expansion tank and remove it from the hole in the insulation:
The engine compartment insulation is also attached from below, which is not very clearly visible, but in the photo below this screw is quite clearly visible.
Now you can lift the expander up and move the insulation section to the side, as shown in the photo below.
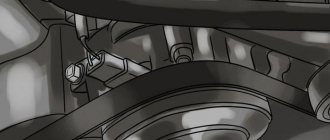
Now you can begin to unscrew the mounting nuts and bolts of the motor with the trapezoid. Top left:
And top right:
But to get to the trapezoid mounting bolt in the bottom center, you must first unscrew and remove the expansion tank mounting bracket. Two mounting bolts are located on top, as can be seen in the photo:
And two more bolts on the inside of the wing, of course, after first removing the fender liner.
Now the platform can be removed and the last bolt securing the Priora trapezoid can be unscrewed.
Now we carefully remove the entire assembly, finding the desired position so that the trapezoid does not cling to the body and heater housing.
There is still one thing left to do - disconnect the block with the power wiring harness.
Now the entire trapeze assembly with the motor can be removed without any problems.
Video review of replacing the motor and trapezoid wipers on Priora 2170, 2171, 2172
To more clearly show the entire process of this repair, a video review of the repair will be shown below. If you have any questions, ask below in the comments or on the channel under the video!
Read more: Automotive electric pumps for tire inflation
In bad weather, driving with faulty windshield wipers becomes unsafe. While driving, the driver must clearly see the space in front of him in order to quickly react and make the right decision in the event of an extreme situation. Over time, the wipers on the Priora begin to work worse and the quality of cleaning decreases - streaks and unwiped areas appear. The reason may be a breakdown of the wipers, motor or brushes. In this case, it is better to repair the windshield wipers on the Priora at a car service center. Since this is not always possible, the question arises of how to change the wipers on a Lada Priora yourself.
Most experts recommend replacing windshield wipers on a Priora once a year, regardless of the intensity of use of the car. It is best to change brushes after winter, since this is the time of year that most negatively affects the condition of the entire car. According to technical requirements, windshield wipers must efficiently remove snow and dirt from the windshield for 400 thousand cycles, which is approximately equal to one year of use.
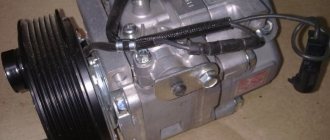
Replacing the windshield wiper motor on a Priora
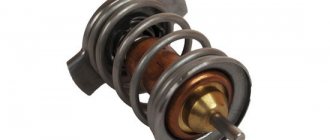
To replace the wiper motor itself, you must first note the position of the trapezoid bar relative to its body, so that later you can install everything in the same order.
Unscrew the three motor mounting bolts:
And the central nut using a 13 mm wrench. We remove the motor and replace it with a new one if necessary.
Installation occurs in reverse order. The price of a new trapezoid is from 1000 rubles for the original one produced by AvtoVAZ. You will have to pay at least 2000 rubles for the motor.
How to remove wipers on a Priora video
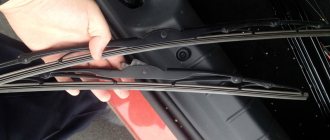
We replace the brushes when the quality of windshield cleaning deteriorates, approximately once a year - preferably before the start of the autumn-winter period. The length of both windshield wiper blades is 500 mm. When purchasing imported brushes, you should focus on the size of 20′ or 510 mm. If the brushes are very dirty or covered with ice, they should be removed and cleaned. Brushes should be washed periodically under the tap with warm water and soap.
Be careful when removing the brushes: the lever under the action of the spring may suddenly drop onto the glass and break it. To do this, move the lever with the brush away from the windshield.
By pressing the brush locking tab...
...move the brush from the hook of the lever so that the brush lock comes out of the hook.
Remove the brush from the lever. If you need to replace the brush retainer, move it from the brush axis and remove it. Similarly, remove the other windshield wiper blade.
Frameless type brushes can be installed on the car. Install the brushes in reverse order.
1200 rub. for the photo report
We pay for photo reports on car repairs. Earnings from 10,000 rubles/month.
Write:
Removing the Priora windshield wiper trapezoid, as well as dismantling and replacing the motor that drives this windshield wiper trapezoid, is slightly different from cars of the tenth family (VAZ 2110-12), since on the Priora the fastening of the frill is different, and the fastening of the sound insulation is also slightly different, so performing this procedure will be a little more difficult . So if you are the owner of a Lada Priora and need to remove the windshield wiper drive trapezoid to repair or replace the motor, then you should still use the visual video instructions so that unexpected difficulties do not arise when removing and installing the windshield wiper trapezoid on your Priora.
Replacing the windshield wiper motor on a Priora
To replace the wiper motor itself, you must first make a mark of the position of the trapezoid bar relative to its body. This is necessary in order to install it back in the same order. Next, unscrew the 3 bolts that secure the electric motor and the central nut using a 13mm wrench. After this, you can remove the motor and replace it with a new one, if necessary. An original trapezoid costs from a thousand rubles, a new gear motor costs from two thousand rubles.
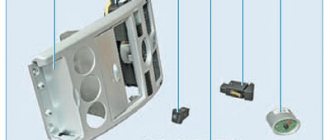
How to change rubber bands
You can replace the rubber bands yourself, which will save you money on buying new brushes. You will need pliers and a wide blade screwdriver. First of all, to replace the wiper blades on a Priora, you need to install them perpendicular to the arms, press the locking brackets and then pull them out. After removing the wipers, carefully bend the rubber band clamps located at the edges of the pressure plate to a minimum angle. This is done so that the rubber can easily come out of the wiper. It is better to bend the clamps with pliers, as there is a risk of damaging the clamps.
After the rubber band is removed from the clamps, you need to pull out the metal plates that hold the curved shape. You should immediately remember the directions of the bends of the plates so as not to confuse them and not to do the work again, since the elastic band will not be pressed tightly against the windshield. The plates have recesses where the rubber grooves should fit. There are situations when the thickness of the groove is greater than the width of the opening. In this case, it can be expanded with a thin file.
Read more: Volvo s40 2008 reviews
The rubber band is easily inserted into the latches until it clicks. At the same time, it should not play, otherwise it will quickly wear out. If the installed rubber band leaves uncleaned areas on the glass, it must be replaced again. However, it is worth considering that the cost of several tapes damaged during installation may be more than the cost of the assembled wiper.