Removing the instrument panel console trim
We remove the instrument panel console trim for replacement, as well as when dismantling the control unit and central deflectors of the heating and ventilation system, and the hazard warning switch.
Disconnect the wire terminal from the negative terminal of the battery. We take out the container from the niche for the head unit of sound reproduction...
...and disconnect the two wiring harness blocks from its connectors. In the niche of the console lining under the container, use a Phillips screwdriver to unscrew...
...two self-tapping screws (the self-tapping screw on the other side is not visible in the photo) for the upper fastening of the console trim. Having opened the cover of the compartment for small items, use a Phillips screwdriver to unscrew...
...two self-tapping screws for the middle fastening of the console trim. Open the front ashtray.
Using a slotted screwdriver, press the ashtray out and remove its axis from the hole in the trim... ...and remove the ashtray.
Using a Phillips screwdriver, unscrew the two screws of the lower fastening of the console trim.
We move the cover away from the console, overcoming the resistance of two clamps.
By pressing the latch, disconnect the wiring harness block from the hazard warning switch. Disconnect the wiring harness connectors from the clock and from the heated rear window switch and outside rear view mirrors.
We disconnect the two wiring harness connectors from the heating and ventilation control unit... ... and remove the instrument panel console trim assembly. We remove the clock, the hazard warning switch, the heated switch for the rear window and exterior rear-view mirrors, and the heating and ventilation system control unit from the trim (see “Removing the heating and ventilation control unit”). If necessary, carefully pry the plastic latches of the central deflectors with a slotted screwdriver and remove the deflectors from the lining socket. We assemble and install the instrument panel console trim in the reverse order.
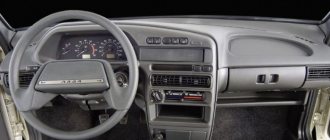
Instrument panel console trim and elements located in it
: 1 — console trim; 2 — central deflectors; 3 — switch for heating the rear window and exterior rear-view mirrors; 4 — heating and ventilation system control unit; 5 — alarm switch; 6 - hours
Sometimes vehicle parts require replacement, most often due to breakdown or wear. The question of how to remove the center console on a Priora worries those motorists who want to replace a part hidden by the console. For example, without removing the panel it is impossible to get to the clock block, heating control device or deflector.
I am glad that the process of dismantling the console panel is quite simple and you will need a minimum of tools, which can be found in the trunk of every motorist. If you need to replace one of the above parts, learn how to remove and reinstall the console.
see also
Comments 11
That is, in order to change the hazard warning button you don’t have to remove the console?
It is possible, but it will require great care.
Is it possible to get the watch out without removing the panel?
no, there's a latch on the back
Is it possible to fit through the slot for the radio? By the way, are there diodes?
You can't unless you're an octopus. yes there are 2 diodes
Is it possible to get the watch out without removing the panel?
You can get it without taking it off! Today I pulled it out because the watch has stopped! And the backlight works! Just pull out the radio! Bend over and you will see the latch! And use a small L-shaped piece of iron to bend the latch! No difficulties! Easy. Can anyone repair the watch? Inside there is a round magnet and a thin winding wire... is the winding resistance of 400 ohms normal? Perhaps the magnet has become demagnetized over time... and because of this the clock does not go...
The question of removing the center console on a Priora worries quite a few car owners, since this has to be done quite often and here’s why. The fact is that some control elements, such as a clock, a heater control unit, or the central heater deflector, cannot be replaced without removing the console.
To remove it, you will need a minimum of tools and the main one, which you simply cannot do without - a Phillips screwdriver.
Features of dismantling
The process will not take much time, it is quite simple, no special tools are needed, only a cross-shaped twist. But before you find out how to remove the console on a Priora, learn about some of the features of the procedure.
Disassembly always begins with removing the radio and disconnecting the wires. To remove it, press the special buttons on the sides of the device; you should hear a characteristic click. Pull the radio towards you, disconnect the wires.
Now you need to remove the compartment in which the radio is located, after which the car owner will see two self-tapping screws, they must be unscrewed during the process of dismantling the console.
How to remove the center console on a Priora? But you never know why you need it
For motorists, knowing how to remove the center console on a Priora will be useful for carrying out repair work or replacing the part in question with a more modern version. This manipulation should sometimes be carried out when installing the DVR. To do the work yourself, you will need a basic set of tools: a screwdriver and wrenches.
We'll look at how to remove the center console on a Priora below. The dismantling procedure consists of the following operations:
- The first step is to deactivate the rear window heating button;
Dismantling the panel on Lada Priora
Removing the Priora center console involves dismantling the radio, if installed. Usually, special keys are sold with the radio for removing the device, but if they are not available, just select the appropriate size and unscrew the nuts.
After you remove the radio, follow the instructions explaining how to remove the center console on a Priora:
- Press the buttons on the inside of the console; they should fall out of the connectors.
- Remove all the buttons located on the console, carefully disconnecting the box with wires from the buttons.
- Open the compartment with the ashtray, carefully but forcefully pull its edges. Remove the ashtray and set it aside.
- Inspect the area where the ashtray was just pulled out. The two bolts that secure the bottom of the console are now visible. Take a cross-shaped screw and unscrew the bolts.
- Inspect the recess from which the radio was pulled out. There are bolts on the sides and top, unscrew them.
- There is a cover under the three buttons that regulate the temperature in the cabin; open it. You will see two screws inside, unscrew them.
- The panel can be detached. Gently pull it back, threading the wires through the empty button compartments.
- It remains to disconnect three devices with wires - a heating control device, a clock and an alarm. Gently pull the connectors and disconnect the wires.
- Now remove the console completely.
Note! If there is a need to replace the Priora instrument panel, then do not forget to disconnect the heating control unit from it, the wires with the clock and the air duct nozzles from the stove.
Installation of the console is carried out in the reverse order - repeat the above steps, starting from the ninth point, gradually moving up to the first. Now readers know how to remove the console on a Priora car.
When a driver needs to replace the instrument panel on a Lada Priora, problems with the purchase may arise. It is not easy to find in specialized stores, but you can find it at a dealership or car market, and even at a lower price.
Removing and installing the center console of the instrument panel on a Priora
The center console trim on cars with “standard” and “luxury” configurations may differ in the size of the cutout for the radio. Otherwise, there will be no difference in fastenings. Moreover, many owners cut a hole out of a regular one for installing a 2-din radio and everything works out quite successfully. So, let’s get closer to the point - if you have a radio installed, you must first remove it, using special removable keys that usually come with it.
After the niche is free, pressing on the button connectors from the inside, we take them out, approximately as can be seen in the photo below.
Removing and installing the panel (dashboard) Priora
If you decide to install sound insulation for the engine shield, or paint or reupholster the panel, then carefully study the instructions on how to remove and install the Lada Priora dashboard yourself.
Necessary tool . Phillips and flathead screwdrivers, 10mm head, pliers with narrow jaws.
Before starting work, you should disconnect the negative terminal from the battery. Then remove the steering column switches.
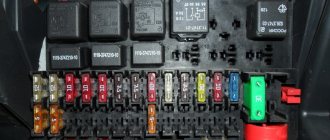
Remove the fuse box cover:
- Turn the three locks of the mounting block cover 90°.
- Unclip the fuse box cover.
Disconnect the wires from the ignition switch. Then remove the instrument cluster. and remove the central floor tunnel. Disconnect the wires from the electric power steering:
Then in order:
- Unclip the plastic clips and remove the left A-pillar trim. Remove the right A-pillar trim in the same way.
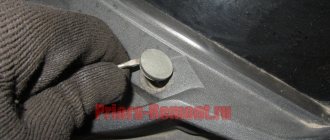
- Pry off the left door glass blower nozzle using a flat-head screwdriver with soft material underneath to avoid scratching. Similarly, remove the blower nozzle on the right side.
- Unscrew the nut of the upper fastening of the Priora panel, it is located in the cavity under the door glass blower nozzle, using a “10” socket. Unscrew the nut on the right side in the same way.
- Unscrew the bolt securing the ends of the ground wires of the dashboard using the same key.
How to remove the center console (panel trim) of Lada Priora
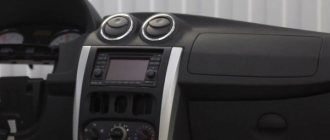
The interior of Priora 2 (after the latest restyling) is significantly different from the previous version of the car. The interior now has a more stylish dashboard (dashboard) with the ability to install a modern multimedia system. If you are engaged in independent modifications or repairs of your car, then you will need instructions for removing the central lining (together with the tunnel, it is also called the “beard”).
The plastic center console is attached to the panel (dashboard) with 6 screws. To gain access to the lower two mounting screws, you will have to remove the tunnel cover:
- Remove 2 screws under the heater and air conditioning control unit;
- Remove the gearshift knob cover by prying it off with a flat screwdriver and remove the 3 screws under the cover;
- Unscrew the 2 lower screws securing the center console .
screws for fastening the tunnel cover of the Lada Priora; screws for fastening the tunnel cover of the Lada Priora; lower screws for fastening the center console of the Lada Priora
To remove the remaining four screws securing the center console:
- Remove the upper block of buttons and the plug by prying them off with a flat screwdriver or a plastic spatula;
- Remove the 2 upper console mounting screws;
- Remove the 2 middle console mounting screws .
plugs for the center console of the Lada Priora, upper mounting screws for the center console of the Lada Priora, middle mounting screws for the center console of the Lada Priora
All that remains is to pull the center console towards you and disconnect the connectors with wires at the back. Installing the plastic cover is done in the reverse order. The process is also shown in the video:
How to remove the center console on a Priora
The reasons for removing the console may be its damage in the form of cracks, the appearance of extraneous noise or knocking under the panel while driving. Or you may simply want to install a console of a different color.
Before getting started, it should be noted that on the Priora the console body and the instrument panel are one solid part. However, an independent decorative trim on the console itself can be removed for easy access to the cavity of the instrument panel. The decorative panel of the console itself, together with the gearbox tunnel, is also called the “beard”.
Since in the process of removing the console it will be necessary to disconnect various electrical contacts, in order to avoid a short circuit it is recommended to turn off the ignition or disconnect the negative terminal from the battery. To remove the console you will need a Phillips and flathead screwdriver. It would also be a good idea to pick up some small box for collecting unscrewed screws and other small items.
So let's get down to business. First of all, you need to remove the radio. If you have a car with a standard radio, then you should not try to pick it out with something sharp. To remove it, it’s time to use available materials. Stiffening plates from VAZ windshield wiper blades can help with this. Locking grooves are provided along the edges of the plates. There are narrow grooves on the radio under the Scan (on the left side) and Tab (on the right) buttons. We insert the plates from the windshield wiper blades into these grooves, move them slightly apart and carefully pull the radio towards you.
You should not pull it out far, since you only need to disconnect the power wires.
If a regular, non-factory radio is installed, then removing it is much simpler. It is enough to pry the radio frame with a small screwdriver, and the entire assembly can be easily removed. It happens that special keys are needed to remove the radio frame itself.
After removing the radio, remove the heated rear mirror button. The button is carefully pryed up with a screwdriver and pulled out, and the chip with wires is disconnected from it. Afterwards you need to remove the ashtray. The plastic insert is removed from it and, by slightly pulling outward, the ashtray body itself is removed. Then the glove compartment lid is removed from the pins.
Then four screws are unscrewed: two are located under the already removed ashtray and two are located just below the glove compartment. To get to the screws located under the ashtray, you must first remove the decorative panel with a cup holder located on the gear shift lever. To do this, use a thin screwdriver to pry up and remove the leatherette cover from the box lever, and unscrew the fastening of the panel itself, or, as it is also called, the tunnel cover. After this, access to the lower console mounting screws opens. For convenience, we put all the unscrewed screws into a pre-prepared box or jar.
Removal and installation of the instrument panel Lada Priora, VAZ 2170, VAZ 2171, VAZ 2172
Useful tips When installing the instrument panel, you may need clamps to secure the wiring harnesses, since in some cases it is easier to cut them when dismantling the panel. Depending on the vehicle configuration, a different number of pads with wires may be used. Therefore, when separating the pads, mark them relative to each other. This will make the job easier when installing the instrument panel. Mark the free pads separately.
You will need: 8" and 10" socket wrenches, flat and Phillips blade screwdrivers.
1. Disconnect the wire from the negative terminal of the battery. 2. Remove the steering wheel (see “Removing and installing the steering wheel”). 3. Remove the steering column trim (see “Removing and installing steering column trim covers”). 4. Remove the VAZ 2172 steering column switches (see “Checking and replacing steering column switches”). 5. Remove the floor tunnel linings (see “Removing and installing the floor tunnel linings”). 6. Remove the lada priora instrument cluster (see “Removing and installing the instrument cluster”).
7. Remove the right and left screws securing the center console of the Lada Priora instrument panel.
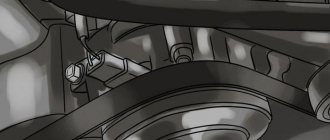
8. Using a screwdriver...
9. ...remove the side window heating nozzles on the right and left.
10. Using a 10mm socket wrench, unscrew the two nuts of the upper fastening of the Lada Priora instrument panel on the left and right.
11. Turn the three latches and remove the fuse and relay box cover.
12. Remove the four screws securing the instrument panel amplifier of the Lada Priora...
13. ...and remove the amplifier.
14. Turn inside out from the bottom left...
15. ...and on the bottom right there are two screws securing the Lada Priora instrument panel.
16. Remove the screw securing the instrument panel to the left of the steering column...
17. ...and the fastening screw located on the right under the instrument panel.
18. Using a size 8 wrench, remove the bolt securing the ground wires of the instrument panel to the body bracket.
19. Move the clamps of the VAZ 2171 instrument panel wiring harness blocks to the right...
20. ...and disconnect the three harness pads from the pads installed on the bracket.
21. Disconnect the wiring harness block of the Lada Priora ignition switch (lock).
22. Disconnect the wiring harness connectors from the electric power steering.
23. Using a 10mm wrench, unscrew the nut securing the ground wire of the instrument panel harness from the bracket for the electronic units.
24. Slide the pad lock...
25. ...and disconnect the instrument panel harness from the ignition system harness.
26. Disconnect the instrument panel harness connector from the electrical accessories control unit.
27. Slide the lock...
28. ...and disconnect the instrument panel harness connector from the airbag control unit.
29. Remove the instrument panel and remove it from the interior of the Lada Priora.
Note Since the instrument panel is quite bulky and heavy, this operation should be performed with an assistant.
30. Install the VAZ 2170 instrument panel in the reverse order of removal.