The handbrake light is not on, what should I do?
The fact that the light bulb in the instrument panel burned out is very unlikely, they are practically “eternal” there, but as for the button (limit switch) located under the parking brake tension lever, this is really the most likely reason. Perhaps it itself has failed, but most likely (I’ve had this happen myself) it’s just a bad contact on the terminals of the button itself, or the wire has completely fallen off. You will have to disassemble the tunnel cover and look at the terminals and wires, and “ring” the button itself.
To install any alarm system yourself, you should study its instructions in detail.
In our example, we will look at the installation of an alarm model Starline A91.
ATTENTION! A completely simple way to reduce fuel consumption has been found! Don't believe me? An auto mechanic with 15 years of experience also didn’t believe it until he tried it. And now he saves 35,000 rubles a year on gasoline! Read more"
Alarm systems from this company are perfect for installation on VAZ -2114 and VAZ -2115 cars
Before installing an alarm on a VAZ - 2115,2114 car, you need to have a good understanding of the car's structure, and also decide what to connect to the alarm.
Handbrake tension on VAZ 2114
The VAZ 2114 car has good performance, reliability and maintainability.
But this does not allow you to completely insure yourself against possible breakdowns. Considering the state of domestic roads, it is not surprising that most often car owners turn to service stations with problems in the braking system or suspension.
A striking example of a breakdown is problems with the handbrake. More precisely, with cables that are responsible for blocking the rear wheels and do not allow the car to move until the handbrake is returned to its original position.
Whether you use a handbrake or not, sooner or later you will need to use the system. And if the handbrake has to survive regularly, then there is no debate at all regarding the need to urgently solve the problem.
Design
Many people mistakenly believe that the handbrake is a simple lever located near the gearbox, on the right hand of the driver. In fact, it is a whole system of elements that are connected to each other.
When the hand brake fails, in 90% of cases the culprit is a cable or a pair of cables that go to the rear brake pads from the equalizer.
To determine the reasons for the failure of the handbrake, it is necessary to understand the circuit diagram of the device and its components.
The device includes a number of structural elements. Namely:
- Lever arm;
- Traction;
- Springs;
- Lever button;
- Main cable axis;
- Bolts;
- Washers;
- Drive unit;
- Equalizer;
- Case;
- Locknuts;
- Cotter pins;
- Right and left lever;
- Expansion left and right strip;
- Lock washer, etc.
Tension
So, having understood the diagram, you can begin the procedure of tightening the handbrake cables.
The tensioning procedure is as follows.
- Place the car on an overpass or pit. If you don’t have a garage and you have the opportunity or desire to carry out the procedure at a service station, use a jack. The rear of the car is raised on a jack. The most extreme option is a curb onto which the car is driven and all you have to do is crawl under it.
- Engage the gearbox in first gear and put the car on the handbrake by pulling the lever up.
- The ideal number of handbrake clicks is from 2 to 5. If there are fewer or more clicks, it is easier to take appropriate measures to tension the cable.
- If there are less than 2 clicks, then the cable will need to be lengthened. If there are more than five clicks, then the cables are shortened.
- Lengthening the cable means relaxing it. To do this, unscrew the locknut. When tightening the cable, the locknut must be tightened in reverse.
- Before you start looking for the required nut on the bottom of the car, release the handbrake lever all the way.
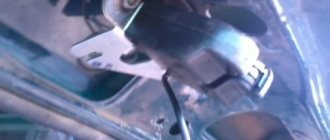
- Take a 13mm wrench under the car and head down.
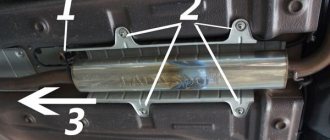
- Find the handbrake cable equalizer. This is the same element from which the main handbrake cable is divided into two cables.
- In some cases, it is simply not possible to gain access to the equalizer, since the muffler holders made of rubber are in the way. In such a situation, it is better to remove them. This is not difficult to do, but working with the handbrake will be much easier.
- Now there are two nuts in front of you. One is a simple nut and the other is a lock nut. Having two keys in your hands, fix the nut with the first one, and with the second one begin to unscrew or tighten the locking nut. Be careful that the nut does not start to turn.
- Taking into account the condition of the handbrake and the need to loosen or tighten the lever, turn the locknut in the appropriate direction. Remember what is the optimal number of clicks.
- Tighten or unscrew the locknut to obtain the required degree of tension.
Electricity consumers
Vehicle systems, depending on model and configuration:
- ABS - anti-lock wheel system (anti-skid automatic braking)
- SRS - safety system (airbags, belt tensioners, etc.)
- EFI, ECM - electronic engine management systems
- Electronically controlled automatic transmission
- Trip computer
- and other
Lighting devices
Main article: Car lighting devices
Automotive lighting devices are divided into external and internal.
- External ones include headlights (with low and high beam), side lights, turn indicators (combined with hazard warning lights), brake lights, reversing lights, license plate lights, fog lights, contour lights, spotlights, and in some cases decorative lamps.
- Internal lamps include interior lighting lamps, engine compartment lamps, trunk lighting lamps, glove box lighting lamps, instrument panel lighting lamps, etc.
Other consumers
- Starter
- Ignition system
- On-board computer
- Electric power steering
- Fan motors, windshield wiper drives, power windows, etc.
- Heated glass
- Parking sensors (parking sensors)
- Reversing cameras
- Seat servos
- Cigarette lighter
- Radio (radio), TV, multimedia entertainment system
- Sound signal
- Anti-theft alarm
- GPS navigator, built-in or separate,
- Seat heaters,
- as well as other auxiliary and information systems and devices.
Dismantling and replacement
It is difficult to confuse the cable from the handbrake with anything else under the bottom of your VAZ 2114, which greatly simplifies the repair and replacement procedure.
We provide detailed instructions for replacement, and additionally recommend watching the video.
- We advise you to get the car in order in terms of cleanliness in advance. This will make it easier for you to find all the nuts and fasteners.
- Additionally, treat the nuts with the almighty WD40. This will make it much easier for you to unscrew the sometimes sticking and rusting nuts.
- Place the handbrake lever all the way down.
- Start with the adjusting nut and locknut that you used recently to try to tighten a loose cable. In this situation, you should loosen the nuts and remove them from the handbrake rod.
- Remove the washers and cable equalizer. Although this can be done after you jack up the car. But be sure to do it before removing the wheels.
- Raise the rear of the car with a jack, unscrew the wheel bolts and remove them.
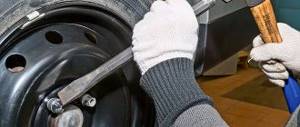
- Tap the brake drum locking pins. This will allow them to be removed from the brake pads.
- Remove the block.
- You now need to disconnect the ends of the two cables from the equalizer. The fasteners can be removed from their places with the simplest pliers, so don’t bother.
- The shifted spacer lever has hooks from which the cable loop can be removed.
- The cable sheath must be removed from the entire suspension of the rear of the car. To do this, the mounting bolts are first unscrewed.
- Pull the cable out of the holes through the brake flaps.
- We got rid of the old cable, so all that remains is to replace the old one with a new element. The procedure is performed exactly in reverse order.
- Thread the new cables through the washers and hook the loops. You can additionally make bosses - this is a special clamp that allows you to fix the cable even more tightly.
- Reassemble the entire disassembled wheel structure.
- Route the cable along the suspension through the sheath and secure the bolts.
- Pull the handbrake in the cabin.
- Check the correct tension and operation of the new hand brake, or rather the cable.
HANDBRAKE CABLE REPLACEMENT PROCEDURE
The moving parts of the brake system tend to wear out. The working condition of such parts must be diligently monitored, since brakes are an extremely important part of the car. Timely repairs and diagnostics will help protect yourself and your car from unforeseen situations. The most unpleasant breakdown is a broken parking brake cable.
If the cable breaks, it must be replaced immediately. We'll look at how to replace the handbrake cable below.
As in any other case, DIY repairs require some tools. First, you need to find a car overpass or a hole (as a last resort, you can use a jack, which we will need anyway). You also need to prepare certain tools, such as thirteen wrenches (preferably 2), pliers, a hammer, plastic clamps and gloves. And the actual new hand brake cable for the VAZ.
When everything you need is prepared, you can start working. Replacing the handbrake of a vase takes place in stages:
- First of all, we put the car on an overpass or a pit, or jack it up and climb under the car;
- By removing the muffler can from the mounts, we will greatly simplify our work. If this is not done, it will be difficult to unscrew the cable tension nut;
- Unscrew the locknut and the adjusting nut of the handbrake. This concludes the work on the overpass for now;
- We drive the car onto a flat surface and jack up the rear;
- Remove the wheels;
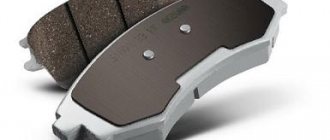
- We knock down the locking pins from the pads;
- Remove the brake pads;
- Now you need to disconnect the cable ends from the equalizer. This is where pliers come in handy; you can use them to remove the clamps;
- You need to remove the cable loops from the hooks of the spacer lever;
- Unscrew the bolt securing the cable sheath and remove it;
- You can pull out the parking brake cable of the VAZ 2114.
Pulling a new cable will no longer be a problem. Similar to the removal procedure, we do everything in reverse order. We start by pulling through the washers and loops on the hooks of the lever, and finish by tightening the handbrake in the cabin. The cable sheath also needs to be replaced sometimes, as it is also subject to wear. You can secure it after replacement with ordinary plastic clamps. This is how the VAZ 2114 parking brake cable is replaced.
Handbrake VAZ 2114
It is necessary to monitor the serviceability of not only this element, but also the entire brake system so that the handbrake can fully perform its functions. If this element fails, then problems will arise with the brake system. Some drivers are perplexed why the VAZ 2114 does not hold the handbrake? In order to find out the cause of the breakdown, you should study the structure of the hand brake.
The hand brake of this car consists of many elements. The very first ones that you can notice are the lever and the locking button. The remaining elements of the handbrake are hidden from view.
- protective case;
- control nut;
- traction for the handbrake;
- equalizer;
- nut for adjustment;
- cable.
The car also has a mechanism that is directly responsible for braking. It consists of brake pads that directly control the braking process. They should be changed constantly. The condition of another element of the system also needs to be monitored most carefully. We're talking about a drum.
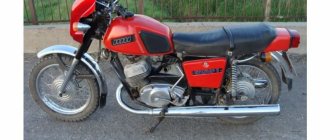
Lada 2114
› Logbook › 067: Replacing handbrake (parking brake) cables Part 1
First, a little digression))
If I had known how much nerves and effort it would take me to replace the cables, then I would certainly have trusted it to the servicemen)) I think, first of all, this applies to those who have not climbed for 100 years, neither tightened the cable, nor removed the rear drums and who has this whole thing quite sour)) Well, or if you, like your plumbing skills, are zero))) Okay, I couldn’t help but say)) Otherwise, God knows how much blood I’ve had from these cables and rear drums))
Something else. I divided the entry into two parts, because everything fits into one entry in a very compressed form, and I would like to describe in more detail all the stages of the replacement, maybe it will be useful for someone)) I myself did it according to vague instructions found on the Internet, I will say right away that it helped she's not enough for me))
So, first of all, I recommend to everyone that before purchasing cables, make sure that it will not cost you the usual tightening of the handbrake rod, and also, before purchasing cables, be sure to find out which cables you have on your car)) I also highly recommend having WD-40 in stock))
I didn't know about this and bought the cables in advance. Parking brake cable VAZ 2109, price 270 rub. for a couple.
And when I reached under the car to unscrew the handbrake linkage, I realized that I had a linkage not for these cables, but from a VAZ 2110)) As a result, I had to go back to the city (fortunately not very far) to buy this evil linkage))
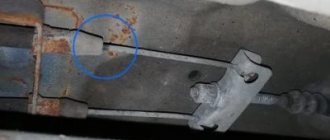
Here it is, the VAZ-2108 hand brake drive rod. Price: 120 rub.
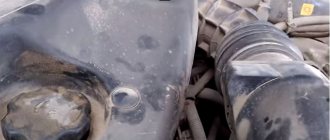
Having finished with all this fuss and running around, I crawled under the car to unscrew the old handbrake rod)) The handbrake must be completely lowered before this.
There is one nut and one lock nut, both 13, it takes a very long time to unscrew, about 1/16 of a turn) Also, the place is not very convenient, right above the muffler pipe) It would be nice if there was a ratchet with a long head for 13)
Unscrew the nuts and remove the cables.
Then we remove the cable from each fastening along the way to the rear drums)
Carefully unscrew the nut by 10 (to be honest, I forgot, maybe by 8...=), after having generously sprinkled it with VDeshka.
Adjusting the hand brake VAZ 2114
A handbrake failure is not a rare event. This kind of malfunction occurs everywhere. In some cases, after tightening the handbrake, the handbrake still remains inoperative. What are the main reasons for this malfunction?
The structure of the parking brake is quite complex.
Most often the problem is:
- Worn out brakes.
- Rope rupture or complete deformation.
- Drum wear.
How to tighten the handbrake on a VAZ 2114
During operation, many elements of the brake system wear out. The cables suffer the most. They may be subject to deformation. They also stretch over time. What needs to be done and how to tighten the handbrake of a VAZ 2114?
To repair the handbrake, do the following:
- The car needs to be driven onto an overpass. As an alternative, a regular inspection hole is also suitable. A jack should be used for repairs.
- After this is done, you need to set the gear lever to 1st gear.
- When this is done, you need to release the handbrake.
- Now it's time to find the most important tool. We are talking about a key for 13. You will need 2 copies.
- After this, you should go under the car and find the muffler. It will be easier to do this if you study the location of this unit in advance according to the instructions.
- The next step is to remove the muffler mounts as carefully as possible. When this is done, the manifold mounts must also be removed. If this is not done, then further repair steps will be much more difficult.
- You need to find a cable equalizer. When this unit is found, you need to loosen the locknut using the first wrench. A second wrench will be needed to hold the nut. If this is not done, scrolling may occur.
- Now it’s time to adjust the lever travel. Tightening the nut reduces the stroke of the lever, and loosening the nut increases the stroke of the lever. A stroke of two to six clicks is considered normal.
- After this is done, all that remains is to raise the rear of the car using a jack. You need to get the car in such a position that the wheels are hanging. After this, you can begin checking the brake pads. The wheels must be secured as securely as possible, otherwise an emergency situation may occur.
- At the last stage, you need to tighten the nut back. After this, you should check the handbrake for functionality.
Important information. Some craftsmen are able to tighten the handbrake even without loosening the muffler. They use homemade keys as tools. It is not recommended to repeat this yourself, otherwise the most unpleasant consequences may occur for both the mechanic and the car.
Parking brake cable malfunctions
The parking brake cable is a twisted braid protected on top with rubber, in which a braided steel cable moves. Some cars use a cable without braid. All cable malfunctions are related to its design. The most common of them:
- Reduced mobility of the cable due to dirt getting inside the braid;
- Rupture of steel threads from which the cable is woven;
- Loosening of the cable fastening in the adapters.
To determine the condition of the cable, you need to put the car on a lift. If you don’t have a lift, then you can get by with an inspection hole, two support stands and one or two jacks. Before you start installing your car on a pit or lift, carefully read the article on safety precautions when repairing and servicing a car, this will help you avoid mistakes and injuries.
Checking the condition of the cable must be carried out by two people, one watches the cable from below, and the second, at the command of the first, turns the parking brake lever on and off. With the parking brake turned off (on rear-wheel drive vehicles, you must set the manual or automatic transmission lever to the neutral position), turn the rear wheels by hand. They should turn without much effort. Inspect the entire parking brake mechanism, paying special attention to damage and rust. Have an assistant lift the parking brake lever two clicks, then try to spin the wheels. They should either not rotate at all or rotate only after applying very serious force. Have an assistant raise the lever two more clicks. The wheels must remain stationary, regardless of the force applied to turn them. After this, ask an assistant to completely turn off the parking brake. The wheels should then rotate without effort. If the wheels are difficult to rotate, the handbrake cables need to be replaced because dirt has accumulated inside the sheath or adapter through which the cable is connected to the brake caliper, or several strands of the cable are broken and clinging to the housing or adapter. If the cables on your car are not braided, then carefully inspect it for breaks in the steel threads. If at least one break is found, both cables must be replaced.
Conclusion
A properly functioning braking system is the key to safe driving and the absence of any problems on the road. The life of not only the transport driver, but also all passengers depends on how efficiently it works.
The VAZ hand brake is the simplest mechanism. Its repair cannot cost a large amount, so you should not put off repairing the brake system until a later date. You don't even need sophisticated tools to carry out repairs. You can repair a VAZ 2114 with ordinary garage equipment.
If you take proper care of your car and its braking system, it will repay its owner with more than just longevity. In an emergency, a car can save lives if all its mechanisms are in good working order and functioning normally.
source