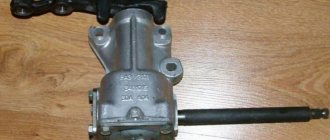
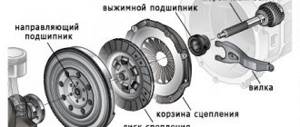
Purpose of the gearbox oil seal
The gearbox increases torque and transmits it from the driveshaft to the rear wheels of the car. This increases the force transmitted from the secondary shaft of the gearbox. All rotating gearbox parts located in the differential and final drive unit operate in an oil environment to reduce wear and reduce friction when the parts rotate. To prevent oil from leaking, a VAZ 2107 rear axle gearbox seal is installed on each of the axles coming out of it. If the seals are worn or damaged, oil leaks from the rear axle of the car are observed. In this case, damaged seals need to be replaced.
Instructions for replacing the gearbox seal of the rear axle VAZ 2107
Before starting work, you should hang the rear axle and remove the rear wheels. After this, you need to drain the oil from the gearbox by unscrewing the oil drain plug.
Important: the oil drain plug should be screwed back in immediately after draining the oil. This way it won’t get lost and you won’t forget to tighten it after repairs before adding oil.
The further procedure is as follows:
- Remove the two axle shafts from the rear axle.
- Unscrew the nuts and remove the 4 bolts connecting the flanges of the gear and universal joint. When unscrewing the nuts, it is necessary to prevent the propeller shaft from turning with the help of a mounting blade.
- Separate the cardan and gearbox flanges using a strong screwdriver.
- Measure the rotation resistance of the gear. To do this, wind a strong cord around the flange of the gearbox gear, attach its end to the dynamometer and, pulling the cord, rotate the gear. Remember the dynamometer readings - they will be useful in determining the correct tightening torque for the rear axle nut. A simpler, but not as reliable option is to remember the number of turns of the bridge nut so that when reassembling it, tighten it as it was.
- Unscrew the nut that secures the flange and remove the washer.
- Remove the flange.
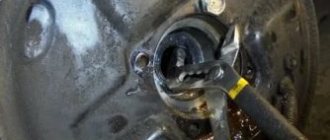
- Using a screwdriver or open-end wrench, remove the VAZ 2107 rear axle oil seal from the crankcase neck.
- Clear
Protect the oil seal seat from corrosion and dirt.- Lubricate the surface of the cuff with Litol lubricant.
- Place the oil seal in place and press it in using a hammer and mandrel.
Note: the oil seal must not be skewed when pressed. The end of the oil seal should be recessed relative to the end of the crankcase by 1.7-2 mm.
The mandrel can be made from an old bearing ring or a pipe of suitable diameter.
Oil seal replacement process
First you will need to arm yourself with the necessary tools. In particular, you need to prepare:
- flat screwdriver;
- calipers;
- a regular mount or some convenient strong metal rod;
- keys for 13 and 24;
- torque wrench;
- dynamometer;
- durable cord.
On a VAZ 2106, the rear axle oil seal is replaced after the oil is drained from the crankcase. In this case, you must not forget about the oil drain cap, which should be screwed into place.
Removing the axle shafts
Let's get started:
- both rear axle shafts will need to be removed from the rear axle beam.
To do everything correctly, you need to strictly follow the instructions. So:
- dismantle the wheel;
- remove the brake drum;
- we see four nuts that will need to be unscrewed (to avoid problems, you will need to turn the axle shaft until the large diameter holes coincide with the two brake shield locking nuts):
- unscrew the nuts;
- remove the spring washers;
- turn the axle flange 90 degrees so that the large-diameter holes and the brake shield mounting nuts coincide;
- We secure the brake drum with two wheel bolts (you can tighten them by hand).
Note. These wheel bolts do not need to be tightened, leaving approximately 5 mm to ensure acceleration of the drum. But you need to be extremely careful not to damage the brake drum.
- The axle shaft is abruptly removed from the rear axle beam.
Advice. There is a special impact puller that will allow you to remove the axle shaft much faster.
Special impact puller for removing axle shafts
Removing the old cuff
After both axle shafts have come out, you need to do the following:
- holding the cardan from turning with a pry bar (see Repairing the cardan on your own) from turning, unscrew the four nuts securing the hinge flange;
- remove the bolts;
Replacing the rear axle oil seal on a VAZ 2106
- disconnect the flanges using a flat-head screwdriver;
- now you need to wind a strong cord, which was stored in advance, onto the flange of the drive gear (when winding it, you need to make several turns and wind it);
- We use a dynamometer to check the moment of resistance to turning or the RPM of the drive gear (this value must be remembered or written down).
Note. MSP is the product of the dynamometer readings, expressed in kgf, and the force application lever, expressed in cm.
- Now you will need to unscrew the flange mounting nut, holding the drive gear with a special wrench;
- remove the flat washer.
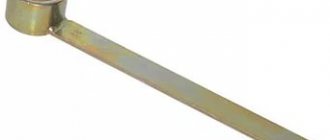
Advice. There is a special wrench to hold the pinion flange. You can even make it yourself from a piece of metal pipe of the required size and two bolts and nuts.
Homemade key for holding the pinion flange
Replacement of the oil seal in the rear axle of the VAZ 2106 continues:
- the drive gear flange is removed;
- we find the drive gear oil seal and remove it from the neck using a screwdriver;
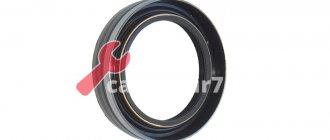
- install a new cuff.
Installation
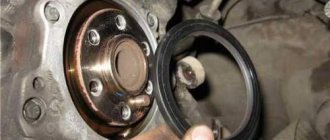
Note. Before installing a new oil seal, you need to lubricate its working edge with Litol-24.
- Light blows with a hammer through a special frame will help to correctly install the oil seal in place.
It is recommended to watch this video, where everything is described in detail.
Note. It must be remembered that the new oil seal should be pressed into the gearbox housing to a depth of 2 mm, counting from the end of the gearbox housing. As a mandrel, you can use some old bearing, or rather its ring, or even a piece of pipe of a suitable size and diameter.
- put the drive gear flange in place;
- put the required washer;
- tighten the flange mounting nut, while holding the drive gear with a special wrench.
Note. The tightening torque of the nut must be equal to a certain value depending on the resistance torque of the drive gear. When tightening the nut, you should start with a smaller torque and periodically check the resistance torque. If, at the moment of tightening the nut, it is discovered that the moment of resistance is too excessive, then this indicates unacceptable deformation. You will have to replace the bushing by disassembling the gearbox and then adjusting the engagement of the main gears. It will be difficult to carry out such work on your own; a highly qualified specialist is needed.
- We assemble all the components and parts in reverse order.
The oil seal replacement process is complete. During the process, you should try to compare the methods for dismantling and installing a new oil seal with photos and diagrams. It is not difficult to carry out this operation with your own hands; it will be enough to follow the advice and notes given in the instructions. Replacing it yourself will help you avoid unnecessary expenses and save a lot of time, because at good car services there is now a long queue and the price of services is high.
How to replace the rear axle gearbox seal of a VAZ-2107
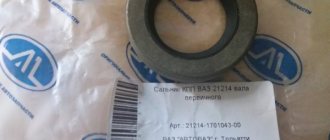
The VAZ-2107 rear axle gearbox seal prevents lubricant leakage, so if it is displaced or worn out (rubber is not elastic), it is necessary to fix the problem as soon as possible. Replacing the oil seal suitable for the rear axle is a serious procedure, but if you want, you can learn everything.
Sometimes it is even difficult to find an oil seal of the required size for a VAZ-2107, then to replace it you should take a regular oil seal from a similar engine. For example, if the new oil seal is larger than the old one, it will not be possible to put it on, so it is better to buy a smaller sample.
Make sure that the oil seal has an oblique cutting format, and a boot is also required. A traditional new oil seal is enough for 40,000 - 50,000 km. The boot prevents dirt and moisture from getting inside the part, which is especially valuable on Russian highways. The side thread, playing the role of a pump, prevents the oil from leaking and throws the solution back into the crankcase.
Features of replacing the rear axle gearbox
If you are convinced that such an important unit is faulty, then only replacing the rear axle gearbox of the VAZ 2107 can help out. In principle, this work can be easily done with your own hands:
- Drive the car onto the overpass (you can work in a pit in the garage).
- Place wheel chocks under the wheels (if you don’t have them, you can put regular stone or brick).
- Drain the oil from the gearbox (before doing this, it is advisable to drive the car a little to warm up the lubricant).
- Wait until all the oil has drained from the assembly.
- Remove both rear wheels one at a time and install supports.
- Remove the brake drums and axle shafts (it is better to remove the latter rather than leave it dangling from the car).
- Unscrew the gearbox and cardan.
- Make sure the gasket is intact and, if necessary, treat it with sealant.
- After 10-15 minutes, install a new gearbox and assemble everything in the reverse order.
- Add oil.
That's all. Now you know why a rear axle gearbox is needed, how to determine its malfunction and replace it. Good luck on the roads and of course no breakdowns.
The rear axle of the VAZ 2107 must be removed to repair the gearbox or to completely replace it in the event of its complete failure. It is most convenient to carry out work in a pit, and the car must be installed in such a way that the rear axle gearbox is not above the pit.
Having driven the car into a pit, hang the rear part of the body so that you can remove the wheels. Place a jack under the gearbox and raise the rear axle slightly. In this situation, do the following:
- Disconnect the rear shock absorber lower mounting brackets.
- Drain the transmission oil from the gearbox into a previously prepared clean container.
- Disconnect the brake pressure regulator mounting bracket, then disconnect the tee with brake pipes from the bridge. Remove the rubber hose for the hydraulic brakes.
- Next, you need to disconnect the driveshaft from the gearbox drive flange. Before unscrewing the nut of the fastening bolts, apply a mark to the propeller shaft and the gearbox flange, which you will use as a guide during assembly if the axle is removed for repair and not replacement.
- Lower the rear axle a little with a jack to loosen the rear springs and remove them along with the rubber gaskets.
- Disconnect the parking brake tips from the brake flaps.
- At the final stage of removing the rear axle, all that remains is to disconnect the upper and lower reaction rods, as well as the transverse rod. Place shims under the axle so that when the axle is disconnected, it rests on them and remove the rear suspension rods.
Replacing the rear axle oil seal of a VAZ-2107
The VAZ-2107 is a rear-wheel drive car, the chassis of which is located on the rear component. If the car is used every day, the oil seal has the main function of moving the vehicle. That is why the condition of the oil seal located on the rear axle of the VAZ-2107 must be regularly monitored and, if possible, replaced.
To make replacing the VAZ-2107 rear axle gearbox seal quick, prepare the following set of tools:
- puller equipped with 2 types of removal;
- torque wrench.
Another nuance is that an oil leak indicates a malfunction of the oil seal, but if an oil film has formed on the gearbox housing, this does not indicate a oil seal failure.
When starting work with your own hands, treat it with full responsibility, otherwise you will have to disassemble the gearbox, and this can only be done by highly qualified specialists using special equipment.
Difficulties will not arise if you use these step-by-step instructions:
Rules for installing a new cuff on the rear axle
Before installing a new oil seal, make sure that the flange surface is in good condition:
- matches the seal format;
- no corrosion; if there is one, go over the surface with polishing material;
- no deep grooves. If grooves are present, the cuff is pressed to move it so that it slightly extends beyond the neck of the gearbox.
When installing a new reverse gear cuff on a VAZ-2107, remember the following rules:
- First, apply a small layer of grease to the surface of the cuff.
- Then press the part into place with light hammer blows on the steel seal ring. Avoid distortions.
- Reinstall the dismantled mechanism components onto the shank.
- Replace the fastening nut located on the shank flange.
- Hang up the rear part of the VAZ-2107.
- Disengage the axle shafts from the differential gears.
- Using a 120 Nm torque wrench, tighten the shank nut, remembering to support the shank flange by the fasteners the entire time.
- Now turn the flange by hand. The part should not jam, and rotations should be carried out without much effort.
- Check to see if there is any end play. If there is one, increase the nut tightening torque by 20-30 Nm and check the operation again.
- Adhere to the total tightening torque limit of 225 Nm. If the indicator exceeds this value, there is a risk of damage to the special spacer type sleeve.
- If tightening the flange does not allow the backlash to be eliminated, then only service station specialists can handle this step.
- If the spacer is seated, the torque of the locked nut does not increase even if additional tightening is performed. Therefore, the indicator is equal to a value slightly short of the required size. It is impossible to do without disassembling the gearbox, which, again, is carried out only in a car repair shop.
Step-by-step video instructions on what it looks like to replace the gearbox seal of a VAZ-2107 rear axle with your own hands can be seen below:
Replacing the rear axle gearbox seal on a VAZ 2101-VAZ 2107
Welcome! Rear axle gear oil seal - in general, oil seals serve for a long time, but if they are of poor quality, or if they are not installed correctly, or ultimately if the oil is poorly filled, then their life is immediately shortened, previously (and still) data things were called oil seals, but by the new name they are rubber cuffs, but rarely does anyone say this, and it’s not customary, thanks to this unit, engineers ensure oil containment in the steering mechanism, in the engine and in other places, the oil seal can also serve to contain diesel fuel and water and thanks to it, by the way, dust and dirt do not get into the mechanism they close.
Note! To replace the oil seal on a car, you don’t need much, the most important thing is: Stock up on all kinds of wrenches, also screwdrivers, and if you have torque wrenches, then it’s generally good (Thanks to these wrenches, the tightening torque of the bolts can be set correctly, just if you don’t tighten the bolts while driving they can get unscrewed, and re-tightening won’t lead to anything good) take them too, you’ll also need to stock up on a mounting blade and a torque gauge, but that’s if you don’t have a single torque wrench!
Summary:
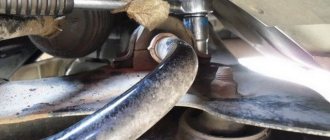
Where is the rear axle gearbox seal located? You won’t see it that easily, firstly you will need to crawl under the car from below, you will see the driveshaft (Many people call the driveshaft, but this is not the correct name, since the driveshaft consists of shafts and in this case the term driveshaft, means any part of the cardan transmission) with the rear shaft it will be connected to the rear axle gearbox, namely to the rear flange of the gearbox (indicated by the blue arrow) it will be connected using four bolts (On the flange, see the photo below, the slots for the rear cardan mounting bolts are visible, for clarity, one of the slots is indicated by a green arrow) and the flange itself is secured by a healthy nut, which is indicated by a red arrow, so you will need to disconnect the rear driveshaft (As you read the article, we will explain to you how to do this) and hang it, then the same Unscrew the healthy nut and, using a hammer or a special puller, remove the rear gearbox flange, which is indicated by the red arrow. After removal, you will see the picture shown in the small photo, namely the same oil seal that you are going to replace, it is also indicated by the red arrow.
Replacing the VAZ-2106 gearbox oil seal
How often do you look under your car? Many car enthusiasts do not do this at all, subsequently facing huge costs. Only with the help of a visual inspection can serious faults be identified, prevented and eliminated. In particular, a leak in the area of the VAZ-2106 gearbox may indicate the need to replace the oil seal.
Purpose and features
What is an oil seal anyway? This is an ancient version of the name for a rubber cuff. The term appeared at a time when ordinary felt or felt was used to seal shafts with casings of various components, which were previously lubricated with ordinary fat or, more often, lard. Hence the name – “oil seal”.
Modern products have already moved far from past technologies and are high quality parts made of resistant rubber in accordance with a number of GOSTs. The purpose of the seals is not only to seal the joint, but also to reliably protect the system unit from the ingress of various debris, moisture and even dust. In this case, the seals can be different in diameter and shape (it all depends on the purpose of the product).
Oil seals operate over a wide range of temperatures - usually from -60 degrees Celsius to +170 degrees Celsius. The material used for manufacturing is rubber (butadiene-nitrile or silicone based) or fluorine rubber. Oil seals are able to withstand various working environments and are not destroyed by the action of mineral oils, diesel fuel and water. The maximum pressure that the oil seal can withstand is about 0.04-0.05 MPa.
Malfunctions of the rear axle and reasons for replacing the oil seal
Aging of the oil seal or its premature failure can lead to serious oil leakage. As a result, the following problems may arise:
— loud noise when the rear axle is operating. In this case, it is necessary to restore the normal oil level, and also check for the presence (fact of absence) of a leak through the oil seal. If a defect is detected, replacement must be made immediately;
— noise in the rear axle area only during acceleration of the car. In such a situation, the oil level is checked (added if necessary), the presence of a leak is assessed and the oil seal is replaced;
— the appearance of a leak in the area of the rear axle gearbox (without any additional signs) indicates the need to replace the cuff.
Reasons for failure
Before making a replacement, you must understand the cause of the problem. Often the problem can be solved by simply tightening the mounting bolts or installing better washers under their heads. For example, you can remove the bolts, put copper washers under them, put them in place and tighten them tightly. In most cases the problem goes away. For reliability, a thread or gel-type sealant can be applied to the threads.