Main signs of generator malfunction
The following signs will indicate that the generator has failed or there are problems with its operation:
- constant lighting of the warning light in the form of a red battery on the dashboard, which indicates that the generator is not charging or is producing insufficient current;
- constantly discharging battery;
- interruptions in the operation of electrical equipment (lighting and alarm units, multimedia, heating and ventilation) while the engine is running;
- the appearance of a characteristic burnt smell in the cabin (engine compartment);
- excessive heating of the generator stator;
- hum (rustle, whistle) of the generator.
The appearance of such signs is a serious reason to conduct a diagnosis. To do this, it is not at all necessary to go to a service station, since it is quite possible to check the generator’s functionality on your own, especially if you have even the slightest skills in handling a car tester. But first, let's talk about the main breakdowns.
Main faults
The generator may have malfunctions of both mechanical and electrical nature. These include:
- failure of the voltage regulator;
- malfunction of the diode bridge (rectifier unit);
- short circuit of the rotor field winding;
- short circuit of the stator windings;
- brush wear;
- bearing wear.
Next, we will talk about how to test the generator for performance yourself, based on the symptoms present and possible malfunctions.
Checking the voltage regulator
The regulator is designed to stabilize the generated voltage before supplying it to the vehicle's on-board circuit, including the battery for recharging it. The only way to determine its serviceability yourself is to check the charging of the generator, or rather, the amount of voltage it supplies to the battery terminals. Depending on the make and model of the machine, it can range from 13.5 to 15.5 V. Therefore, before checking the operation of the generator to ensure that the regulator is working properly, you need to find out exactly what voltage it should produce. This information can be obtained from the vehicle's owner's manual.
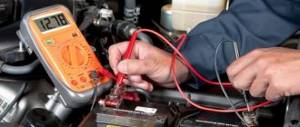
How to test a generator with a multimeter? To do this, switch the device to voltmeter mode and, observing polarity, connect its probes to the battery terminals with the engine not running. A voltage between 12-12.8 V is considered normal. Next, start the engine and repeat the procedure. The voltage at the battery terminals should increase to 13.5-15.5 V. Only in this case can the regulator be considered operational. An increase or decrease in voltage, on the contrary, indicates that it is faulty.
Generator checks
Testing the generator on a stand allows you to determine the serviceability of the generator and whether its characteristics correspond to the nominal ones. The brushes of the generator being tested must be well ground into the slip rings, and the rings themselves must be clean.
Install the generator on the stand and make connections as shown in Fig. 141. Turn on the electric motor of the stand, set the voltage at the generator output to 13 V with rheostat 4 and bring the rotor speed to 5000 min -1 . Allow the generator to operate in this mode for at least 2 minutes, and then measure the strength of the return current. For a working generator it should be at least 55 A.
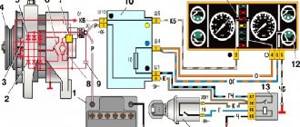
Rice. 141. Connection diagram for testing the generator on a stand:
1 — control lamp 12 V, 3 W; 2 - generator; 3 - voltmeter; 4 — rheostat; 5 - ammeter; 6 - switch; 7 - battery.
If the measured value of the supplied current is less, this indicates a malfunction in the stator or rotor windings, damage to the valves or wear of the slip rings and brushes. In this case, a thorough check of the windings and valves is necessary to determine the location of the fault.
The voltage at the generator output is checked at a rotor speed of 5000 rpm. Rheostat 4 sets the output current to 15 A and measures the voltage at the generator output, which should be (14.1±0.5) V at the ambient and generator temperature (25±10)°C.
If the voltage does not fall within the specified limits, then replace the voltage regulator with a new one, known to be good, and repeat the test. If the voltage is normal, then the old voltage regulator is damaged and needs to be replaced. And if the voltage still does not fall within the above limits, then it is necessary to check the windings and valves of the generator.
How to check the diode bridge of a generator without removing it from the car
The diode bridge acts as a kind of rectifier, converting the alternating current generated by the generator into direct current. It usually consists of six semiconductor diodes, three of them are “positive”, the other three are “negative”, i.e. the first pass current in one direction, the second in the other. The rectifier can be checked either with the generator removed or without dismantling it. Let's consider both options.
Before checking the diode bridge of the generator without removing it, it is necessary to disconnect all wires from it and from the voltage regulator, having first disconnected the ground terminal from the battery. First, let's check the rectifier for a short circuit. Turn on the multimeter in ohmmeter mode, connect the positive (red) probe to terminal “30” of the generator (positive contact of the bridge), and the negative one to the generator housing. With a working rectifier, the device readings will tend to infinity. If the resistance is several ohms, the rectifier is faulty.
Read also: How is a starter indicated on a single-line diagram
Now let's talk about how to check the generator diode bridge for breakdown. Let's start with the positive diodes. Again, connect the positive probe to the corresponding bridge contact (pin “30”), and the negative probe to the rectifier mounting bolts (brackets). In this case, the resistance should also tend to infinity. Otherwise, one or more diodes are broken.
Let's move on to "negative" semiconductors. We attach the red probe of the tester to the rectifier mounting bolts, the black probe to the generator housing. Resistance tending to infinity is a sure sign that the diodes are intact.
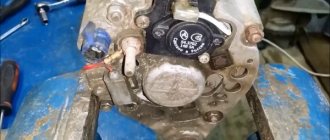
Removing the generator from the car
When the generator is not working, operating the car is not particularly possible, since the battery charge will not be enough for a long time to power the on-board network. Therefore, if problems arise with this unit, it is necessary to diagnose and troubleshoot the components of the generator, and for this it must be removed from the car.
The technology for dismantling the device is not particularly complicated and consists of the following steps:
- Disconnect the negative terminal from the battery;
- Loosen the clamping nut that secures the generator in the adjusting bar. Move the assembly towards the motor as far as it will go and remove the drive belt;
- Remove the protective cover;
- We disconnect the wires (one is removed from the terminals, to remove the other you need to unscrew the nuts);
- Unscrew the nut on the lower fastening;
- Unscrew the nut securing the adjusting bar to the motor;
- We remove the lower mounting bolt and take out the generator;
Installation of the unit is performed in the reverse order, but after installation it is necessary to adjust the drive tension.
The design of the unit installed on the Oka is such that only the voltage regulator and capacitor can be reached from the outside. Therefore, if the generator brushes are inspected for wear or the regulator is checked by replacing it with a known good one, then it is not necessary to dismantle the unit from the engine; you can get to the specified parts without removing the generator. But you can check the condition of the remaining parts only by disassembling the unit.
Checking the rotor winding
A common malfunction of a car generator is short-circuiting of the windings. This can happen as a result of a sudden voltage surge, water ingress, brush wear, etc. Since you can check the generator with a multimeter for the integrity of its windings only by gaining full access to them, you will need to dismantle the entire assembly. We will not describe this process, since it differs for different cars. Before checking the removed generator for operability of the rotor winding, it naturally needs to be disassembled.
After removing the rotor, we find slip rings on its shaft. There are only two of them. Having turned on the multimeter in ohmmeter mode, we connect its probes to these rings. The device should produce a resistance within 2-5 Ohms. These are normal indicators for a working rotor. A higher resistance indicates poor contact between the rings. In the opposite case, when the instrument readings approach zero, an interturn short circuit most likely occurs.
How to check the generator for the operability of the stator windings
Let's move on to the stator. It has several windings, each of which must be checked separately. But before this, you must definitely disconnect the wires connecting the terminals of the windings and the diode bridge.
We connect the probes of the multimeter, switched on in ohmmeter mode, to the terminals of each of the windings in turn. The working winding should have a resistance of about 0.2 Ohm.
Next, you need to measure the resistance between the common terminal (zero) of the stator and the terminal of any of the windings. It should be at least 0.3 Ohm.
Stator check
The stator is checked separately after disassembling the generator. The terminals of its winding must be disconnected from the rectifier valves. First of all, check with an ohmmeter or using a test lamp and a battery to see if there are breaks in the stator winding and if its turns are shorted to the housing.
The insulation of the winding wires must be without signs of overheating, which occurs when there is a short circuit in the rectifier valves. A stator with such damaged windings should be replaced. Then they check with a special flaw detector whether there are any short-circuited turns in the stator winding.
Generator bearing wear
A car generator has two bearings. One of them is fixed to the rotor shaft, the second is pressed into the central part of the cover. A hum or whistle coming from the generator while the engine is running is a sure sign that one of the bearings has given up its life. A related symptom may be heating of the generator housing. If you notice these signs, hurry to replace the bearings. Otherwise, this will lead to distortion of the rotor shaft or jamming with all the ensuing consequences.
You can check the bearings by removing the alternator belt and turning its shaft by hand. If the rotor rotates easily, without jerking or play, the bearings will still serve. If rotation is difficult or there is play in the shaft, do not delay replacing the bearings.
The generator is a miniature electrical station that supplies power to many components of the car: ignition, cooling, electrical wiring. Therefore, its failure will certainly entail other malfunctions. To prevent problems, you need to have this part diagnosed and repaired from time to time.
It will be useful for any motorist to know how to check the operation of a generator in a car, but first you need to understand the possible signs of a breakdown.
On-board power supply
After launch, almost all on-board devices are powered precisely from the generating element; it bears the main load. It recharges the battery, replenishes the energy spent on starting, and also provides energy for lighting, ignition systems, fuel supply, entertainment complex (audio, video), all kinds of heating (seats, windows, mirrors).
It is worth noting that if the generating device cannot cope, then the battery can provide some of the energy; this happens at times of maximum load, for example, at night in the cold, when many electrical appliances are turned on. If some source is turned off and only one generator has enough energy, it automatically recharges the battery. So the cycle repeats.
Read also: Crystal structure of metals, types of crystal lattices
Symptoms of malfunction
may indicate a generator malfunction :
- the warning light on the dashboard is constantly on;
- The battery began to discharge quickly, and recharging does not save the situation;
- there are malfunctions in the functioning of electrical equipment (ventilation and heating, multimedia devices, alarm system and lighting), even if the motor is working properly;
- there was a smell of something burnt in the car interior;
- the generator began to whistle or rustle.
If you notice these symptoms, you should immediately go to a car service center for a thorough diagnosis. However, you can check the functionality of the generator on your own, especially if you have the skills to use an autotester.
Common breakdowns
Generator faults can be electrical or mechanical. These include:
- loss of functionality of the voltage regulator;
- breakdown of the rectifier unit (diode bridge);
- short circuit of stator windings;
- current short circuit in the rotor winding;
- wear of bearings and brushes.
Read also: Silumin application in construction
Voltage regulator
The purpose of this unit is to normalize the voltage before feeding it into the automotive electrical circuit. You can check the serviceability of the regulator by checking the voltage that it supplies to the battery terminals. This indicator depends on the model and brand of the vehicle and varies between 13.5-15.5 V. Therefore, you should find out in advance what voltage your particular type of regulator produces. This can be done by studying the manual for using the machine. For example, you can take a VAZ 2107 or 2110 car, since these vehicles have the most typical faults associated with the integral and relays.
Using a Multimeter
To check the VAZ 2110 generator with a multimeter, you need to switch the device to voltmeter mode. Then you need to connect its probes to the battery terminals. The most important thing is to observe the polarity and turn off the car engine. The voltage normally varies from 12 to 12.8 V. Next, the procedure should be repeated, but with the engine running. The voltage readings should rise to 13.5-15.5 V. Lower and higher voltage values indicate a malfunction of the generator.
Checking the generator without removing it from the car
A bridge of diodes performs the functions of a kind of alternating current converter. It contains three negative and three positive diodes.
Before checking the bridge, you need to disconnect all the wires coming from it and from the voltage regulator. You also need to remove the ground anchor from the battery in advance. First you need to check the rectifier for short circuits. We activate the ohmmeter mode on the multimeter and connect the red (positive) probe to the positive contact of the diode bridge, and the negative probe to the surface of the housing of the generator itself. If the rectifier is fully operational, then the readings of the measuring device will go to infinity. In other cases, the rectifier will be inoperative.
Testing of stator and rotor windings
A common breakdown of a car generator is a short circuit in the windings. It occurs when current surges are too intense, brushes wear out and liquid gets in.
So, you need to remove the rotor and find a pair of slip rings on its structure that will need to be ringed. Having started the ohmmeter mode on the multimeter, we connect the probes to these rings. Normal resistance is 2-6 ohms. If you get large values, then there is a loss of contact between the slip rings. If the device shows lower values, then an interturn short circuit has occurred.
The starter has several windings at once. They need to be checked separately. However, first you need to disconnect the wires that connect the diode bridge and the winding terminals.
Then you should measure the resistance between zero and the terminals of the windings. The normal value is no less than 0.3 Ohm.
Wear of brushes and bearings
If you have already disassembled the generator, then it is advisable to check the condition of the brushes. They can wear out or break due to misalignment of the rotor shaft. If the brushes are damaged, they should be replaced with new ones.
Inside a car alternator there are a pair of bearings. One is fixed on the rotor shaft, the other is in the center of the cover. The whistling and hum of the generator when the engine is running is a clear sign of bearing wear. In this case, the generator housing can become very hot. If you notice such signs, it is better to replace the bearings immediately, otherwise you may encounter more serious problems.
You can check the bearing by removing the belt from the generator and trying to rotate its shaft with your own hand. If the part rotates freely and easily, then everything is in order. If it is difficult to rotate the rotor, then you should not delay replacing the bearings.
How to check the generator for performance? Self-check and repair of the generator
A generator is a typical electrical station that provides energy to all engine systems: power, cooling, ignition, so its failure will inevitably lead to other malfunctions. To prevent breakdowns, you need to systematically diagnose it, and if problems cannot be avoided, repair it immediately.
In this article we will talk about how to check the generator for performance without resorting to the help of professionals. But before that, let's look at the symptoms of its possible defects.
Read also: Working with a metal drill
Checking the unit in parts
The generator is essentially tested legally piece by piece. For example, most experts agree that the light bulb test is only 95% accurate in diagnosis. And indeed, this is so.
In order to fully check the generator, it is necessary to diagnose the unit in parts.
Stator
First, the stator is checked. It is tested individually once the generator is disassembled. The stator is separated from all “native” resistors and semiconductor devices so that its testing gives accurate results.
Stator
Diagnosis is carried out as follows:
- The insulation of the winding wiring is inspected, which should not have signs of overheating or melting (which is much worse, since it indicates a short circuit). If traces of overheating are found on the part, the stator is replaced with a new one.
- Next, take a multimeter, which is set to ohmmeter measurement mode. The generator is checked for breaks in the windings or short circuits.
- Resistance is tested. To do this, you need to connect the probes, adhering to the scheme of alternate connection to the ends. The impedance between them should be two to three tenths of an ohm.
- A multimeter is used to test whether the electrical winding is shorted to the housing. To do this, one of the probes of the device is connected to the stator housing, and the other to each of the winding terminals. It shorts out if the multimeter makes a sound in buzzer mode. Again the stator is to blame, which has to be replaced.
It often happens that the cause of a short circuit is in the winding wires. Any of the wires may be slightly exposed and touching this part of the housing. The problem can be solved simply - this part of the wire is bent and covered with insulating varnish. However, in most cases, it is more difficult to determine a winding short circuit, since the problem area is not visually visible.
Rotor
The next part of the generator that is checked is the rotor. Its electrical winding PP is being tested. It can be easily diagnosed even with the generator not removed. It will be enough to dismantle only the relay-regulator with the brush block, and then connect the test device to the copper contacts. However, for the most part, specialists test the rotor independently of the generator.
Rotor
As in the case of the stator, the probes of the meter, set to Ohm measurement mode, are connected to the rotor contacts. The normal ohmmeter value should be within 2.5-5 Ohms if the generator model has a power of 500-1200 W.
With smaller or larger values, a diagnosis is made: either an interturn short circuit or a poor connection of the winding leads to the contacts.
Attention. If the device shows zero resistance at all, there is definitely a break in the rotor winding.
Device of semiconductor diodes (VB)
The VB or diode bridge is also checked without fail. A good diode, as you know, must pass a limited voltage, that is, along one line. As for the faulty diode, it does not react to electrical voltage in any way or does so on both lines, which leads to a short circuit.
Diode bridge
The entire diode bridge is replaced, as a rule, if at least one of the diodes fails. The fact is that they (diodes) are pressed into a plate. It can be very difficult to remove and change one of the diodes, so you have to change the entire unit.
Important guidelines for diode bridge testing:
- the presence of a short circuit in the diode bridge can be determined without removing the generator from the car;
- Before checking, it is recommended to disconnect the generator wiring and disconnect the battery terminals;
- testing can be carried out not only with an ohmmeter, but also with a test lamp;
- three VB diodes are called positive, since they are connected to the “+” of the rectified voltage, and the other 3 are negative, since they have a “-” on the body (both 3-diode groups are pressed into a separate soft metal track, integrated either with ground or with the 30th current output of the generator).
So, the check is carried out as follows:
- First, the presence of a short circuit in the positive 3-diode group is tested. To carry out this operation, positive voltage is passed from the battery through the light bulb to the generator terminal number 30. The negative terminal of the battery is connected to the generator core. In such a circuit, if the indicator (light bulb) lights up, it means that there is a short circuit in the group.
Generator diode bridge test circuit
- The presence of a short circuit in the group of negative diodes will also be indicated by the glow of the light bulb. However, the connection diagram is slightly different. From the battery, the positive cable is connected to one of the generator retaining screws. An indicator light is embedded in the wire. The negative from the battery also goes to the body.
The glow of the indicator may also indicate problems with the stator, but most often it indicates a short circuit in the diodes.
Punching in resistors can also be detected using a measuring device. It must be an oscilloscope. It is also possible to check for a short circuit on the stand - problems in this case will be indicated by a decrease in the output voltage by 20-30 percent.
And, of course, you can test the breakdown in a diode bridge using a multimeter set to ohmmeter mode. One of the terminals of the device is connected to the positive or negative plate (positive or negative group), while the other alternately touches the diode terminals. Then the probes are swapped.
The problem can be judged if there is no continuity (in other words, if the multimeter shows resistance in both directions). Also, the zero resistance of the multimeter indicates that the diodes are broken.
Attention. As a rule, if one diode of a group is broken, the battery constantly shows undercharging.
Additional diodes
Checking the additional diodes is also the most important part of testing the generator in parts. They (additional diodes) are installed on all modern cars, including the new domestic VAZ.
To test the short circuit on additional diodes, it is not at all necessary to dismantle the entire unit. It’s just important not to forget to remove the terminals from the battery and disconnect the wiring before checking.
Circuit for testing additional diodes
So, the connection is made as in the diagram above. The plus from the battery goes to the 61 output of the generator, and in the middle there is a 1 or 3-watt indicator light (number 2 in the diagram). The negative wire goes to one of the generator mounting bolts.
A short circuit is indicated by the glow of the light bulb. If it lights up, then a short circuit is observed in one of the additional diodes.
The test can be carried out without removing and disassembling the generator, however, in order to determine which resistor has failed, you should dismantle the rectifier and test each of the components separately using a measuring device.
Additional resistors can also be tested using various meters. For example, it could be a voltmeter. If the voltage on it shows less than 14 V, this is an obvious breakdown.
Main signs of generator malfunction
The following signs will indicate that the generator has failed or problems have arisen in its operation:
- constant lighting of the warning light in the form of a reddish battery on the dashboard, which indicates that the generator is not charging or is producing insufficient current;
- constantly discharging battery;
- interruptions in the operation of electrical equipment (lighting and alarm units, multimedia, heating and ventilation) while the engine is running;
- the appearance of a corresponding burnt aroma in the cabin (engine department);
- excess heating of the generator stator;
- rumble (rustle, whistle) of the generator.
The appearance of similar symptoms is a serious reason to conduct a diagnosis. To do this, it is absolutely not necessary to contact a service station, because you can completely check the generator for operability on your own, especially if you have even the slightest ability to use an auto tester. But first, let's talk about the main breakdowns.
Checking the voltage regulator
The regulator is designed to stabilize the generated voltage before supplying it to the vehicle's on-board circuit, including the battery for recharging it. There is no other way to find its serviceability without the help of others than to check the charging of the generator, or more precisely, the amount of voltage it supplies to the battery terminals. Depending on the make and model of the car, it can range from 13.5 to 15.5 V. Therefore, before checking the operation of the generator to ensure that the regulator is working properly, you need to find out exactly what voltage it should produce. This information can be obtained from the vehicle's owner's manual.
How to test a generator with a multimeter? To do this, switch the device to voltmeter mode and, observing polarity, connect its probes to the battery terminals with the engine not running. The usual voltage is 12-12.8 V. Then start the engine and repeat the function. The voltage at the battery terminals should increase to 13.5-15.5 V. Only in this case can the regulator be considered operational. An increase or decrease in voltage, on the contrary, indicates that it is faulty.
How to check a VAZ generator
Checking the VAZ 2101 generator
-2107: 1. Checking the positive and negative valves of the rectifier unit
Reason for lack of battery charge on VAZ 2101 How to find
Make money on YouTube by connecting to the Channel Group affiliate program.
Initial check sequence
An initial performance check can be performed without dismantling the generator. To do this, set the multimeter switch to the “constant voltage 20V” mode. Next, connect the black probe to the negative terminal of the battery, the red one to the positive terminal. After this, you need to start the engine and let it reach a stable idle speed. Multimeter readings ranging from 13.5 to 14.5 Volts are considered normal.
If the multimeter shows a value less than 12.8 Volts, the charging process either does not occur at all, or the charging current is extremely small. The generator is operating in abnormal mode. When the voltage is more than 14.8 Volts, the battery is overcharged. This can lead to boiling of the electrolyte, an increase in acid concentration, and destruction of the battery plates.
To check the voltage at the generator output, you need to turn on the car lamp in the open circuit from terminal 30 on the generator (the point of contact with the thick wire leading to the positive terminal of the battery or starter).
Next, connect the multimeter in the “=20V” mode with the red probe to contact 30 of the generator, and the black probe to the stripped contact on the engine or body. Start the engine. The reading on the multimeter should not be more than 15.5 volts whenever the accelerator pedal is pressed. Otherwise, further operation of the generator is dangerous for the electrical equipment of the car.
When checking, you should evaluate the degree of tension of the generator belt. Using a simplified method, this can be done by pressing on the belt with your finger.
Read also: What kind of wire is needed for a chain-link mesh
The amount of deflection should be within 0.5 - 1 centimeter. At the same time, check the degree of belt wear. To determine the reasons for abnormal operation of the generator and perform repair work, dismantling the generator is required.
How to check the diode bridge of a generator without removing it from the car
The diode bridge plays the role of a typical rectifier, converting the alternating current generated by the generator into constant current. Usually it consists of 6 semiconductor diodes, three of them are “positive”, the other three are “negative”, i.e. the first ones pass current in one direction, the second ones - in the other. The rectifier can be checked either with the generator removed or without dismantling it. Let's look at both options.
Before checking the diode bridge of the generator without removing it, you need to disconnect all the wires from it and from the voltage regulator, having previously disconnected the ground terminal from the battery. First, let's check the rectifier for short circuit. Turn on the multimeter in ohmmeter mode, connect the positive (reddish) probe to terminal “30” of the generator (positive contact of the bridge), and the negative one to the generator housing. With a working rectifier, the device readings will tend to infinity. If the resistance is several ohms, the rectifier is faulty.
Now let's talk about how to check the generator diode bridge for breakdown. Let's start with the positive diodes. Again, connect the positive probe to the corresponding bridge contact (pin “30”), and the negative probe to the rectifier mounting bolts (brackets). With all this, resistance must also tend to infinity. Otherwise, one or more diodes are broken.
Let's move on to “negative” semiconductors. We connect the reddish probe of the tester to the rectifier, the dark one to the generator housing. Resistance tending to infinity is a sure symbol that the diodes are intact.
Checking the removed regulator
The voltage regulator removed from the generator is checked according to the diagram shown in Fig. 144. It is better to check it together with the brush holder, since in this case you can immediately detect breaks in the brush leads and poor contact between the terminals of the voltage regulator and the brush holder.
A lamp with a power of 1-3 W, 12 W is turned on between the brushes. A power source with a voltage of 12 V and then 15-16 V is connected to terminals “B”, “C” and to the regulator body. If the regulator is working, then in the first case the lamp should be on, and in the second case it should go out.
If the lamp lights up in both cases, then there is a breakdown in the regulator, and if it doesn’t light up in both cases, then either there is a break in the regulator or there is no contact between the brushes and the terminals of the voltage regulator.