The other day I caught a vapor lock in the fuel pump. I was very surprised by this because I have a branded Pekar fuel pump in which there are no vapor locks. I decided to figure out what was going on. Having opened the fuel pump, I was somewhat shocked by its contents. which prompted me to write this article. So DAAZ vs Pekar.
First, some description of the pumps.
Left Pekar right DAAZ
Pekar - the words of the manufacturer. OPERATIONAL RELIABILITY — Oil- and gasoline-resistant membrane made from imported materials — Galvanic coating of parts protects gasoline pumps from the adverse effects of the environment REPAIRABILITY — For the first time in Russia, a modular design of gasoline pump units is used LEAK-TIGHT — Valve design that allows maintaining pressure and vacuum ensures quick engine starting ABSENCE OF VAPOR LOCK — Design fuel pumps, providing a minimum parasitic volume, eliminates the formation of vapor locks in the engine power system. PETROL PUMPS PROVIDE: - uninterrupted supply of fuel to the carburetor in various climatic conditions at temperatures from -40°C to +50°C - performance of the car engine in accordance with technical conditions
Pressure at zero supply, at a camshaft speed of 2000 rpm, (kgf/cm2) 0.22 - 0.35 Vacuum created by the pump, at a camshaft speed of 2000 rpm, not less (kgf/cm2) 0 ,4 Capacity for free draining at a fuel temperature of 20°C, at a camshaft rotation speed of 2000 rpm, not less (l/hour) 60 Suction (time from the start of pumping to the start of fuel supply), at a camshaft rotation speed of 200 rpm /min, no more (sec) 10 Valve tightness (pressure drop over 10 min), no more (kgf/cm2) 0.05 Outer diameter of the diaphragm (mm) 70 Pump weight, no more (kg) 0.5
DAAZ - the manufacturer’s words here, I must say, the manufacturer turned out to be more modest.
Capacity for free drainage, l/h 60 If you look at both pumps externally, you will notice that the DAAZ gasoline pump has a much larger cavity for gasoline, this is Pekar’s main move. because The baker does not have a dome-shaped lid, and this is what the buyer is attracted to. Thinking that a vapor lock will form under this very lid. But no, the fact is that this cover is nothing more than an INLET sump. and even if there is somehow air there, it will not affect the operation of the pump in any way. Just as the air in the gas filter does not affect the operation of the pump. The DAAZ dome is essentially an additional gas filter. Well, let's talk about everything in order.
Let's study the design of the Pekar fuel pump. So, the first thing we see in the Pekar fuel pump upon closer examination is that the outlet fitting is not flush with the pump, but is simply inserted into it. Of course, it fits tightly, but on the Internet you can find stories about how this fitting simply flew out of the pump. For example, here is a man’s story about how a fitting fell out of a baker and this led to a car fire https://www.azlk-team.ru/forum/viewtopic.php?t=17726&highlight=%E1%EE%EB%F2%E0%E5% F2%F1%FF
Opening the pump
Yes, the camera is really small, but what immediately catches your eye is the mark left by the exhaust valve on the diaphragm washer, this can be seen in the photo. There is only one diaphragm in the baker
If the diaphragm ruptures, gasoline will flow through the pusher hole straight into the engine crankcase . Under the diaphragm there is a spring whose quality simply shocked me
that’s actually the whole design of the baker fuel pump
The fuel pump itself was purchased by me from the official dealer of TD Pekar and has a halographic sticker confirming its authenticity. Now let’s look at the design of the native Zhiguli DAAZ fuel pump. Both fittings on the DAAZ are tight, so you don’t have to be afraid that one fine day this fitting will come off.
Under the top cover of the pump there is a mesh filter with a sump that additionally filters gasoline at the inlet to the fuel pump. Once again, I want to note that the myth that steam locks form under the top cover of the DAAZ is complete nonsense. The top cover is an INPUT filter to the pump, so even if there is air in it, it cannot affect the operation of the pump.
filter
here we see the inlet valve at the top, the recess of the sump in the wall of which can be seen the hole of the inlet fitting
disassemble the fuel pump in half
and we see that the working cavity of the pump, like that of the baker, is minimal. but the exhaust valve does not stick out and the diaphragm washer does not touch anything. The DAAZ diaphragm itself consists of three diaphragms and a plastic spacer.
disassembled diaphragm assembly
two operating diaphragms, a plastic spacer, a safety diaphragm and washers. Why is the knot made this way? for reliability. If the first working diaphragm breaks, the pump will work on the second one. Even if the second diaphragm breaks, the distance between the diaphragms = 0 and the probability that the second diaphragm will break in the same place as the first one also tends to zero. So even with two torn diaphragms, gasoline leaks will be minimal. The safety diaphragm prevents gasoline from entering the engine crankcase in the event of a breakdown of two working diaphragms. And in the plastic spacer between the working and safety diaphragms there are drain holes through which gasoline will drain towards the manual fuel pumping handle when the working diaphragms break through. (under this handle there is ground and draining gasoline is safe)
spring under the diaphragm
This is the entire design of the DAAZ pump. Now let's move on to tests and comparisons. Pump working chambers
the baker's working chamber is slightly less than 10 cubes versus 12 for the daaz (measurements were made using a syringe. But it is worth considering that the baker's spring is smaller and less rigid than that of the daaz
From here we can conclude that Daaz’s camera is a little larger because the aperture travel is larger. especially considering that the lower parts of the pumps are identical, and completely identical.
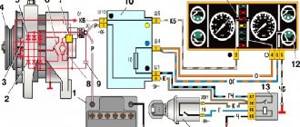
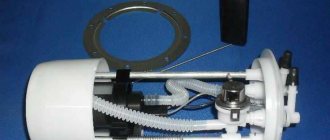
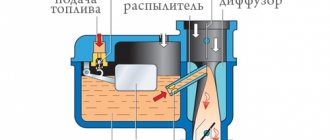
Electric fuel pump device
injection pump
ordinary and conditionally can be divided into two parts:
The most important thing is its structure itself. The fuel pump in the VAZ 2107 is a replacement. The fuel pump fuse (injector) is also clogged. Testing and replacement of the VAZ injector fuel pump, replacement of the VAZ 2110 fuel pump. The electric fuel pump itself is hermetically sealed to protect against the ingress of fuel. The fuel enters the pump through the filter and the intake hole and is supplied to the power system through the outlet hole (sealed from the electric motor).
Here is such a scheme you can find. I would like to point out that it does not happen that the rotor of the engine spins in water and, moreover, in gasoline. Return to contents Description of work. The location of the VAZ 2110 injector fuel pump is in the gas tank located under the bottom of the car, in the area of the rear seat. Firstly, a spark appears on the collector when the engine is running. You yourself realize that this will lead to a fire. Replacing a VAZ 2107 fuel pump: photos and videos. Checking and replacing the VAZ 2110 fuel pump can lead to overheating of the VAZ-2110 injector fuel pump. Secondly, rotation of the rotor in water is so difficult that gaining speed and developing pressure is simply out of the question.
Checking the VAZ 2107 fuel pump (injector)
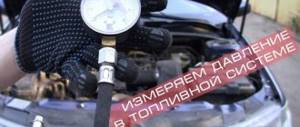
To check the power supply to the fuel pump:
If, when the gray and pink wires are shorted (if there is a “plus”), the fuel pump does not work, the fault is either in the wiring going to it or in the fuel pump itself. Power connectors located in the trunk especially often fail. This is where you should start checking. There are two of them. The first has an elongated shape and black color, the second is white, located on the fuel pump cover itself. The second can be checked only by removing the fuel pump (by pulling it out of the gas tank). It is also worth checking for ground on the fuel pump housing.
If the fuel pump makes noise, but does not pump, or does not produce enough pressure, you should try replacing the coarse filter.
Fuel pump characteristics
The fuel pump module has its own individual designation, which is the order number 21073.1139. The device has the following characteristics:
- The rated voltage at which it provides normal operating pressure is sufficient for stable operation of the engine - 13V.
- The maximum permissible voltage should not exceed 13.5 V.
- The maximum productivity at a supply voltage of 13.5 V is 3 kg/cm2, which is equivalent to 60 l/hour.
- The rated operating current of the device is 6.5A under normal operating conditions.
Removing the VAZ 2107 fuel pump (injector), replacing the coarse filter
- Key for 7.
- The key is 17.
- Crosshead screwdriver.
- Flathead screwdriver.
- New coarse filter (if necessary),
- New sealing rubber gasket (if necessary).
- Disconnect the ground terminal on the battery to prevent a short circuit.
- Using a Phillips screwdriver, unscrew the 4 screws holding the gas tank trim.
- Remove the trim.
- Unscrew the clamp bolt to free the tank and provide access to the fuel pump (a 10 mm wrench is required).
- Unscrew the fuel pump pipe fitting using a 17 mm wrench.
Before installing the fuel module (fuel pump with fuel level sensor), you must carefully check the condition of the rubber gasket that ensures the sealing of the connection. At the slightest suspicion, it is better to replace it. It is cheap, but removing/installing the fuel pump again when a fuel leak occurs is a labor-intensive task.
Further operations are performed in the reverse order of removing the fuel pump.
The fuel filter performs an important mission: it cleans the fuel from foreign impurities, thereby protecting the injectors from clogging. If the car is operated in the CIS, the condition of this part should be given special attention, because the quality of the fuel does not always meet the requirements. According to the manufacturer, the VAZ 2107 injector fuel filter should be replaced every 30 thousand km. But in reality, the filter can become clogged much earlier if you use poor quality fuel.
The need to replace the filter can be seen by a decrease in vehicle power and an increase in fuel consumption.
To replace the filter yourself, you do not need any special tools or special knowledge, and the whole process, if done correctly, will take an hour.
Necessary tools and materials to replace the fuel filter:
- keys for 10 and 7;
- rags;
- new filter (original filter number 2112-1117010-01);
- pliers and screwdriver.
List of actions related to repairs
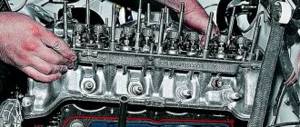
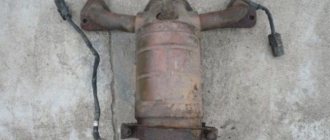
After preliminary diagnostics and determination of the cause of the mechanism malfunction, it is necessary to remove the fuel pump and check its functionality by inspecting all components.
Carrying out the necessary operations when disassembling the pump:
- It is necessary to remove the screws that secure the head.
- The fuel pump head with valves, filter and cover is removed.
- The condition of the diaphragm is checked by pressing and turning 90° clockwise or counterclockwise.
- The diaphragm and return spring are removed.
- The diaphragm is inspected, if there are defects, the faulty parts are replaced with serviceable ones from the repair kit.
- Carefully remove the parts from the diaphragm assembly.
- A complete revision of all components is made and the assembly is assembled in the reverse order.
- If it is necessary to replace the valves, carefully press the fuel pump head out of the seat, first removing the core. Next, a new valve is installed and the seat is punched.
- The tightness of the discharge and suction pipes of the fuel pump is checked.
- A complete inspection of the head flange fit is carried out in areas of fastening that are subject to increased stress when tightening fasteners. The screws are tightened crosswise using uniform force.
See photo instructions for disassembling the fuel pump below:
Unscrew the screws and separate the case
Remove the diaphragm assembly and spring, replace the assembly, and replace the old spacer
Replacing a diaphragm kit
Replacing the strainer and cracked parts
Wash with gasoline, blow and reassemble
The fuel pump of a VAZ 2106 car is the most important unit and ensures an uninterrupted supply of fuel to the carburetor to form a fuel mixture. When traveling long distances, it is necessary to have an additional fuel pump to replace it in case the standard pump installed on the car breaks down.
Sequence of work when replacing a filter on a VAZ 2107
First of all, before starting work, it is necessary to relieve the pressure from the fuel line. To do this, turn off the fuse in the fuse box that controls the operation of the fuel pump and start the engine. Let the engine run at low speed until it stalls, which will indicate a release of pressure in the system.
All further work will take place in the engine compartment, namely in the engine compartment.
To operate safely, the vehicle must be de-energized. To do this, it will be enough to remove the negative terminal from the car battery.
Next, you should unscrew the fuel hose fitting from the filter, after placing an old rag under it.
After unscrewing the fitting, we disconnect the tubes going to the filter, as a result of which a little gasoline may leak out.
The fuel filter is attached to the car body through a clamp with a coupling bolt. We unscrew it with a 10mm wrench, and then remove the old filter from the clamp.
Next, install a new filter. At this stage, it is necessary to consider the position of the arrow on the filter housing; it should point towards the fuel rail.
Also, when installing a new filter, it is necessary to replace the O-rings in the fuel pipe fittings.
Now it remains to reassemble in the reverse order, after which the replacement of the VAZ 2107 injector fuel filter is considered complete. After this, we turn on the ignition several times to pump fuel into the system, and start the engine. With the engine running, it is necessary to inspect the threaded connections for fuel leaks.
Other articles have already described how to replace the fine filter on Lada Kalina cars. Today this procedure will be discussed on the VAZ 2107.
The photo shows that in the above case the fuel filter was completely clogged.
Electric fuel pump for VAZ 2107
Increasingly, owners of “classics”, including the VAZ 2107, are installing modern devices on their cars. So, the mechanical fuel pump is replaced with an electric one. The main goal of introducing an electric fuel pump is to get rid of the problems that arise with standard pumps. However, you need to understand that if on injection “sevens” such a mechanism is installed directly in the gas tank, then on carburetor cars it is placed under the hood.
Which one can be installed
As an electric fuel pump, you can install any device designed to work on fuel-injected cars on the “classic”. Based on reviews from Zhiguli car owners, Chinese-made pumps, as well as Magneti Marelli and Bosch, are often used. It is important to know that the product must provide low pressure . A standard mechanical pump produces about 0.05 atm. If the indicator is higher, then the needle valve in the carburetor will simply let fuel through, which will lead to it leaking out.
Installation of an electric fuel pump
To install an electric fuel supply pump on a carburetor “seven”, you will need a certain list of materials:
- tee 8x6x8 mm;
- fuel line for VAZ 2107;
- check valve from the "eight";
- 8 mm threaded fitting;
- clamps, blocks from Kalina for a four-pin relay (3 pcs.) with a fuse holder;
- the four-pin relay itself (3 pcs.);
- fuel jet (150);
- fuel return hose from the V8;
- wires;
- non-latching button.
We carry out the work in the following sequence:
- We lay the fuel pipe (return) parallel to the standard fuel line, securing it in the factory locations.
Video: installing an electric fuel pump on a VAZ 2107
Once the installation of the mechanism is complete, it will function according to the following algorithm:
- after turning on the ignition and pressing the pumping button, the pump is activated and pumps up gasoline;
- when the starter starts, the fuel pump turns on;
- while the engine is running, the pump is powered by a generator;
- after the engine stops, the operation of the unit stops.
Installation benefits
Owners of Zhiguli cars who have installed an electric fuel pump on their cars note the following advantages:
- an engine with such a device operates more stable at idle speed;
- when accelerating sharply, the car responds well to the pedal, there are no dips, which is not the case with a mechanical pump;
- when switching gears there is a smooth ride, and when the gas is abruptly released there is no twitching;
- at high speeds the engine spins better;
- there are no jerks at low speeds when starting the car after a long trip.
The VAZ 2107 fuel pump sometimes has to be repaired or replaced. Doing this is not as difficult as it might first seem. Repair and adjustment work is carried out with a minimum set of tools in accordance with step-by-step instructions.
Regardless of the type of fuel for which the car is designed, it must be supplied to the engine uninterruptedly. Its reliability and stable operation directly depend on this. The quality of domestic gasoline traditionally leaves much to be desired - most engine mechanisms and systems suffer from this, primarily the fuel pump. To prevent it from breaking down at the most unexpected moment, you need to know the signs and causes of the malfunction, and also adhere to preventive measures to maximize the life of the gas pump.
Self-replacement of the VAZ 2107 fuel filter
- First, the pressure in the power system must be relieved, and the fuel plug must be unscrewed
- Use a key to “17” to unscrew the fuel pipe fitting, holding the fuel filter with a key to “19”.
- Using a 10mm socket wrench, loosen the clamp bolt holding the fuel filter.
- Disconnect the inlet and outlet pipes that lead to or from the fuel filter.
- Remove the VAZ 2107 fuel filter.
- If possible, it is better to replace the 2 o-rings in the tube connections.