Elastic coupling for driveshaft VAZ 2107
The driveshaft of the VAZ 2107 consists of two parts (front and rear), connected to each other by a articulated coupling (cross).
This design allows you to avoid loads on the shaft while driving, when the body and chassis of the car begin to “play.” The VAZ 2107 cardan consists of front and rear shafts connected by a cross
The end of the rear shaft is connected to the axle gearbox, and the end of the front shaft is connected to the gearbox shaft. The connection to the gearbox is made through an elastic coupling, which is a kind of buffer for leveling shock and dynamic loads on the driveshaft and gearbox shaft.
The elastic coupling acts as a buffer, smoothing out dynamic loads
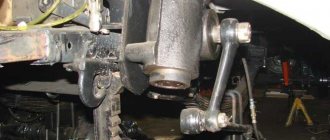
The elastic coupling is located in the lower front part of the car on the rear side of the gearbox. You can see it if you remove the engine protection and climb under the car. The coupling is easily recognizable due to its hexagonal shape.
The clutch is located on the rear side of the gearbox in the lower front part of the car
Coupling design
The basis of the coupling is a cushion made of especially durable rubber. Along its circumference there are six steel bushings fused into rubber, through which the bolts connecting the cardan flanges and the gearbox secondary shaft pass. The coupling kit also includes a special tightening clamp, which is put on it during installation or dismantling.
The elastic coupling consists of a rubber base and six steel bushings located around the circumference
The coupling may fail as a result of:
- wear of metal bushings;
- body wear;
- rupture of the body.
In each of these cases, the malfunction will manifest itself in the form of body vibration and extraneous sounds coming from the gearbox.
The condition of the coupling can only be checked by inspecting it and assessing the size of the play between the flanges of the gearbox and cardan shafts. This is done as follows.
- The car is driven onto an overpass or inspection hole;
- The engine protection is removed;
- The coupling body is inspected and the condition of the bolted connection is assessed.
- By loosening the cardan, the presence or absence of play is determined.
If signs of wear or mechanical damage are found on the coupling body (the body is partially or completely torn), the part must be replaced. A slight play (provided the body is intact) is eliminated by tightening the nuts of the connecting bolts. If the play is large, the elastic coupling will have to be replaced with a new one.
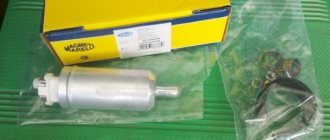
Driveshaft couplings for the VAZ 2107 in Russia are produced under catalog numbers 2101–2202120 and 2101–2202120Р. The retail price of the part, depending on the manufacturer, ranges from 400 to 600 rubles.
Replacing the driveshaft crosspiece on a VAZ 2106
So:
- We first mark the relative positions of the parts (cardan joint forks) so as not to disturb the factory balancing of the cardan shaft during assembly.
- Then we mark the locking rings and their seats in order to install them in their standard places during assembly. Remove the retaining rings (four from each hinge).
- We press the bearings out of the hinge fork using mandrels of a suitable diameter.
- Since the bearings are not pressed in completely (the joint cross rests against its fork), we remove the bearing using pliers
- We disconnect the cardan joint by moving its crosspiece in the direction of the removed bearing, slightly turn the crosspiece and remove it from the hinge fork.
- Press the opposite needle bearing out of the hinge fork.
- We carry out steps 3 and 4 for other needle bearings and remove the cross.
- We do the same with the second cross if necessary.
As you can see, replacing the crosspiece on a VAZ 2106 with your own hands is not particularly difficult.
If necessary, replace the intermediate bearing
So:
- Unlock the nut securing the front shaft fork. We unscrew it and press the fork using a puller from the front shaft.
- Remove the dust deflector from the front shaft.
- Screw the nut onto the threads of the front shaft so that it is flush with the shaft itself
- We compress the intermediate shaft support (we apply force to the inner race of the bearing) and unscrew the nut.
- Remove the support along with the bracket from the propeller shaft
Tip: Remember the position of the arms - the long and short support bracket relative to the driveshaft (it is better to mark the position of the support bracket relative to the driveshaft).
- We unscrew the bolts securing the bracket to the support, remove all the washers and disconnect the bracket from the intermediate shaft support.
Advice: Disassembling the intermediate support requires special tools and certain skills, therefore, it is recommended to change the intermediate shaft support assembly.
Defective parts
So:
- We thoroughly clean the parts with a brush before inspecting them.
- To cull the cardan transmission elements you will need: a bore gauge, a dial indicator.
- Since we have removed the cardan and disassembled it (albeit partially), we check the integrity of the welds. Drive shaft splines so that they do not contain wear marks
- For the rear cardan shaft, we check the presence of balancing weights, the condition of the seams and measure the diameters of the fork holes for the needle bearing. Dents of pipes and misalignment of the holes of the cardan forks are not allowed.
Important: Be sure to measure the diameter of the holes in the universal joint forks, where the needle bearings go, so that it does not exceed 23.825 millimeters. Measurements are made with a dial gauge.
- We check the condition of needle bearings, oil seals, their cages and spider spikes for damage and significant wear.
Note: A clear sign of a defect in the studs, upon detection of which the entire joint is replaced, are longitudinal dents left by the bearing needles.
- At the same time, check (while the cardan is removed) the condition of the rubber coupling of the cardan.
- The presence of cracks, mechanical damage or detachment of rubber from steel liners is not acceptable.
- We check the intermediate support for deformations. Cracks or ruptures of the elastic clip, as well as peeling of the rubber, are not acceptable. Replacing the defective support assembly
- We check the intermediate support bearing, rotate its inner race in two directions, while pressing it against the outer race (the inner race should rotate smoothly). We check the bearing seals for mechanical damage.
- We replace all defective parts.
We assemble the cardan in the reverse order, taking into account the features given below:
- Before installing the front shaft fork, lubricate the splines of the fork and shaft with grease.
- When installing the front shaft fork, tighten the nut securing it with a torque wrench 8.1-10 kgf•m (79.4-98 N•m) and tighten the nut with a chisel.
- When installing the oil seal race, the oil seal itself with the flange onto the front driveshaft splines, we fix the oil seal race by bending its three “tendrils”.
- Using an oil syringe, coat the splined part of the front driveshaft. Remove excess grease with a rag. We unscrew the grease nipple and screw in the plug in its place.
Note: It is not necessary to replace the grease fitting with a plug. It’s just that when you re-lubricate the spline joint, you will have to thoroughly clean the oiler from adhering dirt.
- Lubricate the needle bearings and stud surfaces of the universal joint with grease.
Tip: We recommend using grease (purple) for bearings containing molybdenum disulfide.
- Having installed the bearing races, we determine the gaps between the end part of the bearings and the upper edge of the annular groove located on the hinge fork using a flat feeler gauge. The permissible gap is within 1.5-1.66 millimeters.
- We select the thickness of the locking rings based on the obtained gap values (we measure the rings with a micrometer).
- After installing the rings, we apply a couple of blows with a rubber hammer to the hinge forks from the reverse sides (this ensures the contact of the needle bearing races with the locking rings and the free movement of the cross).
That's all, all that's left to watch is: Replacing the crosspiece on a VAZ 2106 video.
The most common reason for removing the driveshaft on a VAZ 2106 is its repair, or more precisely, the replacement of crosspieces. In order to remove the driveshaft from the car, you do not have to perform any complicated actions. You just need to have a few keys on hand:
- Rozhkovy at 13
- Flat head screwdriver
- 13mm head with crank or ratchet
Now I will tell you about this procedure in more detail below, and also provide several photographs of this repair. Firstly, it is worth noting that as such, the driveshaft is bolted in just one place - to the shank of the rear axle gearbox. This is where you should start, unscrew all the bolts in a circle:
If suddenly, when unscrewing, the bolts themselves begin to turn, then you need to insert a screwdriver into the place shown in the photo, thereby stopping the bolt head from turning:
When you unscrew the last mounting bolt, you should be careful and hold the driveshaft with your other hand so that it does not fall on you. And then move it to the side when the bolt is completely unscrewed:
Now you need to unscrew the central suspension, which holds the cardan in a horizontal position, and for this it is better to use a socket and a ratchet, or a wrench:
When the suspension mount is removed, the cardan falls down, or rather one side of it, so it needs to be held.
And to remove it completely, you just need to pull the cardan off the gearbox, after which it is completely free:
If it is necessary to replace or repair it, we perform all the necessary operations and install the part in the reverse order. If you decide to buy a new driveshaft for a VAZ 2106, then it will cost you quite a lot, since its price is about 4,500 rubles assembled.
Removing the shaft from a VAZ 2107 car
As for parts and spare parts for the VAZ-2107, it is better to buy a new outboard bearing (propeller shaft support) than a factory-made one. All this is because there are a lot of low-quality products on sale now, and buying a factory suspension bearing from a VAZ will help avoid getting a pig in a poke. To get a factory part, you just need to contact the sellers who sell goods from the manufacturer. Finding such a person is not difficult, you just need to try.
In order for the part to function well in the future on your VAZ-2107, when purchasing the selected outboard bearing, you should check its movement, that is, the movement of the outboard bearing must be smooth with elastic adjacent rubber. Rotating the outboard bearing from its hooks is a bad sign, and it is better not to take such a part. Otherwise, the cost of your negligence will result in unpleasant noise in the cabin of the VAZ-2107.
In the case when a replacement is necessary, but you do not have experience in such matters, you should take care of purchasing one cross with an outboard bearing already present. The purchase will be made with the intention that when a replacement is made, one crosspiece will need to be removed and it may be damaged.
If you don’t have to replace the entire propeller shaft support, for example, because only the outboard bearing was broken, and it’s a pity to throw away the rubber, then only the bearing is bought and replaced.
⦁ remove the support ring;
⦁ knock out the old bearing;
⦁ carefully hammer in a new one.
And it is advisable to purchase retaining rings, since old ones are often deformed or even broken. In addition, it makes sense to buy bolts, nuts, etc., the old ones may already be “licked”. Replacing parts will be much more convenient in a viewing hole or overpass, and for convenience, one of the rear wheels should be jacked up.
⦁ it is necessary to unscrew the cardan shaft. Using a 13mm wrench, remove the bearing mount that secures it to the transverse support (a pair of bolts);
⦁ now unscrew the nuts with which it is attached to the shank.
To further avoid vibration of the cardan and its beating on your VAZ-2107, it is best to place marks on all joints of the cardan before removal. And assembling according to your marks will save you from such unpleasant moments. A chisel can be useful when placing marks.
⦁ it is more convenient to remove all available retaining rings using round pliers with a bend;
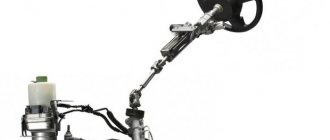
- Parts capable of changing the angle and length of the transmission are the coupling (5), as well as rigid hinges (9.7) and elastic (3). It is called a coupling. The role of the coupling is that it reduces the noise of the connection and angular torque is transmitted. Repair of the driveshaft is required if the coupling material is cracked and crumbled. Simply put, the clutch needs to be replaced.
- The cardan coupling consists of 6 rubber parts (30), with metal spacers (31) between them. These parts are tightly connected into a one-piece unit, so in case of failure, the most correct solution is to replace the coupling.
- The coupling is placed between the flanges (4,2). They are attached to it with 35 bolts.
- Intermediate support (6), which serves to reduce vibrations and various types of beating.
- The front shaft of the VAZ 2107 (5) is a pipe with splines installed by welding. There is a tip (40) at the front. One of the coupling flanges is located on it, and the rear splined end is located on the support bearing (6). The bearing itself is well insulated from dirt by seals. Repair of the driveshaft is necessary if the splines are worn out.
- The rubber pad (12) in which the bearing is located dampens vibration well. On it, the front shaft may move slightly.
- The intermediate cardan support is attached to the bracket (15).
- Important is the safety bracket (27), which prevents the shaft from falling out if the coupling fails. If this bracket was not there, then the cars would overturn at full speed, and such cases have happened before. In this case, repairing the driveshaft is impossible; replacement is required.
- The difference between the rear shaft (8) and the front “neighbor” is that it has a hinge fork at the ends.
- The hinge itself is an important element of the transmission; it consists of a pair of forks (23), one crosspiece (22) and, in a separate figure above, needle-shaped bearings (20) - there are 4 of them, rings (19) and oil seals (21). The bearings are pressed with a fairly large force of about 800 kg into the fork holes. They are non-separable; if they malfunction, they need to be replaced.
- The cross has the required gap, from 0.1 to 0.4 mm. Only within such limits is the crosspiece correctly centered. There are rings in five sizes and five different colors for proper alignment. Repair of the driveshaft most often consists of correcting these gaps and replacing the rings.
Read more: Haval N9 2020 model prices, new body, equipment, photos, videos ||
Haval H9 2020 photo of the configuration and price of the Chinese Haval SUV after restyling Attention! Before separating the transmission parts relative to each other, you need to make marks with chalk so as not to rotate the position of the parts differently and not cause alignment problems!
- We hang up any drive wheel using a jack;
- We put the gear shift lever, or “stick”, in neutral, lock the “handbrake”;
- Remove the safety bracket by unscrewing the nuts and washers;
- Now we release the coupling from the gearbox flange by unscrewing 3 nuts;
- We turn the cardan, take out all the bolts from the flange and coupling; to make work easier, you can carefully knock them out with a punch and a hammer.
- Now you can disconnect the front end from the gearbox flange;
- Now we unscrew the nuts of the rear half of the transmission from the differential flange (there are 4 of them);
- Now you can separate the driveshaft and differential flange:
- We unscrew the nuts securing the cross member and remove it;
- And only now we remove the cardan from the VAZ 2107
That's it, the withdrawal is complete. The reverse installation is carried out in exactly the same way, you just need to make sure that the cardan coupling with its liners (2) fits into the grooves of the gearbox flange (1,3).
After installation, you need to check how the cardan rotates with one wheel hanging.
How to change the suspension bearing on a VAZ 2107?
As soon as you hear the characteristic sounds of bearing failure, evaluate the appearance of the bearing. To do this, you need to look where it is located. Most often, a failed bearing has minor external damage in the form of a bent protective insert, and traces of lubricant are visible on the housing. After this, you can begin replacing the part.
Replacement procedure:
- The car must be driven into the inspection hole and put into first gear. To be more confident, it is recommended to place wheel chocks on both sides to prevent any accidental movement of the vehicle.
- In all places where the driveshaft is fastened, treat the connecting parts with WD-40 lubricant. It is worth noting that when replacing the outboard bearing, it is also necessary to replace the driveshaft crosspieces. The fact is that these parts have approximately the same service life, which explains their simultaneous failure. While the WD-40 is absorbed, you can visit the nearest store and purchase the necessary components. Don't forget to make notes on the cardan, gearbox and gearbox parts. This is necessary in order to install the driveshaft correctly during assembly and prevent the occurrence of new vibrations.
- Now, using a 13mm wrench, unscrew the propeller shaft fasteners located on the gearbox shank. After this, all fastening parts of the outboard bearing are unscrewed. Next, you need to flare the special locking petals and pull the driveshaft out of the coupling made of elastic material. Now remove the cardan and dismantle the locking rings of the crosspieces. The fixing retaining rings can be unfastened using special pliers.
- Place special spacers under the crosspieces. Next, with gentle blows of a hammer or chisel, knock the parts off their seats.
- Let's move on to the bearing. The driveshaft is clamped in a vice, and the nut is unscrewed at the bearing mounting location. Using a puller, press out the suspension fork and knock the bearing off the cardan using uniform hammer blows along the entire circumference of the part.
- Clean the installation site of the new bearing from dirt with any available means. In all cases, it is recommended to use rags for these purposes. Install the new bearing onto the driveshaft. To assess the correct installation, pay attention to the part stopper, which should lock towards the rear axle of the car. Don't forget to install the protective washer.
- Screw the nut securing the bearing onto the shaft and lock it. To do this, you can use a hammer and chisel.
- New crosspieces and driveshaft are installed in the reverse order. This completes the bearing replacement.
This is how to replace the outboard bearing of a VAZ driveshaft. As you can see, this is not a complicated operation at all and only requires you to have space and the appropriate tools.
Diagnostics
If your problem is formulated as “broken outboard bearing,” you should contact a specialized service center for diagnostics in order to accurately identify the breakdown and find out its cause.
When carrying out such a procedure in car services, they take into account the fact that the first sign of natural wear of such a part is vibration, as well as a knocking sound in the area of the driveshaft at the moment when the car starts moving. If previously there were no problems with balancing the axle, but the knocking still appeared unexpectedly, then the first thing you should do is check the outboard bearing. The diagnostic procedure in car services is carried out in the following order:
- First, the machine is installed on an overpass, lift or inspection hole.
- Next, they find the driveshaft itself under the bottom. First of all, mechanics
check the play. To do this, move the part by hand in the axial direction. Free movement in such a situation is unacceptable.
- Next, the diagnosticians rotate the cardan and listen to how the bearings behave. If there is vibration, rattling, knocking, or rolling, the part must be replaced immediately.
- The next step is to inspect the body of the part. The degree of tightness of all bearing mountings is checked. Even the slightest leakage of lubricant is not allowed.
- Then the car service workers pay attention to the bearing bracket. The fastening must be reliable.
Important! Such an algorithm allows you to fairly accurately determine whether the outboard bearing is in good condition or requires replacement. It is best that the described procedure be performed by an experienced person who is not the first time to see a faulty outboard bearing.
What faults occur in this connection?
Typically the bearings will tell you when they need to be repaired or replaced. The sound of the outboard bearing indicates a failure. It can send the following signals:
- Various knocks and noises, such as humming, buzzing or crunching;
- Vibration, such as beating or jerking;
- Play of the outboard bearing if it is subject to visual inspection.
If you hear that the suspension bearing is humming, you need to contact a car service as soon as possible.
As a rule, such elements of the driveshaft do not fail on their own. They break for the following reasons:
- Natural wear of the element
structures, gradual destruction of the rubber that holds the bearing.
- Features of operating conditions, for example, low or high temperature conditions, contact with dirt and dust on the bearing, movement over rough terrain, hard gear shifting, increased loads.
- An installation error that can easily be made if an inexperienced person is working.
- Reduced quality characteristics of the components used. The fact is that the installed spare parts must be original or have proven themselves in the market.
Important! If the driver tries to exclude the maximum number of reasons during operation, then he can rest assured that the part will serve him for a very long time.
Of course, most often the most loaded elements fail: the universal joint and bearings. There are reasons for this: lack of necessary lubrication in the bearings and defects in the production of crosspieces. In the USSR, there was a terrible shortage of crosspieces: there is no crosspiece - the transmission is faulty - the car is stuck. Repairing the cardan shaft often cost a week's family budget, and replacing the crosspiece (or rather, the need for it) led many to despondency.
More rare transmission malfunctions of the VAZ 2107:
- Damage and misconfiguration (hitting rocks when driving in the mountains);
- Abundant amounts of dirt in parts and bearings;
- Failure of flanges, splines and couplings under load.
For lubrication, maintenance, if a part needs to be replaced, first of all, you need to properly remove it from the car and put it back. Repair of the driveshaft is also possible only after removal.
How to diagnose wear on crosspieces
Replacing the crosspiece in a VAZ 2106 is carried out after diagnostics:
- When, during rapid acceleration or braking of a car, when changing gears, a knocking sound from the cardan transmission or vibration of the axle is heard, all this indicates wear of the crosspiece and its bearings. There is an urgent need to replace the VAZ 2106 crosspiece, which has become unusable.
- If you don’t pay attention to these signs in time, then the result will be destruction of the bearing and the cardan falling out directly onto the road. The axle gearbox and the underbody of your car can also be damaged.
Balancing the driveshaft VAZ 2107
After disassembling and replacing any element, the driveshaft must be balanced. This is done on a special stand, so for balancing it is easier to contact the nearest car service center. The balancing itself consists of measuring and eliminating the imbalance on the three shaft supports. Its permissible value at a shaft rotation speed of 5500 rpm should not be more than 1.62 N*mm. The imbalance is eliminated by welding small weights (metal plates) onto the surface of the front driveshaft.
If vibration appears after repairing the driveshaft, you can try to balance it yourself. Naturally, there can be no talk of any accuracy here, and the balancing itself will be only temporary. This is done as follows.
- Drive the car onto a viewing hole or overpass.
- Inspect the driveshaft.
- Conventionally divide the front universal joint into four sectors (if you imagine it in cross-section).
- Find a small weight weighing 30-50g and attach it to the front of the shaft using tape or tape.
- Drive along a flat section of road, paying attention to your choices.
- If the vibration does not disappear or increases, move the weight to another sector and repeat the checking process.
When the load is in its place, the vibration should stop, unless, of course, it is caused by an imbalance of the shaft.
Design features, signs of an outboard bearing
A similar element of the propeller shaft consists of a housing made of metal, as well as a hole into which the sleeve is inserted. There is a gap between the body and the bushing. It is filled with a certain lubricant. Thus, easy movement of the bearing components relative to each other is achieved.
Design advantages are provided due to the presence of the following operational features:
- resistance to
vibrations;
- silent operation;
- the ability to perform basic functions under different radial and angular loads;
- effective protection that reduces the impact of various negative environments on the bearing;
- ease of disassembly and maintenance.
Important! All this ensures uninterrupted operation of the cardan shaft element for many years.
Some more useful tips on how to make a successful repair
- protect the bottom of the car from large cobblestones, stones, and crushed stone flying at speed into the driveshaft;
- use the correct lubricant CV joint - 4, FIOL - 2u, paint the cardan. Corrosion protection will allow you to maintain alignment longer;
- check accessible connections and protective brackets more often, tighten connections;
- do not be lazy to check the gaps in the hinges and adjust them in a timely manner;
- Inspecting the coupling quarterly for cracks in the rubber or defects will allow you to replace it, otherwise the entire driveline may fail, and this will be more expensive.
- Regularly lubricate the VAZ 2107 driveline.
— try not to pollute the car too much, do not allow water to get into the middle of the unit;
— if the lubricant has dried out or is missing altogether, apply it in sufficient quantities;
— do not disturb the balancing in the cardan shaft;
- carefully monitor the expiration date;
- make sure that the fasteners do not loosen;
- do not replace parts with low-quality fakes.
Some more useful tips on how to make a successful repair
To increase the service life of the VAZ 2107 driveshaft, you need to follow a number of simple recommendations.
- Avoid excessive contamination of the driveshaft couplings.
- Systematically check the tightness of the fastening elements and the presence of lubricant in the connecting units.
- If shaft malfunctions are detected, do not delay repairs.
- When purchasing spare parts for a cardan, pay attention to the manufacturer and compliance with GOST or ISO requirements.
- After repairing the driveshaft, be sure to have it balanced at a service station.
Diagnosing a malfunction, repairing and replacing the suspension bearing and elastic coupling of the VAZ 2107 propeller shaft with your own hands is quite simple. This requires minimal plumbing skills, a standard set of tools and careful adherence to the recommendations of professionals.
Replacing the suspension bearing and universal joint in VAZ cars
Despite the abundance of foreign-made cars, a considerable number of car enthusiasts are owners of the familiar Zhiguli cars. One can argue for a long time about the positive and negative qualities of this brand, but many will unite in matters of repair - this is not the most difficult process, but it also requires skill. Let's take a closer look at all the intricacies of repairing the driveshaft crosspiece, as well as the outboard bearing for VAZ-2101, VAZ-2102, VAZ-2104, VAZ-2105, VAZ-2106, VAZ-2107.
Purchasing spare parts that will be used during repairs is a very important point. For an outboard bearing that you plan to purchase, an important factor will be the smoothness of its movement, as well as the degree of elasticity of the rubber. Various failures and “clinging” when checking its operation only indicate that it is better to put such a bearing aside - it will not work. The rubber used in the suspension bearing must be sufficiently elastic and soft. If it is very rigid, then by installing a driveshaft with such an outboard bearing, the driver will encounter body vibration when driving. This is caused by the transmission of vibration from the driveshaft. In addition, such tires will require replacement very quickly. It is best to purchase a VAZ crosspiece from the manufacturer. It is also important to buy retaining rings, since old ones can very quickly break or become damaged, which will require repairs to be carried out again.
As for the set of tools that need to be used when repairing the driveshaft crosspiece on a VAZ-2101, VAZ-2102, VAZ-2104, VAZ-2105, VAZ-2106, VAZ-2107, it includes:
open-end wrenches (for 12 and 13)
· socket wrench (13 and 27)
· aluminum (or copper, if necessary) hammer attachment
In the event that it is necessary to replace the driveshaft outboard bearing, a shrink puller and the old flexible coupling flange are added to the tool kit.
Initially, you should understand that bearing replacement is best done on an overpass, or in a garage above a pit. In the latter case, for greater simplicity and convenience in unscrewing the nuts attached to the rear axle shank, one wheel is lifted using a jack.
The first point is to remove the VAZ driveshaft. To do this, use a 13mm wrench to unscrew 2 bolts that secure the suspension bearing to the transverse support. Then unscrew the nuts securing the propeller shaft to the rear axle shank. It is best to change the mounting locations. Often these fastening nuts are too difficult to unscrew and are cut with a chisel. Therefore, it is better to initially stock up on a set of nuts to replace broken ones.
All parts of the cardan must be marked in order to assemble it correctly, otherwise vibration and beating of the cardan cannot be avoided. They can be set with anything - chalk, chisel, core. After this, the cardan crosspieces are directly replaced. It is installed in the “suspended” position, after which the cup of the cross is knocked out using a hammer and a mandrel. The remaining cups are also knocked out, the cardan eyes and grooves for the retaining rings are cleaned.
The next step is to insert the splined end of the universal joint into the flange of the elastic coupling, and from the other end unscrew the nut that attaches the universal joint fork to the front shaft using a 27mm wrench. Remove the joint fork with a puller, after which the bearing is also removed. This is done either using a puller, cutting off the outer ring of the outboard bearing, or knocking it down with a chisel.
How to properly lubricate the cardan?
We'll tell you about proper lubrication of the driveshaft without removing parts from the car.
First, as usual, we put the VAZ 2107 on the inspection hole, tighten the handbrake, put the gearshift lever in the “neutral gear” position, manually remove dirt and dust from the cardan drive, then check how tight all the available bolts and nuts are and tighten what "dangling"
- You can insert a screwdriver and wiggle it, this way you can determine the play in the hinge bearings. In this case, the part will have to be removed from the car, as described above, and the crosspiece replaced or the O-rings replaced.
- In addition, we grasp the front shaft firmly with one hand and rotate (pump), inspecting the coupling: is there any angular play?
- To lubricate the driveshaft splines, you need to take an 11 mm wrench, unscrew the plug on the coupling flange and take an oiler in which you can supply oil under pressure. Then, using a syringe, squeeze the grease (CV joint - 4, Fiol - 2u) into the splined joint until it “comes out” from under the oil seal, then put the plug in place.
These simple tips will allow you to keep the VAZ 2107 transmission in good condition for a long time, without having to repair the driveshaft.
How to replace the spider and driveshaft suspension bearing?
1. Remove the driveshaft from the car. Using wrench No. 13, unscrew the two bolts that secure the suspension bearing to the transverse support. Then unscrew the nuts securing the cardan itself to the rear axle shank.
2. After removing the cardan, be sure to mark every single part of it with a core or chisel. It is very important! The assembly of this part of the engine will need to be carried out in full compliance with your marks, otherwise vibration or beating of the cardan cannot be avoided.
3. Start repair work by replacing the cross. Using pliers, remove all the retaining rings, and then carefully install the cardan so that the cross is suspended.
3. Take a mandrel and a hammer and knock out the cup of the cross.
4. Expand the cardan, remove the cup, and knock out the next cup. It will be very easy to drive them back in.
5. Clean the cardan eyes from dirt and rust and clean the grooves for all retaining rings.
6. The next step is installing the cross. Remove the cups from both sides of it and tuck the cross into the eyes. Sliding it to one side, very carefully put on the cup so as not to scatter the needles in it.
7. Using a soft metal attachment, press the cup, feeling the moment when a groove appears for the retaining ring. Install it and turn the driveshaft over.
8. Then, also very, very carefully move the cross towards the cup and put it on in the same way as in the previous case, i.e. until a groove appears. Install the retaining ring. At this stage, be very careful, because... installing the second cup is much more difficult than the first, especially if you have never encountered such work before. Difficult, but doable. The main thing is to be patient, especially since you are doing repairs for yourself.
9. Proceed to replacing the outboard bearing. After the cross is removed, insert the splined end of the universal joint into the flange of the old flexible coupling. Taking wrench 27, unscrew the nut that secures the universal joint fork to the front shaft.
10. Pull the hinge fork using a puller. Next, all that remains is to remove the suspension bearing from the shaft. How to do it? You can cut the outer ring of the bearing and use a puller, or take it and knock it off the driveshaft.
11. Reassemble the parts in the reverse order, using the marks. Don't forget to press the flange of the fork nut away from the propeller shaft.
Repair of spare parts has been completed. Check the progress of the machine by listening for any vibration, “beating” or other sounds. If everything was done correctly, the car will run along the road easily and smoothly.