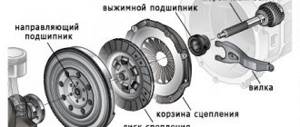
Replacing the clutch (the release unit is always changed in tandem with the clutch, it is very stupid to change the release bearing and not replace the clutch basket, since this is quite an expensive and time-consuming job) VAZ-2109 is considered one of the most difficult tasks to repair by the driver’s hands. The difficulty is that you have to disassemble almost the entire lower part of the car, and this requires an overpass or inspection hole, which not everyone has. In addition, the units contain very heavy parts that are difficult to remove without special tools. But you can always find a way out of such a situation.
About the properties of the structure
Before you completely disassemble all the components, you need to understand how it all works when assembled.
The clutch system is required to perform two functions:
- Briefly disconnecting the car engine from the transmission.
- Smoothly connects the engine back to the transmission during gear changes.
The clutch on the VAZ-2109 also protects the transmission from damage and overload during operation, so this unit must be maintained in working order and damaged parts replaced as soon as damage is discovered.
The “nine” has the simplest single-disc friction system. It works according to this principle:
- While the pedal is not depressed, the driven disc is compressed by a spring mechanism between the flywheel and the drive (pressure) disc. In this state, the clutch is engaged and the speed is transmitted through the system to the gearbox.
- When you press the pedal, a mechanism is activated that disconnects the drive disk from the driven one, the connection between the system elements is lost, so the torque is no longer transmitted further.
In this scheme, we are most interested in several details:
- The driven and driving disks, which very often quickly wear out, causing them to lose the necessary performance properties.
- Drive is a device that drives the unit when the pedal is pressed. If it is faulty, you will experience jerking and vibration when trying to change gear.
- Clutch cable - connects the pedal to the system. Over time, its tension weakens, which causes the effect of incomplete activation of the mechanism.
https://youtu.be/https://youtu.be/1858lZXHZ-g
_
Replacing the clutch on a VAZ 2109/21099 without removing the gearbox
Replacing the VAZ 2109/21099 clutch without removing the gearbox is quite difficult. You will not find instructions or recommendations on this topic in the car's owner's manual. These recommendations are based on the experience of car enthusiasts who share their experience of replacing the clutch.
The main problem when replacing a clutch is that not every motorist has an overpass, a pit, and especially a lift, and it is necessary to make sure that the massive gearbox does not fall to the ground. But lifting it is problematic, since it is impossible to crawl under the car with it. All steps for removing the gearbox are almost the same as the instructions above, with the exception of some nuances:
- Purchase two bolts from the upper arm of the classic front suspension from the store. Their threads are exactly the same as those on the bolts that secure the box and the engine block together.
- Screw them in from above, only after that, with a small crowbar or screwdriver, we begin to disconnect the nodes. After moving away, the rear part of the box will rest on the transverse rod, and a gap of about 15 centimeters will form between the clutch housing and the flywheel.
- The release bearing is removed through the resulting gap and the bolts on the basket are unscrewed.
Malfunctions
Replacing the clutch on a VAZ 2109 is not the easiest task, so you should correctly determine the moment when it is worth completely dismantling something, and when it is enough to repair several parts.
In the “nine” there are 4 common problems that precede the replacement or repair of clutch elements:
- Incomplete gear shift, clutch is moving.
- Incomplete activation of the system, towing occurs in the system.
- Jerks with vibration when trying to change gear and disengage the clutch.
- Noise coming from under the car when changing gears.
If problems from the first point occur, do this:
- check the travel of the fork lever, it may be too small, which is why the system does not work correctly;
- check the cable; if damaged, the VAZ-2109 clutch cable will need to be replaced with subsequent adjustment;
- clean the splines so that the driven disc hub works properly;
- The clutch housing itself with the springs may need to be replaced, and the pressure plate may also need to be replaced.
If the clutch is not fully engaged:
- check the discs (driven and driven), the clutch disc on a VAZ-2109 is replaced if it is damaged or its elements are worn out;
- replace the seals and clean the system parts;
- check the condition of the drive;
- check the system shutdown plug.
When jerking, most often it is necessary to change and repair the discs or clutch drive. The noise occurs when the driven disk is faulty; it will need to be dismantled as an assembly. The noise could also be due to the bearings.
Replacing the clutch at home
Clutch basket VAZ 2109
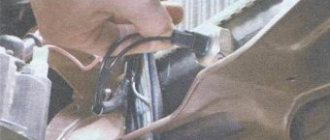
Before starting to replace the clutch, it is necessary to ensure all conditions for this operation. First you need to raise the car on a jack or lift. This way you can better see all the damaged parts. After this you need:
- Remove the exhaust pipe clamp. It comes off very easily. However, if it has never been removed before, you will have to lightly hit it with a hammer from the back side.
- Disconnect the driveshaft.
- Remove the rear flange.
- Unhook the starter (see Repairing the VAZ 2109 starter yourself - an opportunity to save a lot of money). This operation will become available only after all the bolts holding it are loosened.
- You need to start removing the gearbox handle.
- However, first of all, you should disconnect the beard by unscrewing the 3 bolts that hold it in place.
- Remove the rubber band and ring.
Note: This ring is usually very difficult to put on. At the same time, it is removed much easier, but still not very good.
- After this you can remove the handle.
- Before you begin removing the clutch, you must unscrew all the bolts that secure it to the engine.
Clutch basket for VAZ 2109
- Unscrew the speedometer cable (see VAZ 2109: how to properly repair the speedometer). Remove two bolts.
- Unscrew the traverse. After this, you can easily remove the box.
- When all the bolts are unscrewed, you can remove the basket.
Note: The basket is attached to the flywheel, so the flywheel will also need to be removed.
- You need to unscrew the bell.
- It is necessary to clean the gaskets with a knife to remove excess sealant.
- Pull out the oil seal. Clean it and put it back in place.
Note: if the old oil seal is damaged, you can replace it with a new one.
- Insert disc.
- Clean the entire surface and spray with degreaser. This manipulation is necessary so that the sealant fits well and then holds the gaskets.
Clutch basket for VAZ 2109
- Apply sealant and install gaskets.
Note: if the gaskets do not adhere well, they will need to be replaced after a short time. Therefore, during their installation, you need to ensure that the sealant layer is sufficient.
- Put on the bell.
- Remove the clutch bearing (you can remove it using pulling movements). Put a new one in its place.
Note: You must first lubricate it with oil so that it can move freely.
- Put the gearbox in place.
- Pour in the oil.
Note: by the way, it is advisable to drain the oil before starting work or during work. If it is not replaced, the clutch will soon fail again.
- Everything needs to be assembled in reverse order.
Clutch adjustment
You can adjust the clutch as follows:
- Loosen the lock nut so that the adjusting nut can move.
- Using the tension nut, slightly tighten the cable (the car should move forward).
- To control the tightening, you can use the clutch pedal.
Note: It is important to find the middle. That is, both an over-tightened and under-tightened cable is not what is needed. In the first case, the cable will burst, and in the second, the desired result will not be achieved.
If these steps do not fix the clutch, then there is another problem. Perhaps the clutch cable itself needs to be changed.
How to get to the desired node?
Now about how to replace the clutch correctly. If you want to get to this unit, you will have to remove the gearbox and several additional parts. To do this, you definitely need a jack, inspection hole or overpass. If necessary, you can make a homemade overpass. You cannot do without such devices, since in order to replace the clutch on a VAZ, you will have to lie under your car for almost a day.
Once you can work normally under the car, you will have to remove the transmission piece by piece. It looks like this:
- Disconnect the starter assembly - disconnect all contacts, then unscrew the three screws and remove the device.
- Next you should deal with the gear change drive . Loosen the clamp and pull out the device.
- Disconnect the cable from the speedometer and reverse wires.
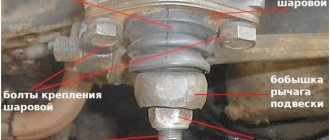
- Next you will see stretch marks to the suspension arms . It is necessary to loosen their fastenings, and then move them in different directions.
- Remove the ball joints from the swing arms.
- Pull out the CV joint tip and immediately plug it with some kind of plug, otherwise oil will flow out.
- The lower part of the clutch housing protection is dismantled ; there are only 3 bolts.
- To prevent the engine and gearbox from falling , supports are placed under them.
- Then unscrew the remaining supports , after which you can carefully pull out the gearbox assembly.
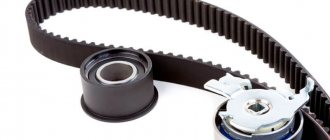
Replacing the fork and clutch release bearing of a VAZ 2109 Lada Samara
- Repair manuals
- Repair manual for VAZ 2109 (Lada Samara) 1987+.
- Replacing the fork and clutch release bearing
EXECUTION ORDER↓ Comments ↓1. Description of the car 1.0 Description of the vehicle 1.1 Appearance 1.2 Engine compartment 1.3 General data 1.4 Technical characteristics 1.5 Passport data 2. Vehicle operation 2.0 Vehicle operation 2.1 Safety rules and operating recommendations 2.2 Side doors 2.3 Trunk lid 2.4 Opening and closing the hood 2.5 Luggage compartment 2.6 Adjusting the front seats 2.7 Controls 2.8 Interior ventilation and heating 2.9 Eliminating fogging or frosting of windows 3. Vehicle maintenance 3.0 Vehicle maintenance 3.1 Checking the tightness of the engine and gearbox seals 3.2 Checking the tightness of the cooling system 3.3 Checking the tightness of the fuel system 3.4 Replacing the coolant 3.5 Replacing the oil filter and engine oil 3.6 Replacing the air filter filter element 3.7 Checking and adjusting the generator drive belt 3.8 Replacing the belt generator drive 3.9 Cleaning and flushing parts of the crankcase ventilation system 3.33. Replacing lamps 4. Car care 4.0 Car care 4.1 Car washing 4.2 Caring for and restoring body paint 4.3 Body lubrication 4.4 Cleaning drainage holes 4.5. Car storage 4.6 Preparing for winter use 4.7 Tips for starting the engine in severe frost 4.8 What is useful to buy for winter 4.9 Tips for winter use of the car 5. Problems along the way 5.0 Malfunctions along the way 5.1. Engine 5.2. Checking electrical equipment 5.3 Extraneous knocking noises appeared 5.4 Vibration and shock on the steering wheel 5.5. Brake problems 5.6 Wheel puncture 6. Chassis 6.0 Chassis 6.1. Front suspension 6.2. Rear suspension 7. Steering 7.0 Steering 7.1 Steering wheel 7.2 Steering column 7.3 Steering mechanism 7.4 Replacing steering rods 8. Brake system 8.0 Brake system 8.1 Front wheel brake 8.2 Rear wheel brake 8.3 Wheel cylinder 8.4 Brake drive 9. Electrical equipment 9.0 Electrical equipment 9.1 Relay and fuse box 9.2. Generator 9.3. Starter 9.4. Lighting and light signaling 9.5. Heater 9.6. Windshield wipers 9.7 Sound signal 9.8. Ignition system 9.9 Instrument panel (high) 10. Body 10.0 Body 10.1 Replacing the front buffer 10.2 Replacing the rear buffer 10.3 Replacing the radiator trim 10.4 Replacing the front fender 10.5 Removing and installing the hood 10.6 Adjusting the hood 10.7 Adjusting the hood lock 10.8 Front door 10.9 Rear door 11. Engine and its systems 11.0 Engine and its systems 11.1 Removing and installing the engine 11.2 Adjusting the clearances in the valve drive 11.3. Power supply system 11.4. Lubrication system 11.5. Cooling system 11.6. Exhaust system 11.7 Complete disassembly of the engine 11.8 Cylinder block. Inspection, troubleshooting and repair 11.9 Piston with connecting rod. Disassembly, troubleshooting and assembly 11.10. Cylinder head 11.15. Carburetor adjustment 12. Transmission 12.0 Transmission 12.1 Gearbox and differential. Main components and parts 12.2 Removing the gearbox 12.3 Installing the gearbox 12.4 Adjusting the clutch drive 12.5 Disassembling the gearbox 12.6 Inspecting and troubleshooting gearbox parts 12.7. Secondary shaft of the gearbox 12.8 Primary shaft of the gearbox 12.9. Differential 12.16. Clutch drive 12.17. Front wheel drive 13. Applications 13.0 Appendices 13.1 Appendix 1. Basic data for adjustments and monitoring 13.2 Appendix 2. Fuels and lubricants and operating fluids 13.3 Appendix 3. Tightening torques for threaded connections 13.4 Appendix 4. Service book 13.5 Appendix 5. Vehicle electrical diagram |
How to remove the clutch?
Now there are only a few steps left before you can remove the clutch from its seat.
You will need to unscrew several bolts. Be sure to secure the driven disc somehow, otherwise it will fall off as soon as you try to move the clutch assembly.
We carefully remove the entire system assembly, inspect it and replace damaged parts.
How to change the clutch disc? The parts themselves are in your sight; you need to check their functionality. Check the springs and the condition of the entire device. If any damage is detected, dismantle the part according to the user manual. It is better to replace it with the same spare part.
If you want to install a clutch disc, then it is better to replace all the assembled parts, that is, both the drive and driven elements along with the release bearing. There are sets of all the parts on sale.
The VAZ-2109 clutch cable is replaced if it is damaged or severely worn out. After replacement, adjustments must be made. Tighten the cable so that the pedal travel does not exceed 160 mm. To do this, tighten the nut securing the cable to the lever, measure the distance, then adjust the tension again if necessary.
Upon completion of work, install the clutch in the reverse order. Some installation and dismantling features may vary depending on modifications of the “nine”; you can find out the details by looking at the user manual for your car.
If you don’t have enough free time, take your car to a service station, where all the work will be done in a few hours, although you will have to pay a considerable amount for this.
Didn't find the information you are looking for? on our forum.
Replacing the clutch basket
To replace the clutch basket, you need:
- Disconnect the negative terminal of the battery. By the way, it is advisable to remove the battery itself, since it is quite possible that it will interfere.
- Disconnect the headlight switch connector.
- Remove the cardan.
- Get rid of the slave cylinder.
Note: In some cases, problems arise precisely because the slave cylinder is in a faulty condition. Therefore, when repairing the clutch, special attention should also be paid to the cylinder.
- Remove the gearbox.
- To remove the clutch, you need to unscrew the bolts securing the clutch to the engine.
- Unscrew the speedometer cable. Remove two bolts. Unscrew the traverse.
- When all the bolts are unscrewed, you can remove the basket.
- It comes off quite easily. To do this, you just need to unscrew a few bolts with which it is attached to the flywheel.
- You need to look carefully at its surface. It may have been damaged during use. Therefore, it will need to be replaced.
Note: to make it easier to pull it out, you need to slightly pull it towards you, and press on it from the other side.
Clutch basket repair
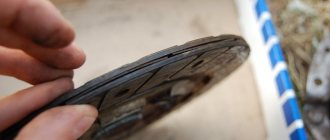
Petals on the clutch basket of a VAZ 2109
If there are all signs that the clutch is not working correctly, then you need to carefully examine all its parts. If the basket is broken, it needs to be repaired. Repair is possible if there are no grooves or scratches on it. So, the repair:
- Replace the basket spider. It needs to be riveted to the required place.
Note: everyone can rivet in their own way. There is no special technology here. It is only important not to harm the spider itself.
- In addition, instead of a spider, you can use a special ring. It's much easier to do this. First you need to remove the spider.
- The release bearing will be attached directly to this ring.
- Place the basket in its place and firmly clamp it.
Photos and videos found on the Internet will help you replace or repair the clutch basket yourself. Any instructions will help you quickly and efficiently carry out this work. But the price of “home” repairs is much lower than in a car service.