Many car owners, despite the prohibitions of state traffic inspectors, still prefer that some of the windows in their car be covered with a special film that provides protection from sunlight. This can be done at car service centers, but it’s no secret that tinting a car yourself is a fairly simple procedure. Let's look at it in detail.
What tools will you need?
To do this you will need:
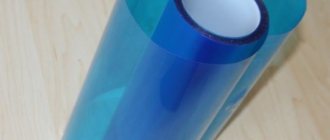
- Purchase tint film from a parts store. It is better to take film produced in America or England, where there is strict control over the quality of such products. Recommended brands: Jonson, Llumar, Global, SunControl.
- You will need special plastic scrapers to smooth the material. They are not included in the package of expensive films, but are mainly included with Chinese or Korean films of very low quality. If there are no scrapers on sale, you can also make them yourself. You should take elastic plastic and cut out a plate from it, the dimensions of which should be 10x12 centimeters. One edge of the scraper should be made very even and smooth so that there are no burrs or irregularities on it, because it is destined to become the working edge of your tool. This is a necessary condition, since the tint film is very easy to tear or scratch, so it would still be better to purchase a factory scraper rather than skimp on such a trifle, on which the quality of the work depends.
- You will also need a small amount of transparent shampoo, you can take the usual one for washing your hair, but only transparent, so that it cannot give a tint to the glass when applied; cream or gel shampoos are not suitable for these purposes. If you don't have clear shampoo at home, you can use clear liquid soap or dishwashing detergent.
- Prepare a spray bottle, preferably with an air pumping function. You can, of course, take a container from a glass cleaner, but it will be more convenient for you to work with the type of sprayer that first pumps in air, and then it will be sprayed by simply pressing a button or lever. Such sprayers are used when working in the garden to spray seedlings.
- Buy one of the types of stationery knives with a retractable blade in advance. You can use a razor blade, but you should use a new one, not an already used one. Only you will need to secure one edge of the blade into a wine bottle cork; this will protect your hands from possible cuts and it will be much more convenient for you to work. The special tinting knives offered, as a rule, are made in Japan; at their high price, they are several times sharper than ordinary knives.
- Car glass cleaner should be in every car. All you have to do is thoroughly rinse the glass that will be tinted.
- To carry out all stages of work, it will be good to have a supply of new napkins, but not made of fabric, but of non-woven material.
- Sufficient amount of clean water in a clean container.
The list may seem long, but it lists the ingredients for all stages of the work and therefore they should be prepared in advance, in sufficient quantities and placed within such a distance that you have them at hand without having to interrupt your work in order to take the right thing. Despite its apparent simplicity, the work of tinting car windows requires special care and concentration. It should be carried out in a clean box where dust does not fly. If you plan to do it outside, then it is better to choose a gloomy day so that the sun and insects cannot interfere with you.
After all the preparatory work has been completed, feel free to begin covering the glass with tinting film.
Let's start work
Before you start tinting your car with your own hands, you will have to cut out the film, taking the dimensions of the glass as a basis. You need to do the following: spray the entire glass plane with clean water and apply the film to the wet glass so that it fits tightly to the surface. Drops of water hold the material, but make it possible to move it around the perimeter of the glass. You should arrange the film so that the waste is the smallest part of it. You should leave a margin of up to one millimeter along the edge, and even more at the bottom, if the windows are lowered, then cut off the material along the margin line. But this must be done carefully, since it is very thin and can easily tear.
If you are afraid of making incorrect cuts, you can initially make a “pattern” from plastic film or tracing paper. These materials also adhere well to a wet surface, and only then, using the existing template, you can cut off the amount of tinting film you need on a flat surface. After this, we remove the prepared blank from the glass and thoroughly wash the plane of the glass on which we plan to glue the film. While the glass is completely dry, you can dilute shampoo or detergent in water in a ratio of 1:10 and pour the composition into a spray bottle. It is in this composition that the most important secret lies, which the car service workers involved in tinting will never reveal to you. And at the same time, it is shampoo diluted with water that “neutralizes” the glue on the film for a short period of time. Now that you know the main secret, you can continue working.
Spray the prepared composition onto the glass from a spray bottle, then take the film by the upper edge and peel the film directly from the adhesive base in one of the corners. A small amount of solution should be injected into the place where you just peeled the film. Having secured it to the place intended for it, with smooth movements we begin to release the tint film from the protective one, while simultaneously pressing it against the glass. You should not rush to carry out such actions, because the shampoo neutralizes the glue for a period of up to five to seven minutes, and if you spray the area where the film is glued from time to time, you will have even more time.
After you have removed the entire protective layer, the tinting film remains attached to the surface of the glass. It is currently fixed, but has not yet been finalized. You still have time to position the film while it can still slide over the applied solution.
Final fixation of the film on the glass
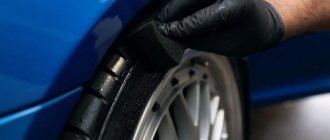
When you are sure that it has taken its rightful place, you can begin the process of final gluing it. To carry out this step you will need a scraper and napkins. Using a scraper, you begin to carefully, without making significant physical effort, smooth the film; this is necessary to remove soap solution and air bubbles from under it. As a rule, these actions are carried out starting work from the center of the surface. Ultimately, if the material is properly glued, then there should not be even a small air reservoir underneath it, since these bubbles look like whitish spots on the outside and are clearly visible.
Your job is to push them to the outer edge of the glass, where they can be removed with a clean cloth. The film that you left as a reserve around the edges should be cut off at the level of 1-2 millimeters to the level of the outer edge of the glass. If you do not do this, then over time it will begin to touch the edges and ride up. But the level of the lower edge should be placed under the sealing tape at a distance of about 0.5 centimeters, this will protect it from possible lifting during daily use of the windows.
After all these operations have been carried out, the work of attaching the tint film to the car windows can be considered complete. It will finally dry in 24 hours; this period will be required for the glue to completely harden and secure the material to the glass. It is not recommended to use glass covered with glass or turn on the heating during this time.
DIY car tinting. Recommendations
It is recommended to start tuning with the side windows; they are easier to remove.
Tinting. Step #1
Car window tinting begins with cleaning work, so to speak, with a serious wash. Dirt and dust are wiped off the glass, both from the inside and the outside. First they are treated with soapy water, then they are wiped dry with a clean, lint-free cloth. The site should remain virtually sterile. The next step is to prepare a special solution for applying and fixing the tint on the glass. Take the detergent, the main thing is that it foams well, dilute it in warm water and whip up the foam. This soap composition is needed to ensure the film slides over the glass for final grinding. Pour the prepared soap composition into a spray bottle. This is where the preparation for working with film ended.
Tinting. Step #2
The dimensions of the window must be known thoroughly and accurately. The film must be cut in accordance with them. Error is not acceptable. You can make a pattern for another one. The film is placed on the glass, smoothed out very well, and then it needs to be cut along the contour as if using a template.
Tinting. Step#3
When the film is cut it means that the tinting process is 50% done. Now let's try to apply the film to the glass. You can separate the two parts of the film using tape, which is glued on both sides and then pulled in different directions. The film is applied to the glass and tightened with a soap solution until it sits perfectly. You need to smooth it out with a rubber spatula. In the process, water and air bubbles are removed from under it.
Practice before you do it!
As in any matter, the success of perfect tinting is influenced not only by the quality of the film you purchased, but also by the skill of the person who glues this material. Therefore, it will be better if you, before tinting your car window for the first time, practice gluing scraps on regular glass. You need to master the skill of neutralizing the adhesive layer and smoothing it out. The success of window tinting lies in the quality of these works.
Using the same principle and in exactly the same sequence, windows are covered with armor film. Its structure is more rigid and thicker, but this only makes the process of working with it easier.
Films of different types can be glued one on top of the other, that is, when the glass covered with tinting has completely dried, you can stick an armored film on top of it or in the reverse order.
When armoring or tinting the glass in a car with your own hands, it is worth remembering the fact that some types of glass have a concave or curved structure. This primarily applies to the rear half of the body and the windshield. And the shape of the film when flattened remains flat. This circumstance presents some difficulties when carrying out such operations. The film itself can stretch, but only slightly, although usually this is quite enough.
However, it happens that the car windows have a strongly concave shape and here you will not be able to carry out the work in a single, solid piece. You can get out of this situation in a simple way: divide the glass plane into several parts and carry out the previously described algorithm using several specially cut parts.
DIY car window tinting video
First, you should thoroughly clean the surface from dust on the side that will be most convenient for gluing. You will need a certain amount of film, but it is worth considering that it should be enough to cover the entire glass in one sheet. And get ready for the fact that you may not succeed the first time and will have to make a second attempt, and sometimes a third. You need to prepare a scraper, although it is often included as a bonus with the material itself. For such work, you need an industrial hair dryer; a home appliance will not work here; it has a low level of temperature rise with a strong air flow. You will also need a sharp utility knife and scissors, as well as glass cleaner and a spray bottle of water. After all the necessary materials and tools have been purchased and prepared, you can begin tinting your car windows yourself.
Artistic tinting or art tinting
There is also a type of tinting called art tinting. This option is great for those who want to make their car stand out from other cars. But it’s better not to do this type of tinting yourself, because it requires more serious experience and artistic talent. Therefore, to get art tinting done on your car, it is better to contact a service that does this work.
In general, the technology used to tint car windows with your own hands, given in this article, is already quite old, and nothing much new has changed in this technology. The only annoying thing is that there are laws that impose fines for using tint, so it’s better to do removable or automatic tint. And then a video on how to do tinting:
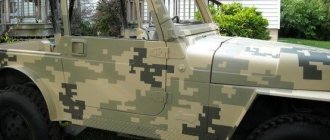
It’s not often that we get the opportunity to work with the domestic auto industry. It was with great pleasure that we tinted the rear windows of a NIVA car. The film chosen for tinting was the American brand Suntek 5% (maximum darkening). Looks great on a car in camouflage.
There is always a large selection of high-quality films from well-known manufacturers. All work is carried out without dismantling parts and upholstery and is guaranteed for life. Do you need high-quality tinting in Moscow? Contact us!
The operating procedure is as follows:
- With a margin of at least two millimeters around the entire perimeter of the glass sheet, cut a piece of film of the length you need.
- Decide which side of the film is protective (it will be transparent) and which side is tinting.
- A thick layer of water from a spray bottle or spray bottle should be applied directly to the film and glass surface.
- Without peeling off the protective layer under any circumstances, you should lay the film so that the transparent side faces up.
- You begin to smooth the film to remove water and ensure it adheres tightly to the surface of the glass. Folds should begin to appear along the edges of the curved surface.
- At this stage of work, it is best to do a little training with a small piece of film on the curved glass, so that in case of failure you do not have to remove the entire film. To do this, you need to determine the temperature regime for using a hair dryer and the distance to the material so that the film begins the compression process under the influence of high temperature.
- After finishing the training, you can begin to remove folds on a large plane; you should start working from the immediate center of the fold. As soon as the film begins to heat up, without removing the hair dryer, smooth it with a scraper and carefully ensure that the surface of the film does not overheat.
- After painstaking smoothing work, the film should take the shape of glass. You have to carefully remove it and thoroughly wash the glass plane where you will subsequently glue the tint film. There should be no dust or small grains of sand left on the glass itself.
- It is necessary to fill the spray bottle or spray bottle with the purest water, preferably purchased in a store, this will guarantee that there will be no sediment in it.
- Carefully begin to peel off the protective film, immediately starting to spray it with water, this will protect it from accidental twisting.
- The next stage of work will be to spray the glass with water and lay the film on it with the side that is covered with the adhesive solution. It will be better to start the gluing process from one side of the glass, rather than from the bottom or top. Here you will most likely need the help of a friend, since you need to spray water on both working surfaces and at the same time continue to lay the adhesive side of the film on the glass.
- At the end of the work, you should have a protective layer in your hands, and the tinting material should lie on the wet glass, with the adhesive base facing down. Then you need to put the protective film on top of the tint film and begin to remove the trapped air and remaining water with a scraper. This process should begin from the middle of the surface; if large bubbles appear, you can use a hairdryer and ensure that the film remains even and smooth.
- You begin to enjoy the work you did yourself on tinting the windows in your car! And if something doesn’t work out, start working again.
In conclusion, I would like to say the following. Do-it-yourself car window tinting is easy on flat surfaces, but working on a curved surface can cause you a lot of trouble. Before you achieve the effect you want, you can ruin many rolls of tint film and have time to fray your nerves, so it will be better if you entrust this work to professionals from the service center. You will pay them a certain amount of money, but after a certain time, usually no more than a day, you will be able to pick up your car from the workshop with high-quality work done.
Kolodiychuk Andrey
, especially for
Frequently asked questions about car tinting
Question: Is it possible to tint car windows only in winter?
ANSWER: You can tint car windows AT ABSOLUTELY ANY TEMPERATURE, we have successfully tinted cars when the air temperature outside is down to minus 30 degrees, we are waiting for phone numbers to sign up for training 8 (495) 7209283
Also, the car's tinting will not be negatively affected by precipitation. On the contrary, during rainy weather and in winter you can avoid waiting in line and get a discount on tinting.
Question: Can I buy a film from you and tint the car myself? ANSWER: Yes, of course, we can sell you the film by the meter, but to properly tint a car you need certain skills and tools. Therefore, we recommend that you turn to our professional services. By the way, we have examples of self-tinted cars “by craftsmen in the garage and with a bottle of beer” in the “road humor” section
Question: Do you glue the film outside or inside? ANSWER: The film is always glued from the inside, but the pattern on the glass and the molding of the film is done from the outside.
Question: How long does it take to tint a car? ANSWER: Tinting a car in our tinting center lasts on average 1.5-2.5 hours, but the time can vary both up and down, depending on the condition of your car and the individual characteristics of the bodies to sign up for tinting 8(495)7209283
Question: What should I do while the car is being tinted? ANSWER: During tinting, you can sit in our cafe. Although your presence with us is not required, you can leave the car and take a walk. We are located in close proximity to the large RIO shopping center, where you can have a fun time.
Question: When you tint a car, do you disassemble the interior trim? ANSWER: We try to disassemble the car as little as possible. But sometimes, due to the technical features of the car’s structure, a little disassembly of the door trim may be required... but nothing more. But this is only when it is necessary. Although we think there is no point in being too afraid of analysis, since we employ professionals in their field. Disassembly and assembly of the casing is carried out by qualified personnel, so there is no reason to worry. and there is also something like that, but regarding those tinters that promise to tint your car 100% without disassembling it... without even knowing the make of your car... we would advise you to think about the professionalism of such tinters, because basically it is necessary to remove the rubber seals on the door windows always, since it is simply not possible to dry the bottom edge of the film with a hairdryer at 650 degrees with the rubber seal installed!!!!!!!!!!!!!!!!! otherwise, over time, the film will begin to lift along the bottom edge .
Question: And if I leave the car with you and leave, nothing will happen to it? ANSWER: We have video surveillance on our territory, with video recording. So there is no need to worry about this.
Question: Can you come to us to order? ANSWER: Yes, of course. We have a mobile team that can come to you and tint on your spot: Bus, yacht, country house, office, apartment, shop, etc.
Question: Do you tint with American films? ANSWER: We give preference to American films, but at the client’s request, we can also offer high-quality Korean films to reduce the cost of tinting. But BE SURE!!!!!! Even if we can offer Korean film, we will NEVER replace it with American film!!!!!
Question: Which removable tint film would you recommend for me?
Answer: We think it’s good if you glue it to the front windows, then the usual traditional tint film on the adhesive layer, since it has the best indicators of visibility from the inside, but if, for some objective reason, you don’t want to glue a regular tint film, then If from removable types we recommend you silicone tint film
If you have any other questions, our consultant will be happy to answer and give recommendations by phone: 8 (495) 720-92-83