Greetings. Today Vic is with you and today we will talk about the Lada Kalina stove. What can we say, replacing the Lada Kalina stove is currently no longer a complex technical undertaking.
Change it as you want - cut, paste, in any way that you find on the Internet, it does not matter. After replacement, 90% of owners notice that there is no heat in the car like before.
Many people begin to remove the air from the car, change the thermostat caps, and remake the system for other Russian-made cars, but, unfortunately, nothing helps.
Everyone stops and drives around, practically freezing in their cars. And my brother and I conducted research in this area, studied how the Lada Kalina stove of the 8th family, in which the box works.
This one is simply inserted into the box and pressed on both sides with plastic and the air always passes through the radiator, always, in any case.
To keep it hot, simply open the tap; to keep it cold, close the tap. The tap is closed, the radiator is cold, air flows through the radiator, the air is cold, that’s it.
But, in the Lada Kalina, the tap is removed and another heating system is used, that is, the heat is redistributed using a damper that is located inside and when the damper is pressed against the radiator, the hot mode is turned on.
And when the damper moves away from the radiator, this is called cold mode, that is, air begins to circulate along a different path. And what did our direct research lead to?
They led to a simple, very simple, so to speak, matter. When you remove an old radiator, you have repeatedly noticed that wide foam rubber is glued along the entire width of the radiator, along its height.
However, when you buy another radiator in a store, as a rule, there is either no foam rubber, or there is a thin strip, in this case this foam rubber plays 90% of everything.
Since the valve is directly pressed against the radiator, if you do not attach or glue this foam rubber onto the sealant, air will circulate around the stove, because without foam rubber there remains about 5-6 mm on each side, and the air naturally follows the path least resistance.
That's the whole reason why you don't have heat . That is, there is also a possible reason, which yes, it plays a role, try to buy original stoves, that is, those that are sold directly in showrooms, specifically for the production of AvtoVAZ or simply VAZ auto parts.
Do not use third-party companies, because, as a rule, they save on materials, they do not twist the inside of the tubes, special plastics are inserted so that at idle speed the circulation wraps around more slowly and the stove heats up better.
Savings mean that even when you do everything right, you will still heat less, but it will be much better. That's it, the reason has been found, use it. When replacing foam, be sure to glue it in any way that is convenient for you.
But most importantly, don’t forget the foam rubber that covers the entire width and length of the stove. This video will show you everything. Bye everyone. Good luck.
The heating system in the cabin of the budget Lada Kalina model can significantly increase comfort for the driver and his passengers. It ensures that the required temperature conditions are maintained inside the car. Along with such useful options as:
- "ABS";
- airbag;
- electric power steering;
- electric front windows;
- front seat heating function,
Heating system composition
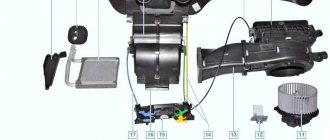
The operating principle of the heater in the Lada Kalina is very simple. It is built on a supply and exhaust circuit. The heater circuit contains:
- cabin air filter;
- air ducts;
- heater radiator;
- electric fan;
- air flow and fan operating mode control module.
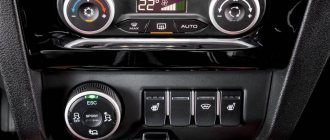
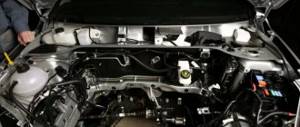
The design of the interior stove looks exactly like this, and is located behind the dashboard and only the system controls are present on its front surface in the Lada Kalina cabin. A running engine generates heat, which is removed from it by the cooling system. This circuit includes a heating radiator. The circulating liquid heats the honeycombs, from which the warm flow is directed into the cabin by means of a fan. Adjustment of the required temperature, strength and direction of the air stream is carried out using the handles and dampers present in the cabin. Sometimes the dampers need to be adjusted.
The air taken from the external environment initially passes through the intake element located on the hood at the bottom line of the windshield of the Lada Kalina. Next, the air rushes to the filter component and is supplied inside the cabin space by means of a fan.
The fan can operate in 4 different speed modes. The adjustment is carried out using the corresponding knob on the device, and the switching itself is possible due to the presence of a resistor block in the control module.
How to diagnose a heating system in Kalina?
Before performing a diagnostic procedure, you will need to carefully study the diagram. You should only try to check while the engine is running.
- The temperature regulator, located on the control unit in the cabin, is installed in the extreme left position. We activate the fan and observe hot air entering the cabin through the deflectors. Gradually moving the handle to the right until it stops, we reach the exit of the cold air stream.
- Checking the speed should begin by setting the appropriate knob to the minimum speed position. If the fan and its control module are working properly, then the force of the air stream should increase as the handle is moved to subsequent positions (and so on until the 4th speed mode, corresponding to the maximum number of revolutions).
- We check the dampers. Here we move the temperature level regulator to the maximum to the left position. We move the fan speed switch to the position corresponding to the 4th speed. The check itself boils down to smoothly moving the damper regulator between the extreme positions. This should be done in order to feel the adjustment in the direction of flow. By moving the temperature regulator to different positions, we observe a change in the degree of heating of the incoming air.
List of faults in the heating circuit
If the owner of LADA Kalina suspects the presence of any deviations from the normal functioning of the heating system, then the diagnostic procedures below will be required.
- The first step is to make sure that there is a sufficient amount of antifreeze in the cooling circuit.
- Next, check the integrity of the fuse.
- We make sure that the fan speed regulator is working properly.
- A weak air flow through the deflectors indicates the need to check the condition of the filter component.
- If there is no warm flow into the cabin when the engine is warm, then there may be air pockets in the cooling system or the dampers in the air ducts are jammed.
- A faulty temperature sensor will cause only hot or, conversely, cold flow to enter the cabin.
- Among the common reasons is depressurization of the LADA Kalina cooling system. Sometimes this may be due to the loss of tightness of the heater radiator itself. At the same time, antifreeze will enter the cabin, giving itself away as a specific smell and wet decorative floor covering. In order to detect a leak in a timely manner, it is necessary to monitor the level in the expansion tank frequently.
Let's sum it up
The heating system is simple. Timely diagnostics can save the owner of a LADA Kalina from unexpected breakdowns; the heater circuit will also help with this. Monitor the level of antifreeze, change it according to the regulations, and the system radiator will serve its regulated life, delighting you with warmth and comfort in the cabin.
The Lada Kalina air heater is considered one of the best in terms of heat performance in the VAZ family, but is far from the most reliable in operation. Problems begin almost at the car dealership, as many motorists say. But most of the problems are completely solvable, and often even without the involvement of car service specialists.
Replacing the heater radiator on Kalina 1117
Replacement
heater
radiator for VAZ 1117
Kalina
Group in contact
Step 2:
Next, you should release the pedals. replacement of the gas-31105 stove, replacement of the stove radiator on the Volga 31105 without removal. Replacing the heater radiator without removing the panel and steering wheel. To do this, pull the pedal about halfway and turn it to the side. Today I will talk about what flushing the stove is, how to clean the stove, and also how to flush the stove radiator without removing and disassembling the dashboard. Thanks to this manipulation, you will be able to free up the area that will be used to dismantle the radiator. To make this even easier, you can slightly bend the reverse tongue, which serves to create a stop for the sensor.
Step 3:
Remove the stopper axle. Lada Kalina - replacing the heater radiator (without removing the panel. Unfortunately, in this case you will not be able to achieve visual contact, so you will have to work by touch.
Step 4:
Pull out the metal casing, cut it and mount it in its original place.
Step 5:
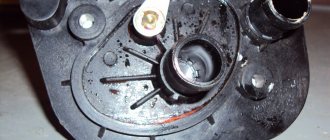
Now you should carefully inspect the radiator. The thing is that it can become clogged, which will require you to clean it using special solutions. Replacing the heater radiator without removing the panel on the Lada Kalina. The video will tell you how to remove the heater radiator on a VAZ-2114 car without removing the dashboard, and will also tell you about the nuances and subtleties of the process. In some cases, you may find that it is damaged, requiring you to buy a replacement.
Step 6:
dismantle the valve of the car’s heating system and, just as in the case of the radiator, carefully inspect it, clean it, and, if necessary, replace it with a new one.
Step 7:
Now all you have to do is clean the remaining elements of the heating system, carefully inspect them and, if necessary, replace them. It is important to note one small but very significant detail: radiator hoses are very difficult to put in place, especially if you decide not to change them, therefore, if you have the financial opportunity, it is better not to skimp on them. Replacing a stove radiator without removing the panel on a VAZ. This also applies to tubes, but in their case there is one more important detail - they must have absolutely identical length.
Step 8:
Reassemble everything in the reverse order and do not forget to add antifreeze to the system, since most of it will be lost during the repair process.
Step 9:
Check the functionality of your car's heater.
The method described above, although simple and practical, has a number of significant disadvantages compared to the classical technology, which is usually used as an answer to the question of how to change the stove on Kalina. Replacing the Lada Kalina heater radiator without removing it. The thing is that with such partial disassembly of the machine, you will not be able to inspect all the components of the stove well enough, and you will not be able to replace some of them, if necessary. Therefore, we recommend resorting to the method of replacing the stove on the Lada Kalina without removing the dashboard only in extreme cases, and when you are sure that either the faucet or the radiator is to blame - two elements that will definitely be in your hands, and you will definitely you can determine the degree of their wear.
I would also like to note another important nuance regarding the “simple” method of repairing the Lada Kalina stove. Without disassembling the instrument panel, you will still not avoid contact with it, so act very carefully so that its elements do not burst. Also, do not forget about spilled antifreeze, which must be constantly collected with rags so that it does not spoil the interior of your car.
Thanks to the stove, the car creates comfortable conditions for the driver and passengers in winter. It is very important that it works flawlessly. Sometimes heating problems that arise can only be solved by replacing the stove radiator with a Lada Kalina. The article examines the main problems of the radiator and provides recommendations for its selection and replacement.
[Hide]
Common faults
The stove itself on Kalina is well conceived, but due to the poor quality of the elements and parts, various troubles constantly happen to it. Even the latest models with climate control have various “diseases”.
The list of the most common faults looks like this:
- The heater core is leaking;
- the heater damper is jammed or does not open completely;
- failure of the fan or control unit;
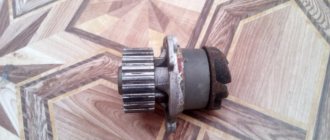
- gear motor failure;
- the temperature sensor or heater resistor has become unusable;
- The cabin filter is clogged.
To find out where this or that element of the heating system is located, you should look at the operating instructions; there will definitely be a corresponding diagram there.
The design of the Kalina stove without climate control is such that the air sucked in by the fan passes through the air filter and enters the heater radiator. There it is heated and supplied to different areas of the cabin through adjustable grilles and openings. The dampers are controlled and the fan speeds are switched manually. This heating system is more reliable because it does not contain any electronics.
On a Lada Kalina with climate control, the rotation of the dampers is controlled by a gearmotor at the command of the electronic unit. The latter receives signals from a temperature sensor located inside the car and reacts accordingly to changes in the microclimate. The controller interacts with both the heater and air conditioner.
Cooling system problems
Most often, Lada Kalina car owners have to deal with the following malfunctions:
- engine overheating due to untimely switching on or failure of the main fan;
- the stove fan fails;
- the heater tap or the radiator itself leaks, which leads to a complete replacement of the Kalina heater;
- The VAZ 2118 power unit does not warm up to operating temperature due to the fact that the fan is constantly running.
Forced cooling of Kalina is controlled by an electronic control unit (ECU), based on pulses transmitted by the temperature sensor for turning on the fan. When the antifreeze in the upper pipe heats up to 103-105 °C, this sensor transmits a signal to the ECU, which starts the impeller through a relay.
If the fan switch-on temperature is reached and the cooler is not started, then the fault lies in the sensor itself or in the relay contacts.
When the cooling fan does not work, this threatens to overheat the engine, leading to the replacement of the piston group. But if the impeller rotates constantly, regardless of temperature, then you must immediately open the relay block. In one of them, which is responsible for the operation of the cooler, the contacts are probably stuck. A decrease in fluid temperature or engine overheating can also be caused by a jammed thermostat, which must only be replaced.
Also, only replacing the stove on Kalina can correct the situation when a leak appears in its radiator. The reason is that the factory parts are made of aluminum and cannot be soldered. It often happens that the heater fan does not withstand harsh operating conditions and fails. Here, too, only replacing the heater motor will help.
The trick is that the first group of faults, after correct diagnosis, can be eliminated quite easily. There is nothing difficult about changing the fan switch sensor or cleaning the relay contacts. Installing a new thermostat will take a little more time, but replacing a stove fan or radiator is quite a task.
You will have to remove the entire instrument panel, which is a lengthy process. That’s why information on how to change Kalina’s stove without dismantling the dashboard is so important.
Diagnosis and troubleshooting
The easiest way to resolve the issue is regarding the cabin filter. For the first time, thorough blowing of the element will be enough, but then it is better to replace it. The real problem is a leaking radiator or a broken fan; an expensive replacement of the unit cannot be avoided. An equally high price will have to be paid for a new control unit.
It will be somewhat cheaper to install a new temperature sensor, gearmotor or resistor for the Kalina heater. Moreover, the malfunction still needs to be correctly diagnosed, which can be quite difficult. A burnt resistor is easily identified - the fan only runs at maximum speed.
It is more difficult to check the sensor hidden in the lighting shade. Symptom of a malfunction - a hot or cold stream flows from one or more grilles, regardless of the position of the regulator handle.
How to change a radiator
The operation is very labor-intensive, for which the car service center will charge you a hefty sum. But there is another, slightly barbaric, but fast and widely practiced method. The work flow diagram is as follows:
- Drain the antifreeze, disconnect and remove the battery, and then disconnect the hoses from the heater pipes.
- Unscrew the nut located near the fittings in the engine compartment. It holds a steel plate that will interfere with the removal of the heater.
- Remove the gas pedal and pull out the steel brake pedal shaft. Unscrew the decorative panel and behind it the plastic panel covering the stove radiator.
- To remove it, cut an opening in the plastic frame that allows you to pull the radiator towards the driver.
- Install the new element and reassemble in the reverse order. The cut opening can be sealed with plastic and decorated in any suitable way.
When performing the operation, it is worth moving the controller located directly under the stove to another place. Antifreeze dripping from it can damage sensitive electronics. Also, with the radiator removed, it is easy to change a faulty heater valve or gear motor, because access to them will be open. The gearbox is a single unit with a damper position sensor and can also be changed entirely.
Procedure for replacing the stove faucet.
Change the heater valve on a cold engine. Place a rag under your feet to absorb any spilled liquid. We will replace the stove valve without removing the dashboard. All we need is to get to the place where the heater valve is located on Kalina.
- Remove the air filter housing.
- Remove the ignition module.
- Unscrew the bolt and drain the antifreeze
- We unscrew the nut in the place where the stove pipes go into the cabin.
- Remove the upper heater pipe from the thermostat.
- Remove the lower pipe.
- Let's go to the salon.
- Disconnect the gas cable from the pedal.
- Remove the gas pedal along with the bracket.
- Unscrew the heater radiator cap.
- We bend the metal part, which is located to the left of the stove body.
- Partially unscrew one handbrake mounting bolt, and completely unscrew the other. Now you can unscrew the tunnel screws.
- Disconnect the cigarette lighter plug and the fuse box.
- We unscrew and disassemble the front console. Everything is visible and accessible, nothing is complicated.
- We remove the ashtray. In place of the emergency button there are two plugs. When you pull it out, you will see screws under them.
- Label and number all chips and wires. Then there will be no complications during assembly.
- Pull out the electronic control unit (ECU) as far as the wires will allow. Place it in a safe place, most importantly, away from the heater.
- Now you will have to unscrew all the bolts that you encounter during disassembly. Only then will it be possible to completely dismantle the front console.
- Remove the dashboard panel, move the radiator to the side, and then take out the air duct. You have reached the place where the Kalina stove tap is located.
Remove the old faucet, install the new one and reassemble everything in reverse order. We also recommend changing the pipes going to the radiator from the faucet.
Fan replacement
The most convenient way to get to the unit is from the passenger seat, which will have to be dismantled so that you don’t have to do acrobatics inside the cabin. The chair runners are held in place by 4 13 mm nuts; unscrewing them is not difficult. Further work on replacing the fan is carried out in the following sequence:
- Remove the cabin filter and remove dirt and dust from the opening.
- Unscrew 4 screws located on the back wall of the glove compartment, and another one under the right heater grille.
- Remove the plastic cover from the stand and unscrew the 2 screws that secure the panel and the blower unit.
- Remove the blower unit, lift the plastic panel and loosen the 2 fan mounting nuts underneath it.
- Move the dashboard as far back as possible and secure it. The turbine must be removed from below, from a lying position.
You should not rush to change the fan when it only works at speed 1 and the heater switch is at maximum. This is a sure sign that the resistor located below the glove compartment has failed. The part is a small green plastic panel with a connection connector. Replacing the heater resistor is carried out without any disassembly; you just need to disconnect the connector and unscrew the 2 screws that secure it to the body.
Basically, troubleshooting the Kalina stove is not a difficult job, but very labor-intensive. To change a small part, you need to spend time disassembling to get to it.
Removing the blower motor
The stove fan is a fairly reliable unit, but when used in difficult conditions (heat, a lot of dust or high humidity), its electric motor may fail. Repairing a burnt-out motor is more difficult and more expensive than buying a new one, so in such a situation, the Kalina heater fan is replaced.
To carry out the work, you need a standard set of tools, and even “star” socket wrenches. Such grooves have all self-tapping screws that will have to be unscrewed during disassembly. The latter begins with removing the outer plastic grille and removing the cabin filter.
All debris from the seat must be removed so that it does not fall on your head when dismantling the stove fan.
Replacing the heater motor will require you to take an acrobatic pose inside the Kalina's cabin, unless you remove the front passenger seat in advance. Its runners are fastened with 4 nuts, so this operation does not take much time.
Then you need to open the glove compartment, empty it of things and unscrew the 4 screws located on its back wall. Another screw is located outside, under the airflow grille, it also needs to be unscrewed.
Next, the decorative trim is removed from the right front pillar, underneath it you will find 2 screws securing the plastic panel and the blower unit. They are unscrewed, the blower unit is removed and the plastic panel is lifted (held on by Velcro).
There are 2 nuts under it, they should be loosened with a socket wrench. To remove the stove fan, you need to move the dashboard as far as possible and fix it in this position.
The last step is to lie on Kalina’s floor and remove the stove fan by disconnecting the electrical connector. It is necessary to replace its turbine with a new electric motor. Then the unit is installed in place, and then assembly work is carried out. The replacement process is shown in detail in the video.
Hello, dear readers! The topic that will be discussed will be of more interest to owners of the Lada Kalina car. Winter is a harsh time. But severe frosts are not scary if the car heater is in good condition. However, if the unit breaks down and the stove is leaking, then the problem needs to be solved as quickly as possible. We will tell you how to properly carry out Lada Kalina.