Tighten the handbrake on the Lada Kalina
The manual brake system in the Lada Kalina model, as in any other car, is an independently functioning unit. The main task of this mechanism is to ensure that the wheels on the rear axle are locked so that the vehicle can be securely secured during parking or parking. The presence of a handbrake allows the driver to confidently start on an inclined section of the road. Many car owners are interested in the question of how to tighten the handbrake. In this article we will talk about this.
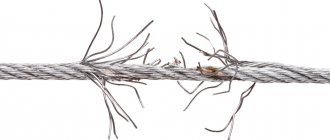
Time makes its contribution to the condition of the unit we are considering, because with its passage, gradual wear of the linings and stretching of the Lada Kalina drive cable occurs. At such a moment, every adequate owner is inclined to think about the question of how to tighten the handbrake or replace it manually without the involvement of service station specialists.
If the classic VAZ had a one-piece cable design, then in the Lada Kalina model the developers used a separate scheme, when the handbrake cable consists of two separate branches, which are independent parts.
When the handbrake is activated by the driver of the Lada Kalina, the pads are clamped individually, that is, the right side is tensioned by one branch of the cable, and the left side, respectively, by the other. Reliable operation of the unit will be achieved only through timely and high-quality adjustment of the drive cable and replacement of worn components. And here you need to know how to tighten the handbrake. Also, these simple steps make it possible to instill in the driver confidence in reliably parking his Kalina on more difficult sections of the roadway.
How to check the condition of the unit, and what are the causes of breakdowns?
If you feel that the parking brake system on your Lada Kalina is insufficiently effective, then the first action will be to check the degree of tension of the cable; the handbrake cable should be well tensioned. To do this, pull the lever towards you and count the clicks made by the ratchet mechanism.
On a correctly adjusted unit there should be from 2 to 4 such clicks. If these limits are not met, then you will need to know how to tighten the handbrake when the number of clicks is exceeded or loosen when there are less than the designated minimum.
Quite often, the need for loosening appears after replacing the pads or cable drive.
Lada Granta standard
There are also frequent cases when the parking drive is not able to cope with its functions, which may be due to excessive wear of the pads or the unsuitability of the cable for further use, and in this case the parking brake cable must be replaced.
During an external inspection, it is possible to reliably determine whether the cable is stretched or broken. This case involves no alternative replacement.
What can cause the Lada Kalina handbrake to not work correctly? Several reasons can have a negative impact on this, including the following.
- Driving with the lever not fully released. This situation leads to premature wear of the pads, which implies a subsequent need for tightening the cable.
- Damage to the Lada Kalina cable drive under the influence of mechanical factors. Due to the external location of the cable branches (under the bottom), they are prone to rapid wear, especially if the casing is damaged. The problem can only be solved by replacement.
- Malfunction of the ratchet assembly. This is where disassembly and subsequent replacement of worn-out elements comes to the rescue.
All indicated breakdowns can be repaired manually. In our material we will look at the technology of tightening the cable or the sequence of actions when replacing it.
How to adjust?
We recommend that you only purchase high-quality pads and cables, then adjusting the handbrake or replacing it will be much less common. However, this procedure cannot be completely avoided. After all, as noted earlier, these components are subject to natural wear or stretching (in the case of a cable).
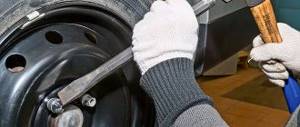
To adjust the handbrake successfully, you will need to acquire the necessary tools and auxiliary equipment. It is also indispensable to study the relevant manual. The tool set in our case is indecently simple, because it consists of two open-end wrenches, the size of which is “13” and one regular head of “10” paired with a wrench (preferably a “ratchet”). We also recommend stocking up on WD-40 penetrating agent.
When the preparation of the tools is completed, we can safely proceed to simple manipulations. Below we provide instructions, following which you will face inevitable success. So, adjusting the handbrake:
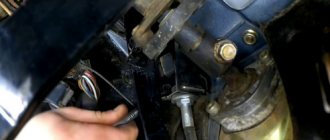
- The specifics of the work imply that the regulatory entity is located under the bottom, so we drive our car into a pit or hang it with a lifting device. When such conditions do not exist, the only way to provide access is to lift the rear of the car using jacks.
- Armed with the previously indicated head, we confidently unscrew the 4 nuts that hold the unit casing in place.
- Then we move the designated protection screen towards the front of the car, having previously “thrown off” the adjacent part of the muffler from the support cushion. Now access to the mechanism is completely open. To make repairs easier, the muffler pipe can be slightly moved back and supported with a suitable block.
- What appears before your eyes is the lever pull, both branches of the cable and the equalizer. The rod itself has two nuts, which act as adjusting and locking components.
- The first step is to release the lock nut (a key set to “13” helps).
- Now we rotate the second nut in the direction of tightening, which increases the tension of the cable drive.
- In cases where it is necessary to “release” the handbrake cable, the adjusting nut will need to be rotated in the opposite direction, which means reducing the tension level.
- In both cases of adjustment, after two or three turns of the specified nut, “dive” into the interior and check the stroke of the lever, achieving the required number of “ratchet” clicks.
- After completing these manipulations, be sure to check the operation of the handbrake with the rear wheels hanging and the lever clamped. Release the handbrake lever and rotate each of the rear wheels. Make sure they rotate freely and the pads do not touch the drums.
- At the last stage, we test the unit in conditions close to road realities. To do this, set the car at a tilt angle of 25% and activate the handbrake. We consider the adjustment successful when in this position the car does not roll, but is securely fixed.
How to change the handbrake cable on a viburnum?
On the Lada Kalina, during operation of the handbrake, it may become stretched and will require adjustment. So, signs that the handbrake needs to be tightened are poor fixation of the car, with the handbrake raised, on an inclined surface. This bell signals that the cable needs to be tightened.
Handbrake diagnostics
To diagnose the parking brake yourself, use the inspection hole. On automobile forums, it is advised to develop the cable when it is dirty and snagged, but this measure is ineffective. Don't skimp or change, your safety is more important.
Some European countries have a fine for drivers driving a vehicle with a faulty handbrake. We don't have that yet.
When the lever is tightened, clicks are heard. With the handbrake adjusted, there should be from two to four. In this position, the wheels should not spin. If there are fewer or more clicks, proceed to adjusting the handbrake or replacing the rod and drives.
Setting up the handbrake on Kalina hatchbacks and station wagons
After making sure that all components of the brake system are normal, you can begin adjusting. Goal: to ensure that the rear wheels are completely locked with 2–4 clicks of the lever lock.
- If the blocking occurs faster, you need to lengthen the cable a little and check again.
- If you have to expect five or more clicks, you should shorten it, selecting the desired length experimentally.
This work can be done independently, without an assistant, but you will need an overpass or inspection hole. You will also need:
- two 13mm wrenches (open-end and socket);
- wrench with extension and heads for 10 and 13;
- liquid key type product (WD-40).
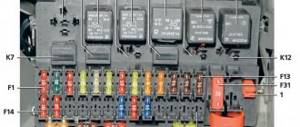
Tools needed for setup - gallery
Open-end wrench 13 Socket wrench 13 Wrench with extension and heads 10 and 13 Liquid wrench WD-40
The procedure is simple:
- After placing the car on the overpass, engage first or second gear. Place wheel chocks or bricks under the front wheels.
- Treat all threaded connections with WD-40 10-15 minutes before starting work. This will make it easier to unscrew the nuts without damaging the threads.
- Lower the handbrake lever.
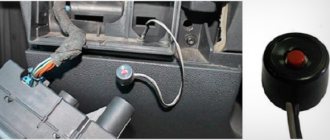
- Remove the muffler from the rubber pads.
To adjust the handbrake you need to remove the muffler from the rubber pads - Unscrew the four bolts of the protective screen (10mm head) and remove it.
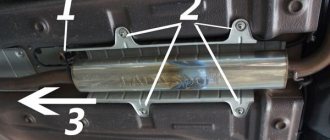
Unscrew the protective screen from the four attachment pointsUnder it there is a parking brake rod, an equalizer, and two brake cables (left and right).
Under the protective screen there is a handbrake rod for Kalina
- Loosen the additional nut on the rod with a 13-mm spanner, holding the main one with an open-end wrench. To make adjustments you will need the main nut on the rod. If you need to shorten the cable and, accordingly, achieve earlier wheel locking, the nut should be tightened; If necessary, increase the length by unscrewing.
- After every 3–5 turns of the nut, check the operation of the handbrake, ensuring that complete locking occurs with 2–4 clicks of the latch.
- With the rear wheels hanging, check the brakes. When the handbrake is raised, the wheels should be blocked, and when lowered, they should rotate smoothly without touching the pads. If everything is ok, tighten the locknut.
- Reinstall the protective shield and muffler. Tighten the nuts on the fasteners carefully, otherwise the threads may be stripped.
- Check the parking brake on a 25% slope! If the car rolls away, the cable needs to be replaced.
We recommend: Do-it-yourself instructions for changing engine oil
The design of the parking brake and the procedure for adjusting it are similar for all models of the Kalina 1 (sedan, hatchback, station wagon) and Kalina 2 (hatchback and station wagon) family. The Kalina 2 Sport stands apart, having more modern disc brakes at the rear instead of drum brakes. You need to check the pads of a Kalina Sport car like this:
- Raise the car with a jack and remove the wheel.
- Check to see if wear is even across the entire visible part of the disc. If not, you should go to a car repair shop, where they will carry out detailed diagnostics.
- Inspect the brake pads through the inspection hole. If installed parts appear thinner than new, replacement is required.
Verification methods
The handbrake on most cars should hold the car on a 25 percent grade, provided it produces three to five ratcheting clicks when tightened.
Tool for the job
Any work related to the repair and maintenance of a car, as a rule, requires the use of a certain set of tools, and tensioning the handbrake on Kalina is no exception to the general rules. Tools:
- keys No. 10 and No. 13;
- head with extension No. 13;
- ratchet.
Of course, you can simply jack up the car and place it on trestles or blocks. This, however, is not entirely safe, and working this way is not very convenient. The best solutions are:
In order to tighten the handbrake on Kalina, you need to drive the car onto an overpass or inspection ditch (the car owner hardly has a lift). Further sequence of actions:
- Engage first gear and fully release the parking brake.
- While under the car, you first need to use a 10mm wrench to unscrew all four bolts that secure the protective cover of the device.
- To make it more convenient to work, you need to remove the rubber suspension from the muffler mounting hook - a “carrot” in driver’s slang.
- The protective cover must be moved forward, providing access to the adjustment unit, which serves to tighten the handbrake on Kalina. At service stations, mechanics use a special long wrench with a swivel joint so as not to remove the muffler from the suspension and speed up the whole process.
- Then you need to fix the adjusting nut with an open-end wrench No. 13. Next, use a 13mm head to unscrew the locknut, which ensures reliable fixation of the adjustment. By turning the adjusting nut in the direction of tightening, tighten the cable. From time to time you need to check the number of clicks of the tensioner ratchet. Having brought the number of such to four or five, it is worth checking the handbrake in action.
- Having jacked up the rear wheels, you need to turn each one in turn. In this case, the brake drums should rotate freely, slightly touching the brake drum - this will be audible - and when tightening the cable, it is not possible to completely rotate the wheels by hand. Or you can try, by lowering the rear wheels and removing the jack, to move the car with a taut cable - all these methods have already been described above.
It is possible that you will still have to tighten the handbrake on the Lada Kalina or, conversely, loosen it in order to achieve the correct adjustment.
If everything is in order, then you need to tighten the locknut with the head, while holding the adjusting nut so that the adjustment does not go astray.
After this, the casing is put in place.
In order to understand the reason, you need to jack up the rear wheels again, putting the car in first gear.
After removing the drums, make sure that the brake pads and drums are in good condition or not. The thickness of the linings should be at least four millimeters, and the wear of the drums should not be excessive.
If everything is fine here, then the handbrake cable will need to be replaced.
Adjusting the handbrake cable on a viburnum - VAZ
In the Lada Kalina, as in other cars, there are many parts that over time either lose their properties or fail.
Filters get dirty, brake pads wear out, and the response time of the devices increases.
Setting them up does not always require the intervention of a service station; the owner can solve some problems himself, for example, adjusting the handbrake. Often it requires adjustment: they want to tighten or loosen the handbrake.
- 1 Where is it located?
- 2 How to check the handbrake on Lada Kalina
- 3 What if I replace it?
- 4 Tool for adjusting the handbrake
- 5 How to tighten up
- 6 If you need to loosen the brake
- 7 How to tighten or loosen on a station wagon and hatchback
- 8 If it doesn't help
Where is
The handbrake consists of a pair of cables and an adjustment block, which is located at the level of the rear seat under the bottom of the car. It is better to use a pit for adjustment, but you can use an overpass.
Often, it is precisely because of the design features of the Lada Kalina that the handbrake weakens and it becomes necessary to tighten the cable
How to check the handbrake on Lada Kalina
Checking the operation of the handbrake is easy to solve. Having driven onto a slope of 20 degrees or more, they try to tighten it. It is considered normal when 2-4 clicks are enough to hold the machine in place. If the number reaches 6–8, it means that the brake cables have stretched; if it is less than 4, the mechanism may need to be loosened.
The handbrake directly controls the rear brake pads. If they are erased, then even with normal adjustment it will not be possible to keep the car in place.
Handbrake adjustment tool
- key for 13, 2 pieces;
- wrench for 10, 1 piece (preferably a spanner);
- extension for key;
- a can of WD-40.
Spare parts are not needed for adjustment yet.
How to tighten up
- Since the handbrake system is located under the bottom, it is covered with an outer casing to protect it from dirt and dust.
But its fastenings - 4 nuts - will be stuck. To unscrew them, wet each one with WD-40 and wait a couple of minutes. The nuts are unscrewed with a 10mm wrench. Protective cover - The casing is held in place by a rubber ring that holds the front of the muffler. This ring is also removed.
- Slide the casing forward towards the engine, then remove it completely.
- On the opened block (bar with two cables), turn the inner nut with a 13mm wrench, periodically checking the number of clicks, periodically turning the wheels.
It is this pair of nuts that controls the tension of the handbrake cables - Having adjusted, fix the position with the outer nut (key 13).
- Check the operation of the handbrake for both wheels, turning them in turn.
The pad may be skewed, and one wheel will need fewer clicks - this is not critical. - Having done everything, close the casing in the reverse order.
The studs on which the casing is attached are quite weak, so when tightening the nuts, you don’t need to apply much effort.
If you need to loosen the brake
If less than 4 clicks are enough for complete locking, this means that the handbrake cables are overtightened. In this case, you need to let them go a little. This is adjusted in the same way as when tensioning, except that the nut will have to be turned in the other direction, so there is no point in dwelling on this issue. Also, it may be necessary to work with the external one first, rather than the internal one.
How to tighten or loosen on a station wagon and hatchback
The shoe brake system was developed even before Kalina and is still used on all new AvtoVAZ models, so there is no difference in adjustment between versions of the car body. Similarly, the work on Kalina-1 and Kalina-2 is no different.
Replacing the cable
It is clear that before changing the cable, you need to purchase a new one. The original of this element is desirable, and not a cheap counterfeit, which abounds in the modern automobile market. A cheap cable may not be exactly the same length and, moreover, of poor quality, which will lead to its rapid wear - that is, stretching.
In order not to turn your leisure time into an eternal repair of the car’s brake system, you need to make the right purchase in a specialized store. How to change the cable:
- Secure the front wheels with chocks to prevent them from rolling away.
- Jack up the rear wheels and install the rear axle of the car on trestles.
- Using a size 7 wrench, unscrew the two screws securing the brake drums.
- Turning both screws over and screwing them back in place will help remove the drums. Having removed them, you need to do a thorough inspection of not only the pads and drums, but also the working brake cylinder: it should not leak and have intact boots. Pistons in good condition move freely without jamming.
- The hand brake cover is removed. It needs to be unscrewed again.
- Remove the muffler mount and move the casing forward.
- Unscrew the nut and locknut completely and remove the bar.
- Knock the pressed cables out of their seats.
- Remove the fuel line protection cover by unscrewing the three nuts.
- Install a new cable.
- Next, the pads are installed in place along with the spacer bar and the upper return spring. When installing the pads, you need to make sure that their upper ends fit into the slots in the brake cylinder.
- The lower return spring is put on.
- The drum of each wheel is put in place and screwed on.
The wheels are installed in place. The cable tension is adjusted.
After adjusting the parking brake, reinstall the additional damper protection and secure it with four bolts. Place a rubber cushion on the front suspension bracket of the additional muffler.
After adjustment, check whether the rear wheels rotate freely. If they are difficult to rotate, loosen the adjusting nut a little and secure it with the locknut.
- how to tighten the front ones
- How to tighten and adjust the handbrake on a VAZ
The brake lever should hold the car on a slope of 16-20%. If for some reason you are not satisfied with the parking brake, and you decide to use the handbrake
. What do you need for this? How to do it?
- Inspection hole, a minimum set of keys from 12mm to 17mm, a metal brush, WD-40 penetrating fluid, protective equipment.
If you have difficulty unscrewing, use WD-40 penetrating fluid.
The vehicle's brake system must always be in good condition. Not only your life depends on it, but also the lives of other people. The parking brake can be the last “lifeline” in an emergency stop. Therefore, it is necessary to periodically check its operation and adjust it.
Check that the parking brake of the VAZ 2106 is adjusted correctly. To do this, install it on a loading ramp, overpass, etc., the height of which is 1.25 m, and the entry length is 5 m. This ratio is equal to a slope of 25 percent. The parking brake must hold the car on such a surface at 5-8 clicks (tooth). If there is no such platform, then for a simplified check of the handbrake adjustment, park the car on a level surface. Move the gear shift lever to neutral and raise the parking brake lever all the way. Leave the vehicle and try to move it. If you succeed in doing this, immediately adjust the handbrake drive.
Some drivers, in an effort to wear out the parking brake cable less, try to use it less often.
This “saving” leads to a bad result: the cable, rarely moving in the shell, gradually loses mobility and ultimately jams and breaks. Use the parking brake whenever necessary.
If the parking brake lever does not lock into the selected position, first check the pawl spring. If the spring is OK, replace the lever.
1. Unscrew the button from the lever
2. Remove the pawl spring. Replace the defective spring
You will need: two 13mm wrenches, a 13mm socket wrench (head), a Phillips screwdriver, and pliers.
1. Disconnect the wire from the negative terminal of the battery.
2. Remove the floor tunnel lining.
3. From the bottom of the car, using a 13mm wrench, unscrew the locknut and the parking brake adjusting nut and remove the equalizer 1 from the rod 2.
4. Remove the protective cover from the hole in the floor and remove it from the rod.
5. From inside the passenger compartment, remove the screw of the front fastening of the parking brake lamp switch bracket.
Please note that the ground wire of the switch is secured with a screw.
6. Using a 10mm wrench, remove the four bolts securing the parking brake lever (the two front ones also secure the switch bracket).
7. Set the bracket with the switch aside.
8. Remove the parking brake lever by moving the rod out of the hole in the floor.
Lada Kalina is equipped with a classic version of a cable-driven parking brake. The parking brake allows you to lock the vehicle in a stationary position on a flat surface or slope. The hand brake can be used during emergency braking. The “handbrake” is able to replace the foot brake if the latter fails. In this article we will tell
How to tighten the handbrake on Kalina or replace its cable + video
The handbrake is one of the components of the car's braking system. The parking brake prevents unintentional movement when parking the vehicle. Regular maintenance and adjustment of the handbrake helps to avoid troubles when parking on an uphill or downhill slope. The adjusted parking brake should ensure that the vehicle is held on a slope of 25 degrees.
The Lada Kalina has a handbrake brake drive in the form of two cables. The force from the parking brake lever is transmitted through two cables to the rear drum shoes. When the handbrake is tightened to the top position, the pads unclench and fix the brake drum. In this position the wheel does not spin.
Possible causes of handbrake problems
There are several reasons for the handbrake not working correctly on the Lada Kalina. Below are the main ones:
- Driving with the parking brake lever applied. One trip is enough. Brake pads wear out faster in this mode. After “driving with the handbrake” you will have to tighten and adjust the parking brake.
- Biting the cables. In a car they run along the underbody. Handbrake cables are used in extreme conditions. They are affected by dirt, moisture, temperature changes.
- Malfunction of the ratchet mechanism or jamming of the parking brake lever.
To diagnose the parking brake yourself, use the inspection hole. On automobile forums, it is advised to develop the cable when it is dirty and snagged, but this measure is ineffective. Don't skimp or change, your safety is more important.
Some European countries have a fine for drivers driving a vehicle with a faulty handbrake. We don't have that yet.
When the lever is tightened, clicks are heard. With the handbrake adjusted, there should be from two to four. In this position, the wheels should not spin. If there are fewer or more clicks, proceed to adjusting the handbrake or replacing the rod and drives.
If it doesn't help
Usually, a slight tightening of the inner nut on the block is enough for a long time, but if you set it to 4 clicks, and then, after checking, you are convinced that this is still not enough, you should think about replacing the brake pads. Such a replacement is a slightly more complicated operation, so novice car enthusiasts who are unsure of themselves should contact a service station. For more experienced people, replacement of labor will also not be an issue.
The hand brake on a car is a lever to the right of the driver, which additionally secures the car during long-term parking. Over time, it weakens, and for a strong fixation it is necessary to tighten it more. At the same time, even a novice car enthusiast can adjust it independently.