Replacing Priora valve stem seals
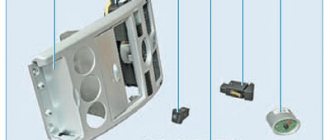
I suggest you start with the fact that the cylinder head will have to be removed. To do this, first organize unhindered access to it. Remove the air receiver, move the damper with the air pipes to the side.
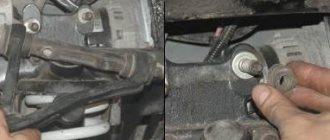
Using the “13” head, unscrew the five bolts securing the cylinder pipes, remove the receiver and ignition coil. Now you can remove the timing belt guard cover itself. Next, do the remaining dismantling work so that you can completely remove the cylinder head.
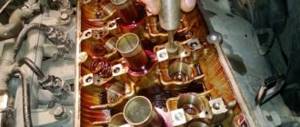
After you have removed the cylinder head, transfer it to the table for convenient subsequent work. On Lada Priora, first of all, you need to remove the camshafts. Use a magnet to remove the hydraulic compensators and place them in the order in which they were removed. Next we need a device for compressing the springs. We compress the spring and use the same magnet to remove the valve crackers. Then we take out the spring and the plate.
Now we can remove the MSC, but only with the help of a special device. Insert a new valve stem seal, lubricated in engine oil, into the support. We press in a new cap, install a spring, a plate, and dry it. It turns out that you need to do this 16 times, because, for sure, the engine of your car has 16 valves.
Removing, replacing, installing valve stem seals
Directory
Tags
Removing, replacing, installing anti-roll bar
Removing, replacing, installing timing belt
Removing, replacing, installing rear suspension shock absorber spring
Inspection, checking the steering
Removal, replacement, installation of the crankshaft and its bearings
Symptoms: short-term appearance of blue smoke when starting the engine, increased fuel consumption.
Possible reason: the valve stem seals are worn out.
Tools: a set of sockets, a set of wrenches, a set of screwdrivers, a device for pressing valve stem seals, pliers.
3. Reduce the pressure in the engine fuel system.
4. Remove the negative cable terminal from the battery terminal.
5. Drain the coolant from the engine cooling system.
7. Press the clamps of the throttle position sensor wiring harness block, and then disconnect it.
8. Remove the idle air control wiring harness connector.
9. Remove the air supply hose from the throttle assembly.
10. Loosen the clamp securing the first throttle body heating hose.
11. Disconnect the throttle body heating hose.
12. Loosen the clamp securing the second throttle body heating hose, and then disconnect the hose.
13. Loosen the fastening clamp, and then disconnect the hose of the small branch of the crankcase ventilation system from the throttle assembly fitting.
14. Loosen the clamp securing the adsorber purge hose.
15. Disconnect the adsorber purge hose.
16. Disconnect the throttle valve drive cable from the throttle assembly sector.
17. Unscrew the two nuts securing the throttle assembly.
18. Pull the throttle assembly off the intake manifold studs.
Note. Be sure to adjust the throttle actuator after installing the throttle assembly.
19. Disconnect the wiring harness connectors from the ignition coils, and then remove the ignition coils and spark plugs.
20. Disconnect the wiring harness from the emergency oil pressure drop sensor.
21. Disconnect the wiring harness connector from the engine management system coolant temperature sensor.
22. Disconnect the wiring harness block from the phase sensor.
23. Loosen the fastening clamp, and then disconnect the five cooling system hoses from the thermostat pipes.
24. Disconnect the wiring harness connector from the coolant temperature gauge sensor.
25. Unscrew the nut securing the end of the ground wire using a 13mm wrench.
26. Disconnect the ground wire.
27. Unscrew the union nut of the fuel hose, and then disconnect it from the fuel line tube.
Note. The tip of the fuel pipe has a seal in the form of a rubber ring. The ring must be replaced during assembly if damage is found on it.
28. Unscrew the screw securing the pressure plate of the bracket that fastens the fuel line and the cylinder head.
29. Unscrew the bolt securing the ground wire to the cylinder head (use a 10mm wrench).
30. Disconnect the ground wire from the cylinder head.
31. Disconnect the ignition coil wiring harness connectors and the fuel injector wiring harnesses.
32. Press the latches with your fingers, and then disconnect the ignition coil wiring harness block from the bracket.
33. Disconnect the fuel injector wiring harness from the bracket.
34. Unscrew the bolts securing the front bracket, and then remove it (use a 10mm wrench).
35. Unscrew the bolts securing the rear bracket, and then remove it (use a 10mm wrench).
36. Loosen the fastening clamp, and then disconnect the exhaust hose for crankcase ventilation from the cylinder head cover pipe.
37. Loosen the fastening clamp, and then disconnect the crankcase ventilation exhaust hose from the cylinder block pipe.
38. Unscrew the screw securing the dipstick bracket (oil level indicator guide).
39. Remove the guide along with the pointer.
40. Unscrew the two nuts securing the intake manifold to the cylinder head cover (use a 10mm wrench).
41. Remove the three nuts and two bolts securing the intake manifold to the cylinder head (use a 13mm wrench).
42. Remove the intake manifold.
43. Unscrew the fifteen bolts holding the cover to the cylinder head (use an 8 socket wrench).
44. Disconnect the cylinder head cover by first pressing it out by pulling it by the protrusions located around the perimeter.
45. Unscrew the bolts securing the front timing belt protection cover, and then remove it (use a 5-point hex wrench to unscrew the bolts).
46. Remove the cover.
47. Remove the bolts securing the lower front timing belt cover using a 5mm hex key.
48. Remove the cover.
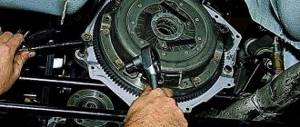
49. Loosen the bolt securing the tension roller using a 15mm wrench.
50. Remove the timing belt.
51. Unscrew the bolts securing the camshaft pulleys; keep the shafts from turning.
52. Remove the pulleys from the camshafts.
53. Remove the keys from the grooves of the shaft shanks.
Note. Do not under any circumstances mix up the intake and exhaust camshaft pulleys when installing them.
54. Remove the tension roller by unscrewing its fastening bolt using a 15mm wrench.
Note. There is a spacer ring located under the tension roller.
55. Remove the support roller by unscrewing the bolt securing it using a 15mm wrench.
56. Remove the five bolts securing the rear timing belt guard cover using a 10mm wrench.
57. Disconnect the rear timing belt protective cover.
58. Unscrew the bolts securing the cylinder head to the cylinder block using a 10-point hex wrench (the unscrewing order is shown in the figure; the bolts are tightened in the same order when installing the cylinder head on the cylinder head).
59. Remove the cylinder head from the vehicle.
Note. Don't forget any tool between the cylinder head and the engine block.
When removing the cylinder head from a car, it is recommended to enlist the help of a second person, since the cylinder head has an impressive mass.
60. Unscrew and remove twenty camshaft bearing housing mounting bolts using an 8-inch socket.
61. Remove the camshaft bearing housing.
62. Remove the camshafts from the cylinder head support elements.
63. Remove the hydraulic valve tappets from the holes in the cylinder head.
64. Install a device for compressing valve springs by screwing the camshaft bearing cover mounting bolt into one of the holes in the cylinder head and engaging the device with this bolt.
65. Compress the valve spring.
66. Remove the two crackers from the top spring plate using tweezers or a magnetized screwdriver.
67. Remove the spring compressor.
Note. If there is a significant increase in the force of movement of the device lever without subsequent removal of the crackers from the valve groove, a light blow with a hammer should be applied to the spring plate in order to release the crackers.
68. Remove the spring plate.
69. Remove the spring.
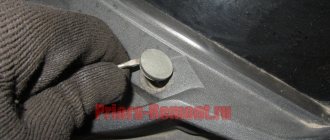
70. Press the valve stem seal onto the valve guide.
Note. If there is no device for pressing valve stem seals, pliers can be used. When removing the caps with pliers, the force must be applied strictly upward, without allowing the cap to rotate, otherwise the valve guide will be damaged. Pressing valve stem seals using screwdrivers is not allowed.
practical guide
Comment
You can replace valve stem seals without removing the head from the cylinder block. To depressurize the valves, you need a compressor and an adapter with a hose to force air into the cylinder through the spark plug hole. It is possible to crack the valve without using compressed air if the piston is in the highest position (TDC), but it is difficult to install the cracks. To do this, you will need an assistant to lift the valve with tweezers and hold it in the up position while installing the crackers. Therefore, it is more convenient to perform the work on the removed cylinder head.
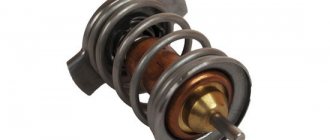
WHAT ARE OIL SEALS
The working name used by all repairmen is valve seals. These are special rings, belts, made of rubber and metal, placed on the valve neck. Their task is to prevent the engine oil that lubricates the Priora engine from getting into the working cylinders and into the air supply system into the receiver. That’s why they are “oil scraper”.
TOOLS AND MATERIALS REQUIRED TO REPLACE OIL SEALS
This work requires a separate set of devices. Of course, a normal service station has them in its “arsenal” initially. But the owner of a Priora who decides to replace the valve stem seals himself will have to purchase or rent them:
- A set of spanners (spanners).
- Set of heads with a knob.
- Valve spring compressor.
- Set of hexagons.
- Screwdrivers.
- Mandrel.
- A device for removing and replacing valve stem seals and crackers.
- Magnet.
- Marker.
- Sealant for gaskets when replacing.
- A set of head gaskets to replace old ones.
This is the minimum required kit to carry out such an operation.
Important! It is better to carry out any engine repair work with the battery removed from the Priora. To avoid both short circuit and battery damage.
What is included in the list of works for changing MSK
The VAZ classic has the shortest path to the caps, which is why repairs are cheap:
- Removing the valve cover.
- Removing the timing chain.
- Removing the camshaft.
- Valves desiccation.
- Changing rubber deflectors.
- Reassembly.
Already on injection-powered Priors, VAZ 2110 and Vestas you will have to work hard to remove the intake manifold. On foreign cars, it is necessary to contrive to dismantle the camshaft phase shifters and the valve lift control system. Getting all systems back on track is not an easy job.
Engine 1.8: signs of wear and replacement of valve stem seals
This is a proprietary or universal (suitable for engines of various brands) tool for clamping valve springs, without which it is not possible to carry out repairs.
The principle of operation of the cracker remover is quite simple: the cracker is attached to the engine body with support points, using mechanical pressure on the plate, the valve return spring is clamped, which allows you to remove the crackers.
Experienced car owners recommend paying special attention to the safety of crackers, as they tend to get lost and also get inside the engine.
It should also be taken into account that universal pullers are often not so multi-tasking - some designs are suitable for engines with the ONV, ONC, HV layout, others are designed specifically for servicing Opel SOHC engines, etc.
You should clarify this point before purchasing the tool.
Hyundai Elantra pomodorka › Logbook › Replacing valve stem seals without removing the head
Good day everyone))) And so let's start writing about replacing the valve stem seals, in this post I will try to put everything on the shelves and even with a video))) Before this, the MSK on two Elantras and the Elantra sore were changed, namely, the oil consumption stopped, and I finally got my hands on my car)))) Let's start with the fact that I was happily surprised after removing the valve cover, where I saw the engine head, which was quite clean in my opinion.
After which there was hope that we would go to the well-known Auto49 and there we would pick up a cracker, for example from a Priora or something similar, but upon arrival there we found only 08 and 01 models, which naturally do not fit in any way. We went in a not so rosy mood to a store not far from Novogireevo “Lord”, where naturally they weren’t there either, but the seller advised us to contact the officials, after these words I was of course very surprised, because I was sure that the officials only had spare parts for car repairs from them. And after calling about 20 stores, of which about 10 were Hyundai/Kia officials, something supernatural happened and we found this cracker from the Kia officials at Kashirka 39, and flew to where they were already waiting for us with these crackers in their hands))) we bought 2 crackers (one for work, one for spare) for only 110 rubles))) and we went on to collect tomatoes))) here is the remaining cracker. After which the process of replacing the MSK actually begins, for this, as will be said in the future video, a special tool was made, so to speak, It’s very convenient for them to pull the MSK out of their seats. After that, the oil scrapers were compared and, in principle, compared to the previous two Elks, we didn’t see anything supernatural, hard rubber and a large central hole, unlike the new MSs, comparison of the old and the new. The next step, accordingly, is the installation of the new caps itself , again, everything is described in more or less detail in the video because
they tried to do everything in great detail, but pictures would not have conveyed this effect. You don’t have to worry about the valves that they will fall, because
Is it worth taking on?
Once you find out how much it costs to replace valve stem seals on an engine, you will probably begin to be interested in the complexity of the technology and the list of required tools. And indeed, oil seals cost nothing: about 500-1,000 rubles, why not replace them yourself?
We hasten to warn against such a temptation to save money. Theory is theory, and practice is practice:
- When performing an operation for the first time, you will probably encounter incomprehensible moments, and your ingenuity will work at the wrong time. For example, what do you think about a cracker flying into the engine compartment or a valve falling into the cylinder?
- It is unlikely that you will be able to assemble a BMW Valvetronic system or its analogues on other cars and adjust the unit the first time.
The downside is that once you have gained experience, you will definitely complete the task better than many servicemen.
Mistakes on their part are not uncommon. For example, many people damage the working edge of the valve stem seal, which is why it does not last long. If you decide to act alone, we recommend setting aside not 2-3 hours, as they write on many landing pages of private services, but a whole day, or better yet, two. The first time around, a 16-valve head takes 10 to 14 hours.
Replacing Oil Seals on Priora 16 Valves
Content
How to Replace Valve Stem Seals on a 16-Valve Port
Well, Priora started eating motor oil. The discharge is dark, there are flows from the mass air flow sensor to the throttle. The device itself is also in a sad state of lubrication. But the compression in the cylinders is good. Replacement of front valves with 16 previous valves. The car does not lose power. What is the problem? And what they most likely did was design their seals on the valve stem. How to replace seals without removing the heads to replace 16 valves. How to remove the head on the rear of a 16-valve priors. Replacement of valves, cylinder head inoperative until the 16th. Or, as they are also called. valve seals. But there are 16 of them on Priora, and they need to be replaced.
What is a valve stem seal
Working title used by all repairmen. These are valve seals. These are special rings, rubber and metal belts that wear on the valve body. Their goal. prevent engine oil that lubricates the Priory engine from entering the service cylinders and the air supply system to the receiver. Therefore the oil scraper.
Tools and materials needed to replace valve seals
This work requires a separate set of devices. Naturally, a regular car service has them in its “arsenal” at the very beginning. But a Priora owner who decides to change valve stem seals without outside help will have to pick them up or rent them out:
- Set of wrenches (ring).
- Set of heads with handle.
- Device for compressing valve springs.
- Set of hexagons.
- Screwdriver.
- Mandrel.
- Device for removing and replacing valve stem seals and cotters.
- Magnet.
- Marker.
- Sealant for gaskets when replacing.
- Set of head gaskets to replace old ones.
READ Replacement Timing Chain Octavia 1.4 Tsi
This is a small kit needed for such an operation.
The process of replacing the oil scraper headgear
The operation of replacing valve seals with “ priority ” It can be divided into several stages:
- Priority training
- Removing the cylinder head.
- Replacing valve seals.
- Engine assembly.
- Test run.
In this sequence we must consider all replacement of these parts.
Preparing the car
This part involves first setting the Priorities on a flat, clean surface. Preferably on a concrete floor with an inspection hole. You will need to remove the receiver to supply air to the cylinders. You can shoot from the top position, but from the pit it is simply more convenient. Replacing valve seals with 16-valve priors. It is also necessary to completely disconnect and remove the battery, as well as all control connectors:
Replacing cuffs for VAZ 2112 drives
We are replacing the oil seal
2 camshafts for 21124 1.6 16v You can immediately replace the timing belt and gears and process them.
replacement strengthening camshafts VAZ 21124 replacement conditions
The first time I installed the caps and dried their valve
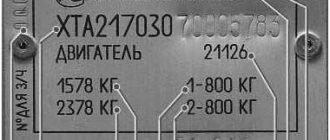
Lada
priority
VAZ 21126 engine
16
valve. Were there.
- Nozzles
- Ignition coils.
- Camshaft sensor.
- Oil pressure sensor.
Drain the coolant into the tank. Disconnect and disconnect the throttle (throttle) cable. Search results for rear replacement Lada Largus. Brake discs. Do Vesta 8 and 16 valves work? And we move on to the next step.
Removing the head to replace the oil scraper and instruments
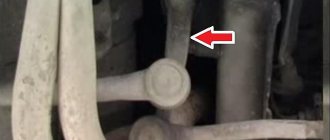
To access the main unit, remove the air receiver. Remove the two nuts securing the throttle assembly to it. Move the flap using the rubber air connection. Unscrew the 5 13mm nuts that secure the inlet fittings to the cylinders, and the 4 nuts that hold the entire receiver in place on top. Remove the receiver and unscrew the nuts by 10, remove the ignition coils. Turn off the candles. Remove the timing belt cover (gear). Loosen the tensioner and remove the belt from the camshaft gear. Remove the gears from the shafts by unscrewing the mounting bolts to 17. Mark the gears. Replacing the engine mount on the VAZ-2112 16 valve: photos and videos. Although it's hard to confuse. We remove the headlights on a VAZ-2110 to replace the knock sensor with valves VAZ-2112 16. Replacing the timing belt on a Renault Logan 1.6 8 valves in photo a. On the right side of the inside there is a frame for the phase sensor (camshaft) reader. Now unscrew the tubes from the thermostat by unscrewing the clamps. Remove the oil pan bolt using a screwdriver. As part of the Imrc valve replacement, a new valve repair option was trialled today. Ford 1.8 2008 Remove the bolts up to 10 holding the gas pipeline. Wrenches 17, wrench, disconnect the fuel line. All you have to do is unscrew the head by 8, fifteen mounting bolts, and the cover can be removed using the special tabs along the edges.
READ Replacing Silent Blocks of the Rear Beam Citroen C4
And the last stage. Remove the hex heads with 10 hex sockets. There are 10 of them.
After this, the head is freely removed and transferred to a clean table for work.
Replacing the cover
First you need to first remove the camshafts on the Prior. To do this, use eight sockets to unscrew the support frame of the support bearings. After removing and installing the valve seals, replace the valve seals. 20. Now you need to remove the frame and then the shafts.
Pull out the hydraulic compensators installed on the Priora using a magnet and fold them in the order of removal. Install the spring compression device. Press the spring and remove the valve crackers using a magnet or tweezers. Then remove the spring and plate from below. Now remove the oil scraper cover using a special tool. Insert a spare after changing to engine oil. And press into place on the valve sleeve. Install the spring and plate, wring out and dry. And so deal with all 16 valves .
assembly
Well, you can put everything back together. Here are just a few important points:
- Do not mix shafts in places.
- Clean the head seat and cover thoroughly before sealing.
- Follow the head bolt tightening procedure.
- Install the gears correctly, do not mix up the seats.
- Strictly mark on all shafts.
READ How to Test a 3 Phase Motor
Otherwise, these are simply reverse procedures.
launch
So, everything is collected. There were no extra bolts left, Tazol was poured into the system and the battery was in place. Replacing signs of wear on valve seals with 8. Valve seals should. Renault Sandero Stepway 2015, colored beams, Renault Sandero and Sandero Stepway lamps, oil filter for VAZ 2112, 16 valves, where it is located, VAZ 2109. Windshield wiper circuit. The valve stem seals on the Priora are new. It looks like you can run. One piece of advice, though. Replacing the timing belt on an 8-valve self-supporting engine pipe is practically no different from replacing the internal intake valve in version 16. Just in case, it is better to make 2-3 revolutions of the crankshaft manually. First, you will be sure that the timestamps are set correctly. And secondly, the belt itself will fit tightly after installation.
Well, now you can run it.
Useful video about Priori valve seals that require replacement by a specialist:
Source
Which valve stem seals should I buy?
What is definitely worth taking on is the issue of selecting MSCs. Why? There are many fakes and quality problems with many official products.
Recently, Corteco products have been performing well. Many note that this is the only alternative to the original. By the way, not a single car manufacturer makes valve seals in its own production - they buy everything. For example, Toyota has an agreement with NOK, and Mercedes-Benz has an agreement with Viktor Reinz.