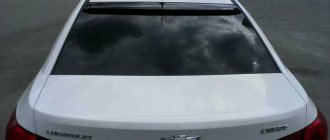
A function such as heated rear window is by no means new on domestic VAZs. This option is available on all modern Volga-made cars, including “tens” and “nines”. Heated rear window is useful not only in winter, but also in summer (in particular, when it rains heavily). Clean glass is the key to your safety. After all, the visibility of the car thanks to the interior mirror increases by a third. Sometimes this system fails. The VAZ-2110 is no exception. Rear window heating not working? What to do and what are the reasons? You will find out the answers to these questions in our article today.
Device
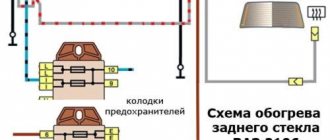
First, let's get acquainted with the structure of this system.
It includes the following elements:
- The thread that provides heating.
- Wiring (positive and negative).
- System switch. Equipped with a warning light inside.
- Heating relay.
- Fuse.
- Control buttons.
This system works very simply. There is a conductive thread on the rear window. It warms up when power is applied. This way the glass is heated and condensation is removed from the inside.
Why does the rear window heating not work on a VAZ-2110 car? The reasons may be trivial. After all, the device has no mechanical parts. Therefore, all you need for diagnostics is a multimeter and a test lamp. This is the only way to find out why the heated rear window of the VAZ-2110 does not work. There is a photo of the diagram in our article.
Below we will look at the main elements to check.
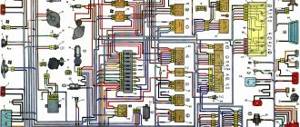
Pinout of mounting block 2108
Here is a new type mounting block. The old-style block generally has the same circuit, but some contacts (less than 5%) may not match.
Schematic electrical diagram of the LADA Samara mounting block (VAZ-21099 with VAZ-2114 panel).
Numbering of terminals in connecting blocks, color of wires and electrical circuits connected to them.
| Connector | Contact | Wire color | Purpose |
| X1 (Ш1) | 1 | B | window lifters |
| 2 | G | ignition switch (cl. 15/2) | |
| 3 | GP | ignition switch (terminal 15) | |
| 4 | ZhG | heater motor switch | |
| 5 | R | ignition switch (cl. 30/1) | |
| 6 | KR | ignition switch (terminal 30) | |
| 7 | door lock | ||
| 8 | P | ignition switch (terminal 50) | |
| X2 (Ш2) | 1 | BG | rear window wiper switch |
| 2 | G | Turn signal switch (right) | |
| 3 | RP | brake light switch | |
| 4 | B | lamp continuity indicator | |
| 5 | IF | hazard warning switch | |
| 6 | GB | left front door | |
| 7 | ABOUT | rear fog light switch | |
| 8 | 34 | high beam warning lamp | |
| 9 | — | ||
| 10 | 4 | rear fog light switch | |
| 11 | sch | fuel reserve warning lamp | |
| 12 | IF | fuel level warning lamp | |
| 13 | Warhead | interior lamp | |
| 14 | KG | hand brake warning lamp | |
| 15 | hh | Turn signal switch (left) | |
| 16 | electric motor for headlight cleaner | ||
| 17 | — | ||
| X3 (Ш3) | 1 | and | speed sensor |
| 2 | emergency | hazard warning switch | |
| 3 | GP | direction indicator switch | |
| 4 | SB | oil level warning lamp | |
| 5 | H | weight | |
| 6 | RB | washer fluid level warning lamp | |
| 7 | RO | brake lining wear warning lamp | |
| 8 | 3 in | headlight switch | |
| 9 | ZhZ | windshield wiper switch | |
| 10 | PG | portable lamp connection socket | |
| 11 | ignition switch (terminal 15) | ||
| 12 | RF | rear window washer switch | |
| 13 | |||
| 14 | and | fog light warning lamp | |
| 15 | |||
| 16 | SG | oil pressure indicator | |
| 17 | |||
| 18 | R | wiper switch | |
| 19 | CO | wiper switch | |
| 20 | WITH | wiper switch | |
| 21 | ABOUT | rear fog light switch | |
| X4 (Ш4) | 1 | Salary | On and indicator lamp for heated rear window |
| 2 | GB | headlight switch (high beam) | |
| 3 | ABOUT | wiper | |
| 4 | Warhead | outdoor lighting switch | |
| 5 | TO | Instrument lighting rheostat | |
| 6 | R | battery | |
| 7 | BW | windshield wiper and washer switch | |
| 8 | ABOUT | block Ш4 of the mounting block terminal 3 | |
| 9 | midrange | horn switch | |
| 10 | BP | brake light switch | |
| 11 | R | battery | |
| 12 | JV | headlight switch (low beam) | |
| 13 | warning light | ||
| 14 | — | ||
| 15 | — | ||
| 16 | RG | brake fluid level warning lamp | |
| 17 | ZB | coolant temperature gauge | |
| 18 | KB | battery charge indicator lamp | |
| 19 | ZhCh | fog light switch | |
| 20 | RZ | coolant level warning lamp | |
| 21 | AND | tachometer | |
| X5 (W5) | 1 | 3 | high beam (right) |
| 2 | 3H | high beam (left) | |
| 3 | midrange | low beam (left) | |
| 4 | P | starter (cl. 50) | |
| 5 | PB | electric radiator cooling fan | |
| 6 | WITH | low beam (right) | |
| X6 (Ш6) | 1 | — | |
| 2 | 3 | reverse light switch | |
| 3 | MS | Turn signal (left front) | |
| 4 | — | ||
| 5 | — | ||
| 6 | — | ||
| 7 | — | ||
| 8 | ZhCh | side light (right front) | |
| 9 | Warhead | electric fan thermostat | |
| 10 | ZhCh | side light (left front) | |
| 11 | G | Turn signal (right front) | |
| 12 | reverse light switch | ||
| 13 | RG | brake fluid level sensor | |
| X7 (W7) | 1 | — | |
| 2 | ZhG | electric motor for headlight cleaner | |
| 3 | B | electric motor for headlight cleaner | |
| 4 | — | ||
| 5 | SB | oil level sensor | |
| 6 | midrange | sound signals | |
| 7 | WITH | speed sensor | |
| 8 | ZB | coolant temperature sensor | |
| 9 | KB | generator (cl. 61) | |
| 10 | R | windshield washer pump | |
| 11 | Warhead | engine compartment lamp switch | |
| 12 | RB | washer fluid level sensor | |
| 13 | RF | brake linings | |
| 14 | — | ||
| 15 | KP | tachometer | |
| 16 | RZ | coolant level sensor | |
| 17 | reinforced concrete | fog light relay | |
| X8 (W8) | 1 | ZhP | fog light relay |
| 2 | ZhCh | fog lamp (left) | |
| 3 | AND | fog lamp (right) | |
| 4 | GP | ignition coil | |
| 5 | R | generator (cl. 30) | |
| 6 | R | generator (cl. 30) | |
| 7 | — | ||
| S | RF | fog light relay | |
| X9 (W9) | 1 | RF | electric motor rear window wiper |
| 2 | G | Turn signal (right rear) | |
| 3 | BG | electric motor rear window wiper | |
| 4 | VERY | rear fog lights | |
| 5 | midrange | back door | |
| 6 | IF | front right door | |
| 7 | Warhead | interior lamp | |
| 8 | KG | handbrake sensor | |
| 9 | Warhead | open door alarm buttons | |
| 10 | rear window heating elements | ||
| 11 | WITH | license plate light | |
| 12 | GB | front left door | |
| 13 | B | interior lamp | |
| 14 | P | brake lights | |
| 15 | AND | side light (right rear) | |
| 16 | 3 | reversing light | |
| 17 | ZhCh | side light (left rear) | |
| 18 | ZhG | rear window cleaner | |
| 19 | rear window heating elements | ||
| X11 (W11) | 1 | AND | pump |
| 2 | RF | rear window washer valve | |
| 3 | — | ||
| 4 | AND | pump | |
| 5 | Warhead | engine compartment lamp | |
| 6 | — | ||
| 7 | — | ||
| 8 | CC | engine compartment lamp | |
| 9 | B | electric windshield wiper motor | |
| 10 | windshield wiper motor | ||
| 11 | — | ||
| 12 | CO | emergency oil pressure sensor | |
| 13 | — | ||
| 14 | R | windshield washer valve | |
| 15 | CO | electric wiper motor | |
| 16 | WITH | electric windshield wiper motor | |
| 17 | reinforced concrete | electric windshield wiper motor | |
| 18 | — | ||
| 19 | — |
Useful: VAZ cooling fan connection diagram
Relay
The most common reason why the rear window heating does not work on a VAZ-2110 car is the relay. Over time, it burns out and stops passing current normally. How to check this element for serviceability? You will need a multimeter. But first we check whether the relay is emitting signs of life. We turn on the heating button and listen to its operation. A working relay should make a characteristic click. If it is not there, we continue to search for the problem deeper. We pull the relay out of the mounting location and apply the probe of the device to one of the contacts. The second wire goes to ground (that is, to a bare area of the body). If the device shows “zero”, most likely the element needs to be replaced. It is because of the relay that the rear window heating does not work well. The VAZ-2110 is equipped with an element of the “K6” brand. It can be bought at any car store for a price of no more than two hundred rubles.
If you don't have a multimeter, you can use a test lamp. It is important that it is 12 volts. We connect one wire to the “plus” of the relay. The second one is connected to ground. If the lamp does not light, then the relay is faulty. But contacts can also burn out, due to which the voltage will not be fully supplied. The light bulb will not be able to determine this. For more accurate diagnostics, experts recommend using a multimeter.
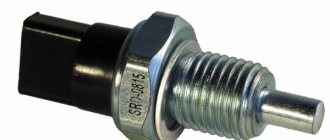
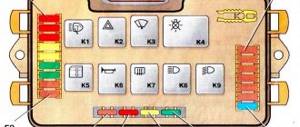
Fuse
If your rear window heating does not work, your VAZ-2110 should be checked for a blown fuse. In the mounting block, check the elements in connector F8 (usually they are rated at 20 amperes). If the fuse looks like the one in the photo below, it needs to be replaced.
For the future, experienced car owners advise carrying a spare set in the glove compartment. After all, if the fuse for the fuel pump burns out (especially while on the road), then the car will not be able to start at all.
What is the reason for this phenomenon? Most often this happens due to a short circuit. At one point, the voltage on the on-board network increased above normal. To prevent the contacts from melting, the system is simply turned off by breaking the connecting elements. In this case, this is +12 V power and conductive elements on the rear window.
Heated rear window
Home / Repair and operation manual for VAZ 2110/2112/2111 / Rear window heating system
Rice. 7-44. Diagram of the door lock system:
1
— mounting block;
8
A
fuse 3 - control unit; 4
— gear motor for locking the lock of the right front door;
5 — gear motor for locking the right rear door; 6
— gear motor for locking the left rear door lock;
7
— gear motor for locking the left front door lock; A - to power supplies; B - diagram of conditional numbering of plugs in the control unit block; C - scheme for the conditional numbering of plugs in the blocks of geared motors for locking locks
doors. It is installed on the trunk lid to the left of the lock drive.
If the electric drive of the lock fails, it is necessary to check the fuse F15, the switch, the wires, and the reliability of the connection to ground of the black wire of the gearmotor. A faulty gear motor cannot be repaired and must be replaced with a new one.
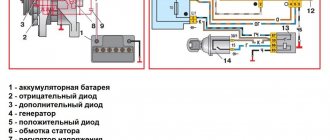
COOLING FAN MOTOR
To drive the fan of the engine cooling system, a DC electric motor with excitation from permanent magnets of the ME-272 type is used. The electric motor connection diagram is shown in Fig. 7-46.
The electric motor is turned on by a sensor type 9030330, which is screwed into the right radiator tank. The sensor contact closing temperature is (99+2)° C, and the opening temperature is (94±2)° C.
Rice. 7-45. Trunk lock connection diagram: 1
— mounting block; 2 — trunk lock switch; 3 — trunk lock motor;
A - to power supplies; B - the order of conditional numbering of plugs in the gear motor block
On vehicles equipped with a fuel injection system, the electric motor is switched on by the injection system controller. In this case, the sensor is not installed in the radiator.
The electric motor does not require maintenance and in case of malfunction must be replaced with a new one.
Motor test data
Rated shaft rotation speed when the electric motor is loaded with an impeller, min-1…..2500-2800
Current consumption at the specified load and rotation speed, no more than, A…………………..15.3
AUTOMATIC HEATER CONTROL SYSTEM
Device Features
The system is designed to ensure the desired temperature in the vehicle interior. The control unit of the system is controller 3 (Fig. 7-47) type 13.3854, which has two control handles. The left handle (temperature sensor) sets the desired temperature in the cabin (range from 16 to 30 ° C), and the right handle sets the fan operating mode: 0 - fan off, I - medium fan speed, II - low fan speed, A - automatic fan control. Between the control handles there is a button to turn off the controller. The addresses of the controller output plugs are given in table. 7-7.
The controller receives information from:
— sensor 6 of the air temperature in the cabin (a small fan is built into the sensor);
— shaft position sensor of the micromotor reducer 9 of the heater damper drive, i.e. information about the position of the heater damper.
Based on the information received and the set air temperature, the controller controls the position of the heater damper, sending appropriate signals to the micromotor gearbox of the damper drive.
If the fan operating mode switch handle is in position A, then the controller also controls the fan speed depending on the difference in the air temperature in the cabin and the temperature set point.
To quickly warm up the air in the cabin, use recirculation valve 8 with switch 7. When the valve is turned on, the flow of outside air into the cabin is blocked and only cabin air circulates through the heater.
Heater fan
electric motor
1 is used as
Rice. 7-46. Connection diagram for the electric motor of the engine cooling system fan: 1
— fan electric motor;
2 — electric motor switching sensor; 3 — mounting block; A - to power supplies See also: Control devices →
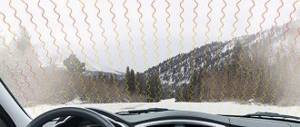
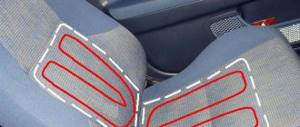
Damage to the heating filament
For what other reasons does the rear window heating not work? VAZ-2110 is equipped with special threads. A break can happen here too. The threads are a small layer of conductive substance.
It is easily damaged by the slightest mechanical impact (even with such harmless actions as removing tint). You can determine the location of the damage using a magnifying glass. It is advisable to carry out diagnostics during daylight hours. Damage to the threads is one of the obvious reasons why the rear window heating partially does not work on the VAZ-2110.
Comments and reviews
Ignition circuit and engine control system We provide control circuits for the following internal combustion engines: - January 5. VAZ engine control system and
VAZ Tarzan. It’s good that the cooperation of car enthusiasts and their timely tips help save time, money and nerves when the car needs repairs.
VAZ Tarzan.
You need to check whether the battery terminals are tightly connected and whether they are oxidized. Turn signals Turn signal lamps 1, 5 and 6 are activated by switch 7. If independent repair or tuning concerns the car’s electrical system, then you cannot do without diagrams of such equipment. On x with engines there is a wiring harness for the fuel injection system, installed instead of the engine ignition system harness, see.
Actuators, central locking unit and one limit switch It would seem that everything is simple here.
High beam indicator lamp F14 10 Left fog lamp F15 20 Electric seat heating. Fuse diagram for VAZ 2110, 2111, 2112 - instructions
How to repair the conductive layer? Method No. 1
You can do this yourself. To do this, you do not need to dismantle the glass. All you need is to purchase a special conductive paste (available in auto stores or on the market) and apply it to the damaged area. It is important to prepare it carefully. To do this, carefully clean the varnish from the surface and degrease the area with alcohol (use a piece of soft rag). Next, we clean the ends of the damaged threads. We apply adhesive tape or electrical tape to its upper and lower parts so that there is a small gap (no wider than the thread itself). We apply a special adhesive into it. After a day, the composition will completely dry out. Next, you can remove the remaining tape and check the system for functionality. If the heating works only partially, it means that the break occurred in several places. Find the second place where the thread is damaged and treat it with a conductive compound using a similar principle. That's all. We will also consider the old-fashioned method of repairing threads.
Method number 2
This method involves the use of non-ferrous metal shavings as a conductive element. Also, to repair the thread, we will need a transparent varnish (it is advisable to use a thick one, like for nails).
Mix the shavings with a brush and apply to a strip previously sealed with tape, as in the previous case. After an hour, the varnish will completely dry. The method is quite old. It is not always possible to connect damaged contacts as needed. Therefore, if it is possible to buy conductive glue, it is better to use the first method. It will be much faster, easier and more reliable. The cost of a 10-gram tube with this composition is 78 rubles. This volume is more than enough to repair several damaged heating threads.