10/30/2020 1,016 Alarms
Author: Victor
Programming of the Tomahawk 9010, 9020 and other key fobs is done using a personal password, a button to enter the service mode and standard buttons on the remote control. Depending on the system model, the combination of controls will be different, usually this is the simultaneous pressing of buttons with indicators of an open trunk and a crossed out horn. The binding of additional communicators occurs in a similar way.
[Hide]
The principle of registering key fobs
Key fob programming is necessary in alarms without a dialogue code to synchronize the “floating” code. In such systems, to control the central unit, only one code message is used, encrypted using a constant algorithm, but with a key changing according to a certain law. Therefore, you have to write down the key fob both when you buy a new one, which is not initially synchronized with the alarm system, and when the regular ones have problems with communication. It is not for nothing that the operating instructions usually warn that you cannot repeatedly press the key fob buttons outside the communication zone with the car - the encryption key “goes” further according to a given algorithm, although from the point of view of the central unit it should not yet change. This explanation is quite schematic, but it makes it clear the principle of communication in such systems and the loss of control, which is easily corrected by re-registering a set of key fobs.
We especially note that an attempt to bind the Tomahawk key fob (and other alarm systems) one by one will lead to the fact that the remaining key fobs will no longer be perceived by the alarm system. The fact is that at the beginning of the programming procedure, for security reasons, the data on previously registered key fobs is erased; this does not make it possible to “additionally register” an additional key fob in secret from the owner, without having access to the standard ones. And therefore, all alarms have a Valet mode, which allows you to give the car for service without the need to transfer key fobs.
How to attach a key fob Tomahawk TZ-9030, TZ-9031, Z-5, 9.3, 9.7, G-9000, 7.1, 8.1
These systems have a different operating procedure; they should not be confused with those previously described, despite the external similarity. The difference begins from the moment you enter the programming mode: here you need to turn on the ignition when the alarm is disarmed, do not hold down the Override button, but quickly press it 7 times. After the appropriate number of confirmation signals from the siren, you need to hold down the arming and disarming buttons on each of the key fobs being registered - for the main one in the Tomahawk TZ series they are on the front side, for the additional one in the top row. For the Tomahawk Z-5 alarm they are the first in the general row on both key fobs.
Settings Features
In order for the alarm to work correctly, you need to adjust the sensors before setting up:
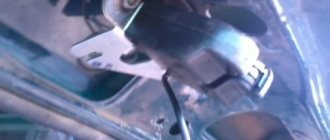
- First, find a sensor already installed in the cabin (as a rule, the device is located under the front panel).
- Disarm the alarm system. Only after this is access to programming available.
- The sensitivity scale has only a few levels, from 0 to 10. If the factory settings are installed, the indicator is at the fourth or fifth level.
- The degree of sensor perception should be increased gradually. As rugelization progresses, it is necessary to check how and at what levels the devices operate.
How to set up and reprogram the key fob
In accordance with the technical manual, the communicator is configured as follows:
- A working battery is installed in the key fob.
- The key is placed in the lock and the ignition system is turned on.
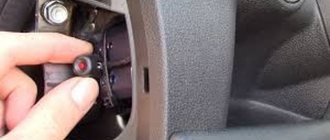
- The Jack button is pressed and held. The user needs to know in advance where this element is located (usually installers disguise it by wrapping it with electrical tape).
- If the security complex has entered the binding and configuration menu, the siren should emit four beeps.
- The service mode button is released.
- On the communicator, the keys with two locks and a key are pressed simultaneously. If the siren sounds with a single signal, this indicates successful pairing of the remote control. To exit the setup menu, the user must take no action for six seconds.
How to set up autorun
Features of setting the engine to warm up automatically on command:
- On the remote control you need to “click” on the key with the key icon.
- If the engine starts without failure, the siren will emit a triple beep and the external lighting devices will blink three times.
- An icon with the inscription “SE” will appear on the remote control screen, as well as an indicator of smoke from the exhaust pipe.
The nuances of setting up autorun by time:
- In order for the motor to start at timed intervals, according to the timer, you must simultaneously press the buttons of the crossed out horn and the key. These keys on the remote control are held for several seconds until the alarm sounds. Successful activation of the option is accompanied by the appearance of an alarm clock icon on the key fob.
- The start of the power unit will be carried out daily at the time when the user started.
- If you need to set up the timer, then within five seconds after turning on the option you need to press one of the remote control buttons. If the start is made every hour, the key with the lock “clicks”, 2 hours - with the key, 4 hours - with the trunk open. To start the motor at a time interval of 12 hours, press the button with an indicator in the form of a crossed out horn.
- If you want to disable the option, press the keys with the crossed out loudspeaker and the key at the same time.
The start of the power unit based on temperature is as follows:
- The option is activated by simultaneously pressing the buttons with the open luggage compartment and the key. The parking lights or hazard warning lights should blink once, and the siren will also sound once. If the start is successful, an indicator in the form of a thermometer will appear on the key fob, and the start temperature will also be displayed. The communicator must also play a melody.
- Using the key fob keys, you can set the starting temperature; it can range from -5 to -30 degrees.
- To disable the option, you need to press and hold the key and trunk open buttons. The car's headlights will blink twice.
Video: setting up autorun on Tomahawk 9010
User Olzhas Zhaylaubay made a video in which he clearly showed the process of setting up automatic engine start on a car with the Tomahawk anti-theft system.
How to reset to factory settings
Good to know
Resetting or returning to factory settings will eliminate some software problems in the operation of the Tomahawk 9010 alarm system.
More information on how to reset Tomahawk 9010 to factory settings:
- The car's ignition system turns on.
- The emergency alarm maintenance button is pressed 10 times.
- The ignition system in the car is turned off. The siren should sound ten times.
- To reset and reset the parameters, the emergency mode button is “clicked” once.
- On the communicator, press the button with the icon in the form of a key.
- The ignition is turned on. The exterior lights should flash five times.
Emergency shutdown
To emergency deactivate the security system, perform the following actions:
- The car's ignition system turns on. The siren and hazard warning lights will turn on as the alarm mode is activated.
- The service mode button is pressed 4 times.
- The ignition is turned off. If deactivation is successful, the lights will blink twice.
Tomahawk Z-1 Programming
It would seem that all Tomahawk systems only have two options when linking key fobs. But Tomahawk Z-1 has its own algorithm. Just like with other alarms, first you need to disarm the car and turn on the ignition. But then the Override button is pressed eight times, the ignition is turned off, and the alarm confirms entry into the programming mode with eight siren signals, accompanied by flashes of the headlights or turn signals, depending on the connection of the central unit.
Next, you can register not 4, but up to 6 key fobs, while on each one, only one arming button is pressed in turn - it must be kept pressed until the siren gives a confirmation signal.
Having registered the necessary key fobs one by one, to exit the programming mode, you need to turn on the ignition.
Video: Linking the new TOMAHAWK TW-9030 key fob
The most common malfunctions and their elimination
List of the main causes of breakdowns and errors due to which a car anti-theft installation stops working correctly:
- mechanical problems with the remote control - clogged or damaged contacts, board failure due to falling into water;
- low battery in the communicator;
- the vehicle enters an area of serious electromagnetic interference;
- lack of normal conditions for transmitting remote signals between the microprocessor module and the key fob;
- wear and tear of structural components of the security complex;
- loss of synchronization between the vehicle and the remote control.
Communicator malfunction
Repair manual for a faulty key fob for controlling the Tomahawk 9010 alarm model:
- First, you need to turn off the remote control; to do this, you need to remove the back cover of the device and remove the battery.
- The next step is to disassemble the communicator. Parts of the device are fixed using self-tapping screws, which need to be unscrewed with a Phillips screwdriver. The fastening elements can be located either on the back cover or in a special compartment under the battery, it all depends on the year of manufacture and model - TW or TZ.
- The two parts of the case are carefully separated from each other.
- The display is removed from the device. If the screen is damaged, it is immediately replaced with a new one. It is almost impossible to find a separate display for sale, so it is recommended to monitor the secondary market. You can purchase a non-working key fob and use its parts to repair your communicator.
- The buttons for remote control of the alarm are carefully removed. If they are damaged or the key guides are broken, the elements are replaced. Parts can be found in the same way as with the remote control.
- The contacts connecting the buttons, display and antenna to the working board are diagnosed. If there is damage, they are re-soldered; this will require a soldering iron with tin and rosin. You must act carefully so as not to flood the circuit components.
- At the next stage, the driver needs to check the integrity of the board itself. If this element is damaged, there is no point in repairing it; a complete replacement will be required. If there are traces of oxidation, clean the circuit using a dry cloth and alcohol. You cannot fill the board with liquid, as this will lead to its complete failure.
- The circuit is checked for traces of mold. If the remote control has been dropped into water or exposed to moisture for a long time, it must be dried. It is not recommended to use a stove burner, open fire sources or a household hair dryer for this purpose. You should place the board in a dry and warm place for several hours, for example, next to the battery, but not in direct sunlight.
- The capacitors and contact tracks on the circuit itself are checked. If the capacitor elements are swollen, they are soldered to similar ones. If you have no experience in performing such tasks, it is recommended to entrust this procedure to a specialist.
- At the final stage, the components are assembled in the reverse order. If the control unit still does not receive signals from the remote control, it will need to be replaced.
Video: repairing the display on the 9010 remote control
The “NEKettle” channel filmed the process of repairing the communicator screen from the Tomahawk 9010 alarm system.
The battery has failed
It is important to know
The main sign of battery failure is a gradual decrease in screen brightness.
Troubleshoot battery problems as follows:
- The back cover of the communicator is being dismantled.
- The battery is removed from the device; if necessary, you can use a flat-tip screwdriver.
- On the remote control, press the button to open the trunk door.
- A new battery is being installed, and polarity must be taken into account. To replace cells, the manufacturer advises using only AAA alkaline batteries.
- The back cover of the device closes.
- On the remote control you press a button with an indicator in the form of an open luggage compartment.
Being in a radio interference zone
If the configured alarm functions are not performed or the anti-theft system responds inconsistently to commands, the problem may be interference from:
- large shopping centers, hypermarkets and supermarkets;
- collection vehicles;
- industrial companies and enterprises;
- airports;
- sensitive objects;
- transformer substations;
- large parking lots with cars.
To fix the problem, the user needs to do the following:
- Take the communicator and bring it as close as possible to the transceiver installed in the car. Typically, transceivers are located in the windshield area.
- Press the security mode disable button on the key fob.
- If these steps do not help, then they must be repeated again after a few minutes. In order not to encounter such a problem again, you need to move the vehicle away from the interference zone by 100-200 meters.
If the security mode does not turn off, you can resort to the emergency deactivation method using the “Valet” key.
No conditions for wave transmission
The problem of lack of conditions for wave transmission usually manifests itself in the cold season. At low subzero temperatures, the battery voltage may not be sufficient to carry out commands. In particular, an anti-theft system installed on a car will not be able to open door locks or perform the function of automatically starting the engine. The only solution is to replace the battery or restore its functionality by recharging.
Wear and tear of the security system
It is important to know
To repair the alarm system if you suspect wear of the security system, you need to check the integrity of all components and replace damaged parts.
Items that need to be diagnosed:
- Control block. It is necessary to check its connection to the wiring. If the connection is broken, it must be restored by cleaning and repairing contacts, as well as replacing cables. The reason may be the effect of moisture on the device, then you can fix the problem in the same way as in the case of the remote control. You will need to disassemble the module and dry its working circuit.
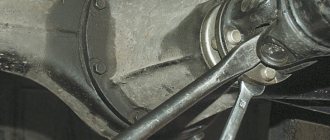
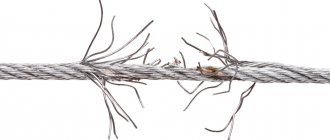
- Transceiver with built-in antenna. Most often, the wire wears out at the bend in the connector connecting to the device. A detailed diagnosis of the connection quality and replacement of the cable or connector if necessary is required.
- Circuit breakers. Depending on the installation method, there may be several of them. Safety elements are located on the electrical circuits connecting the siren and additional relays. Damaged parts must be replaced.
- Shock and sensitivity sensor. Most often, the element fails as a result of vibration, since it is installed on the partition between the passenger compartment and the engine compartment. It is necessary to check the quality of the controller connection and the integrity of its wires; the latter are replaced if damaged. The cause of the problem may be that the configured sensor is not adjusted correctly, in which case the user should change the sensitivity level.
- Siren. This device is located in an aggressive environment - under the hood of a car. Because of this, its malfunction may be associated with oxidation of the contacts or their damage. If the siren was installed with the horn facing up, this could lead to moisture accumulation inside the horn. To eliminate this, you will need to deploy the device.
Problems synchronizing the remote control with the car
Loss of synchronization between the remote control and the car can occur when the battery is disconnected or after replacing the battery in the key fob. To solve the problem, you will need to re-link the key fob to the anti-theft system.
Video: control unit repair
The Pavel Kalinin Autodiagnostics channel clearly showed the procedure for restoring the alarm control module.
Reprogramming non-working key fobs
Often an attempt to re-register key fobs is needed because the car refuses to disarm. But without disarming the system, you cannot enter the programming mode.
To do this, use the disarming method provided for a specific system, and only then try to register the key fob as usual. For example, on Tomahawk Z-3, TZ-7010, S-700 and others you need:
- Open the car with the key and turn on the ignition.
- Press Override the number of times corresponding to the first digit of the secret PIN code (factory value 1).
- Turn off the ignition and immediately turn it back on.
- Enter the second digit of the code, which is set to 1 by default.
- Turn off the ignition, the car will be disarmed at this moment.
On the Tomahawk Z-1, where there is no PIN code for protection, press the Override button 10 times with the ignition on and without closing the door.
After disarming the car, be sure to try to register the entire set of key fobs - this will allow you to immediately understand where the problem was.