Getting to know oil scraper rings
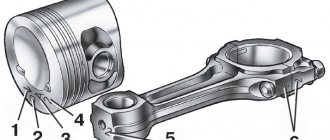
So, piston rings, which include oil scraper rings, play a huge role in the design of a vehicle. This set consists of three elements: an upper compression ring, a compression oil scraper ring and a lower oil scraper ring. Many parameters depend on their performance: acceleration power, exhaust toxicity, engine starting properties, and fuel and oil consumption. So monitoring their condition is very important.
So, the main function of such rings is to remove heat from the piston. Otherwise, various defects will appear on it - burnouts, scuffs - which will lead to incorrect operation. The part will jam in the cylinder. They also ensure the tightness of the combustion chamber, and therefore minimize the movement of gases from the cylinder to the crankcase and in the opposite direction. In addition, the lubrication of the mating elements is regulated. After all, both oil starvation and its excess lead to negative consequences. And the flow of liquid into the combustion chamber must be very limited or completely excluded.
Before talking about malfunctions, replacement and decarbonization of oil scraper rings, let’s pay a little attention to their design features. One-piece parts today have lost their popularity and have even been discontinued. Due to their increased rigidity, they cannot adhere sufficiently to the surface and remove oil thoroughly.
There are parts consisting of two and three parts. The first set includes the ring itself and a spiral spring. Their advantages include increased flexibility, which ensures a tight fit to the cylinder walls. The spring is so pressed against the inside of the ring that the structure is solid. Three-element rings consist of a spacer spring and two steel plates. They mainly found their use in gasoline engines. The advantages include the tightest possible fit around the entire perimeter.
Principle of operation
The main task of oil scraper rings is to drain oil. Excess lubricant is directed through special channels into the piston cavity and then drains into the oil pan.
There are several options for ring design:
- One-piece ones are made of cast iron with a groove along the outer diameter and grooves for oil drainage. The main disadvantage of such parts is their low elasticity and poor fit to the cylinder.
- Consisting of two parts. The main task of such an assembly is to control the amount of oil. A small part of it goes to dead spots. The design consists of the ring itself and the expander spring. The round part is made of steel or gray cast iron. There is a semicircular groove along the inner diameter for installing the expander. A radial expansion coil or leaf spring is installed. Its function is to increase the elasticity of the assembly, as well as to ensure uniform fit to the cylinder. In addition, the outer edges of the ring are chamfered. They work on the principle of a scraper - the angle improves oil removal. Additional chrome plating of the working belts of the ring increases its durability. This is true for diesel engines with their increased compression ratio.
- Set of three parts. They are most common for gasoline engines. The design consists of two steel plates and a spacer spring that expands them. It can have axial, radial and tangential expansion.
Flat chrome-plated parts up to 0.7 mm thick are independent of each other. This allows them to adhere evenly to the cylinder walls and also prevent oil from entering the combustion chamber. This increases the risk of depletion of the lubrication of the working couple of the unit. Engine manufacturers solved this issue by reducing the diameter of the compression rings.
Review of popular models of piston rings VAZ 2109 – 2115
There are many companies that produce piston rings, as well as many fakes, and there is simply not enough time to look through them all. Therefore, let's look at those manufacturers of piston rings that differ from others in normal quality and price. The first thing I want to recommend is SM piston rings.
Piston rings from SM
And
Piston rings from Mahle.
These companies produce piston rings for VAZ cars of various diameters and are perfect for us. They are most likely produced in China, because the original ones will cost much more. But this does not mean that everything is so bad, their quality is excellent. I still recommend rings from “SM”, because their price is much lower than that of “Mahle”, and the quality is the same, so why pay more and overpay for the brand.
The upper compression ring from these manufacturers is chrome-plated steel, but from the “SM” company it is copper-plated, this is clearly visible in the top photographs. The second compression ring is black and made of cast iron, but the ring from Mahle has a darker color. On the picture
The lower oil scraper rings are metal typesetting. The graphics on the left are “SM”, and on the right “Mahle”.
I recommend using metal oil scraper rings, because, unlike box-type rings, they fit perfectly in the cylinder, are resistant to overheating (they do not lose their spring properties) and their main advantage is that they work as two rings independent of each other. The rings are box-type, very afraid of overheating. When they overheat, they lose their spring properties and do their job poorly
And one more serious disadvantage: they require very careful running-in. At the slightest deviation from the running-in conditions, the working edges of the ring may break off in some places and will allow oil to pass through
Of course, there are other manufacturers of piston rings, but as usual they are complete fakes and sometimes it’s not possible to choose quality ones
Signs of piston ring wear
Blue or black smoke from the exhaust pipe indicates that wear has reached a critical stage. This indicates that excess oil entered the combustion chamber past the oil scraper ring and burned there along with the fuel. Black smoke coming out of the crankcase ventilation tube indicates that the compression rings, due to wear, allow gases to escape from the combustion chamber into its cavity.
Critical wear is accompanied by a decrease in compression (the ability to maintain pressure) in the engine cylinders. This means that some of the gases formed during the combustion of the fuel mixture, which was supposed to push the piston, broke into the crankcase without performing useful work. This is what will lead to a drop in pressure in the cylinder, therefore, the engine will lose some power. Increased oil consumption is observed.
Compression is checked with a special device - a compression meter. When the nominal pressure values are unknown (there are no operating instructions), it is first measured in a dry cylinder, then a little engine oil is poured through the spark plug hole, and the measurement is made again. If the compression increases, then the rings need to be replaced. Similar signs can be observed in the case of their “occurrence”.
“Sticking” occurs when carbon deposits formed in the piston grooves prevent the piston rings from springing, resulting in a decrease in the tightness of their contact with the cylinder surface.
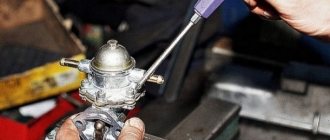
This problem, if the case is not very advanced, can be corrected with the help of special fuel additives. For an engine with a carburetor system, you can try cleaning it with a carbon remover spray that is injected directly into the carburetor. If removing carbon deposits from the combustion chamber has no effect, then there is only one way out - replacing the piston rings and cleaning the grooves.
This is interesting: Rating of autonomous and electric engine pre-heaters: which one is better to install
Instructions for correct installation of piston rings on the piston
To make it more convenient to control the process of installing the rings on the piston, it must be securely secured in a vice, this makes it easier to work and does not require outside help. Having securely secured the piston in a vice, we proceed to installation. We take a set of piston rings and select the oil scraper. It is dressed first, as it stands lower than the rest. First, the oil ring spring is installed, then the ring itself is carefully installed on the piston. It is not recommended to squeeze the oil ring too much to prevent it from bursting.
Oil ring spring
After this, we begin to install the compression rings one by one. To correctly follow the order, you should carefully look at the special marks on the rings; it indicates where the top side is.
Move the ring locks apart at 120° C relative to each other (as recommended in the instructions for installing piston rings). As in the case of the oil scraper ring, do not squeeze the compression rings too much so that they do not burst.
To ensure that the rings easily fit into the cylinder, we use a special crimping device (homemade).
The nut on the device is first loosened, then it is put on the rings and the nut is tightened. As a result, the rings are recessed into the piston grooves and easily fit into the engine cylinder. Before this procedure, it is recommended to lubricate the inside of the crimping device with machine oil so that the process of passing the rings into the cylinder goes smoothly.
The nut of the crimping device should be tightened moderately so that it rotates around the piston with little effort. Then, using a hammer, lightly tap the crimping device so that it is flush with the piston.
After this, the piston can be “released” from the vice, turned over with the yoke up, and removed (the yoke).
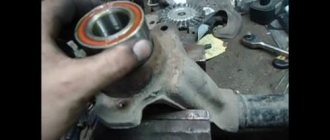
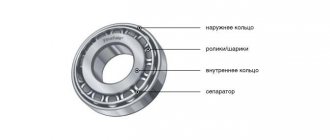
We take the connecting rod bearings, wipe them from the oil in which they are preserved, and install them on the connecting rod, while ensuring that the special marks (bulges) match correctly. The bearings with the connecting rod must be flush and not protrude at the edges.
Having thoroughly wiped the liners from the old grease in which they were stored, we lubricate them again with fresh engine oil. This will then make it easier to start the engine until the lubrication system pressure returns to normal. After this procedure, the piston with rings is ready to be installed in its rightful place.
When is it time to change rings?
There are three piston rings on the car. They are not closed rims that are located on the outer wall of the cylinder in special grooves. These parts serve to seal the combustion chamber, regulate oil flow and improve heat transfer through the cylinder wall. Two compression valves prevent gases from the combustion chamber from entering the crankcase, and an oil scraper valve removes oil from the cylinder walls and prevents it from entering the combustion chamber.
Wear of piston group parts occurs after approximately 150 thousand kilometers due to the action of gases and friction of metal parts. They need to be changed if the following symptoms are present:
- compression drop;
- increased fuel consumption;
- the appearance of bluish smoke in the exhaust gases;
- increased oil consumption.
The cause of deterioration in engine performance may be coking of the piston and stuck rings. This happens when using low-quality fuels and lubricants that do not meet the manufacturers’ recommendations. During long-term operation, carbon deposits form, which covers the combustion chamber and its parts. Piston rings covered with carbon deposits “stick” and cannot perform their functions properly. In this case, they should be changed or decarbonized.
Step-by-step replacement instructions
Piston repair work must be performed on an inspection ditch, lift or overpass.
What will you need?
To repair a VAZ 2109 engine with your own hands, you need the following tools:
- a set of keys;
- set of heads;
- funnels;
- extension cords;
- torque wrench;
- set of probes;
- mandrel for pressing products on the piston;
- hammer;
- needle file;
- new repair kit.
When purchasing piston rings for the VAZ 2109, you should take into account the material of manufacture and their width. It is better to purchase original products to avoid fakes.
- First of all, you need to dismantle the cylinder head with your own hands.
- Then you need to remove the engine oil pan.
- After rotating the crankshaft, install it so that the connecting rod mounting nuts extend as far as possible.
- After unscrewing the fastening nuts, remove the connecting rod caps.
- Using a hammer, tapping lightly, remove the piston with connecting rod from the cylinder.
- Having opened the gap with your fingers, you need to remove all three products from the groove in turn and dismantle them from the piston. Together with the oil scraper, its expander is removed.
- Using old products, you should clean the grooves from carbon deposits.
- Removed products must be checked for suitability. To do this, they must be inserted into the cylinder and the gap measured using a feeler gauge. It should be in the range of 0.25 - 0.45 mm. A gap of up to 1 mm is allowed. If the value is greater, then the part must be urgently replaced. If the gap is larger, then the product needs to be sharpened using a needle file.
- Before installing new products on VAZ 2109 pistons, they should be run in the grooves. If biting is detected, the part must be ground in using fine-grained sandpaper.
The table shows the maximum values of the gaps between the part being replaced and the groove walls.
- When installing, all parts should be thoroughly lubricated with oil.
- Installation of products begins with the oil scraper. First, the expander is installed - a special spring with a lock. Then the product itself is put on her. The expander lock and the oil scraper ring gap must be opposite each other.
- The lower compression ring has a groove and a tooth. When installed, they should be at the bottom of the part. On the upper surface there is usually an inscription “vas” or “tor”.
- The upper compression ring is installed in the same way - with the lettering facing up.
- The sequence of putting on the parts is as follows:
- first, the lock is released so that the part can easily fit onto the piston;
- then the lock itself starts;
- the remaining part is installed.
After installation on the piston, all parts need to be oriented. The installation axis of the piston pin should be 45 degrees with the lock of the upper compression ring. The lock of the next product should be at an angle of 180 degrees with respect to the previous one. Thus, the angle between the oil control valve and the upper compression valve will be 90 degrees. Then the pistons and rings are pressed out with a special mandrel and inserted into the cylinders from which they were removed. Next, we perform the reverse assembly with our own hands.
After replacement, the VAZ 2109 piston rings must be run-in. In this case, you should not load the engine, drive on roads with long ascents, and change gears correctly.
Video “Installing piston rings”
This video shows the process of installing piston parts: how to install and what to pay attention to. https://www.youtube.com/embed/MEXS-DzbEVc
If you find an error, please select a piece of text and press Ctrl+Enter.
How to properly check oil scraper rings
If you look at the operating conditions of the oil scraper rings, it immediately becomes clear how difficult it is for these parts. Often, a standard kit is enough for about 150,000 km, although some motorists claim that their cars have traveled 500 km without any replacement. Who knows, maybe this is so, because the life expectancy of these parts depends on the operating conditions of the vehicle. If the machine is forced to work almost at the limits of its capabilities, then it is clear that engine failure should be expected much earlier.
The “health” of oil scraper rings is also significantly affected by untimely oil changes, especially if the lubricant used is classified as “low-quality”. Most often, the use of such oil is manifested in the occurrence of rings. You should also monitor the condition of the air and fuel filters.
The need to replace oil scraper rings can be determined by several characteristic signs of wear. Firstly, oil consumption increases significantly, and secondly, at the beginning of movement or after short stops (for example, in traffic jams or at traffic lights), clouds of bluish smoke may appear from the exhaust pipe.
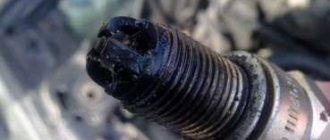
Moreover, alarming signs of wear include evaporation and oil leaks, and if the “new” fluid also darkens quickly, then it will definitely not be possible to avoid replacing the rings. It would be a good idea to check the spark plugs: in normal condition they should be clean, but if this is not the case, then most likely you will have to visit a service center or do the repairs yourself.
If any of the above signs of wear are detected, it is necessary to immediately diagnose the oil scraper rings. Performing this procedure will not take much time and does not require any special knowledge. All that is required of you is to disconnect the ventilation system hose, and if the crankcase gas pressure is increased, it means that the rings are no longer coping with their duties.
What you need to check oil scraper rings
In the case of oil scraper rings, the required set of tools is determined by the method of diagnosing these elements. If you carry out express diagnostics, that is, check the oil scraper rings “here and now,” then you will not need virtually any special tools to implement your plans. A standard set will be sufficient, including screwdrivers, vices, pliers and other elements available in the motorist’s arsenal. But if you decide to verify the malfunction of the oil scraper rings in practice, then you will additionally have to prepare a piece of a transparent tube and a transparent filter (precisely transparent, since only with its help we can see whether dirt is flying from the engine or not).
Having disconnected the crankcase gas suction tube, you should connect the filter along with a piece of hose into the gap. After a week of active driving, you will notice how oil accumulates in the filter jar, and if there really is something wrong with the oil scraper rings, then it can fill to the top in just a few days.
Why does piston ring sticking occur?
The main reason for stuck piston rings is the formation of a large amount of carbon deposits on the engine elements. There are 4 main reasons that lead to this:
- Operating a cold engine. Drivers often forget the importance of the engine warm-up procedure and decide that they can neglect it, but this is not so. Traveling 5-10 kilometers on a cold engine is especially dangerous;
- Failure of valve stem seals;
- Using low quality oil that burns out in the engine;
- Untimely replacement of oil and oil filter.
To avoid sticking of the piston rings, it is necessary to eliminate as much as possible the formation of carbon deposits on the engine elements.
Decarbonization and its meaning
During engine operation, a layer of carbon deposits forms on the piston grooves. It reduces the elasticity of the rings. This leads to even more wear.
There are several options for cleaning these places:
- Incomplete decarbonization. A mixture of kerosene and acetone is prepared in equal proportions. The spark plugs are unscrewed from the engine, then this mixture is poured into the holes. Then it takes 9 hours for the carbon deposits to dissolve. After the time has passed, the spark plugs are screwed in and the engine starts. You need to drive 15 km as usual. The oil and filter are being replaced. This procedure allows you to clean only the internal surfaces of the piston group.
- Hard decarbonization. This cleaning requires special means: First, the engine warms up to operating temperature.
- The candles are unscrewed. By turning the crankshaft, the pistons are set to the middle position.
- A special product is poured through the holes, the candles are screwed in, and rest is given until the next day.
- The candles are taken out again. The starter rotates the crankshaft to remove hard pieces of plaque.
- The candles are put in place. The engine should run for 1 hour at idle speed.
- The oil and filter are being replaced.
This is interesting: Technical inspection of Renault Logan by mileage: maintenance regulations
Decoking mixtures contain special oxidizing agents that soften carbon deposits and remove them along with the exhaust.
What is needed to replace oil scraper rings yourself?
In order to replace the rings, you will need such devices as
- puller;
- tweezers;
- a mandrel intended for pressing;
- metal rod;
- desiccant.
Purchasing parts: highlights
Before you begin the replacement process itself, you need to purchase new parts. You should buy only original oil scraper rings, the price of which is not less than 300-500 rubles, depending on the model. Why is it not recommended to purchase cheaper parts? As a rule, a low price indicates either a low-quality product or a fake. Such spare parts cannot guarantee the correct operation of the engine, so such a car simply will not travel more than several thousand kilometers. And what’s most unpleasant about this moment is that the breakdown can be much more serious and require large financial investments.
Quite often, specialists in the field of car repair specially select oil scraper rings consisting of a material that completely matches the one from which the engine itself is made. As for the remaining components (caps, etc.), they must also meet all the criteria.
Step-by-step instructions for replacing rings and valve stem seals
The decarbonization process removes small deposits. In case of severe wear, a complete replacement of all piston rings and valve stem seals is required:
- The necessary parts are selected in accordance with the make of the machine. You should give preference to original spare parts so as not to bother again later.
- The spark plugs are unscrewed, the cover is removed, and then the entire cylinder head (cylinder head). The oil is drained and the oil pan is unscrewed. Next, the connecting rod caps are unscrewed and the pistons are pulled out.
- Use a puller or a screwdriver to remove the old rings. Using old pistons, the landing grooves are cleaned. It is done carefully with an unnecessary ring. Their installation should be carried out only after connecting the piston to the connecting rod.
- Of all the piston rings, the oil scraper rings are installed first. All operations must be done by hand. On box-shaped ones with a spiral spring, the expander lock rotates 180° relative to the ring lock. For composite ones, the spring is installed first, then the lower plate and the upper one. The plate locks rotate 180° relative to each other.
- After installing the remaining rings, it is necessary to evaluate the appearance of the cylinders. In case of severe wear, boring and honing are performed.
- Place the pistons in their places, screw on the connecting rod caps and the oil pan.
Valve seals also play an important role in retaining oil. They remove excess from the valves. The caps are replaced either with or without removing the cylinder head.
- In the first case, the crankshaft is turned with a wrench until the first pair of pistons is set to the top dead center (TDC) position. This is done to keep the valve from falling into the cylinder.
- The axles of the intake and exhaust rocker arms with hydraulic compensators are removed. In many models they can fall out - nylon clamps are useful for this.
- Using a special puller, you must simultaneously compress the valve springs and remove the crackers with tweezers. They are needed to compress the spring relative to the valve axis. An assistant will come in handy here.
- After removing the worn cap, install a new one in its place. It should be remembered that they are divided into inlet and outlet.
- The crackers are installed in reverse order. Next, you should rotate the crankshaft to the TDC position of the other pair of pistons. Everything is done the same way. If you replace the caps and remove the cylinder head, you can pull out the valves and assess their condition. The resulting carbon deposits must be cleaned off.
- After installing the valves and springs in place, reinstall the rocker arm axles.
- Along the way, you can check the tension of the timing belt, and also use the marks to establish the correct ignition. This will protect the CPG from wear.
- Install the cylinder head cover. It will require a new gasket.
- Install a new filter and fill with oil.
- Connect all devices, start the engine.
Starting operation of the unit with new parts will require their grinding in. Unnatural sounds and whistles are possible. Smoke may pour out of the exhaust pipe, and the engine may stall. For the first 500 - 1000 km, you should not increase the speed much.
Replacing rings: where to start?
So, new parts have already been purchased, then you can proceed directly to the process of replacing them. The first thing that needs to be done next is dismantling all components, as well as mechanisms. This will provide full access to the necessary parts, or rather, will allow you to easily replace the oil scraper piston rings.
What is included in the dismantling work package?
- The air filter should be removed, followed by the fuel pump.
- Don't forget about the distributor in the ignition system. In order to dismantle the drive housing, it is necessary to disassemble the bolted connection.
- After this, you should remove the negative terminal from the battery, as well as the pulley (toothed) from the camshaft. At this point, part of the work can be considered successfully completed.
- Next, in order to better get to the cover located on the head of the block, it is necessary to remove the mass drive.
- The last thing you can do is unscrew the nuts that secure the camshaft bearing housings.
This is interesting: Car maintenance: daily, periodic, seasonal maintenance
Second stage of dismantling work
In order for the replacement of rings and valve stem seals to lead to proper engine operation, general diagnostics of the vehicle is necessary. As a rule, at this moment the wear of other parts and their good fit are checked. Under no circumstances should the position of the camshaft keys be ignored. If during the dismantling process it is noticed that they are not seated too tightly, then they should also be removed. This must be done to avoid loss of the part while the vehicle is moving.
After everything was done, access to the camshaft was completely opened, which must be pulled out along with the oil seal. Next, in order to remove the oil scraper rings, you should install the spare part in a position where the piston will be at TDC. Having pulled out the candle, you need to insert a rod into the resulting hole. If this is not done, the valve will easily fail.
Next, you need to use a special tool to compress the springs located on the valve and pull out the two crackers. You can get them out using tweezers. After this, using a special tool, you should press out the rings. This completes the dismantling work.
Installation process
Now let's talk about how to properly complete the installation process. This work will consist of several stages:
- First, the springs should be removed from the new parts. This must be done extremely carefully to avoid damage.
- Next, you need to coat all elements with engine oil. After this, you can press the engine itself and return the springs to their intended place.
Important: oil scraper rings are replaced in strict accordance with the sequence. The detailed removal process is described above. Be careful that the sides are where they should be. Otherwise, this may cause a sharp increase in the amount of oil consumed.
Installing new rings
For ease of work, clamp the connecting rod in a vice. We use tongs or our hands to separate the locks, and then remove the 2 compression rings. Next, we dismantle the oil scraper, as well as its expander. After removing the worn elements, we clean the seating grooves from carbon deposits. Using a set of feeler gauges, we check the gaps between the ring and the wall of the corresponding groove.
For each of the rings, permissible clearance standards are established.
| Elements | Gaps |
| upper compression | 0.04—0.075 mm; |
| lower | 0.03–0.065 mm; |
| oil scraper | 0,02–0,055. |
We begin the installation with the oil scraper ring expander. Then the oil scraper itself, then the lower compression and upper ones. After this, the rings need to be “run in” along the landing grooves. They should rotate freely in their places and not bite. If there is any biting, grind the parts using fine-grained sandpaper.
When installing, you need to be very careful with the second compression ring. It is rigid, less elastic and may break
Installation of piston rings is carried out only using pliers. The lower compression ring must be installed with the chamfer facing down. If there is an inscription “TOR” or “VAZ” on the oil scraper ring and the upper compression ring, the edge with the inscription should be on top.
When installing each of the rings, first we open the lock, put on the ring, put the lock on the piston, and lastly put it on with the back of the circle. After installation, you need to set an angle of 45 degrees between the upper compression ring lock and the piston pin axis. Relative to this lock, the lock of the lower compression ring is set to 180°. We orient the last ring with the lock at 90° from the topmost lock.
Now we mount the pistons into the sleeves strictly in the direction of the arrow pointing to the crankshaft. In this case, the inner surface of the cylinder, the piston itself and the rings are lubricated with oil. Mandrels are put on the rings, and in steps of one ring the piston is tapped into the cylinder. We put the liners on the connecting rod from below, before wiping the connecting rod bed, the cover for the liner dry and lubricating it with oil. The crankshaft connecting rod journal should also be lubricated. We mount the cover on the connecting rod and tighten the nuts with a torque wrench (torque 5 kgf/m).
Be sure to check the length of the bolts. If it is more than 135.5 mm, replace the bolts with new ones. Having replaced the rings, attach all the parts to the motor in the reverse order.
Running in the engine after replacing the piston rings
Regardless of whether the piston rings were only replaced or the engine underwent a major overhaul, the engine will require a break-in. This is due to the need to break in new parts. Running in the engine after replacing the piston rings should be similar to running in the engine of a new gasoline or diesel car.
After replacing the rings, the engine cannot be operated in heavy loaded conditions (high speeds when driving, idling, driving at low speeds in high gears, etc.) for at least 3-5 thousand km. Also, you should not start a trip without first warming up the internal combustion engine.
Next, we will consider the opinions of experienced auto mechanics and answer the general question of how long the engine needs to be run in after replacing the piston rings. It is a fairly common statement among experts that it will take about 10-15 thousand km to completely grind in the rings. This leads to the conclusion that after a minimum run-in of the car after engine overhaul or replacement of rings (up to 5 thousand km), it is highly undesirable to spin the power unit above the average speed range for another 5 or even 10 thousand km. mileage
How to repair a piston VAZ 2109
If wear in the cylinders exceeds 0.15 millimeters, the cylinders need to be bored and the pistons and rings replaced to the following repair size:
Replacement of a VAZ 2109 piston must be carried out taking into account the compliance of each piston class with a new piston ring. When choosing a ring, you need to pay attention to its markings:
- if it is absent on the parts, then the product has nominal dimensions;
- “40” - an increase of 0.4 millimeters in the diameter of the repair ring is marked;
- “80” - corresponds to the marking of an increase in size by 0.8 millimeters.
Piston repairs in a BC are performed as follows:
Cylinder wear is checked. Using a bore gauge, the diameter of the cylinder is measured in two directions—longitudinal and transverse—in four zones.
Measuring cylinder diameter with a bore gauge
In the area of the first belt there is practically no wear on the cylinder. Therefore, the amount of wear in the remaining belts of the part can be determined by the difference in diameters between this cylinder belt and the others.
Cylinder wear control belts
- If the amount of wear is more than 0.15 millimeters, the cylinders are bored to the closest repair size. It should be taken into account that the final operation for processing the cylinder is honing. Therefore, it is necessary to leave an allowance for processing of a diameter of 0.03 millimeters.
- After the final operation, the repair size of the piston and the diameter of the cylinder differed in the range of 0.025 - 0.045 millimeters.
- A new piston is installed.
Tip: The caps on the connecting rod are not interchangeable. The connecting rod cover and the part indicate the number of the cylinder where the connecting rod can be installed. When replacing a VAZ 2109 piston, the numbers on the connecting rod should be located on one side.
- In the same way, all remaining pistons on the VAZ 2109 are replaced.
- The engine is assembled in the reverse order of disassembly after the last piston is installed.
The replacement of VAZ 2109 pistons is well shown in the video.
How to properly break in an engine after replacing a piston
Proper running-in of the car is of great importance after the entire piston engine on the VAZ 2109 has been replaced. This must be treated very carefully, as well as repairs
Particular attention should be paid to those units in which the parts are connected to each other by friction, and the efficiency depends on the optimal clearances with which they should be adjacent to each other. So:
- The speed of the car, after installing new pistons, should not exceed more than 60 kilometers in one hour per 1000 kilometers. This is necessary for grinding in parts that rub against each other.
- The main purpose of running in is to smooth out all micro-irregularities. This occurs by friction between the parts until their complete fit is ensured. Increased heating of engine parts occurs when there is high friction during “grinding in.”
- This indicates that the engine should operate with gentle, minimal loads.
Compliance with all these rules, after replacing the piston on a VAZ 2109, will ensure the use of the car in good condition for a long time.