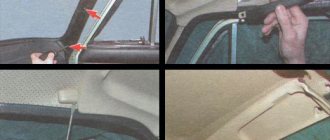
To replace the front wheel bearings on a VAZ 2106, you first need to remove the front wheels and remove the hub with the brake disc from the steering knuckle.
We take out the brake pads and remove the caliper. We hang the caliper in the wheel well so that the brake fluid supply hose is not strained.
Unscrew the hub nut and remove the washer and inner race of the outer bearing. If necessary, if the outer bearing cage is damaged along the way, we do not press out the outer ring of the bearing, but replace only its inner part. However, at the first opportunity we install a completely new bearing
Carefully, trying not to damage the cuff, remove the hub together with the brake disc from the steering knuckle axis
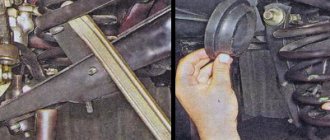
Using a 12mm wrench, unscrew the two guide pins
Remove the brake disc and spacer from the hub. We clean the internal cavity of the VAZ 2106 hub from old lubricant, wash all parts with kerosene and add fresh lubricant
To remove the outer race of the outer bearing, secure the hub in a vice. Using a beard, trying not to damage the hub, we strike along the perimeter of the outer ring of the bearing
We knock it out of the hub
We take out the hub cuff by prying it off with a screwdriver
A spacer bushing is installed under the cuff. We remove the inner bearing from the hub in the same way as the outer one.
We press the outer rings of the bearings in a vice, using the corresponding rings from old bearings. The old rings should be oriented with a smaller cone diameter inside the hub to facilitate their removal after pressing in the new rings.
Using caution, the inner races of the bearings can be pressed in with light hammer blows through the spacer.
We put about 40 g of Litol-24 lubricant in the separator of the internal bearing and the internal cavity of the hub. We cover the new cuff with the same lubricant. Install the inner bearing into the hub. We install the spacer bushing.
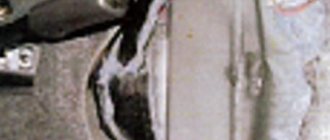
Carefully press in the new cuff using a hammer and a suitable tool (installation blade). Trying not to damage the cuff, install the hub on the steering knuckle. We lubricate and install the inner ring of the outer bearing of the VAZ 2106, the washer and tighten the hub nut. We adjust the clearance in the VAZ 2106 hub bearings and install a protective cap. Before installing it, put Litol-24 lubricant in the hub cap. Replacement of the front wheel bearings on the VAZ 2106 has been completed.
Replacing bearings and hub cuffs
To carry out this work, remove the hub from the steering knuckle.
We take out the brake pads and remove the caliper (see Replacing the front wheel brake caliper ).
We hang the caliper in the wheel well so that the brake fluid supply hose is not strained.
Unscrew the hub nut and remove the washer and inner race of the outer bearing.
If necessary, if the outer bearing cage is damaged along the way, we do not press out the outer ring of the bearing, but replace only its inner part. However, at the first opportunity we install a completely new bearing.
Carefully, trying not to damage the cuff, remove the hub together with the brake disc from the steering knuckle axis.
Using a 12mm wrench, unscrew the two guide pins and...
...remove the brake disc and spacer from the hub.
We clean the inner cavity of the hub from old lubricant, wash all parts with kerosene and add fresh lubricant.
To remove the outer race of the outer bearing, secure the hub in a vice. With a beard, trying not to damage the hub, we hit the perimeter of the outer ring of the bearing and...
...knock it out of the hub.
We take out the hub cuff by prying it off with a screwdriver.
A spacer bushing is installed under the cuff.
We remove the inner bearing from the hub in the same way as the outer one.
We press the outer rings of the bearings in a vice, using the corresponding rings from old bearings.
The old rings should be oriented with a smaller cone diameter inside the hub to facilitate their removal after pressing in the new rings.
Using caution, you can press the inner races of the bearings with light blows of a hammer through the gasket.
We put about 40 g of Litol-24 lubricant in the separator of the internal bearing and the internal cavity of the hub. We cover the new cuff with the same lubricant.
Install the inner bearing into the hub. We install the spacer bushing.
Carefully press in the new cuff using a hammer and a suitable tool (installation blade).
Trying not to damage the cuff, install the hub on the steering knuckle. Lubricate and install the inner ring of the outer bearing, the washer and tighten the hub nut. We adjust the clearance in the hub bearings (see Adjusting the clearance in the front wheel hub bearings ) and install the protective cap. Before installing it, put Litol-24 lubricant in the hub cap.
To operate a vehicle safely, its wheels must rotate without any problems. If any appear, then nuances arise in driving the vehicle that can lead to an accident. Therefore, the condition of the hubs, axle shafts and their bearings must be periodically monitored, and if problems arise, they must be corrected in a timely manner.
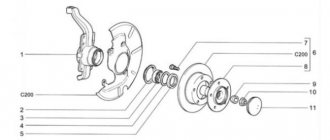
Front hub VAZ 2106
One of the important elements of the VAZ 2106 chassis is the hub. This part allows the wheel to rotate. To do this, a wheel disk is screwed onto the hub, and the rotation itself is carried out thanks to a pair of wheel bearings. The main functions assigned to the hub are:
- connection of the wheel disk with the steering knuckle;
- ensuring a high-quality stopping of the car, since the brake disc is fixed to the hub.
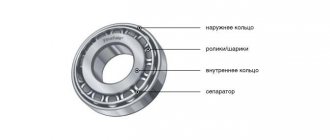
To know how hub malfunctions manifest themselves, as well as how to make repairs, you need to familiarize yourself with the structure of this element. Despite the fact that the part is designed to perform complex functions, it is structurally quite simple. The main parts of the hub are the housing and bearings. The body of the part is cast, made of durable alloy and processed on turning equipment. The hub fails quite rarely. The main malfunction of the product is the wear and tear of the outer bearing races at the installation sites.
How to replace a wheel bearing on a VAZ 2106, 2107?
We determined that it was the wheel bearing that was faulty, bought a new one and are preparing the tools for the job:
- Hammer
- Pliers
- Socket wrench set
- Impact screwdriver (that you can hit without breaking)
- Mandrel for pressing in new bearing races
- Head 27 with a large collar (for the hub nut)
Removing the wheel bearing.
First of all, remove the cap covering the hub nut. Next, we align the rolled edges of the hub nut and unscrew it.
ATTENTION: The hub nut thread on the right wheel is reversed.
We hang the wheel and unscrew the brake caliper.
You can remove the hub along with the brake disc.
We take out the ring separating the seporators.
We take out the internal and external separators and knock out their clips.
We clean the hub from old grease and dirt.
Installing a new wheel bearing.
Installation occurs in the reverse order of removal.
Carefully through the mandrel (an old clip as a last resort), we press in new clips, having previously lubricated their walls with motor oil or lithol.
Install the separating ring.
We generously lubricate the internal separator with lithol, put it in place and close it with an oil seal. We fill the hub a little less than halfway with lithol and place it on the steering knuckle.
Lubricate the outer separator and put it in place.
Now tighten the hub nut, but not all the way. We install the brake caliper and screw the wheel.
When all the old parts have been replaced with new ones, you need to adjust
Rounded fist
An equally important element of the six's chassis is the steering knuckle. Force is transmitted to it from the steering linkage through the lever, resulting in the rotation of the wheels of the front axle. In addition, ball joints (upper and lower) are attached to the assembly through the corresponding eyes. On the reverse side of the steering knuckle there is an axis on which the hub with bearings is placed. The hub element is fixed to the axle with a nut. The left trunnion uses a nut with a right-hand thread, and the right one uses a left-hand thread . This was done in order to prevent the bearings from being tightened while moving and to avoid overheating and jamming.
An additional function of the steering knuckle is to limit the rotation of the wheels, while the part rests against the levers with special protrusions.
Malfunctions
The resource of the steering knuckle is practically unlimited, if you do not take into account the quality of roads and neglect of adjusting the wheel bearings. Sometimes a product can travel 200 thousand km. The part is made of cast iron and can withstand heavy loads. However, if it fails, the owners of Zhiguli cars often replace it along with the bearings and hub. It is necessary to pay attention to the steering knuckle when the following symptoms appear:
- the car began to pull to the sides, and the problem is not eliminated by adjusting the wheel alignment;
- It was noticed that the wheels turned out at a smaller angle. The cause may be problems with both the steering knuckle and the ball joint;
- wheel break. This happens due to the breaking of the threaded part of the steering knuckle or the ball joint pin, which happens relatively often on Zhiguli cars;
- unadjustable play. If the wheel bearings were adjusted untimely or incorrectly, then in the places where they are installed, the steering knuckle axis will gradually wear out, which will lead to the appearance of play, which cannot be eliminated by adjustment.
Sometimes it happens that during car repairs a small crack is discovered on the steering knuckle. Some car enthusiasts advise fixing the problem by welding. However, it must be taken into account that safety directly depends on the condition of the steering knuckle. Therefore, such elements should not be repaired, but replaced with known good ones or new ones.
How to increase wheel turnout
Many owners of the VAZ 2106 and other “classics” are interested in the issue of increasing wheel turnout, since the model in question has a rather large turning radius, which is not always convenient. Those who are seriously involved in tuning their car simply install a set of suspension elements (levers, bipod) with changed parameters. However, such sets for the average owner of a VAZ “Six” may not be affordable, because for such pleasure you will have to pay about 6-8 thousand rubles. Therefore, other more affordable options are being considered, and they exist. You can increase the wheel inversion as follows:
- We place the car on the pit and dismantle the bipod installed on the inside of the hub.
- Since the bipods have different lengths, we cut the longer part in half, remove the part, and then weld it back together.
The described procedure allows you to increase the wheel turnout by about a third when compared with the standard position.
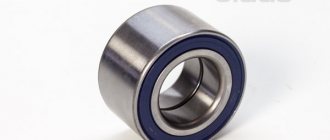
Front wheel bearing "six"
The main purpose of wheel bearings is to ensure uniform rotation of the wheels. Each hub uses two single-row roller bearings.
Table: parameters of VAZ 2106 wheel bearings
| Wheel bearing | Options | ||
| internal diameter, mm | outer diameter, mm | width, mm | |
| outer | 19.06 | 45.25 | 15.49 |
| interior | 26 | 57.15 | 17.46 |
The hub bearings last about 40–50 thousand km. When installing new parts, they are lubricated for their entire service life.
Malfunctions
A broken wheel bearing can cause an accident. Therefore, their condition must be periodically monitored and any extraneous sounds or unusual behavior of the machine must be responded to in a timely manner. If play is detected, the elements need adjustment or replacement. The main symptoms indicating problems with the wheel bearings are:
- Crunch. Due to the destruction of the separator, the rollers inside the device roll unevenly, which leads to the appearance of a metallic crunch. The part must be replaced.
- Vibration. If the bearing wears too much, vibrations are transmitted to both the body and the steering wheel. Excessive wear and tear may cause the product to jam.
- Pulling the car to the side. The malfunction is somewhat similar to incorrect wheel alignment adjustment, which is caused by the bearing getting wedged.
How to check a bearing
If you suspect that the wheel bearing on one side of your car is faulty, you should follow these steps to check its functionality:
- Raise the front wheel.
- We place a stop, for example, a stump, under the lower arm, and then lower the jack.
- We grab the wheel with both hands at the top and bottom and try to tilt it towards and away from us. If the part is working properly, then there should be no knocking or play.
Video: checking the wheel bearing on the “six”
How to adjust
If increased clearances are found in the bearings, they need to be adjusted. Tools you will need:
- jack;
- chisel;
- torque wrench;
- head at 27;
- hammer.
The sequence of adjustment actions is as follows:
- Raise the front of the car and remove the wheel.
- Using a hammer and chisel, knock the decorative cap off the hub.
It is recommended to replace the hub nut with a new one when adjusting the bearing, since the fasteners may end up in the same place and it will be impossible to lock it from turning.
Bearing replacement
During the operation of the bearings, the cage, rollers and the races themselves wear out, so the part must only be replaced. To do this, you will need the same list of tools as when adjusting the clearance in the bearings, plus you also need to prepare:
- key for 12 and 27;
- beard;
- head at 17;
- knob;
- flat screwdriver;
- Litol-24 lubricant.
We carry out the work as follows:
- Raise the front of the car and remove the wheel.
- We remove the brake pads and caliper. We fix the latter in the wheel well to prevent tension on the brake hoses.
Video: replacing the wheel bearing
Which to choose
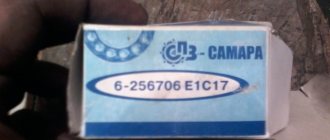
Owners of classic Zhiguli cars, sooner or later, have to deal with replacing wheel bearings and the issue of choosing a manufacturer. Today there are many companies that produce products of this type. But it is better to give preference to the following brands:
The products of these manufacturers are characterized by high quality and meet the most stringent requirements.
If we consider domestic manufacturers of bearings, then they also exist. Bearings are supplied to AvtoVAZ by:
- CJSC "LADA Image" is a supplier of original Lada wheel bearings on the secondary market;
- SPZ (Saratov Bearing Plant);
- Volzhsky Standard (Volzhsky Plant);
- VBF (Vologda Bearing Plant);
- SPZ-9 (Samara plant).
Replacing the wheel bearing on a VAZ 2101-VAZ 2107
Welcome! Wheel bearing - why do we need a bearing at all, we think you know, but for those who don’t know, in a nutshell let’s say that in order for any parts to rotate, rotate, etc., there are several types of bearings, namely plain bearings and rolling bearings (This is based on the type of friction), bearings are also classified according to where they will be used, for example, take a sliding bearing, classification “Radial” - they take radial load and are designed to work in difficult conditions, its maximum temperature can reach as much as 400 °C, and the speed of relative movement of the surfaces can be a maximum of 40 m/s,” there are also bearings classified as “Support”, “Self-aligning” and others.
Note! To replace the hub bearing, you will need to purchase: A repair kit for the hub (There will be bearings and lubricant), as well as stock up on hammers, screwdrivers and all the necessary keys, and of course, choose a free day and get to work!
Summary:
Where is the wheel bearing located? Having read the name itself, you can already understand that the bearing is connected to the hub, and so it is located in its inner part, usually when replacing this bearing, people remove the brake disc together with the hub, because separating the brake disc is only a waste of time, but changing the bearing on the installed hub will not work at all, so it will need to be removed (without removing the brake disc) and then replaced.
When should you replace a wheel bearing? When will it start to hum, but the whole point is that it is very difficult to determine when you drive a car all the time, because the bearing will start to hum strongly only when it has actually all broken down and become unusable, so checking this way is not an option to carry out more For an accurate check, you will first need to hang the wheel (First the right front, then the left, it doesn’t matter, both wheels need to be checked) and after that, turn it by hand, it should spin without any jamming and hum (extraneous sound), there should be no (Only the pads can touch the brake disc, but this sound will be completely different, you can distinguish how the bearing hums and how the pads rub), for more details on how to check it, see the video below, it will be said about this hum, and more about how to determine by rocking whether the bearing has become unusable or not yet.
Caliper
When considering the chassis of the VAZ “six”, you cannot ignore the brake caliper. This unit is mounted on the steering knuckle and holds the brake pads and brake wheel cylinders through appropriate holes, slots and grooves. There is a special hole in the caliper for the brake disc. Structurally, the product is made in the form of a monolithic steel part. When the piston of the working brake cylinder acts on the brake pad, the force is transmitted to the brake disc, which leads to the deceleration and stopping of the car. If the caliper is deformed, which is possible with a strong impact, the brake pads wear unevenly, which significantly reduces their service life.
The caliper may receive the following damage:
- appearance of cracks. Since the part is constantly exposed to loads, over time cracks appear on it due to metal fatigue. This indicates the need to replace the caliper, since it is unsuitable for restoration;
- formation of oxides on moving elements. The working cylinders gradually become covered with dirt and an oxide film, and the pistons begin to jam over time, which reduces braking efficiency. In this case, repair or replacement of the cylinders is required.
Rear wheel axle shaft of VAZ 2106
On the VAZ 2106, the rear wheels are secured using axle shafts. The part is fixed on the rear axle housing and is an integral part of it, since it is the axle shaft that transmits rotation from the gearbox to the rear wheels.
The axle shaft is a reliable part that practically does not fail. The main element that sometimes requires replacement is the bearing.
With its help, uniform rotation of the node in question is ensured during movement. Bearing failures are similar to hub elements. When a part fails, the problem is solved by replacement.
Bearing replacement
To remove the axle shaft and replace the ball bearing, you need to prepare a certain set of tools:
- knob;
- head at 17;
- hammer;
- flat screwdriver;
- chisel;
- Bulgarian;
- new axle bearing with retaining ring;
- blowtorch or gas torch.
Removing the axle shaft
We carry out dismantling in the following order:
- We lift the rear of the car from the desired side and remove the wheel, as well as the brake drum.
- To prevent grease from leaking out of the rear axle beam, lift the edge of the stocking with a jack.
- Using a 17 mm socket wrench, unscrew the axle shaft mount.
The brake pads do not interfere with the removal of the axle shaft, so there is no need to touch them.
Bearing removal
The bearing removal process consists of the following steps:
- We fix the axle shaft in a vice.
- We cut the ring with a grinder.
Bearing installation
We install the new part as follows:
- Remove the boot from the new bearing.
Video: replacing the axle bearing on a “classic”
Although hubs with bearings and axle shafts of the VAZ 2106 are reliable elements, they can still fail due to constant exposure to high loads. The problem is mainly related to the wear of bearings, which the owner of a Zhiguli can replace on his own. To work, you will need a little experience in car repair and a minimum set of tools, and in order to do everything correctly and avoid mistakes, you should first read the step-by-step instructions.
Rotation of car wheels would be difficult without the use of rolling bearings. Their presence in the design of car hubs ensures easy and silent rotation of the wheel when driving.
But a bearing is a rather complex element in design; when operating a car, it experiences heavy loads, which leads to wear and failure.
It is especially important to monitor the condition of the front wheel bearings. Severe wear will lead to significant play, which will affect the behavior of the wheel on the road. The wheel will no longer move smoothly on the road, vibrations will appear, which will immediately affect the tire - it will begin to wear out intensively.
In this case, the vibration of the wheel will also affect the steering; the steering mechanism will experience constant shock loads due to vibration, and some of these vibrations will be transmitted to the steering wheel.
Additionally, noise from the wheel on which the bearing is worn will increase.
Tool
To carry out this operation you will need the following tool.
1. Special puller for dismantling and installing bearings of both hubs on VAZ cars with front-wheel drive.
Without such a tool, removing the old and installing new bearings is hardly possible.
2. It is necessary to have a mandrel, which can be a small fragment of a metal pipe of suitable diameter. This device is useful for knocking out the hub itself.
3. A 30mm wrench head with a strong and sufficiently long wrench. You will also need a 19 and 17 socket wrench.
4. It is also necessary to have wheel chocks to prevent the car from rolling. Of course, you can’t do without a wrench that unscrews the wheel nuts.
Checking status
Checking the condition of the front wheel bearing is not that difficult. You just need to jack up the front wheel, where the bearing is supposed to be worn out. If the car is front-wheel drive, you need to set the gearbox to neutral, put chocks under the rear wheels and put the car on the handbrake. Rear-wheel drive cars use both a gearbox (1st gear is installed) and a handbrake.
You need to grab the jacked wheel with your hands at the top and bottom, and check for play with rocking movements. In a bearing in normal condition there should not be any play, not even the slightest.
Additionally, you need to spin the wheel around the axle. The wheel should rotate easily; the presence of any jamming, as well as a slight crunch or noise, will indicate that the front wheel bearing needs to be replaced.
Video: Diagnostics of the VAZ front wheel bearing.
If you have the appropriate equipment, you can make a replacement in a garage, but you must first purchase a new bearing, as well as related spare parts (hub nut, oil seal, retaining rings).
As for the bearings themselves, they differ on different cars. For example, the VAZ-2106 has two tapered roller bearings at the front, but the Chevrolet Aveo has a double-row angular contact ball bearing.
Due to the differences in these elements used, work to replace them is carried out slightly differently. Therefore, let’s look at how to replace the front wheel bearing on the above models.
What is a wheel bearing used for?
This part ensures free rotation of the wheel hub on the steering knuckle axis. Depending on the type of drive and front suspension system, the bearing can have the following modifications:
- Radial roller.
- Radial ball.
- Radial thrust conical type.
The bearing housing holds the hub and wheel on the axle, ensuring balanced rotation without play or deflection.
Replacing a VAZ-2106 wheel bearing
So, on the VAZ-2106 there was an assumption that this element of the hub was worn out. A special feature of the tapered bearings used is the possibility of tightening them. Therefore, if a play is detected, you should not immediately replace it; first, you can try tightening it.
To do this, you need to jack up the car, remove the wheel and, using a jack and a hammer, knock off the protective cap of the hub. Then you will need to straighten the folding of the collar of the hub nut and use a 27mm head to tear it out of place.
Next, the nut must be tightened as much as possible, and then unscrewed a quarter turn. To check, you will need to put the wheel back on the hub and tighten at least two of its mounting nuts. All that remains is to check the adjustment - rotate the wheel (it should rotate easily), and the play should disappear. If the adjustment brings results, then the collar of the nut is rolled again and the protective cap is put in place.
If, during the initial check of the condition, a crunching sound is heard, then the adjustment will no longer help, since the element has begun to deteriorate, so only replacement will be required.
Next, let's see how this element is replaced on a VAZ-2106. To complete the work you will need:
- socket wrenches or heads with collars at “7”, “12”, “17” and “27”;
- wheel wrench;
- pliers;
- powerful flat screwdriver;
- hammer;
- soft metal attachment;
- bench vice.
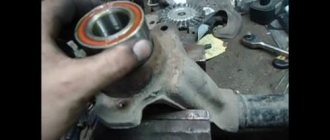
To carry out the replacement, you will have to remove the hub with the brake disc from the steering knuckle of the VAZ-2106. To do this, you will need to jack up the wheel, remove it from the car, knock off the protective cap, and flare the hub nut flange.
Then you will need to unscrew the brake caliper mounting bolts and remove it from the disc. There is no need to completely dismantle the caliper, just remove it and hang it on the strut spring so that the brake pipes are not under tension.
Afterwards you will need to unscrew the hub nut, use a screwdriver to pry and remove the thrust washer, as well as the inner race of the outer bearing.
To remove the hub, you should grab the disc well and pull it towards you. If you can’t remove it by hand, you can carefully knock it down with a hammer and a wooden pointer, but the blows should be applied not to the disk, but to the hub. The remaining work is carried out on the removed element.
First you will need to remove the inner bearing race and seal. Then use a screwdriver to remove the split spacer sleeve.
Next, the hub must be fixed in a vice so that the installation side of the outer bearing is at the top. Using a “7” or “12” socket wrench (on older models), unscrew the guide bolts, and then remove the spacer ring from the hub, and then the brake disc.
Then, using a tool and a hammer, you will need to knock out the outer rings of the bearings from the hub. This completes the disassembly.
To press in the new outer rings, you need to use a vice. In this case, use the old rings as attachments, and install wooden spacers between the attachments and jaws of the vice.
After pressing the rings, you need to fill the internal cavity with lubricant, install the inner bearing race, as well as the split ring and oil seal. Next, assembly is performed in reverse order.
Replacing the front wheel bearing of a Chevrolet Aveo
On a Chevrolet Aveo, replacement is carried out using the following equipment:
- wheel wrench;
- socket wrenches and heads with collars on “17” and “30”;
- screwdrivers (phillips, flat);
- ball joint remover;
- puller for pressing out the hub;
- special pliers for removing retaining rings;
- vice;
- hammer;
- wooden and metal attachments.
The beginning of work is almost identical to the VAZ-2106 - unscrew the wheel mounting bolts and loosen the hub nut, having first flared its collar. Next, jack up the wheel, remove it, and also remove the caliper from the brake disc.
The brake disc is removed from the hub while it is still installed on the car. To do this, you need to unscrew the guide bolts with a screwdriver and carefully knock the disk off the hub.
Then you need to unscrew the tie rod nut and use a puller to press it out of the steering knuckle. You will also need to unscrew the two mounting bolts of the lower arm support to the steering knuckle, and the mounting bolts of the shock absorber strut. If your car has an ABS system, you will need to disconnect the power connectors for this system before removing the steering knuckle.
Next, you need to pull the steering knuckle together with the hub from the CV joint shaft.
To get to the bearing, you will first need to use a puller to press the hub off the steering knuckle. Then, using special pliers, remove the retaining rings.
After this, it will be possible to press out the worn element itself with a puller. Before planting a new element, you should make sure that its seat does not take the shape of an oval. To do this, you need to inspect the old bearing.
The new bearing can be pressed in using a vice, using the old one as a guide.
Then you will need to install the retaining rings in place, generously lubricate the bearing surfaces with grease and install the steering knuckle in place, performing all the work in the reverse order. After assembly work, be sure to check the tightness of all bolts.