The main places where you can encounter a leak:
- wells (containers) of candles;
- area near the oil filter;
- crankshaft or camshaft oil seals.
Oil leakage is not just a problem of engine contamination (although this fact does not have a positive effect on the general condition of your “iron horse”). A low oil level, as is known, has an extremely negative effect on the operation of the engine, while significantly accelerating the wear of its components. We strongly recommend periodically checking the oil level using a special dipstick. This will help prevent a leak in time, as well as begin the process of identifying the problem.
One of the most common problems is oil getting into the spark plug wells. Let's look at the reasons for its occurrence, and also determine for ourselves a way to deal with the malfunction.
Reason for oil getting into spark plug wells
The roots of the problem lie in a malfunction on the valve gasket side. There may also be a problem with the spark plug well seals. In short, any source of oil ingress implies problems with the rubber gasket or sealing agent.
Often the rubber gasket may not even be used by the manufacturer. This is done in order to simplify production, as well as minimize the cost of parts. Of course, the absence of a gasket (using only sealant) negatively affects the reliability of the connections.
It should be noted that high mileage of a car does not always act as a catalyst for wear or incorrect functioning of gaskets. The problem with filling spark plug wells is quite common on cars with no mileage or with a minimum number of kilometers traveled.
causes and ways to fix the problem yourself
The quality of operation of the power unit largely depends on the performance of the spark plugs. Therefore, the appearance of problems in their operation can lead not only to incorrect operation of the motor, but also to the impossibility of starting it as a whole. What does the oil on the spark plug thread mean, the reasons for the appearance of engine fluid and what to do in such cases - read in this article.
Content
[ To uncover]
[Hide]
Causes of the problem
The appearance of oil on the spark plugs is accompanied by engine vibration during the first time after starting, as well as a bluish tint of the exhaust gases. When the engine warms up, these symptoms disappear. With such a problem, the power unit will consume more lubricant; these symptoms indicate incorrect temperature in the engine cylinders. The appearance of oily soot indicates that the heating value SZ is too high.
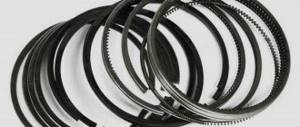
The problem may be due to wear on the oil seals, piston rings or valve liners. The pistons or cylinders could be worn out; if the crankcase ventilation system is clogged, excess lubricant will enter the combustion chamber.
The layer of soot on the SZ may vary depending on the degree of neglect of the power unit. Usually the problem lies in the valve stem seals, if carbon deposits appear on the top of the threads, and if at the bottom or on the electrode, then the piston rings are to blame. Such problems are accompanied by a decrease in engine power, an increase in gasoline consumption, difficult starting, and unstable engine idle speed.
If there is a layer of lubricant on the SZ with the remains of unburned fuel, this indicates the inoperability of the cylinder as a result of wear of the valve or the partition between the rings. In this case, the internal combustion engine will constantly triple, and gasoline consumption may double.
Sometimes it happens that a dismantled SZ has neither an electrode nor an insulator - this is a consequence:
- regular engine operation with detonation;
- use of low quality fuel;
- factory defects;
- incorrect ignition setting.
If this is the case, then the “best” option for the car owner would be if the remains of the insulator and electrode get into the exhaust system without getting stuck or remaining between the seat and the valve. Otherwise, you will have to carry out repairs or completely replace the cylinder head. To accurately identify the cause of the problem, it is necessary to measure the compression in the engine cylinders. If the situation is not advanced, perhaps decoking the piston rings will solve the problem; sometimes it is advisable to clean the crankcase ventilation system. In the worst case scenario, the engine will have to be overhauled.
How to fix the problem?
To ensure normal operation of the motor, there are several options to avoid the problem. Let's look at each of them.
Cleaning the crankcase ventilation system
The procedure is demonstrated using the example of a Lada Granta car:
- It is necessary to loosen the clamp and disconnect the crankcase ventilation system pipe from the air supply line. Disconnect the second end of the pipe from the fitting located on the cylinder head cover; the hose can then be removed. Carry out the dismantling of the small branch pipe in the same way; to do this, you need to disconnect it from the cylinder head and the fitting of the injection module. At this stage, you need to disconnect the supply pipe of the ventilation system, disconnecting it from the BC and cylinder head fittings.
- All pipes must be washed with kerosene or fuel, then blown with air and dried. It would be a good idea to clean the fitting holes.
- Remove the cylinder head cover.
- Unscrew the screws securing the oil separator device on the inside of the cylinder head cover and remove the washers. The oil separator housing must be removed.
- Then all the screens are removed from the cylinder head and must be washed with kerosene along with the cylinder head cover and the oil separating element.
- All system components are assembled in reverse order.
Engine decarbonization
For candles that are filled with oil, there are not many options for solving the problem. You can try to decarbonize the power unit, which is done as follows:
- High-voltage cables are dismantled and all protective equipment is removed. At this stage, it is advisable to remember their location. After this, unscrew the high-voltage cables from the reels.
- The consumables are drained from the motor and the drain plug is put in place. A special decarbonizing agent must be poured into the engine. The best option would be to decarbonize all cylinders of the internal combustion engine.
- After this, the SZ must be slightly tightened, this will prevent the evaporation of the product. So the car should be left for 6-12 hours, depending on what is written in the instructions for use of the cleaner. After waiting the appropriate time, unscrew the lock, but do it carefully, otherwise the cleaner, along with carbon residues, may splash throughout the engine compartment.
- Afterwards, the drain plug is unscrewed and all consumables are drained along with the remaining carbon deposits. You can pour oil into the engine and spin it on the starter for 10 seconds; this must be done without installed SZ and a connected coil. Such actions will prevent water hammer when starting the internal combustion engine. When you are sure that there is no more carbon deposits in the cylinders, the SZ must be screwed into place.
Video “Testing decarbonizers”
avtozam.com
What are the dangers of oil in spark plug wells?
You need to fix the problem as soon as you discover it. This issue cannot be delayed. Driving a vehicle with such a malfunction entails the appearance of many more serious problems. Some of them:
- weakening of insulators (in high-voltage wires, spark plugs);
- failure of spark plugs and coil;
- loss of engine power;
- periodic spark breakdowns.
In addition, minor troubles are possible: the engine may start noticeably worse. This is especially noticeable in winter.
As a result of the occurrence of the above-mentioned malfunctions, the “Check engine” indicator lights up. The car owner is forced to spend time and money diagnosing the engine, as well as resetting errors. The consequence of “flooding” the spark plug wells is accelerated wear of the high-voltage wires and the spark plugs themselves.
Consequences of oil
What could be the consequences if you do not pay attention to this in time? When operating a car with such a defect, breakdown of high-voltage wires occurs due to softening of the rubber insulator. Also, premature carbon deposits will occur on the candles, so they will not reach their service life. This leads to their frequent replacement.
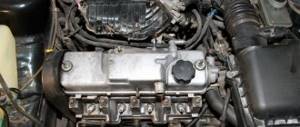
Engine designs for the VAZ-2110 are constantly being improved. Therefore, on some engines, such as 1.5 liters, guide pipes - cups - are installed. Engines with a volume of 1.6 liters are not equipped with cups; the design includes spark plug wells. You can determine this yourself:
- Unscrew the spark plug.
- Visually inspect the nest.
- If glasses are installed, then the surface is smooth up to the top of the well.
- If it is absent, two slots are visible in the well.
Engine 1.6 l
The design of 1.6 liter engines is a more modified version. On such engines, the appearance of oil in the well may be due to a poor seal. You can try to stretch it first; the nuts on the head studs may be loosened:
- To do this job you will need a #8 socket.
- Tightening must be done by alternating the nuts on the right and left sides.
Wipe the seats of all candles with a rag. Try the car in operation. Oil continues to flow into the spark plug sockets, which means it is necessary to replace the layer of sealant on the lid seal. To do this, you need to buy an anaerobic sealant from a car store:
- Park the car in the garage.
- Disconnect the negative terminal from the battery.
Prepare the tool:
- head No. 8;
- open-end wrench No. 10, No. 13;
- a screwdriver with two attachments – flat and Phillips;
- sharp knife.
The procedure for tightening work:
- Press out the plastic fastener.
- Disconnect the wiring harness connectors from the coil output.
- Unscrew the bolt that secures the coil to the cylinder head cover.
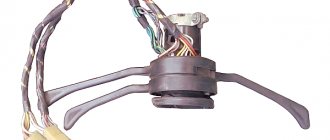
- Remove the coil from the spark plug well.
- Using the same method, disconnect the injector wire harnesses from the front bracket. Using an open-end wrench No. 10, unscrew the bolts of the front and rear brackets.
- Loosen the screws on the clamps of the crankcase ventilation exhaust hoses, from the pipes of the cover and the cylinder block.
- Take them off.
The oil level indicator (dipstick) is installed on the guide bracket, so you need to unscrew the screw that secures it.
- Remove the guide assembly with the pointer.
The intake manifold is attached to the cover with two nuts; unscrew them with a #10 open-end wrench. The manifold is attached to the block head with three No. 13 nuts and two bolts; unscrew them with an open-end wrench:
- Then remove the manifold.
- Using socket No. 8, unscrew the nuts from the cover studs.
Using a flat-head screwdriver, carefully press the cover away from the block, holding it with your hand by the protrusions around the perimeter:
- Take it off.
- Place it on the workbench.
From the inside, use a flat screwdriver to carefully remove old sealant. Moisten a rag in solvent to degrease the areas where the sealant is applied. Wipe the inner surface of the lid with a rag. Clean the surface of the block from applied old sealant and degrease it with a solvent.
Note: do not degrease with gasoline, as it contains oil additives.
After completing the cleaning work, apply a thin layer of sealant along the edge of the block:
- Place the lid.
The nuts must be screwed in the order established by the assembly technology.
1.5 l engine
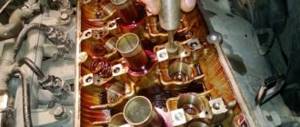
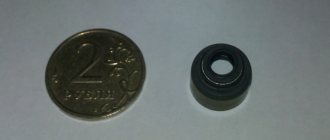
Oil in the spark plug well can accumulate due to damage to the oil seals (seals) that are installed in the wells themselves. In each well, oil seals are installed at the top and bottom of the glass (2 pcs.). It is necessary to buy oil seals after inspecting them. You need to make sure that there are no cuts, cracks, or growths on them. The rubber seal should have a glossy shine.
Replacement of spark plug well seals.
To my misfortune, I listened to people and did the decoking with Laurel.
As a result, the car began to drive better, but after a few days white smoke started pouring out. Before things got too bad, I took my Vinograd for global repairs.
I won’t describe the parsing process; everything is described in great detail in the manual.
Now I’ll tell you specifically about replacing spark plug well seals and the accompanying hemorrhoids in this process.
I bought oil seals at the car market, not the original ones, for 150 rubles. per piece (seal size 27*48*8). I tried it on the wells, they fit tightly, we will see during operation. I decided to change everything at once, although only two seals were sweating.
To do this, I purchased Reinzosil sealant, a crankcase ventilation valve (part number 11810 - 0M300, price 600 rubles), a crankcase ventilation valve gasket (part number 11812 - 41B00, price 100 rubles), a valve cover gasket (part number 13270 - 4M700, price 500 rub.) and crankcase ventilation gasket (part number 13271 - 4M501, price 150 rub.).
After all the parts were delivered to the house, the fun began.
I removed the crankcase ventilation valve with gasket and the crankcase ventilation gasket from the valve cover. The rubber bands were so stiff that at first I thought they were plastic, but they were still rubber. The valve was blown and it was concluded that he was dead. Pouted in both directions. I compared it with the new one, it only blows in one direction.
We take a screwdriver, the bit is a couple of millimeters larger than the diameter of the oil seal. I had a crown of either 50 or 52. I didn’t write it down, but now I don’t remember. From a sawn-off piece from a mop, I made a spacer into the valve cover for the oil seal, so that there would be somewhere to center it (the photo clearly shows exactly how I installed it) and began to drill out the oil sump plate. It's glued into the valve cover, so don't try to remove it. It’s also not worth chipping it off; you won’t be able to do it smoothly and without harm to the valve cover. You need to drill out carefully so as not to damage the valve cover itself.
Once you get to the oil seal, and this will be easy. Just use a screwdriver to pick out the drilled textolite and “Voila!!!!”, here they are, the oil seals. We press the screwdriver against the seal from the front side and slowly tap it and remove it one by one. I immediately clean the seats. I cleaned them with a wood cutting kit. I bought a Chinese one for 250 rubles. in a stationery store. Useful thing! The photo is exactly the same as mine.
Next, I decided to rinse a little with kerosene those areas where the crankcase gases are ventilated. There was sooo much dirt there. After all this, it's time to dry the lid. I left it in the sun to dry for two days.
The final step was degreasing the seats for the oil seals, applying sealant and that’s it!!!
After the sealant had dried, I installed everything in place the next day. I didn't forget about the valve cover gasket. I read a lot, some write that it is reusable, others write that it is disposable. I didn't bother and installed a new one. Yes, by the way, if you order a non-original valve cover gasket, then the crankcase ventilation gasket comes with it.
Well, that's all for now! What else I do next, I’ll write about it.