Danny-D › Blog › HOW TO MAKE UNWELDERS WITH YOUR OWN HANDS
What are weldings? These are wheels of increased width. The car looks more interesting and unusual on such wheels. Unwelding can be made from any disk; most often they are made from ordinary factory stamped steel disks (“stampings”). Let's figure out how to make such a disk. To make one wide disk, you will need: - a standard steel disk (stamped) - 2 pieces - an angle grinder - a welding machine - seam sealant (not necessary, read about this at the very end of the article) Let's consider the first method. We take two ordinary stamped disks and saw them off with an angle grinder or on a lathe along the red line.
We remove unnecessary residues from the second disk with a grinder
We put the remaining part of disk 1 on the rear axle hub, fix it with nuts and put on the second part. We align the second rim relative to the first, eliminate the runout, and weld it at four points at the joints.
Boiling areas are indicated in green.
And this is what came out of it:
For tubeless installation we simply need to seal the seam in the middle of the rim. This of course should be done before painting. For this purpose, we will use 3M Joint Sealant. Alternatively, it can be diluted with a Degreaser. Attention! Precisely a degreaser, and not a solvent or, God forbid, white spirit! Apply diluted sealant to the seams. Wait until it gets up, remove the excess (a chisel, sandpaper, etc.), and paint it so that it doesn’t rust and makes you happy with its appearance.
The second method is slightly different from the first. The point is that one disk is cut into two parts, and a strip of metal is welded into the middle. This method is much more economical, because we only need one set of disks.
We cut the disk into 2 parts as shown in the figure.
Exactly cut off a strip of metal of the required width and bend it. The thickness of the metal, as far as I remember, is 3mm. You can bend it any way you like, but it’s better to use special rollers. Next, we take part of the disk with the hub and attach the strip to it by welding. The hub part holds the strip well and sets it in the right direction.
Next, we attach the strip to the second part of the disk. And we weld all the seams, trying to make sure that the disc does not move. It’s good if it is possible to automatically weld a rotating part - everything is much stronger and more predictable.
We clean the seams and check that everything is holding together. It’s good if you have a lathe to clean the seam on the disk shelf in the place where it will later please the eye. This will also help correct the geometry of the disk if it is slightly disturbed (and this is very likely). Even if everything is done carefully, it is advisable to roll the resulting discs before painting to be sure of their geometry. Our weldings pleased us with the quality and, despite the seemingly not very smooth rim (the rims were used), they showed minimal runout.
Next we send the wheels for painting. Ours were sandblasted and powder coated. On the side of the disk that is usually hidden from view by the tire, it was decided to leave the reinforcement of the weld seam (i.e. the seam itself). On the front side the seam was ground off. The discs were assembled without tubes and they hold pressure perfectly; you can read about how to put tires on unwelding by clicking on the link.
To be fair, I note that this method is universal in every sense. I assumed here from the very beginning that most often everyone needs to boil the disk outward to get a shelf and a specific look. But needs and ideas are different. You can boil the disk in the other direction.
This is what happened with the test welding. We weren’t very happy about this at that moment, but now we can show these photos here. The seams are not additionally processed and are clearly visible.
If you use a little imagination, it’s not at all difficult to guess that you can boil the disk in both directions at once.
Here's another video for you:
And this video is for those who think that welding joints are not a reliable product!
Thank you all for your attention! Materials from the article were borrowed
>Unwelding from two disks >Unwelding from two disks with your own hands
Pros and cons of welding
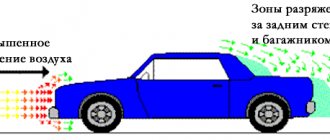
If we talk about the effectiveness of such tuning as welding, then it is practically zero. The only advantage of installing such wheels is the unusual appearance of the car. The welding looks especially impressive on lowered cars, in which you can partially hide the wheel under the cut arch. Such tuning can often be seen on cars that are intended exclusively for drifting, but not for everyday movement around the city.
There are many more disadvantages to welding, and many of them directly affect the technical characteristics of the car, which will affect its daily operation:
It's difficult to find the right set of tires. Boiled wheels of increased width require wide tires. Since such tires are not in demand, their price in car stores is quite high, and their prevalence on sale is low. Important: If you use narrow tires, this can lead to them “sliding” in a sharp turn, which is likely to provoke an accident.- Increased load on suspension elements. This is due to the high mass of welding. The load leads to accelerated wear of suspension components;
- Difficulty in installation. Not every tire shop will undertake the installation of welding on a car, much less do it correctly. These tires need to be inflated using the explosive method.
- The above are just some of the disadvantages. Also, depending on the weld design, other problems may arise. If the disk is not stamped at the factory, but welded from parts or by laying a metal strip, you need to make sure that all the seams are well welded and will not come apart over time, otherwise this will lead to “bleeding” of air.
Please note: A vehicle that has welding joints installed will not be able to undergo maintenance. Also, such cars attract much more attention from traffic police officers, and a car with welding marks can be sent to an impound lot if it is moving on public roads, and the driver can be fined.
( 174 votes, average: 4.38 out of 5)
Molding on a car door: how to remove, install, why it is needed
Tinting with athermal film Chameleon
Related Posts
How to weld discs with your own hands? 2 ways to choose
Proponents of self-tuning rarely ignore the wheels, since welding the discs with your own hands is quite simple, and the effect is amazing. Even a model that was unprepossessing or outdated in the last century begins to look more solid, modern and expressive.
And it will certainly stand out among the standard representatives of the model range. For those who have never engaged in such improvement of the appearance of their car, let us explain: welding is called increasing the width of the disk.
Source materials
So, in order to make welding with your own hands, you will need a certain arsenal of equipment and the ability to use it, including two steel disks, an angle grinder with replaceable disks, a welding machine and a drill with nozzles 4 or 5, 10 or 11.
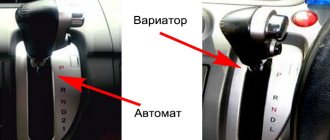
We recommend: Do-it-yourself methods for tuning a gear knob
Before you begin, you should additionally check the functionality of all tools. Depending on the manufacturing method, you may also need sheets of metal for welding. An additional, but optional material will be sealant.
How to make unwelding yourself - several options.
If, after weighing all the pros and cons of this type of tuning, you still decide to install welding joints on your car, our instructions will help you avoid making mistakes.
Option #1.
Unwelding from 2 stamped (standard steel) disks.
- Using a grinder, cut the existing disks so that the middle part of one is wider than the middle part of the second disk, that is, like this (the red lines here are the cutting locations).
As a result, you should have 2 elements like this.
- Place the element remaining from the first disk onto the rear axle hub and secure it with nuts. Then install the second element on it, as shown in the figure.
- Align the second rim with the first, eliminate runout and spot weld the joints (these 4 points are indicated in green in the picture).
- As a result, you should get a weld like this.
Seal the seam using 3M joint compound. If necessary, the sealant can be diluted with a degreaser (but only with it; the use of white spirit and solvent here is strictly prohibited.)
- After drying, remove excess sealant (with sandpaper, a chisel, etc.), paint the joint on all sides with paint - this will not only make it more attractive, but also protect it from rust.
Types of rims for cars
First, let's figure out what wheels are - why they are needed and what types of them exist. The disc is the central part of the wheel, made of metal, on which the tire is mounted. Together this structure forms the wheel of the car. However, this is not only a functional, but also a decorative element of the car, the design of which can significantly transform the appearance of the entire car.
Tuning wheels can transform a car
We recommend: How to determine the wear of winter tires?
There are various manufacturing methods. There are three types of these car elements:
- stamped;
- forged;
- cast.
They are divided according to their characteristics, appearance and price. Let's take a closer look at each of the disks.
Stamped
On many low-price car models, stamped wheels are installed at the factory. At the same time, drivers often do not want to spend time and money on buying new spare parts, especially if they are quite satisfied with the appearance of the car. On the other hand, such disks are often chosen to replace broken or worn ones. The reason for this is the low price. However, this does not mean that the stamps are bad or of poor quality. On the contrary, they have no less advantages than disadvantages. Judge for yourself:
- stamping is more durable, as it is made of steel;
- if a wheel gets into a hole, the risk of the part splitting is less than in the case of cast ones;
- a deformed disc can be restored in a special workshop.
Of course, such elements of the car also have negative qualities:
- the weight of stamped discs is higher than forged and cast ones;
- subject to corrosion;
- unattractive appearance that repels motorists.
Stamped wheels are sold at a low price, but have an unattractive appearance
How significant such shortcomings are is up to you to decide.
Cast
This is almost the exact opposite of stamped ones. Just swap the pros and cons of the previous type of parts to understand their characteristics.
Alloy wheels are made of aluminum, so they are less durable, but lighter
- alloy wheels are made of aluminum, so they have much less weight, which has a positive effect on the speed and maneuverability of the car;
- aluminum is not afraid of rust;
- a special manufacturing technology allows them to be given any design shapes unique to each car model.
The disadvantages are also quite impressive:
- light and soft aluminum does not bend, but is covered with a network of cracks, so if it falls into a hole, there is a high risk of breaking the disk;
- as a rule, workshops do not undertake repairs of such parts, offering the owner to buy a new one;
- the price of casting is 2–4 times more than stamped ones.
Given the condition of most roads, driving on such wheels is a risky activity. However, this does not stop motorists from purchasing and installing these parts.
When purchasing castings, pay attention to the country of origin. Turkish parts have a bad reputation. Despite the use of aluminum in the design, their weight is not much different from stamped iron ones.
Forged
If you can't decide between appearance and durability, consider forged wheels. They combine the advantages of both previous types:
- special manufacturing technology increases their strength;
- just like stamped ones, they bend and do not crack, which allows them to be repaired if necessary;
- such parts are lightweight;
- corrosion will not damage the metal;
- simple but interesting appearance.
Forged wheels are both strong and lightweight, but they do have certain disadvantages.
We recommend: Do-it-yourself illumination of car rims as a stylish type of tuning
Regarding the last point, it should be noted that among forged wheels there is not such a wide variety of designs as among cast ones. So if you're looking for something different, check out the previous look. However, unlike stamped ones, forged elements look more elegant.
Of course, like everything in the world, forging also has negative sides:
- when it hits a hole, the disc does not break, but transfers the impact energy to the suspension, so when driving on broken roads, you are guaranteed frequent car repairs;
- the price is the same as for cast ones, or a little higher.
Recently, you can find a special type on sale - combined. It is a combination of a cast disc and a forged rim. Thanks to such modernization, they retain lightness, gain strength and can have a wide variety of appearances. Such parts have only one drawback - a very high price and low availability for sale.
Combined wheels combine the positive qualities of forged and cast ones, but have a very high cost
Preparation
At the initial stage, you need to fully understand the entire process. You should know that the starting material for manufacturing is stamped car wheels. Cast ones will not be suitable, since welding work will be carried out during the process - cast products do not withstand thermal loads.
The rim width of discs can be increased in 2 ways:
- a steel plate is welded into the middle;
- from two ordinary disks cut in half, one wide one is welded.
You should estimate what width of rims the design of your car allows. For VAZ cars, width 7j is usually chosen. But if you cut or roll out the wheel arches, you can increase the width to 10 j. So, first we need to calculate the width of the rim we want to get.
If we decide to use the method of welding two disks, we need to take this into account and stock up on the required number - for each welding we will need 2 disks.
What are weldings and what are they for?
Unwelding - wheels of increased width. Welding joints are made from two factory stamped disks. At the same time, the width of the shelf of such a product is practically unlimited and can reach 10-12 inches (25-30 cm). In specialized services, the production of a product is carried out by sawing a disk lengthwise and welding a strip of metal between the two halves.
As for tires, such wheels, as a rule, are fitted with standard “rubber”, installing it in a “house”. It is generally accepted that such an installation provides additional advantages to welding.
However, the real reason for installing standard tires on a widened disk usually lies in the too high cost of “rubber” suitable for welding in size. Thus, 1 cylinder of rubber for unwelding a VAZ-2106 can compete in cost with the price of the car itself. A set of such tires usually covers this cost.
When it comes to why welding is needed, fans of newfangled tuning usually say that the car is on welding:
- holds the road better;
- looks stylish;
- has better handling;
- increases in price when sold;
- Unwelding on a gazelle can be used instead of a rear “sparkle” of wheels.
In reality, all of the above is quite controversial and does not stand up to expert criticism. The negative qualities of welding include:
- rapid tire wear;
- risk of destruction of welded seams when the vehicle moves;
- an increase in rolling resistance, which leads to an increase in fuel consumption and indirectly increased wear of suspension components, engine, gearbox;
- claims from technical control services and traffic police;
- increase in braking distance due to failure of the factory settings of the braking system.
Actually, everyone decides for himself the question of why welding is needed. The answer depends on what goals the car owner sets for himself. However, how to expand disks with your own hands?
First stage: cut and cook
First, you will have to do metal cutting and welding - to perform these works you will need the appropriate equipment, as well as skills in handling it. So, we have stocked up with the required number of discs, a grinder and a welding machine - now we can get to work. The step-by-step process of welding 2 discs is as follows:
- Using a grinder, cut off the rim from the outside of the first wheel.
- Cut off the rim on the outside of the second wheel.
- We install the first disc on the rear axle hub and secure it.
- We put on the second part and perform alignment, eliminating runout.
- We fix the contact at four points by welding.
- We weld the seam along the entire circumference - this is necessary in order to ensure the necessary strength of the structure.
- Using a grinder, we clean the weld seam outside and inside. It should be remembered that the balancing of the wheel will depend on the quality of stripping.
Making welds
If we weld a steel strip inside, the process will look similar, but will differ in some details:
- Cut the outer rim to the inner part of the wheel.
- We cut out a steel strip of the required size and bend it around the circumference - for this it is best to use rollers. They will provide the required accuracy.
- We install the disk on the hub and fix the steel strip on it by welding.
- We weld the outer rim onto the strip so that deformation does not occur.
What extension is allowed
The standard wheel size is 6.5J, where 6.5 is the width in inches and J is the side flange profile. J is the most popular option, but there are other sizes: JJ, JK, K, L. You can find the designation - 6.5 without a letter. This means that profile J is used by default. The width of the welding is not limited by anything, only by wishes. But tuning a car using welding can require significant financial investments for two reasons:
- When installing rims that are too wide, you need to adapt the car itself to fit them - enlarge the wheel arches (they are cut out or widened).
- Wide tires are expensive and are ordered from abroad - Europe, the USA.
Note! According to expert advice, 13-inch dies are not recommended to be extended more than 7 inches.
Most car enthusiasts do not try too hard to find wide tires, but put standard tires on the welding joints, having pre-heated them. And the wheels used for manufacturing are not new, but already used ones, so this method of tuning can be classified as a budget option. But regular tires worn on a wide rim wear out faster. Before driving on unwelding wheels and doing any unwelding in general, it is necessary to roll the discs to eliminate deformation.
Final stage: painting
And the last stage is painting. However, before this stage, you need to check the welds for runout and roll them. Once you're sure everything is in order, you can think about painting.
Once you have chosen the appropriate enamel, apply it in the following way:
- Carefully sand the surface of the product.
- Degrease using white spirit.
- Apply a layer of primer - it will fill all the micro-irregularities and increase adhesion, ensuring better adhesion of the paint to the metal.
- After the primer has dried, apply the enamel in several layers.
- When the paint dries, it is advisable to coat it with varnish - such a coating will be more durable and aesthetically pleasing.
Painting finished welds