Replacing the front wheel bearing of VAZ 2113, 2114, 2115
Due to the increased loads on the suspension of modern models of Lada family cars, the front wheel bearing on VAZ 2113, 2114 and 2115 often fails, replacing which requires a certain skill and the use of some special tools. In addition to all of the above, an important point here is the correct selection of high-quality spare parts, which determines the long, trouble-free operation of the vehicle.
List of new parts and tools for replacing them
Replacing the front wheel bearing on a VAZ 2114 begins with the purchase by the car owner of the following spare parts:
- front wheel bearing (original art. 11180 – 3103020 – 04);
- front hub retaining rings (usually included in the repair kit under art. 11180 – 3101800 – 86);
- a new front hub (art. 11180 - 3103012 - 00), which will be needed if there is excessive wear of the bearing and rotation in the seat.
It is possible to carry out all the work to eliminate this malfunction without damaging other suspension parts using the following set of tools:
- tire remover;
- set of open-end spanners from 12 mm to 24 mm;
- socket heads from 12 to 19 mm and wrenches;
- specialized wheel bearing puller;
- specialized steering wheel end remover;
- duckbills for removing retaining rings;
- carriage;
- Screwdriver Set;
- regular pliers.
The cost of work to eliminate this malfunction from official dealers (at the end of autumn 2020) ranges from 4 to 6 thousand rubles. In small private service workshops they will ask for work from 2500 to 3000 rubles. After reading the instructions below, carrying out repairs yourself will not cause big problems for the owner of a VAZ model 2113, 2114 or 2115.
How to unscrew a stuck bolt (nut) - basic methods.
There are several reasons why disassembling this simple connection may be difficult or even impossible:
- deformation of the thread or connection parts, for example, due to a strong impact;
- screwing not according to the thread with the application of significant force - in this case, friction between the surfaces of the parts increases significantly (the effect can be aggravated due to the influence of external factors);
- oxidation of the surfaces of connection parts, formation of a layer of rust on them;
- diffusion of materials between joint parts.
The last two reasons are well known to almost everyone, especially motorists.
The problem is that studs, bolts and nuts are most often made of carbon steel. With prolonged contact with water and atmospheric oxygen (for example, wheel bolts are constantly exposed to this effect), these substances penetrate into the smallest gaps, including between the parts of the threaded connection.
Designers try to prevent such troubles by using parts with protective coatings or made of stainless steel for connections. But this doesn’t always work. If a bolt and nut are exposed to heat (an example would be parts on a muffler), the protective coatings may be damaged and corrosion processes will accelerate.
There is also a process of diffusion (mutual penetration) of materials; the parts form a monolith, which becomes difficult to disassemble (those who try to unscrew a bolt on the crankshaft often encounter this phenomenon).
To cope with this task, several methods are used. They can be roughly divided into
- mechanical;
- physical;
- chemical.
Mechanical methods.
These include methods that allow you to disassemble a threaded connection by applying mechanical forces:
- the use of ring wrenches and socket heads instead of open-end wrenches;
- using leverage to increase effort;
- impact with variable direction of force;
- accentuated impact (short-term application of significant force or forces at certain points);
- impact destruction of layers of oxides and rust.
An open-end wrench covers only three edges of the nut or bolt head. In addition, there remains some gap between it and the edges. In this case, applying sufficient force to unscrew it may be a problem - the key may break off and “lick” the edges. A spanner or socket spans all edges, allowing greater force to be applied.
To increase the force, you can use a lever to increase the length of the handle. In this case, there remains a danger of licking the edges or destroying the fastening parts. You can also damage those parts that were connected by a threaded pair.
Often, changing the direction helps to unscrew a stuck or rusted nut - before unscrewing the connection, try to screw it in. The impact of forces alternately in different directions destroys the layers of rust, allowing the connection parts to move.
An example of the application of significant force for a short time is provided by the method using a chisel and hammer. They make a notch on the edge, place a chisel against it (directing it as the nut is unscrewed) and hit it with a hammer. In this case, the impact force is much greater than what can be applied using a wrench. Since the impact is short-term, it cannot destroy the bolt.
For your information! This method can also be used to unscrew a nut with torn edges. This is somewhat easier than trying to cut new ones to fit a smaller key size.
Lightly tapping a nut and/or bolt with a hammer causes the entire structure to shake and destroy the rust layer. You only have to dose the impact force so as not to damage the parts or deform the thread. Although one of the methods for disassembling a “recalcitrant” connection is destroying the nut with such blows. The only problem is that the threaded pair will have to be changed.
Physical methods.
Some of them are based on the physical properties of metals. Of these, only one is widely used - heating the connection parts. At the same time, the material of the nut expands, the gap between it and the bolt increases, and it becomes easier to unscrew it. If you heat up the entire structure, you can destroy the rust that has formed, which will also give a positive result.
DETAILS: How to change a headlight bulb on a Ford Focus 2
Important! Using an open flame near wood, flammable plastic or flammable liquids is dangerous!
Electric heating is a good replacement for open fire. For this, a transformer (factory or homemade) with a secondary winding with a voltage of 1.1 - 1.5 V and maximum current is suitable. Through copper cables and clamps, the secondary winding is connected to a bolt that must be unscrewed. Warming up occurs, after which the transformer is turned off and the connection is dismantled.
Other physical methods use the method of wetting surfaces to reduce friction. For example, if you allow liquid to penetrate the space between a bolt and a nut through the smallest channels, the friction between the threads will decrease and the pair will become easier to disassemble.
Of the easily penetrating liquids, you can use those that are always at hand for the motorist:
- brake fluid;
- antifreeze;
- kerosene;
- gasoline;
- diesel fuel.
The first two contain glycols and ethers - substances with enormous penetrating power. The rest are aliphatic hydrocarbons and have a similar effect.
The second group also includes solvents such as white sprit and turpentine. All of them can be used to unscrew a stuck nut. The processes differ somewhat only in time.
The method is simple - wet a rag and place it on the stuck parts. Penetrating into the gaps and pores, liquids lubricate surfaces and loosen layers of rust. After some time (from half an hour to 3-4 hours), you can try to unwind the connection. If disassembly fails, repeat the process. You can speed it up by periodically light tapping.
These same liquids are the basis for “liquid keys” - lubricants of a special composition that are offered in car dealerships.
One of the most popular among car enthusiasts is WD-40, which contains mineral oil, white spirit and highly volatile gasoline. The effectiveness of this “cocktail” has been tested in practice; it can remove rusted nuts in half an hour.
For your information! If the nut becomes stuck not due to water contact, but under the influence of temperatures, the effectiveness of WD-40 is significantly reduced.
Chemical methods.
Their action is based on the chemical destruction of rust formed between the connection parts. To do this, it is necessary that active chemicals get into the gaps between the bolt and nut.
Almost any acid is used for this treatment of threaded connections:
- sulfur;
- salt;
- vinegar;
- lemon;
- orthophosphorus, etc.
Sulfuric acid for battery electrolyte or hydrochloric acid for soldering radiators is used in this way:
- a rim is arranged around the nut or bolt head made of plasticine;
- A few drops of acid are added inside the resulting “container”;
- a piece of zinc activates the process, creating a galvanic couple.
A day after the start of such treatment, any connection unwinds.
Weaker acids are less effective and require either a significant amount or more time.
For your information! Phosphoric acid is found in drinks such as Coca-Cola. That is why you can try to unscrew the nut with their help. But its concentration is low, the acid itself has low activity, so this treatment is effective only in “mild” cases.
If all else fails.
If you still fail to unscrew the nut, the connection can be destroyed by cutting it off with a grinder.
Another method is to drill out the bolt with a drill.
But before resorting to such methods, you should evaluate all the consequences!
How to change a bearing yourself
Before starting work, you should carefully study all its stages:
- We jack up the car from the side of the faulty bearing, remove the wheel and, having access to the lock nut of the outer CV joint, unscrew it using a 30 mm socket. It is worth considering that when subjected to high loads, the nut can be heavily tightened; in this case, the wheel is put in place, the car is released from the jack, after which we engage first or second gear in the gearbox and with great force and an elongated wrench, it can be torn off.
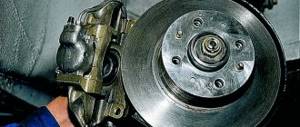
Next, we proceed to dismantling the brake cylinder, for which we need to unscrew the two bolts that secure it from the inside of the hub with a 17 mm wrench, and using a flat-head screwdriver, carefully pressing the pads away from the disc, we remove this unit to the side.
- We unscrew the nut securing the steering tip from the steering knuckle, and using a specialized puller, squeeze it out of its seat, then we perform a similar operation with the tip of the ball joint located at the bottom of the hub
- The upper part of the steering knuckle is attached to the suspension shock absorber strut with two bolts, the lower of which regulates the vehicle's wheel alignment, mark its position and, after unscrewing these bolts, remove the entire hub assembly. We also remove the brake disc secured with two screws.
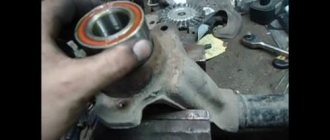
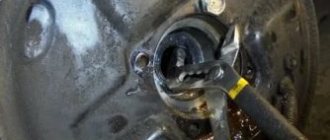
- Using a specialized puller, we press the front hub out of the inner race of the bearing, then remove the retaining rings on both sides, and with the same puller, we squeeze the old bearing out of its seat.
- Before installing a new wheel bearing, we clean its seat from old contaminants, carefully inspect it for possible damage, small chips and cracks, and if they are found, the steering knuckle must be changed, otherwise there is a possibility of its rapid breakdown.
- We lubricate the bearing seat in the steering knuckle, which will greatly facilitate its pressing, install one retaining ring and mount the new part using a specialized puller until a characteristic click is heard, after which the second retaining ring is inserted.
- We clean, inspect for damage and, if there is none, lubricate the seat of the front hub. Then, using a puller, we carefully press it into the inside of the new bearing and mount the entire assembly into its seat. After that, we carefully insert the splined flange of the drive, install the brake disc, caliper, ball joint and steering end, after which we tighten the new nut securing the outer CV joint, which comes in the repair kit for new parts, roll its edges into the locking grooves and put the wheel in place.
This completes all work on replacing the front wheel bearing. Also watch the video for a detailed analysis of replacing the front wheel bearing on VAZ 2113, 2114, 2115 cars:
avtoexperts.ru
Every car has such an element as a hub. Why it is needed is not difficult to guess. It is this element that allows the wheel to rotate around its own axis and at the same time stay tightly on the suspension. That is, such a part is connected to each wheel, without distinction by model or purpose of the car. In addition, in addition to banal rotation, it allows you to transfer torque from the transmission to the wheel.
In cases where the hub transmits torque, it is necessary to distinguish between the design features of the device. Depending on the model, the part has a solid shape with a cast axle shaft, or an attached axle shaft through special splines.
You should also not forget about braking, because it is on the hub that the brake disc or “drum” is fixed, depending on the car model. In addition, in modern cars, they try to install sensors and signaling devices of various levels into the hub.
In general, several main tasks of this element can be identified:
• Hold the wheel securely.
• Serve as a mounting system for brakes, including ABS sensors.
• Allow the wheel to rotate.
Hub device
Considering that structurally a huge force is placed on such a part, it is made of durable materials. Moreover, this is done from a solid cast “blank”, which is then processed on a special machine. Design and purpose of individual hub components:
1. The rim has holes or studs for installing the wheel.
2. The internal part, consisting mainly of a seat for the bearing.
3. Next comes the hole for installing the axle shaft.
Step-by-step replacement of a VAZ-2114 wheel bearing
As practice shows, the most common cause of wheel bearing failure is the too long service life of this part. Like other spare parts, bearings have a limited service life, and therefore there comes a time when they require replacement. The wear of this part is indicated by a characteristic sound resembling a hum. If such a symptom is detected, the best solution would be to replace the wheel bearing in a VAZ-2114 car.
First make sure that it is the bearing that needs to be replaced. After you have driven your car for a long time, touch the area of the wheel that is making the humming noise with your hand. If this area is much hotter than the other side of the wheel, then the bearing does need to be replaced. Another way to check is as follows. Using a jack, you need to lift the car and unscrew the wheel bolts. You only need to lift the side where the sound is coming from. The raised wheel must be rocked with great effort. If you hear a dull sound, you need to ask someone to press the brake and rock the wheel again. If the noise disappears, then the problem is in the bearing and it needs to be replaced.
If you do not have experience in such matters, it is better not to undertake the replacement yourself. In this case, it is strongly recommended to seek the help of a specialist. If you have ever been involved in car repairs, then you can most likely easily and quickly cope with this task yourself. In any case, it is recommended to first watch the training video instructions that you will find on this site.
Unscrew the hub nut with your own hands
The main element that holds a car wheel and allows it to rotate is the hub. Driving safety directly depends on the serviceability of this part. It is for this reason that even the laziest car owners do a mini-hub check at least once a month: they take the wheel with both hands and try to pull it in different directions.
The presence of any extraneous sounds or play requires immediate repair. And then, when the car owner finally gets to the hub, it may turn out that the hub nut is stuck to the drive shaft and cannot be unscrewed. Fortunately, this problem can be solved, which we will talk about in today’s article. We will also mention why she can “stick” so much.
Replacing the front and rear wheel bearings on a VAZ 2114
As practice shows, the main reason for failure of wheel bearings is their long-term operation. Over time, a kind of buzzing begins to be created, indicating wear of this element.
Such a problem cannot be called very serious, but we still strongly recommend carrying out repairs in the near future. Such work is relatively easy to do with your own hands in ordinary garage conditions.
How to check
Before you begin replacing the front or rear bearing of your hub, we recommend that you conduct a simple check of the functionality of this unit. This will allow you to accurately determine the culprit of the malfunction and verify the real need to replace the elements.
There are two verification methods, each of which has its own nuances.
Verification method
What to do
After a long ride, touch the area of the wheel where the noise is coming from.
If the area is hot compared to the other side, the bearing needs to be replaced
Raise the car, unscrew the wheel bolts, lift the side you are checking. Rock the wheel with more force
If the sound is dull, have a second person apply the brake and repeat the procedure. If there is no noise, the bearing must be replaced
What to choose?
Rear and front wheel bearings today are produced by both domestic and foreign manufacturers. The choice, as they say, is yours.
But we still want to give some recommendations on this matter.
- Chinese analogues. We strongly advise against choosing them to repair your VAZ 2114. They are of dubious quality, although they are the most affordable. Such bearings will not be enough for a long service life.
- Imported, mainly from Europe. The price is higher compared to analogues, but the quality is at the same level. When buying imported bearings, pay attention that they are not successful Chinese counterfeits. There are many of these now, unfortunately.
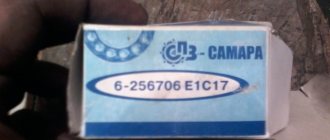
- Domestic. Pay attention to the parts made by Vologda or Samara craftsmen. The quality is quite high, and the price is affordable and adequate. What you need for the VAZ 2114.
To work on replacing the element yourself, you will additionally need:
- Special puller for bearings;
- 30mm socket wrench;
- 19 and 17 mm wrenches.
A little about the device and functionality
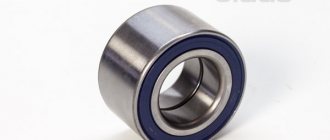
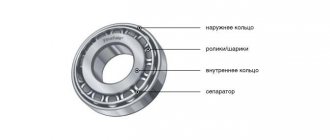
The main purpose of the part is to ensure uniform rotation of the car wheels. Given the name of the part, it is easy to guess that wheel bearings are the connecting link between the hub and the axle to which the brake disc and wheel are attached.
The design of the part fully corresponds to the classic type of rolling bearings. These are two metal rings into which conical rollers are pressed, protected from the body by a durable rubber insulator.
Unlike foreign competitors, domestic bearings are created using outdated HUB technology. They are quite difficult to install, require very precise tightening torque and require plenty of lubrication.
The operation of the mechanism lasts for several years. It is recommended to change a spare part for a VAZ 2114 approximately once every 100 thousand kilometers. But negative operating factors can accelerate the wear process:
- Bad roads. The entire force of the shock load falls on this mechanism of the system. Over time, the metal gets tired and the bearing begins to fail.
- Aggressive reagents. In Russia, in order to save money in winter, aggressive chemicals are often used to remove ice from roads.
- Sudden temperature changes. In winter, owners of warm garages unknowingly shorten the service life of many metal parts, for which sudden temperature changes when leaving and entering the garage create a large load.
Causes of failure
To be honest, the bearing is a very durable part of the hub. And to “kill” him you need to try! Most likely, all kinds of racks, rubber bushings and other attached parts will fail, but if you “try” you can also damage this element.
1) Long mileage . No matter how trivial it may sound, a long mileage of a car wears out all the components, and the bearing is no exception. This is the main cause of the malfunction, the rest are secondary. After approximately 70 - 120,000 kilometers, different manufacturers have different ways. You will hear a characteristic crunch. It says that this part needs to be changed.
2) Loss of tightness . The bearing has a little lubricant, which is covered with special casings made of rubber or plastic. If they break, the lubricant comes out and wear becomes much greater. After just a couple of thousand kilometers you can hear a characteristic hum, which indicates a malfunction.
3) Sloppy driving . If you constantly fly into holes at high speeds, this will also wear out this unit a little. Although, as I wrote above, other suspension elements will fail faster.
4) Incorrect pressing . This is a secondary reason; during repairs, the new bearing may be pressed in incorrectly, for example, obliquely. Thus, when driving, it will not stand correctly, which will wear it out quite quickly; after about a couple or three thousand kilometers it will need to be changed again.
5) If you tighten it too much . This happened especially on our domestic cars; the bearing was overtightened during replacement, so it heated up more than usual, which also contributes to a decrease in service life and subsequent breakdown. So you need to take into account the twisting force; it is usually indicated in the instructions.
These are all the main reasons, but as you can see, the last two are the “crooked hands” of the car service. So we only replace them at trusted stations that provide a guarantee on the work. Sometimes it is more profitable to look at official stations.
Bearing diagnostics
Let's talk about how to check a wheel bearing.
An indirect sign that you need to pay attention to the bearing on the VAZ 2114 is the appearance of a characteristic hum or hum from one of the wheels while driving. Typically, the noise increases at high speeds, making it easier to hear on the highway.
The driver, being in the cabin, is not always able to correctly determine the source of the noise. For example, a hum from the left wheel may be perceived as coming from the right. Or vice versa. To accurately determine by ear where the damaged bearing is located, you need to watch how the sound changes when turning when the mechanism is subjected to a higher load. If the sound disappears when turning right, but appears when turning left, the right bearing has worn out.
How to identify a faulty wheel hub?
- The easiest and most reliable way to identify a broken hub is to tap your foot on the tires . If any of the tires are wobbly or there is excessive play, then the hub has probably failed. Moreover, the play can be found long before the appearance of extraneous sounds, which are not audible at low speeds, or are similar to the noise of the tread on the asphalt.
- Another way to determine if a hub needs replacing is aurally , but this is possible only when the wear of the hub - or, more precisely, the ball bearings located in them - has reached a critical point, and the operation of the car has become dangerous.
- Malfunction of the hubs on the front wheels , thanks to the steering system, is quite easy to determine. To do this, you need to accelerate to the speed when the hum begins to appear (usually 40-60 km/h and above), and wiggle a little. If the sound intensifies when turning right, then the left bearing has fallen off, if on the contrary, then the right one (Replacing the front wheel bearing of foreign cars).
- Identifying a bad hub on the rear wheels is a little more difficult. It happens that it buzzes on one side, but the breakdown, in fact, turns out to be on the other. Therefore, to accurately identify the failed part, it is necessary to lift the rear of the machine. Then, while suspended, rotate and swing the wheel in one direction and the other. If you feel play and vibration of the wheel, and sometimes crackling and crunching sounds are heard, then the hub has failed.
- Finally, the third recommended method. Without certain skills and appropriate tools, you will not be able to replace the hub yourself. If you have the slightest suspicion of extraneous sounds emanating from the area of any wheel, or if play is detected, immediately contact a specialized car service center (in St. Petersburg - Autopride).
Replacement instructions
Replacing the rear wheel bearing on a VAZ 2114 is carried out as follows:
- Loosen the wheel bolts and wheel locknut before jacking up the vehicle.
- Raise the car using a jack. Tighten the hub nut completely and remove the wheel. Unscrew the mounting bolts on the drum.
- Remove the drum. If it is rusty, pre-treat the joint with WD-40. If after this the drum still does not budge, use long pins. Screw them into the holes and tighten them one by one until the part moves out of place. You can gently help with a hammer by tapping it on the back side.
- Unbend the stopper and unscrew the locknut. If it is tight, use a wrench extension.
- Using a universal puller, press the hub.
- The inner race remains on the shaft, and the outer part of the bearing remains in the housing. If you want to replace the pads at the same time, you need to remove the axle mounts.
- Now it's time to demonstrate the entire mechanism.
- As a rule, the rear part of the axle is attached to the brake shield. To dismantle you will have to use a hammer.
- Remove the wheel bearing race using a universal puller. If the brake system does not need to be changed, this operation can be performed directly on the vehicle's axle shaft.
- We place the hub on bricks or bars, as shown in the photo. Use a hammer to knock out the old rear wheel bearing.
- Be sure to remove dirt and wash the hub in gasoline. Clean the axle shaft in the same way. Use thick lubricant to treat the seating surface. Place the new bearing in the hub bore. Mounting chamfers will help avoid distortions.
- Press the bearing with your hand and press it in about 3 millimeters. Place the old bearing on top.
- Using the side of the hammer, carefully hammer the part inward. If the process is difficult, you can cool the bearing in the freezer and warm up the hub.
- Once the rear hub bearing is in place, you can install the circlip. For this purpose, round nose pliers are used. Don't forget to lubricate the axle first.
- Carefully attach the assembled mechanism to the trunnion. Be careful to avoid distortions. Then place a washer on the threads and screw on the hub locknut.
- Using a nut, press the hub onto the axle. Tightening torque: 220 N*M. Place the drum, secure it and screw the chassis.
As you can see, replacing a bearing is a rather complicated and time-consuming task. You need to have a special tool. Sometimes it’s easier to ask a car service for help.
Causes of wheel hub failure
If a failed hub is not repaired or replaced in time, then it is likely that you will get into a serious accident - either due to the wheel jamming at speed, or due to the disc coming off the shaft.
In addition, a faulty hub gets very hot , and thus has a negative impact on the normal operation of the wheel braking system.
The hub never fails all at once unless there is a strong impact from driving into a hole, curb or bump at speed. It is destroyed gradually, and usually its malfunction is accompanied by an unpleasant sound, body vibration, rolling sensations and weak shocks.
The main causes of wheel hub failures:
- Sloppy driving on uneven roads.
- Overloading the vehicle.
- Repeatedly falling under the “belly” into mud or sand.
- Aggressive driving with sudden braking and acceleration, so-called “drifting”.
Depending on the above, the hub body may become deformed, the outer or inner rim of the bearing may crack, the lubricant may “dry out” as a result of sand, moisture and dirt getting into the rotating parts.
Very rarely, rollers or bearing balls are destroyed , the causes of failures of which, most likely, depend not on the ride quality, but on factory defects.
All these malfunctions at the initial stage are very difficult to determine and almost impossible without special diagnostic equipment , until a large wheel play is detected, or a characteristic sound appears, reminiscent of the rumble of an airplane, and sometimes accompanied by a crunching and grinding sound.
Chassis design
Front wheel bearing
Before you begin the replacement process itself, you need to see all the structural elements that need to be dismantled. Therefore, first you need to understand the structure of the front part of the suspension, or rather, look at the elements in section and determine the location of the bearing.
Front chassis design
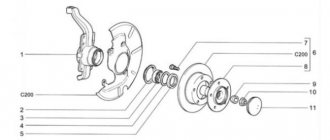
Front suspension assembly: 1 – upper support of the telescopic strut; 2 – upper support cup; 3 – compression stroke buffer with protective casing; 4 – compression buffer support; 5 – suspension spring; 6 – lower spring support cup; 7 – steering rod ball joint; 8 – steering knuckle; 9 – telescopic stand; 10 – eccentric washer; 11 – adjusting bolt; 12 – rack bracket; 13 – steering knuckle; 14 – front brake protective cover; 15 – brake disc; 16 – retaining ring; 17 – wheel hub nut; 18 – splined shank of the wheel drive hinge housing; 19 – guide pin; 20 – wheel hub bearing; 21 – ball joint; 22 – suspension arm; 23 – adjusting washers; 24 – stabilizer strut; 25 – stabilizer bar; 26 – stabilizer bar cushion; 27 – stabilizer bar mounting bracket; 28 – body bracket for mounting the suspension arm; 29 – suspension arm extension; 30 – bracket for fastening the extension; 31 – protective cover of the ball pin; 32 – ball pin bearing; 33 – ball pin; 34 – ball pin body; 35 – suspension strut rod; 36 – outer body of the upper support; 37 – inner body of the upper support; 38 – upper support bearing; 39 – rubber element of the upper support; 40 – travel limiter of the upper support; 41 – protective cap of the upper support; B - zone for monitoring the suspension joint
Wheel bearing replacement process
Now that all the elements have been studied, you can proceed directly to the replacement process itself. To carry out repair operations, it is necessary to prepare, namely, to collect the necessary tools. What you need: a set of all kinds of wrenches and sockets (it’s best to have a set of tools in your arsenal that has everything), round nose pliers (the best option is for removing locking rings), a wheel wrench, a jack, a new part, rags, and a couple wouldn’t hurt either gloves
When the motorist is fully armed, you can proceed directly to considering the sequence of actions aimed at replacing the bearing:
- We place the car on a pit or overpass.
- We dismantle the front wheel.