The device of the standard suspension of the Lada Priora
The main element of the suspension of the Lada Priora passenger car is a hydraulic strut, which is connected at the bottom to a special rotating element - a knuckle. A spring, a compression stroke buffer made of polyurethane, and a strut support are mounted on the telescopic strut.
The support is secured using 3 nuts to the stand. Due to the presence of a high degree of elasticity, the support is capable of ensuring the rack swings during the operating stroke of the car suspension and vibration damping. The bearing built into the support allows the rack to rotate simultaneously with the wheels.
The lower part of the knuckle is integrated with the ball joint and suspension arm. The forces acting on the suspension are transmitted using braces, which are combined by means of silent blocks on the Priora with levers and front supports. There are washers for adjustment at the attachment points of the braces, the lever and the front support.
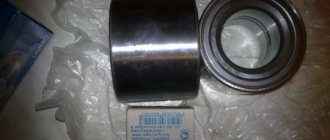
With the help of the latter, the angle of inclination of the rotation axis is adjusted. The rotary cam is equipped with a closed type bearing. A hub is mounted on the inner rings of the bearing to secure the wheel. The bearing is tightened with a nut on the shank located on the Lada Priora wheel drive housing and is not subject to adjustment. All hub nuts are interchangeable and have right-hand threads.
The independent suspension on the Priora has a stabilizer bar, which is a bar. The knees of the rod are attached to the levers located below using racks with rubber-metal hinges. The torsion element is fixed to the body of the Lada Priora using special brackets through rubber cushions.
In addition to the hydraulic suspension, today manufacturers produce another type of Priora suspension - pneumatic. Before you start talking about replacing the hydraulic suspension installed as standard on the Lada Priora with air suspension, you need to choose the right springs and air shock absorbers.
Springs are a special damper whose function is to dampen vibrations that occur in the suspension when it comes into contact with the road. If you choose the right springs for the air suspension on the Priora, you don’t have to worry about suspension breakdowns when hitting bumps if the road is not smooth.
Very often, in the process of tuning a Lada Priora, a screw suspension, which is a type of air suspension, is used to equip the car. This type of front suspension does not have good protection from the influence of road dust and dirt on the shock absorber rods, which act as a good abrasive on the guide bushings, which leads to malfunctions and jamming of the shock absorbers.
One of these breakdowns, which most often manifests itself, is a knocking sound in the front suspension. In addition, this malfunction is the most common and can occur when the silent blocks on the Priora wear out.
Failure of the suspension can lead to unpredictable consequences while the car is moving, so the appearance of such a sign of a malfunction as a knock in the front suspension requires almost immediate intervention in the structure and repairs. During the suspension repair process, wear of the silent blocks on the Priora may be revealed. If such a malfunction is detected, the silent blocks must be replaced to avoid creating an emergency.
Front suspension of VAZ 2170 Priora
- Repair manuals
- Repair manual for VAZ 2170 (Priora) 2004+.
- Front suspension
7.1.1 Front suspension Design features Possible malfunctions of the front suspension, their causes and solutions Removal and installation of the telescopic strut Disassembling the telescopic strut Replacement of the ball joint Replacement of the front suspension arm Replacement of the front suspension extension Replacement of stabilizer parts...
7.1.2 Design features Independent front suspension, telescopic , with hydraulic shock absorber struts, coil springs, lower wishbones with braces and a stabilizer bar. Rice. 7.1. Front suspension assembly: 1 – upper support mounting nut...
7.1.3 Possible front suspension malfunctions, their causes and solutions
7.1.4 Removing and installing the telescopic stand You will need: keys “13”, “17”, “19”. 1. Brake the vehicle with the parking brake and install wheel chocks (“chocks”) under the rear wheels. Raise the front of the car with a jack and place it on supports. Remove the wheel. 2. In the wheel well, remove the brake pad...
7.1.5 Disassembling the telescopic strut You will need: ties for the suspension springs, a 14mm wrench, a 6mm hex wrench, a 22mm spanner. 1. Remove the telescopic stand from the vehicle (see “Removing and installing the telescopic stand”). 2. Clamp the telescopic stand in a vice, compress the spring with a special...
7.1.6 Replacing the ball joint You will need: spanners “17”, “19”, ball joint remover. 1. Raise and place the front of the vehicle on supports. Remove the wheel. Warning Brake the car with the parking brake and install wheel chocks (“shoes”) under the rear wheels. ...
7.1.7 Replacing the front suspension arm You will need: keys “17” (two), “19” (two), “24” (two). 1. Place the vehicle on an inspection ditch or lift and support the front of the vehicle. Remove the wheel. Warnings Brake the vehicle with the parking brake and place brakes under the rear wheels...
7.1.8 Replacing the front suspension extension You will need: wrenches “19” (two), “24” (two), a spanner wrench “17” (two), a wrench for wheel bolts. 1. Loosen the front wheel bolts on the corresponding side. 2. Raise and place the front of the vehicle on supports. Unscrew the wheel mounting bolts and remove it. 3. ...
7.1.9 Replacing parts of the front suspension stabilizer bar You will need: a “13”, “17” (two) wrench, a hammer (wooden or polymer). 1. Place the vehicle on an inspection ditch or lift and support the front of the vehicle. Warning Brake the vehicle with the parking brake and place a brake under the rear wheels...
7.1.10 Replacing the front suspension hub bearing The hub is equipped with a double-row ball bearing, which does not require adjustment or lubrication during operation. When pressing out the hub, the bearing is destroyed, so press the hub out of the steering knuckle only to replace the bearing. You will need: a 17" wrench, a socket wrench (...
↓ Comments ↓
1. Car structure
1.0 Car structure 1.1 General information about the car 1.2 Passport data 1.3 Car keys 1.4. Controls 1.5. Heating and ventilation of the cabin 1.6 Ensuring a comfortable air temperature in the cabin 1.7. Doors 1.8. Passive safety equipment on the car 1.9. Seats
2. Recommendations for use
2.0 Recommendations for use 2.1. Safety rules and recommendations 2.2 Running in the car 2.3 Operating the car during the warranty period 2.4. Preparing the car for departure
3. Problems along the way
3.0 Malfunctions along the way 3.1. The engine does not start 3.2 Malfunctions of the fuel injection system 3.3 Idle speed has disappeared 3.4. Interruptions in the operation of the 3.5 engine. The car moves jerkily 3.6 The car accelerates poorly 3.7 The engine stalled while driving 3.8. Oil pressure dropped to 3.9. Engine overheating 3.10. The battery does not recharge 3.13. Knocks in the engine 3.16. Wheel puncture
4. Maintenance
4.0 Maintenance 4.1. General provisions 4.2. Inspection work 4.3. Lubrication and filling works 4.4. Diagnostic work 4.5. Repair and adjustment work
5. Engine
5.0 Engine 5.1 Design features 5.2 Possible engine malfunctions, their causes and solutions 5.3 Useful tips 5.4 Checking compression in the cylinders 5.5 Removing and installing the decorative engine casing 5.6 Removing and installing the engine splash guard 5.7 Installing the piston of the first cylinder to the TDC position of the compression stroke 5.8 Replacing the drive belt gas distribution mechanism and tension roller 5.9 Replacing the power unit supports 5.11. Replacing engine seals 5.13. Engine cylinder head 5.15. Engine repair 5.16. Lubrication system 5.17. Cooling system 5.18. Power supply system 5.19. Design Features
6. Transmission
6.0 Transmission 6.1. Clutch 6.2. Gearbox 6.3. Front wheel drives
7. Chassis
7.0 Chassis 7.1. Front suspension 7.2. Rear suspension
8. Steering
8.0 Steering 8.1 Design features 8.2 Possible steering malfunctions, their causes and solutions 8.3. Steering column 8.4. Steering linkage 8.5. Steering gear
9. Brake system
9.0 Brake system 9.1 Design features 9.2 Possible malfunctions of the brake system, their causes and solutions 9.3 Bleeding the brake system hydraulic drive 9.4 Removing and installing the vacuum brake booster 9.5 Replacing the brake pedal axle bushings 9.6. Main brake cylinder 9.7. Front wheel brakes 9.8. Braking mechanisms of the rear wheels 9.9. Pressure regulator 9.10. Brake hoses and tubes 9.11. Parking brake
10. Electrical equipment
10.0 Electrical equipment 10.1 Design features 10.2. Battery 10.3. Mounting block (relays and fuses) 10.4. Generator 10.5. Starter 10.6. Ignition switch (lock) 10.7. Electronic engine control system (ECM) 10.8. Ignition system 10.9. Lighting, light and sound signaling 10.10. Windshield cleaner 10.11. Washer reservoir 10.12. Electric fan of the engine cooling system 10.13. Electric motor of the heating and ventilation system fan 10.15. Cigarette lighter 10.16. Instrument cluster 10.18. Electronic anti-theft remote control system 10.19. Immobilizer 10.21. Replacing sensors and switches
11. Body
11.0 Body 11.1 Design features 11.2 Possible body malfunctions, their causes and solutions 11.3 Removing and installing windshield frame lining 11.4 Removing and installing soundproofing upholstery in the engine compartment 11.5. Removing and installing bumpers 11.6 Removing and installing the fender liner and protective wing cover 11.7 Removing and installing the front fender 11.8 Removing and installing decorative sill trims 11.9. Hood 11.10. Trunk lid 11.11. Doors 11.12. Seats 11.13. Seat belts 11.14. Rear view mirrors 11.15. Interior fittings 11.16. Instrument panel 11.17. Heater 11.20. Body care
12. Applications
12.0 Appendix 12.1 Appendix 1. Tightening torques of threaded connections, Nm 12.2 Appendix 2. Fuels, lubricants and operating fluids 12.3 Appendix 3. Nominal filling volumes 12.4 Appendix 4. Basic data for adjustments and monitoring 12.5 Appendix 5. Spark plugs used on vehicles 12.6 Appendix 6. Lamps used on a car 12.7 Appendix 7. What you need to have in a car 12.8 Appendix 8. Tools used when repairing a car
13. Electrical diagrams
13.0 Electrical Diagrams 13.1 Diagram 1. Instrument Panel Harness Connections 13.2 Diagram 2. Vehicle Front Wire Harness Connections 13.3 Diagram 3. Engine Electronic Control System (ECM) Harness Connections 13.4 Diagram 4. Vehicle Rear Wire Harness Connections 13.5 Diagram 5. Light Harness Connections license plate light 13.6 Diagram 6. Left front door wiring harness connections 13.7 Diagram 7. Right front door wiring harness connections 13.8 Diagram 8. Rear door wiring harness connections
Selection of shock absorbers for mounting air suspension on Priora
The manufacturer manufactures and sells several types of shock absorbers that are structurally different from each other for mounting air suspension on Priora. When choosing a shock absorber for a Priora, you should listen to the advice of specialists who really understand the design features of various shock absorbers. The independent suspension on the Priora is mounted on the basis of three types of shock absorbers:
- oil;
- gas, high pressure;
- gas, low pressure.
If the shock absorber is selected incorrectly, the independent suspension on the Priora is not able to work effectively and compensate for vibrations when in contact with the road. With the correct selection of shock absorbers, the independent suspension on the Priora can almost completely compensate for the impacts the car receives from potholes and bumps on the road surface. The dynamics of the Lada Priora will increase significantly and driving comfort will improve.
After replacing the springs and shock absorbers, the independent suspension on the Priora requires high-quality adjustment of the settings. The process of adjusting the new suspension installed on the Lada Priora includes reducing the unsprung masses and ground clearance.
Main characteristics of the air suspension on the Lada Priora
Suspension clearance has the property of changing its value in a range equal to the stroke of the installed shock absorbers. To carry out pneumatization of shock absorbers, the hose method is used. Installation of air suspension parts on Priora is carried out by replacing standard spring elements. The assembly of the vehicle air suspension structure is carried out using lines with a diameter of 6 mm.
To operate the suspension, a compressor and a receiver with a volume of 8 liters are installed on the car. In some models, the independent suspension on the Priora is equipped with a compressor with a 10-liter receiver. This Lada suspension has a reaction time of about 4 seconds. The control principle is manual, and control is carried out using pressure gauges. The control is four-circuit (separate for the front and rear axles, as well as for the right and left sides of the car).
As a rule, the air suspension on the Priora is equipped with options such as wheel inflation, air signal and intermediate shaft. Additionally, the independent suspension on the Priora can be equipped with a remote control and a control controller.
Suspension repair on Lada Priora
The chassis of any vehicle is needed to move along the road surface. It smoothes out the effect of various vibrations and shaking. The chassis is primarily the suspension at the rear and front, as well as the wheels. With the help of the chassis components, the wheels on two axles are connected to the body parts, vibrations are dampened and various forces that arise during movement are transmitted.
Car suspension device
The main advantages of installing air suspension
Installing an air suspension on a Lada Priora car instead of the standard factory hydraulic suspension represents a change in the factory design of the car, i.e. suspension tuning. Installing this car suspension design allows the Lada Priora suspension to ensure excellent absorption of unevenness and potholes on the road while the car is moving. A car equipped with air suspension becomes more stable on the highway.
At the same time, installing air suspension on the car allows you to improve the dynamic qualities of the car. The rear independent suspension installed on the car, along with the installed front independent suspension, allows you to obtain a huge number of advantages, which are expressed in the following:
- The mounted independent suspension on the Priora reduces the lateral roll of the vehicle when the interior is unevenly loaded.
- Installing an air suspension on a Priora allows you to reduce the load on the suspension elements, thereby significantly increasing its service life.
- Driving a Lada Priora with installed independent air suspension allows you to achieve more comfortable driving on roads with varying road surface qualities.
- The independent suspension on the Priora allows you to increase the degree of stability of the vehicle when making turns on the road while driving.
- Installing air suspension on the Priora allows you to reduce the negative consequences on the car if it is overloaded.
- The mounted independent suspension on the Priora eliminates the possibility of vehicle roll while driving on the road.
Installing an air suspension on a Priora allows the driver to independently control and change, if necessary, the car’s ground clearance, taking into account the quality of the road surface and the load on the vehicle’s suspension.
Air suspension on Lada Priora
Feedback from motorists who have decided to make changes to the design of the car and replace the standard suspension on it with an air suspension, as a rule, turns out to be positive, since the use of an air suspension allows you to obtain a number of advantages during the operation of the vehicle.
Set of parts for mounting the air suspension of Lada Priora
The operating principles of air suspension are based on the use of compressed air in the system, which, due to compression, is able to regulate the vehicle's ground clearance. Installing air suspension on the Priora allows you to make driving a vehicle more comfortable on any type of road surface.
The independent suspension on the Priora is installed on the car yourself, and the installation process is simple. Therefore, every car enthusiast can install air suspension on a Priora if you follow certain tips and recommendations from experts.
In order to install the Priora suspension on your own, you need to know some of the subtleties of this operation. In addition, to carry out work on re-equipping the Priora suspension, you will need to purchase a set of parts from a car store. To carry out installation work to retrofit the suspension, the following parts will be required.
| Detail | Description |
| air spring | The air spring is the most expensive part among all the components that make up the pneumatic independent suspension on the Priora. This suspension element is installed on the car instead of standard suspension elements. In the process of pumping compressed air into the airbag, the ground clearance of the Lada Priora changes. When the pressure in the air spring decreases, the ground clearance of the vehicle decreases. Adjusting the ride height is the main function of the Priora suspension airbag. |
| compressor | The compressor is one of the main components of the pneumatic system, ensuring all the functions performed by the suspension on the Priora. A compressor, which is mounted on a vehicle, is necessary to pump air into the air spring. |
| fasteners and braces | An independent suspension is mounted on the Priora using special fasteners and braces. Using these elements, the Lada Priora air suspension is attached to the car body. If you have some skills in working with metal, you can make these parts yourself, but it is best to order these fastening components for the Priora suspension and make them from a specialist. In this case, there will be a guarantee of high-quality manufacturing of components. |
| pneumatic valves | The independent suspension on the Priora is equipped with two pneumatic valves, which are designed to pass pneumatic flow. One of them is intended to inject air into the air bag, and the second pneumatic valve is intended to release air. |
| pressure gauge | To install it in the suspension system on a Priora, you can use the same pressure gauge that is used in pneumatic systems operating at a pressure of a certain range. |
| start button | The start button is designed to adjust the state of the air suspension directly from the interior of the Lada Priora. |
| air supply line | The air line that the independent suspension on the Priora has consists of a system of tubes connecting all the air bags that form the basis of the Priora suspension. |
| air pressure sensor | Pressure sensor - a sensor located in a convenient location on the pneumatic line, is used to monitor the condition of the suspension directly from the passenger compartment. |
| start relay |
Design of the standard rear suspension for Priora
On the VAZ 2170, the rear suspension is constructed of a beam, which includes two levers and a connector. All beam elements are welded using special reinforcements. Brackets with eyelets are welded to the rear parts of the levers, which are used to fasten shock absorbers. In addition, at the ends of the arms there are flanges to which the rear wheels are attached using bolts.
Standard suspension on Lada Priora
Bushings are welded on the front ends of the arms that the suspension has. Silent blocks are pressed into these bushings. Silent blocks are rubber-metal hinges. The bolts that connect the suspension arms to the brackets pass through the silent blocks and are attached to the side members of the car body.
The springs mounted in the rear suspension structure rest on one side of the hydraulic shock absorber cup. On the other hand, the spring rests on a support that is welded to the inner arch of the vehicle body.
The rear suspension is equipped with hydraulic shock absorbers. The hydraulic shock absorber is installed using a bolt to the suspension arm bracket. The shock absorber rod is attached to the upper spring support using rubber pads and a support washer. Increasingly, car enthusiasts are turning their attention to the rear suspension, which is structurally different from the standard rear suspension of the car.
The rear independent suspension installed on the Priora offers the car enthusiast a number of advantages. First of all, the rear independent suspension installed on the car can significantly improve the dynamic qualities of the vehicle.
Lada Priora front suspension diagram
1 — steering knuckle; 2 - eccentric bolt; 3 — shock absorber strut; 4 — lever; 5 — stabilizer bar; 6 — mounting bracket for the stabilizer bar cushion; 7 — stabilizer bar strut; 8 — cross member of the front suspension; 9 — ball joint; 10 - stretching
1 — telescopic stand; 2 - spring; 3 — rod nut; 4 — rebound limiter of the upper support; 5 — upper support; 6 — bearing; 7 — upper spring cup; 8 — spring gasket; 9 — compression stroke limiter of the upper support; 10 — compression progress buffer; 11 - protective cover
1 — ball joint; 2 - hub; 3 — hub bearing nut; 4 — protective cap; 5 — hub bearing; 6 — steering knuckle; 7 - nut; 8 — front wheel brake disc; 9 — brake mechanism shield; 10 — eccentric (adjusting) bolt; 11 — rotary lever; 12 — front suspension spring; 13 — shock absorber rod; 14 — upper spring cup; 15 — upper support of the shock absorber strut; 16 — shock absorber rod nut; 17 — bearing of the upper support of the shock absorber strut; 18 — spring gasket; 19 — front suspension compression buffer; 20 — protective casing; 21 — rack body; 22 — bracket for mounting the anti-roll bar cushion; 23 — front suspension stretch; 24 — front wheel drive shaft; 25 — anti-roll bar; 26 — stabilizer bar; 27 — front suspension arm
Installing rear independent suspension on a car
The rear independent suspension is installed on the VAZ 2170 instead of the standard system installed by the manufacturer. The rear independent suspension, made on the basis of triangular levers, is ideally suited for installation on the Lada Priora. The rear independent suspension provides increased comfort when operating the car.
When operating a vehicle on which a standard rear suspension is installed, the vehicle beam shifts towards the arch when cornering by approximately 1 cm. If the vehicle is equipped with a rear independent suspension, then such a beam displacement is not observed under similar operating conditions. The rear independent suspension is attached rigidly to the body, without using silent blocks in mounting the rear suspension on the Priora, which avoids lateral displacement of the beam.
In the design of both the front and rear suspension of the Priora, rubber-metal structural elements such as silent blocks are used. These structural elements consist of a rubber body and a bushing made of metal, which is vulcanized with the base material of the silent block. In this case, the connection between the sleeve and the base is inseparable.
Silent blocks, which are part of the design of the rear and front suspensions, perform the function of damping all torques and bending moments that may occur during movement, thereby ensuring a stable position of the vehicle on uneven road surfaces and when turning.
It is the rubber-metal design of silent blocks that is capable of providing the maximum possible damping of emerging vibrations and absorption of emerging deformations. Silent blocks are structural elements that do not require additional maintenance and lubrication during operation. These structural elements cannot be repaired; after a certain period of operation, silent blocks are replaced.
Silent blocks are mounted on a car as an element of the chassis and suspension, since this structural element is one of the most reliable and economical ways to prevent the influence of various types of deformations and loads that can occur during the operation of the car on the car body. Installation and replacement of silent blocks on Priora is provided for in some vehicle suspension components:
- front and lower arms, by installing silent blocks the arm is attached to the car body; in addition, by installing silent blocks, the rod was attached to the lever;
- on the stabilizer, using silent blocks, it is attached to the lever through the strut;
- on the front linkage mount, called the crab;
- on the rear beam, on fastenings to the car body;
- on the rear pillars, in the upper and lower mounting points.
Lada Priora suspension malfunctions
A lot of words have been said about the need to “sort out” the chassis. Every noise or knock can cause concern even for an experienced car enthusiast, because he knows that there are several valuable components and mechanisms below - no one wants them to break. But over time, having learned to determine the causes of a malfunction based on the primary signs of “disease,” you can roughly estimate the cost of repairs.
Noise or knocking in the front suspension of Lada Priora
It is extraneous sounds that cause more concern about the chassis - as if some important part was “exposed”, having lost its protection, and is now being mercilessly beaten to the point of complete wear. There are several reasons why strange noises may be coming from the front:
- the shock absorber is broken;
- the fastening of the stabilizer or its cushion has become loose, mechanical damage has occurred;
- the place where the upper support is attached to the body has become loose;
- the support gasket has worn out;
- silent blocks collapsed;
- stub stretches;
- the ball joint of the lever “walks” or creaks;
- the damper spring is mechanically damaged or stretched;
- The compression stroke buffer has decreased;
- Wheel balancing is off.
The following signs of malfunction are also found in the front part of the chassis:
- fluid is leaking from the shock absorber strut;
- the shock absorber does not work effectively;
- shock absorbers break;
- the car pulls to the right or left when driving straight;
- tires wear out too quickly;
- tires wear unevenly.