LPG (gas equipment) for a car is installed both on the carburetor and on the injector. When talking about LPG for injection engines (with a gasoline injection system) equipped with a whole range of electronics, we most often mean LPG of the 4th generation, one of the most modern. However, in our article we will tell you that it is possible and quite justified to install 2nd generation gas equipment on injectors.
Advantages
Correct adjustment of Lovato 2nd generation LPG in the injector and carburetor can be done with your own hands. In comparison with the new type of gas equipment (4th and 5th generations), the 2nd generation gas equipment gearbox has somewhat lost its relevance. However, this does not indicate that there is no point in using it. Not at all. The present systems have been preserved on almost all cars. And some experts advise using them. The “blame” for this is the outstanding qualities of 2nd generation HBO:
- availability and proven quality of the system. As a result, installation work can be carried out on your own;
- virtually complete absence of electronic components, which radically simplifies adjustment;
- the ability to repair individual components without leaving the garage. Having identified a malfunction, it is not necessary to rush to the service station. Having basic knowledge, you can do all the necessary work with your own hands;
- reasonable price for equipment. The purchase and installation of gas equipment of a higher class is much more expensive. The situation is completely different with 2nd generation gas equipment. Purchasing and further setting up gas equipment for a 2nd generation car really helps out in the current circumstances.
Setting up the HBO idle mode.
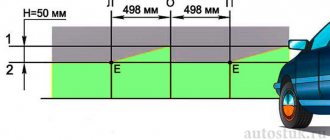
One of the fundamental purposes of setting up LPG is to check and adjust the idle speed.
We would like to remind you that when accepting a vehicle for installation of equipment, it is necessary to inspect and diagnose the vehicle in the presence of the client.
Upon completion of the installation of the gas equipment, the initial filling with gas and setting up the system (auto-calibration) is carried out only after checking it for leaks.
Conditions for auto calibration:
- The cylinder is filled with gas no more than 30% of its total volume
- Open the flow valve of the multivalve on the cylinder
- Connect the scanner to the vehicle's diagnostic connector
- The engine is running at idle speed: with a manual transmission, the gear shift position is in neutral, and with an automatic transmission, the gear selector is in the “P” position.
- All loads are disconnected, i.e. air conditioning/climate control, headlights, heated seats, mirrors, etc.
- Connect the interface cable to the diagnostic connector of the gas controller and to the computer
- Launch the pre-installed software on your computer and wait for it to connect
- Set the necessary settings in the program
- Release the air from the system, briefly switching it to gas, to fill the lines and reducer with gas fuel
- “Blow out” the exhaust system, i.e. Re-gas sharply 2-3 times, but not to the cut-off
- The engine should be running at idle speed, warmed up to operating temperature, if the fan turns on, wait until it turns off
- Enable the auto-calibration process and wait for it to finish.
The operation and adjustment of the gas system is to ensure that the gasoline ECU does not “notice” the change in fuel type.
Therefore, to achieve this goal, the main indicators required are gasoline pulses and/or correction readings in diagnostic equipment connected to the vehicle diagnostic connector (for example, OBD-II).
It follows that on a properly running engine, the petrol time readings when the engine is running on gas should correspond to the petrol timing readings when running on petrol with a deviation of -0.05….+0.05 m.sec.
Checking and adjusting idle speed according to gasoline injection readings:
- After completing the auto-calibration, check the idle speed without any loads on. While observing the petrol injection time, switch the system to gas and check the petrol injection deviations
- Switch the system to gasoline and turn on the engine loads (high beams, electric heating, etc.), if the car has an automatic transmission, then move the selector to position “D” (drive) and switching from gasoline to gas, also check the deviations gasoline injection, the same as without loads.
In all these cases, if gasoline injections deviate, it is necessary to adjust the multiplier points in the MAP map. If, when switching to gas, the gasoline time increases, this indicates that the gas-air mixture is poor and, as a result, the gasoline ECU increased the gasoline pulses. To return to optimal injection readings, you need to activate the required point on the multiplier in the map (display it in red) and raise it to the position at which the gasoline time when the engine is running on gas is set to the same as when running on gasoline. If, when switching to gas, the gasoline time decreases, this indicates that the gas-air mixture is rich, the marked multiplier point in the map must be omitted. It is advisable to carry out this procedure at least 2 times. You can then begin testing and tuning the system while driving with different engine loads.
For engines in which the control system based on lambda probe readings is disabled in the gasoline block or in the absence of them (lambda probes), it is advisable to use an exhaust gas analyzer, for example, an AFR sensor (exhaust gas analyzer). The main condition for using an AFR sensor to accurately display readings is the tightness of the exhaust system.
How is the work carried out?
How is it possible to adjust 2nd generation HBO with your own hands? In fact, the 2nd generation HBO differs slightly from its predecessor (1st generation HBO). The only difference is that an electromechanical system was introduced. Through its use, it is possible to coordinate the force of the gas flow.
Speaking about how to adjust the 2nd generation LPG, it is important to note that the creators managed to significantly reduce the load on the engine (gas burns much more slowly), increase the capabilities of the power unit (oil is stored on the surface of the cylinders), reduce the amount of carbon deposits and reduce the harm from exhaust emissions. By the way, it is the last moment described that allows the catalyst to last much longer. If necessary, when setting up the 2nd generation Lovato gas system with your own hands, the gas supply remains at a certain level.
Attention! The lambda probe emulator is a very useful product. It thoroughly helps with setup, but only if it is in good condition.
Connection diagram for 1st generation gas equipment to a carburetor
Equipment installation kit
This diagram shows what parts the 1st generation LPG consists of:
- Gas cylinder. Its capacity most often depends on the installation location. Installed outside the car or in the trunk, this eliminates gas leakage into the cabin.
- Multifunctional valve. Serves to control the filling and supply of liquefied gas.
- The ventilation device provides ventilation in case of leaks.
- High pressure liquid gas supply pipeline.
- Electric valve. Triggered to open the gas supply from the ignition switch
- Gasoline solenoid valve, the only function is to shut off the fuel supply when switching to gas.
- Vacuum reducer HBO 1st generation. Converts from liquid to vapor and reduces fuel pressure.
- The mixer (mixer) mixes the gas with atmospheric air to form a fuel-air mixture.
- Dispenser. Serves to regulate the amount of gas supplied.
- Refill connector. Refueling at the gas station takes place through it.
How is the gearbox controlled?
The 2nd generation Lovato gas reducer has its own characteristics. In general, gas is sensitive to many important points and changes in the operation of the system. It happens that gas equipment was installed, but then increased fuel consumption or other problems with the engine appeared. Let's say the car starts to start slowly or stalls regularly. In this case, it is better to adjust the gearbox.
What needs to be done for this? To familiarize yourself with the process features, you can view a diagram of the existing pins and control components.
Adjust the electric gearbox. You have regulators available - fluid pressure (2) and gas volume (2). The following algorithm of actions must be followed:
- switch to gasoline, turn on the car and warm up the engine to 95 degrees;
- set the speed to 900-1100 rpm and turn off the fuel supply (in this case, gasoline);
- set the initial positions of the adjusting screws: set the dispenser to the extreme mark, turn the XX regulator (2) all the way and then turn it exactly 5 turns, turn the 1 regulator all the way.
Put XX. Namely:
- Switch the control to gas and turn on the car. Using the choke, set the speed of the power unit to around 2 thousand;
- gradually return the choke to its place and unscrew the XX regulator (2). Do this until the maximum engine speed is achieved. What does it mean? Turn screw 2 until the speed stops increasing. When you reach the specified goal, stop;
- operate in the sequence described until the suction is fully recessed;
- turn the adjusting screw (2) evenly. It is necessary to reach such a state that the sum of revolutions becomes presumably the same as when running on gasoline. During adjustment, you must remember that after rotating the regulator, the reaction to changes is not observed instantly, but after some time. This means that you definitely need to take a break.
Adjust the sensitivity of the gearbox. Everything is simple here. Turn the adjusting screw (1) until the XX speed decreases (increases) (again, do not forget about the delays). After this, turn the regulator slightly back - 1.25 rpm. Next, try to apply pressure on the gas. It is perfect if the car immediately responds to your actions.
However, it is important not to forget one more thing. If the adjusting screw “1” was not tightened well enough, it is preferable to leave it untouched. Among other things, provided that the engine capacity is less than 3 liters, then it is also better not to touch the described screw.
Installation and configuration of HBO
GBO installation is carried out by specialized workshops. They are certified, have trained specialists and the necessary equipment and tools for installation. These same workshops sell equipment of various configurations, repair and service it.
You can install the 1st generation kit on a carburetor or injection machine and connect it yourself, but it is better to contact specialists; installation and adjustment will not be expensive. But there will be all the documents necessary for registration, since this is making changes to the design of the car. Failure to note this in the documents will result in a fine of 500 rubles for the first violation. In addition, installers' warranties will come in handy.
The owner can make the settings himself. It is necessary to regulate the gas supply at every service, and when there are changes in engine operation, increased fuel consumption, etc. Adjustments are also required because over time the springs weaken, the membrane becomes dull, and the air filter becomes clogged.
All gas engines are very sensitive to air filter contamination. When it becomes clogged, the engine replenishes the missing volume of air with gas, significantly increasing consumption. Therefore, it is recommended to change it more often.
It’s easy to independently adjust the gas supply and stable operation of the engine with 1st generation gas equipment. Before you start adjusting the gas supply, you need to check and, if necessary, adjust the ignition. There are two adjustment screws on the gearbox. The idle speed screw and the sensitivity screw, and the quantity screw on the dispenser. Some manufacturers have a dispenser with two screws.
It is better to start setting up in the following order:
- Start and warm up the car engine.
- Unscrew the screw on the dispenser completely so as not to interfere with the flow of gas.
- Tighten the idle speed screw completely to prevent gas from leaking through the idle passage.
- The sensitivity screw located in the center of the gearbox at the end, loosen 4-5 turns.
- Start the engine and tighten the sensitivity screw a quarter turn at a time. Do not hurry!
- It is necessary to take into account that the engine reaction will be slightly delayed, because gas remains in the hose and must be worked out. So, a quarter turn at a time, with pauses of 5-10 seconds, continue to tighten the screw until you feel that just a little more and the engine will stall.
- Now - the idle speed screw. We unscrew it a little at a time, smoothly, slowly, remembering the delayed reaction, until the engine speed rises to those recommended by the manufacturer. Usually this is 700-750 rpm. The engine should run smoothly and steadily without failures when over-throttled.
- Now the screw is on the dispenser, drivers nicknamed it the “greed tap.” Traction and consumption largely depend on it. Increase engine speed to 2000-2500 rpm. More is possible. While holding at these speeds, you need to tighten the screw. At a certain point, the engine will begin to lose speed, as if suffocating. There is no need to tighten it further; on the contrary, you need to unscrew the screw a quarter of a turn.
- Now we need to check the settings. Bring the engine to idle speed. If it works smoothly, steadily, and there are no failures when re-gasping, then the tuning was successful. If it is unstable at idle, level it using the idle speed screw. If failures remain, you need to configure again. There was an error somewhere.
For Solex equipment, the adjustments are slightly different. The difference is that there are two screws on the dispenser.
Patience and accuracy when setting up will determine how the car drives, ride quality and gas consumption.
Results
Regulating gas equipment on your own takes half an hour. And replacing a gas filter with a 2nd generation Lovato gas filter is also not a source of difficulties. It is extremely important in this matter to maintain attention and concentration, avoid haste and strictly follow the practical guidance.
The release of more modern cars forces manufacturers of gas systems to develop, moving with the times. Although the number of obsolete vehicles is inevitably decreasing, in pursuit of savings on fuel and car maintenance costs, 2nd generation LPG does not lose popularity among car owners. Its installation and adjustment does not require special equipment. Therefore, it is possible to install gas equipment on a car yourself in the conditions of an average garage.
What does the equipment consist of and how does it work?
2nd generation LPG (propane or methane) is used in cars with injection and carburetor engines. Such equipment is best suited for cars up to the 3rd environmental class (Euro 0,1,2). Starting from Euro 3, it is more rational to install the 4th generation of gas equipment.
Device on the carburetor
The second generation kit includes:
- filling valve;
- gas cylinder with multi-valve and level sensor;
- filling, consumable lines;
- reducer with a coarse filter (sometimes a remote filter with a solenoid gas supply valve);
- fuel type selection button;
- gas mixture dispenser (power register);
- device for mixing gas with air (mixer);
- an electromagnetic valve that blocks the access of gasoline to the power unit when switching it to gas.
The operating principle of 2nd generation equipment on a carburetor engine is as follows:
The engine starts and warms up using gasoline. Next, the key is moved to the neutral position to produce fuel from the carburetor float chamber. Thus, the solenoid valve is activated, which shuts off the gasoline supply.
After which the switch is set to the gas supply position, activating the gas valve. So the gas, which is in a liquid state in the cylinder, flows through the multivalve and the main pipeline to the reducer. At this stage, the mixture undergoes preliminary rough cleaning.
When the gearbox warms up from the engine coolant, the liquefied gas is converted into steam. In the vapor phase, the fuel, passing through the power register, mixes with air in the carburetor.
To do this, in the 2nd generation HBO system, an injection mixer (spacer) or gas inserts are installed on the carburetor.
Then the finished gas mixture, entering through the intake manifold and cylinder head valves, is ignited by a spark in the combustion chamber of the engine cylinder.
To switch back to base fuel, the LPG button is moved to the position of working on gasoline, bypassing the neutral position.
Diagram on engines with injector
Here the equipment differs in several components:
- the button is specifically for the injection system, but there are also universal ones;
- a mixer with an anti-popping mechanism is installed in front of the throttle valve;
- petrol injector emulator;
- lambda probe emulator (installation is not required on all machines).
There are no radical differences in the operating principles of both gas equipment schemes. Major changes have been made to the design of the gas equipment due to the presence in a car with an injector of injectors for supplying fuel (or a mono injector - one nozzle for all cylinders). Which are controlled by the standard engine control unit (ECU).
The engine can switch to gas in semi-automatic mode (middle position of the toggle switch). Until the engine reaches a given number of rpm (1500-2000), gasoline is supplied to the combustion chamber. Then the switch to gas occurs automatically.
How does 1st generation HBO work?
The equipment of the first generation differs from subsequent generations primarily in its simplicity. Later generations acquired additional devices and electronics. But this did not affect the principle of operation of the engine gas supply system.
The 1st generation equipment operates as follows: automobile gas, a propane-butane mixture, enters the fuel cylinder through a filling device. Refueling occurs automatically until the cylinder is filled to 85% of its volume. The fuel filling process is controlled by a multifunctional valve. The built-in pressure gauge displays the filling level.
Through the high pressure fuel line, through the multifunction valve, the gas reaches the solenoid valve. This valve opens when the ignition is turned on. When the engine starts, gas flows through the line into the gearbox. The 1st generation GBO vacuum reducer is double-circuit, in it gas from a liquefied state is converted into a normal gaseous state.
Propane pressure drops from 12-16 atm. to 1 atm. When the pressure decreases, strong cooling occurs. The 1st generation GBO reducer freezes and becomes inoperable. To prevent this from happening, fluid from the engine cooling system is supplied to the gearbox. This allows the gearbox to be warmed, making mixture preparation more efficient.
The gas can no longer enter the combustion chamber, since its pressure is equal to atmospheric pressure. Therefore, there is no turnover. It uses vacuum, or vacuum, which is created in the cylinders during engine startup and operation. Since there is negative pressure in the open cylinders and pipeline, the gas rushes there.
To ensure that the gas supply is in the required quantity, a dispenser is installed on the low-pressure line immediately behind the reducer. Next, the fuel enters the gas mixer at the carburetor, mixes with the air passed through the filter, and enters the cylinders through the intake manifold.
There are installation methods that do not include a mixer (mixer). In this case, a fitting is cut into the bottom (spacer) under the carburetor or a “turtle” mixer is installed. Gas is supplied directly to the manifold, bypassing the carburetor.
Installation of HBO 2nd generation
After selecting the components, the connection diagram for the 2nd generation LPG to the injector and carburetor will consist of several stages:
- Preparing the location for attaching the cylinder. Here you need to provide ventilation holes, you will have to drill the bottom for the tubes, as well as securely fasten the cylinder. In this case, you should stock up on a drill and a drill bit of the required size. Next comes the installation of the cylinder, then the multivalve.
Equipment setup
As an example, consider the configuration option for a popular gearbox from Tomasetto (Tomasetto AT-07 electronic). Adjustment of 2nd generation Lovato gearboxes and its full analogues, such as Atiker and Torelli, is performed in a similar manner.
Before starting work, make sure that all engine systems are in good condition. The air filter has been changed, the ignition has been adjusted, and the coolant level is normal. Drain the condensate from the gearbox, if it is not new, make sure it is in good condition.
In order to adjust second-generation gas equipment with your own hands, you need to warm up the engine to operating temperature on gasoline, switch to gas and turn off the engine. From now on, we will separate the tuning options for different types of engines.
Correct adjustment of 2nd generation HBO on a carburetor with your own hands
- Using a flat-head screwdriver, tighten the screws of the gearbox and dispenser until they stop (without much effort), and then unscrew:
- membrane sensitivity 2-3 turns;
- “greed screw” of the first chamber until fully open, the second by 1 turn.
- Start the engine on gas. Gradually tighten the sensitivity screw to find the moment the speed drops at a lean mixture. Attention! A drop may occur when the mixture is enriched. Therefore, if, when unscrewing the screw, the speed increases, and then falls again, it means that this is working on a rich mixture. Now, by screwing the screw back in clockwise, you need to set the peak of increased engine speed - this way the idle speed will be found (800-850 rpm). If higher, adjust the quantity screw on the carburetor itself to the desired readings.
- Use the accelerator to increase engine performance around 3000 rpm. Use the “greed screw” of the first chamber to set the moment when, when it is tightened, the drop begins, and when unscrewed, the speed increases. Release the accelerator and revoke the throttle; if the internal combustion engine develops low speed (there is a dip), unscrew the screw of the first chamber of the power register by 1/8. At the same time, adjust the sensitivity screw as indicated in point No. 2. Check by re-gasping again.
- The second chamber of the carburetor operates at increased engine speeds from 3000 rpm (depending on the engine brand). Therefore, the “greed screw” of the second camera must be set to approximately the same position as the first.
- Next, you need to carry out control tests on the move under different loads (lifts, sudden accelerations).
Setting up 2nd generation HBO on an injector
- Unscrew the screw of the power register and membrane by 2-3 turns, tighten it until it stops.
- Start the engine. Raise the engine speed to 3000-3500 rpm, by tightening and unscrewing the dispenser, find the peak of maximum engine speed. From this position, screw in the register screw 0.5 turns.
- Release the accelerator and revise the throttle. If the engine starts to choke, unscrew the metering bolt 1/8. And so on until finding the optimal speed set.
- Then, gradually tightening the membrane sensitivity screw, find the moment the speed drops, loosen the screw by 1/8.
In this case, it is convenient to use a lambda probe emulator. The setting can be considered correct when the indication on it (LED) glows red at idle. If this condition is not met, you can unscrew the x/x screw until the engine speed stabilizes. Also, if you have a device (gas analyzer), you can use it to adjust the gas equipment even more accurately.
5. Make further adjustments during sea trials. If the car does not develop enough power, slightly release the gas supply with the register screw.
Advantages and disadvantages of 1st generation HBO
The undoubted superiority over all subsequent generations is the simplicity of the design and the cost of the kit, its installation and connection. All the advantages. And now the disadvantages. The first generation of HBO requires constant attention of the car owner. Design imperfections cause additional troubles. Adjustments and cleaning of filters are a common process.
Short service life of the vacuum reducer membrane due to large temperature changes. Gas consumption in physical terms is up to 30% higher than gasoline consumption (if gasoline is 10 liters per 100 km, then gas is 13). The unreliability of the system leads to gas leaks, which settle in inspection pits and cellars. This leads to fires. It is no coincidence that in large vehicle fleets all parking lots run on gas, only in the open type.
The advantages of running gas engines relative to gasoline and even diesel engines are quite obvious. From environmental regulations to operating costs. This is especially noticeable during long daily runs. Owners of minibuses and passenger taxis have long realized this.