Selecting heated seats
In order to choose heated seats, you need to decide what kind of heating you need. There are several types of seat heating for Lada Priora: Cover, Standard heating, Emelya heating
Heated seats from the cigarette lighter (cape)
This type of heating has a wide area of application and is quite easy to install. To install heated seats from the cigarette lighter, you do not need any auto electrician skills. To install such heating, you just need to insert the heating plug into the cigarette lighter and select the heating position. It should be noted that the reliability of such heating leaves much to be desired. Filaments are used as a heating element, but since the cape is poorly attached to the seat and is often subject to creases, which leads to the breakage of the filament and, consequently, failure of the entire heating.
Heated seats standard
The standard heating for Lada Priora is a very reliable device that can be bought at any auto parts store at a price of 1000 rubles. Standard heating has only one heating position and does not regulate the heating temperature, i.e. The seat will heat up until you turn it off. This is its only drawback. The advantage of this heating is that there is no need to use additional intermediate relays to unload the contacts. Since the relay itself is already built into the button. The standard heating has heating elements for the seat and lower back.
Heated seats Emelya
Emelya's heated seats have proven themselves quite well on the market. The cost of such a heating kit is not cheap, starting from 2000 rubles. This heating is installed in the same way as standard heating. However, a significant difference from standard heating is the ability to regulate seat heating. But it is also worth noting that installing the seat heating button in the standard place will be difficult; you will have to cut out and trim the standard place. This type of heating has heating elements for the seat and lower back.
Seat heating kit (factory) 2 seats for VAZ Priora
Dear customers, in order to avoid errors when sending the electric seat heating kit 2170-6513010 with wires and a button block to a VAZ 2170/71/72, in the “Comment” line, indicate your car model, equipment, and year of manufacture.
When you have to get behind the wheel of a Lada Priora in severe cold, and feel the cold seat on your back and the fact that it’s lower, you involuntarily have to think about the fact that it wouldn’t hurt to have heated seats in the car. The fact is that standard heated seats on the VAZ 2170/71/72 are found only in the luxury version of the last years of production, and in all other cars of this series heating is not provided. However, you shouldn’t despair, because anyone can do independent repairs and connect heating.
Most modern cars are equipped with many systems that provide comfort to the driver and passenger, one of which is heated seats. It is controlled using a block, looks attractive, modern, not only fits beautifully into the interior, but is also very easy to use.
Despite the fact that seat heating is a relatively new option on the bells and whistles market, this did not stop it from gaining global recognition among all motorists in the world in such a short period of time. Thanks to heated seats, the car driver can get rid of the unpleasant sensations that accompany him every time he gets into a “cold” car.
Manufacturers of heated seats have begun to produce seat heating kits for motorists who do not have this option included, which allows them to install it themselves, thereby saving their “fifth point” from unpleasant sensations.
A built-in (factory) assembled seat heating kit (for 2 seats) is installed on cars for the Lada Priora (2170-71-72) by default.
The product is created according to the formula “the length of the heating filament - the resistance of the material - the voltage of the on-board network.”
This means that a heating filament of this length (at a voltage of 12.5-13.5 Volts) cannot heat up more than 53°C.
The fabric base of the heating is made of non-flammable material, the heating nichrome thread is in fluoroplastic, which together completely eliminates the possibility of the product catching fire.
Equipment:
— Heating element (voltage 13.5 V; power 55 W) — 4 pcs.
— Button block — 1 pc.
— Mounting kit for connection — 1 pc.
— Installation diagram — 1 pc.
— The product is certified.
Standard seat heating 2170-6513010 for cars of the VAZ 2170 / 2171 / 2172 family are supplied to the assembly line of AVTOVAZ OJSC, the product has been tested and has a high degree of reliability.
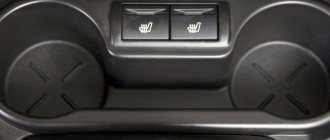
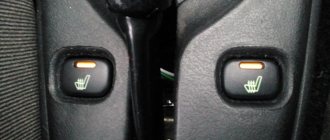
The switch block for heating the front seats is located in the interior of the VAZ 2170/2171/2172 car on the floor tunnel casing between the front seats.
Unpleasant sensations are just the tip of the iceberg; cold sitting is fraught with more serious consequences than it seems at first glance.
The seat heating control unit is designed to turn on/off seat heating (switching the electrical circuits of the driver's and passenger's seat heaters) in two positions on Lada Priora / Priora 2 cars.
Installation of electric seat heating 2170-6513010 of a car, complete with wires and a block of switches for heated front seats of the VAZ 2170, 2171, 2172 Lada Priora 2 and its modifications, can be done independently, without contacting specialized maintenance services.
Other article numbers of the product and its analogues in catalogues: 21700651301023.
VAZ 2170, VAZ 2171, VAZ 2172.
Any breakdown is not the end of the world, but a completely solvable problem!
How to independently install heated front seats in a car of the Lada Priora / Priora 2 family.
With the online store Discounter AvtoAzbuka, repair costs will be minimal.
Just COMPARE and BE SURE!!!
Don't forget to share the information you find with your friends and acquaintances, as they may also need it - just click one of the social networking buttons below.
Installation of heated seats
We will look at installing seat heating using the example of installing standard heating. Since the installation of other heating systems will be similar to the installation of standard seat heating.
In order to install heated seats yourself, you need to remove the seats from the car and remove the upholstery from them. The heating installation will be divided into several stages.
- Removing the seats
- putting the seats back
installation of thermoelements in them
Removing the seats
Tools needed to remove seats:
- Ratchet
- Head at "13"
- Head on "8"
- Head at "10"
- Screwdriver “+”, “-”
- Insulating tape
Seat removal process
- Move the seat forward as much as possible and pull out springs 1 and 2
- Using a ratchet with a head set to “13”, unscrew the seat mounting brackets
- Using a ratchet with a head set to “8”, unscrew the seat skis in 5 places
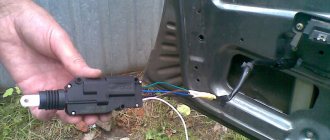
- Disconnect the seat belt sensor plug
- We take out the seat
- Next we move on to disassembling the seat itself and installing thermoelements
Installation of thermoelements
- We bend the plastic clips of the seat upholstery and lift the upholstery up.
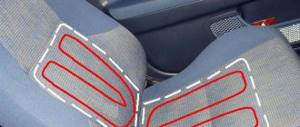
- We slip the thermoelement under the upholstery and sew it to the foam rubber.
- We stretch the upholstery over the seat frame and secure it with plastic clips.
- Fold the backrest, pulling out the hooks securing the backrest.
- Remove the backrest adjustment knob. You need to pull the plastic gear towards you and it will come off.
- Using a “10” socket, unscrew the bolt securing the gear to the seat
- We bend the pins holding the backrest upholstery and remove it from them.
- We slip the thermoelement under the upholstery and sew it to the back.
- We stretch the upholstery over the back of the seat and secure it with clamps.
- Connect the seat heating plug to the lumbar heating plug
How to repair heated seats
To repair heated seats yourself, you will need to remove the seats. In reality, it is not as difficult as it may seem at first. It is enough to unscrew the four bolts and disconnect the connector that secures the chair at the base.
The fact is that the seat belt is attached at one end to the seat, the heating of which does not work. You will have to make some effort to disconnect this device. To do this, it will need to be disassembled.
The plastic seat belt cover is secured with special Torx bolts. They have protrusions, so you will need a special screwdriver to remove them. It is in removing the cover that the main difficulty lies, and when this is done, simply carry out the following manipulations:
- remove the clamping bar;
- press the latch;
- pull out the belt buckle.
After this, remove the elements from the frame. Do everything as carefully as possible so as not to damage the design of the heated seats, which do not work.
To remove the pillow, unfasten the clips on the sides. The lumbar support handle for the heated seats will also have to be removed. Unfortunately, without this procedure the device is unlikely to work.
You also need to remove the handle responsible for tilting the backrest. Once you have separated the non-heating cushion from the chair, you can repair it. The process can be divided into the following stages:
- Remove the top right trim.
- Remove the plastic casing.
- Remove the armrest.
- Unhook the straps holding the backrest in place.
- Remove the headrest fasteners.
- Pull the backrest up.
After you have completed all of the above points, you can work directly with the damaged seat heating element.
After that, simply take the Teflon cable and replace the damaged section. First, do not forget to strip the ends of the wires and treat them with tin. Combine the resulting structure into a twist and put on a special cambric.
When the seat heating repair has been carried out, before reassembling, check that all contacts are working. Only then return the chair to its former appearance. For reassembly, you will need glue; you need to use it to connect the foam rubber.
Every driver can repair faulty heated seats. The main thing is to be patient and take time for diagnosis and dismantling. For a beginner, this procedure can take 5-6 hours, for a professional – about two.
The video shows how to repair the seat:
In winter, without heated seats, a Lada Priora car is very cold, so to add a little comfort in the cabin, we install heated seats ourselves.
First of all, you need to buy a standard heated seats for the Lada Priora:
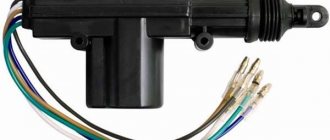
– 4 heating elements (2 backrests, 2 seats) with wiring and connectors – wiring harness with connectors – heating button block
Read more: How to unscrew a water filter without a key video
You also need to buy:
– 4-pin relay 1119-3747210-10 (98.3747-111) – 15A fuse – female terminals (medium and small) – earth terminals – double-sided tape – thin corrugated tube – locking terminals for connecting wires – wires
For ease of work, we remove the seats from the car; you will need a specialized head under the “star” or a head at “8”. Also, to lay the wires, we dismantle the casing of the central tunnel.
Remove the seat trim. Use a screwdriver to bend the metal hooks on the back.
And unclip the plastic latches on the seat.
We lift the casing to the side so that it does not interfere.
We glue the heating elements with double-sided tape.
We bring the wires from the heating elements under the seat through the hole, first putting on a corrugated tube, and securing it with a clamp.
Reinstall the seat trim.
We remove the lining of the central tunnel. We lay the main harness with wires in the tunnel from the block of heating buttons to the armrest, having previously placed a corrugated tube on it. In the tunnel there is a channel in the plastic partition between the button block and the cigarette lighter.
Wiring connection order:
– connect the terminal block to the block of heating buttons – attach the black wire (‘ground’) under the bolt near the handbrake – connect the white wire (button illumination) to the cigarette lighter illumination – stretch the red wire (+12 V) along the standard wiring harness under the floor trim under the driver’s side seat and along the left threshold to the mounting block
Assembling the central tunnel. We install a block of buttons in it instead of a plug. We bring the wires to the seats out into the gap between the floor and the tunnel, connect them to the plugs from the seats and secure everything with clamps.
The order of wiring in the mounting block:
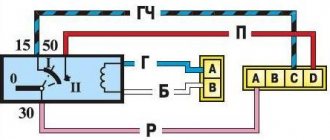
– Relay 1119-3747210-10 is installed in the mounting block in the free slot K11 (a mating terminal block is not needed): – contact '87′ is connected to the red wire from the block of heating buttons - contact '86' is connected to 'ground', the bolt is on the body near the mounting block - contact '85' is connected to the blue-black wire (see photo) going from the ignition switch to the light control unit (+12 V when the ignition is on)
Contact '30' is connected to the pink wire of contact '30' of relay K7 (high beam headlight relay)
The fuse is installed between relays K7 and K11. I couldn’t find any special blocks for the fuse, so I used regular “female” terminals in plastic insulation.
The new fuse was placed in the hole in the mounting block between the spare fuses. Now, during the cold season, heated seats will delight you and your passengers!
– all work on electrical connections should be carried out with the battery terminal disconnected; – heating elements should be glued well, because the main reason for the failure of heaters is the 'moving out' of the heaters and damage to the filaments - the time for warming up the seats when the heating is on depends on the material, the thickness of the seat upholstery and the presence of covers
If you still have the energy for tuning, try installing front speakers on the Lada Priora with your own hands.
Installation of heated seats "cape"
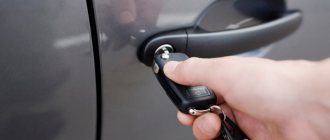
The heated seat “cowl” fits over the cover or seat of your vehicle. Fixed on the seat with elastic bands. The heating plug is inserted into the cigarette lighter and narrower, after which the desired operating mode is selected on the heating button. Such heating is dangerous because some models do not have protection and leaving it in the cigarette lighter can lead to dire consequences.
The installation of heated seats on your vehicle is complete. Standard heating only works when the car's ignition is turned on.
Heated seats Lada Priora: causes of malfunction, diagram
The advantages of the Lada Priora were appreciated by many Russian consumers, choosing this particular model. The car attracts buyers not only with its visually attractive appearance, but also with:
- high-quality assembly;
- affordable cost of components;
- quite reasonable price.
In addition to the above advantages, Priora owners, of course, if they know a little about car repair, without any problems, following the recommendations of specialists, they will be able to fix minor breakdowns with their own hands, for example, replacing a fuse, and installing heated seats on a Priora will not cause any special problems.
Heated seats Lada Priora - breakdowns, installation instructions
In frosty weather, it’s not very pleasant to sit on an icy car seat to start the engine - so heated seats come to the rescue. Inventive owners of the Lada Priora almost immediately began installing heated seats in their Prioras. Of course, the seat does not warm up instantly, but it noticeably saves you from frostbite. While the heater is not heating up (since the engine has not yet warmed up!) is it necessary to sit in complete cold? Factory seat heating is installed only in luxury versions of the Priora car. Installing it is not very difficult, the main thing is to connect everything correctly. Heated seats, like “Emelya”, do not need to be installed, the seat upholstery is not removed, because it is just a cover for the seats - it is inserted into the cigarette lighter - although for some reason, over time, they burn out the cigarette lighter fuse.
You can install heated seats on a Priora yourself; it will cost relatively little (compared to the fact that your health can suffer greatly from warming up a frozen car). The heated seat control unit can be installed in the Priora where it is convenient: the main thing to remember is that this is not the most necessary button when driving a car, it should not interfere with pressing other levers and buttons. Read the article to the end and your car will be warm even at minus 45.
Seat heating kit for VAZ 2170-2172 /Lada-Priora/
APPLICABILITY: VAZ 2170, 2171, 2172 (Lada-Priora). Built-in heating kit for the two front seats.
Today you rarely see a modern car that does not have a heated seat function from the factory.
But, unfortunately, not every LADA configuration has such an option. Heated seats in a car are a very convenient and essential attribute in the autumn and winter. Many car owners who do not have automatic engine start or heated seats in their car are familiar with the unpleasant feeling of sitting on a cold seat in frosty weather. This seat heating kit is designed for installation on cars of the Lada Priora family. The product is created according to the formula: the length of the heating filament - the resistance of the material - the voltage of the on-board network. This means that a heating filament of this length, at a voltage of 12.0-13.5 V
, cannot heat up more than
53 °
C.
The fabric heating base is made of non-flammable material. A nichrome thread with fluoroplastic insulation is used as a heating element. Thus, the likelihood of the product catching fire is completely eliminated. TECHNICAL CHARACTERISTICS:
— normal supply voltage 12 V; — current consumption 3-5 A; — rated power 40 W; — heating time of the module surface to operating temperature is 5-10 minutes; — heater surface temperature +53 °C; — overall dimensions of each module are 240x310x375 mm.
Set contents:
— module with heating element — 4 pcs.;
— installation kit of mounting wires; — push-button heating control unit. Installation on a car.
Heaters can be installed in special pockets on the inside of car seats or under seat upholstery. The inadmissibility of creasing or displacement of heater elements during their operation must be ensured by their additional fastening. When installed in car seat covers, the heaters are inserted into additional pockets on the back and seat of the covers from the inside. Heaters can be attached to covers in the following ways: using double-sided tape; using fabric glue (the glue should be odorless!); If the materials of the covers are thin, the heaters can be hemmed to the covers; for this purpose, fastening zones are provided at the edges of each heater. When installed under the seat upholstery, the heaters are glued to the foam lining of the chair with double-sided tape: one heater to the seat, the second to the back. The heating control keys have two positions (ON/OFF), the button block is installed in a standard place on the floor tunnel lining.
Installation of standard seat heating on Lada Priora
The standard seat heating kit for Priora should include:
- Heating elements (4 in total, two for each seat);
- Block for the control unit with wires;
- Priora seat heating unit.
At the same time, the article number for heated seats for the Lada Priora must contain the numbers 2170 - this, as any Priora owner knows, is the model number. It is worth distinguishing the standard heating kit for Priora 2 by catalog number - in comparison with the kit for Priora 1, they are different. The entire installation of seat heating on a Priora is best described with a detailed step-by-step algorithm, which has been tested by time and other car enthusiasts:
- We remove the front seats. Remove the factory covers from the seats, which are secured with a metal spoke and three plastic latches. You can disassemble the seats without dismantling them, removing only the covers, but then the process will become a little more complicated - it will be inconvenient to deal with wiring and laying out heating elements;
- We attach heating elements to the seats - one on the lower part, the second on the backs, in the lumbar area. Some people recommend attaching it with double-sided tape, but over time it can come off. It would be safer to sew the heating element to the pillow so that it does not move out of its place;
- Pull the wires from the heating elements through the hole in the mount under the pillow (run the wires from the lumbar heating elements to the place where the seat upholstery is attached). The piece of wire that passes through the hole can be protected from chafing using some kind of plastic tube. The power plugs for all four elements are out, all that remains is to connect them;
- Disassemble the central tunnel. Buttons for heated seats will be in place of the plug near the handbrake;
- The wiring is connected strictly according to the connection diagram for heated seats. Before doing this, it is recommended to disconnect the battery from the network. We install a terminal block to the heating control unit. The (-) black wire is attached under the bolt near the handbrake. A gray-red wire (for aesthetes, it is responsible for illuminating the buttons) is connected to the lighting of the cigarette lighter rim. The red 12V wire is pulled to the mounting block. You can't do without a fuse here. Then everything goes strictly “by the numbers”. Connect pin 87 to the red wire, pin 86 to the black wire. Connect the blue-black 12 V wire to pin 85, the pink wire to pin 30. You can connect to the mounting block via cut-in clamps to hold the wires tighter;
- Reassemble the tunnel and install covers on the seats.
The standard seat heating on the Priora is guaranteed to last for several seasons if it is connected correctly. And if immediately after installation the heating does not work, it means the wiring connection was incorrect.
Connection diagram in the fuse box
Work on connecting the wires should be carried out with the battery disconnected.
Install the relay (1119-3747210-10) into the mounting block, connector K11.
The 87th contact of the relay is connected to the red wire of the button block.
The 86th contact of the relay is connected to the body ground.
The 85th contact of the relay is connected to the black-blue wire from the ignition switch.
The 30th pin of the relay is connected to the pink wire of the 30th pin of the high beam relay.
The fuse can be installed between the high beam relay and relay K11 on the pink wire.
As can be seen from the description, the Lada Priora heating connection diagram is very simple.
If, after all the steps taken, the heated seats on the Priora do not work, then you should check point by point that the wires and relays are connected correctly. You can also watch the video instruction “Heating the seats of a Lada Priora with your own hands.”
Built-in seat heaters svkavtomagiccomfort-40
Seat heating kit for Lada Priora
Priora - analogues of heated seats
No matter how strange it may be, in stores you can’t often find analogues of the standard kit for Priora. Most often they are cheaper, but the heating elements have to be adjusted to size, and sometimes they are even trickier with the wiring. All that remains is the factory heated seats - although it costs more than its analogue, it will definitely fit on the seat, and everything will be more or less clear with the wiring.
Well, in general, here are the analogies:
- Emelya;
- Heated car cover “Heat”.
I decided to install heated seats on the Priora to make it comfortable in the car in winter.
We purchase a set of standard seat heating for the Priora for 850 rubles. consisting of:
- 4 heating elements (2 backrests, 2 seats) with wiring and connectors
- wiring harness with connectors
- heating button block
- relay 4-pin 1119-3747210-10 (98.3747-111)
- fuse 15A
- female terminals (medium and small)
- ground terminals
- Double-sided tape
- thin corrugated tube
- locking terminals for connecting wires
- wires
We bring the wires from the heating elements under the seat through the hole, first putting on a corrugated tube, and securing it with a clamp.
Reinstalling the seat trim
We remove the lining of the central tunnel. We lay the main harness with wires in the tunnel from the block of heating buttons to the armrest, having previously placed a corrugated tube on it. In the tunnel there is a channel in the plastic partition between the button block and the cigarette lighter.
Wiring connection order:
- connect the terminal block to the block of heating buttons
- We fix the black wire (“ground”) under the bolt near the handbrake
- connect the white wire (button illumination) to the cigarette lighter illumination
- we stretch the red wire (+12 V) along the standard wiring harness under the floor covering under the driver's seat and along the left threshold to the mounting block
Assembling the central tunnel. We install a block of buttons in it instead of a plug. We bring the wires to the seats out into the gap between the floor and the tunnel, connect them to the plugs from the seats and secure everything with clamps.
The order of wiring in the mounting block:
- Relay 1119-3747210-10 is installed in the mounting block in the free slot K11 (a mating terminal block is not needed):
- Contact “87” is connected to the red wire from the heating button block
- Connect contact “86” to “ground”, bolt on the body near the mounting block
- Contact “85” is connected to the blue-black wire (see photo) going from the ignition switch to the light control unit (+12 V when the ignition is on)
How to remove the front seats
Instructions for dismantling the front seats will be needed not only for installing heating. The front seats in the Priora are installed simply, and to install and disassemble them you will need several tools and strength. By the way, on the Priora 2 seats in the “Lux” configuration have become softer and more comfortable, but the adjustment is still the same - you cannot adjust the height.
There are not many instructions on how to remove the front seat, everything is simple:
First you will have to move the seats all the way back and remove the torsion bars. You will need a size 8 wrench (for five bolts securing the slide) and a size 13 wrench (for four bolts on the bracket fastenings). First you need to unscrew the bolts on the bracket, then tilt the back of the chair back as far as possible and unscrew the two bolts on the slide. After this, tilt the backrest as far forward as possible and unscrew two more bolts. The seat can be removed from the passenger compartment.
How to remove the back sofa
Removing the rear row of seats is rarely done - only for cleaning or upholstery with new covers. However, also read the instructions for removing the rear sofa and keep it in mind “just in case.”
- Unclip the seat cushions on both sides (they are angular) and remove them from the passenger compartment.
- Find the locking strap above one of the backrests and pull it up. Do the same with the other back.
- Unscrew the bolts securing the armrest and remove it;
- Unscrew the bolts securing the hinges to the body.
How to connect seat heating on a Priora yourself
VAZ 2170 The family of Russian cars Lada Priora
, produced by OJSC AvtoVAZ, despite its shortcomings, was able to win the trust of domestic motorists. Recently, the plant team has been making some progress in promoting advanced ideas into production. The latest models comply with European environmental and safety standards.
Luxury configurations of Lada Priora Coupe
include rain and light sensors, parking sensors, side airbags, heated mirrors.
Taking into account our climate, the manufacturer provided heated front seats in the Priora
and included it in the basic set of the luxury model. But what about those who don’t have such a useful option, but want to drive warm?
Let's consider the technology for installing stationary electric heating pads on a VAZ 2170. After familiarizing yourself with the proposed procedure, installing the device and connecting it to the on-board network will not be difficult even for a novice car enthusiast.
Installation of heated seats and heating buttons in Lada Priora
1. Installation of heated seats in Lada Priora
2. Installation of seat heating buttons for Lada Priora
Installation of heated seats in Lada Priora
Purchased from the online store fox-city.ru. It was agreed that the buttons were Priora, but they are not included in the 2110 kit. The quality is lower than the factory one; on my 2110, the substrate with heating elements was better.
First we take out the seats. In my case, you will need a Torx T-10 head, the seat slides are attached to them, and a 13 head - plastic clamps are attached (in front of the seat). The sequence is as follows: move it forward and unscrew the three bolts. We move it back, unscrew the 4 nuts from the clamps (after removing the rods from them), tilt it back and unscrew two more bolts in the middle. We remove the headrest, move the backrest forward using the backrest adjuster and pull out the seat.
Let's take apart the beard (photo 3). The trickiest thing here is the ashtray at the back (its two self-tapping screws are twisted from the inside). We unscrew: 4 screws on the air ducts, 2 under the radio, 4 on the sides in the legs, one in the cup holder under the plug, two on the sides at the back of the seats, 2 under the armrest plug, and 4 under the cartridge inside the armrest. We pick out the plug under the handbrake using a screwdriver wrapped in a rag. We need to run some wiring in the beard. Black on the body, near the handbrake. From the fifth contact the wire goes to the white cigarette lighter - this is the button illumination. And the first one (in the block) is the power one, it goes to the relay in the panel.
Let's disassemble the seat. We unscrew the 4 bolts on the seats with a 10″ wrench (photo 5, two are visible), pull off the hooks (they are left over from seat 2108) and remove the backrest (photo 6-7). The back is disassembled by bending the iron tendrils (photo 6-7) and tightening the material. The seat is disassembled by bending and removing the plastic half-tubes under the seat (photo 10), then we take out one metal rod (it gives shape to the material) in photo 11, and pull the material to the side. We glue the heating elements with “Moment”. Let's pass the wires. There is a nuance here: on the bottom element there are mom and dad, on the top there is dad. Before gluing, of course, we check for operability, measure the resistance, for a break, and calculate the current. For this you need a multimeter.
At the bottom of the diagram, they are the same, for whom one is more clear.
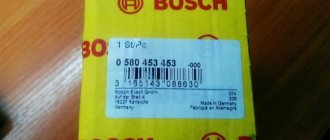
The kit did not include a relay or fuse. We buy a “Kalinovskoe” relay called 1119-3747210-10, a place for the relay in K11, and a place for a fuse in F19 for 15A. Since there are no contacts there, we put them there. The trick is that the contacts in the block are held in place by the plastic tendril of the block itself, and not, as usual, by the contact itself. We take control of the relay from the “yellow with blue stripe” wire, which fits to the K6 wiper relay from F11. Power appears on this wire when you turn the key, and disappears when the ignition is turned off. This is necessary so that the power contact of the seat heating relay turns off when the car is turned off.
The main power supply was carried out with a separate wire (photo 13) for the fogs and warmers. It comes in a loop to F19, and from there to relay contact 30.
Nuance. For high-quality wiring, you will need to crimp the contacts. I took it from the signalmen at work (photo 2). The PRICE of this part is 16,000 rubles. You can buy it in the store for 450-500 Chinese. If there is no crimping, then only SOLDERING.
VAZ 2170 Family of Russian cars Lada Priora
, produced by AvtoVAZ OJSC, despite its shortcomings, was able to win the trust of the domestic motorist. Recently, the plant team has been making some progress in promoting advanced ideas into production. The latest models comply with European environmental and safety standards.
Luxury configurations of Lada Priora Coupe
include rain and light sensors, parking sensors, side airbags, heated mirrors.
Taking into account our climate, the manufacturer provided heated front seats in the Priora
and included it in the basic set of the luxury model. But what about those who don’t have such a useful option, but want to drive warm?
Let's consider the technology for installing stationary electric heating pads on a VAZ 2170. After familiarizing yourself with the proposed procedure, installing the device and connecting it to the on-board network will not be difficult even for a novice car enthusiast.
Briefly about seat heating kits
The following heating elements are used in various sets:
- high resistivity wire;
- carbon fiber.
Seats for Lada Priora The latter material has become widespread nowadays due to its reliability and safety.
Products created on its basis are resistant to mechanical stress and can be easily adjusted to the required size using ordinary scissors. The use of electronic control units allows for smooth temperature adjustments. The kit usually consists of
:
- a set of heating plates;
- wiring harness with connectors;
- thermostats;
- fastening devices;
- templates
Method of installing standard heated seats on Priora
In addition to purchasing a standard set of heating plates, we will need additional materials
:
- fuse 15 A;
- relay 1119-3747210-10;
- ground terminals;
- corrugated tube with a diameter of 18 mm;
- Double-sided tape.
Now you can proceed directly to installation
:
- Move the seat forward and unscrew the 3 mounting bolts.
- Move the chair back and unscrew the 4 nuts from the clamps.
- Tilt the chair back and unscrew two more bolts in the middle and remove the seat.
- Remove the trim by bending the metal hooks on the back and the latches on the bottom.
- Bend back the casing and secure the heating elements.
- Lead the wire down under the seat, having previously put on the corrugated pipe, secure it with a clamp, and put on the trim.
- Disconnect the battery and make connections:
- black wire – attached under a bolt near the handbrake (“ground”);
- white – to the cigarette lighter illumination;
- red - stretch along the standard harness under the floor covering under the driver's seat and further along the left threshold to relay contact “87” in the electronic unit.
- Remove the tunnel lining and lay the main harness from the control unit to the armrest, having first put on the corrugated pipe.
- Install the purchased relay into the free slot K11 of the mounting block and make the connections:
- terminal “86” – connect to the body;
- terminal “85” - connect to the blue-black wire from the ignition switch;
- connect terminal “30” to the pink wire from pin “30” of K7.
- Install a fuse between relays K11 and K7.
- Check connections.
Heating elements for heating Priora seats
you need to glue it efficiently and carefully, because a common cause of breakdowns is the “moving out” of the heater.
Repair
Before you begin repairing heated seats, you should be aware of the reasons that can cause this malfunction. In general, there can be only three reasons causing heating burnout:
- faulty fuse;
- breakage of the heating tape inside the structure;
- control panel or switch located on the seat.
Unfortunately, in some car models, heated seats are extremely unreliable. This usually applies to budget cars - just step on the seat with your knee and a break occurs. Of course, expensive cars like Jaguar or Lexus are free from such defects, but low-budget Citroens and Renaults often have unreliable heating bands.
Checking the fuses
The normal functioning of heated seats depends on how the vehicle's on-board network works. Therefore, before diagnosing the device itself, you need to check the fuse.
The standard F33 is rated at 15 amps. This device is mounted in a block, which in most cases is installed at the bottom of the panel where the driver’s seat is. If the bulbs do not work, you will need to replace them.
Where to start restoration work
So, be prepared for the fact that the chair will have to be taken out of the car and disassembled. Of course, there are cases when everything can be solved without complete disassembly, but if, for example, the cable fails, this procedure cannot be avoided.
We will repair heated seats that do not work using the example of a Citroën C4 Picasso.
To check the switch you need to remove it. Theoretically, this can be done without removing the chair. But in practice this is rarely possible to implement. The thing is that approaching the switch in many models is extremely difficult. Therefore, if you remove this spare part right in the cabin, you risk damaging the casing and the device itself.
To remove a heated seat switch that is not working, first remove the connector. In most car models, it is enough to wiggle the element a little and pull it down. But be careful, some car brands install unique types of mounts.
To release the stoppers you need to reach inside the casing with a screwdriver. Then apply some force to make the part come out. There will be three contacts here. You need to measure the resistance on the two side ones. The middle contact is responsible for the light bulb.
If the resistance is the same in all positions of the adjustment wheel, check the contacts. Perhaps they got grease on them. In this case, clean them and everything should work fine.
Checking the integrity of the heating tape
Very often, the reason why the heated driver's seat does not work is due to a break in the heating element. You can check the functionality of this part of the structure without removing the chair, but this will require thin and skillful fingers; the algorithm itself consists of the following stages:
- Recline your back as much as possible.
- You need to stick your hand into the gap between the back and the seat.
- Try to find the upholstery fasteners in the back by touch. There are usually these to the left and right of center and one more at the bottom.
- Remove the backrest trim fasteners.
Read more: The most expensive license plate for a car
After you complete these simple manipulations, you will need to remove two connectors for heated seats, which does not work. You can remove all three if you wish. Just press the latches first. To do this, just pull down.
Pull out the connectors and check them. In this context, the strength of the resistance itself is not so important. It is enough that it simply exists. During testing you will need to check the following pins:
- two contacts on the back;
- four per pillow;
- two extreme and two middle.
Once you have discovered the place where the break occurred, you will be able to repair the heating that is not working.