Vehicle diagnostic connectors | Table
Audi diagnostic connectors - appearance, location, pin assignments
No.
Appearance Brief description Brand and year
1
2-pin connector All models 1989-1994; some models 1994-1997
2
16-pin OBD-II connector all models after 1997; some models 1994-1996
Connector type No. 1 – two 2-pin connectors
Brands and years:
all models 1989-1994;
part of the 1994-1997 models. Note: on many early models (1989-1992), diagnosis is possible only by reading the so-called slow codes. Purpose of the diagnostic connector pins
Typical location:
under the hood in the fuse box or in the passenger compartment
Appearance
Examples of connector location on selected Audi vehicle models
Audi 100/A6 (1991-1997) Location: under the hood in the additional relay box (left corner of the engine compartment in the direction of travel, closer to the passenger compartment). To access the connectors, remove the relay block cover. Similar connector arrangement on Audi 80 (1992-1995)
Connector type No. 2 – 16-pin OBD-II connector
Brands and years:
all models after 1997;
some models 1994-1996 Note:
on many 1996-2000 models. Despite the installation of the OBD-II connector, none of the OBD-II protocols are supported. Purpose of the diagnostic connector pins
Typical location:
in the cabin under the dashboard on the driver's side
Appearance
Examples of connector location on selected Audi vehicle models
Audi A4 (1995-2001) Location: under the ashtray cover for rear passengers. The connector itself is also covered with an additional cover. On the ashtray cover and on the cover of the connector itself there is an image of an engine crossed out by lightning (like on the Check Engine lamp)
Audi A3 (1997-2003)Location: at the bottom of the center console
Audi TT (1999-2005) Location: under the dashboard, on the left side
GAZ to OBD-II adapter (GAS pinout not Renault)
Options:
Technical condition: good
Warranty: seller's warranty
Availability: in stock
The GAZ to OBD-II connector (not Renault, but GAZ) is an adapter from the GAZ diagnostic connector to the OBD-II diagnostic block (female/female).
5 years of experience in the field of car diagnostics. Possibility of return within 14 days (if suddenly for some reason it doesn’t fit, it turns out to be unnecessary.)
The adapter is mainly designed for quick and convenient connection of equipment via the OBD-II connector.
For example, to connect a K-line adapter (made in an OBD-II housing) to VAZ and Daewoo cars. This connector is used in GAZ cars: Gazelle, Sobol, Barguzin, Volga, 3110, etc.
VAZ diagnostic connector pinout
- Other
- Engine
- Steering
- Electrical equipment
- Transmission
- Brake system
- Suspension
- Tuning
- VAZ 2110 Other
- Engine
- Steering
- Electrical equipment
- Transmission
- Brake system
- Suspension
- Tuning
- Electrical equipment
- Steering
- Video publications
- VAZ tuning photo stream
- Operation and repair manuals
Inside every modern car there is a lot of electronic stuffing. This also applies to the new generation of VAZ, which includes the Lada 2110. If there is electronics, then it can be tested. Today, this task is performed by computer diagnostics, which quickly and effectively finds all problems with the car. Testing can be done by yourself, but this requires an adapter.
Diagnosis requires experience in working with computers.
Computer diagnostics are divided into 2 types:
There is also a computer check of the automatic transmission, but this does not apply to the VAZ 2110. Now we know why diagnostics are required. It is performed using a special scanner, which is connected to the car via a diagnostic connector.
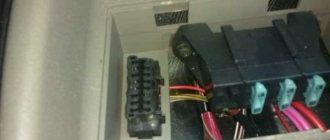
Connector location
So, we plan to check our car and we even have the necessary equipment. Now you need to find the connector - it is located at the bottom of the steering column, to the right of the driver. This connector is also called OBD. Knowing this name, it will be easier to find a suitable adapter.
If you believe the reviews, the K-Line connection device is considered the most successful adapter for VAZ cars. It has a lot of free space, so you can connect almost any testing equipment to it.
As for the main diagnostic device, it will be a computer. Of course, it is easiest to work with a laptop, since the process can be performed right behind the wheel of a car. But if there is only a stationary option, then you should take care of a long cord connecting the computer to the adapter.
Performing diagnostics yourself
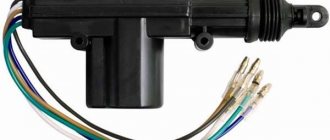
Adapter for connecting a computer to the electronics of a VAZ 2110 car.
Many motorists believe that having a computer and an adapter is enough to carry out a quality check of their VAZ 2110.
But the main “component” for a successful and extensive test is the presence of a competent specialist.
Of course, you can complete the task yourself, but to do this you need to install special software, which is publicly available on the Internet. A good option is Motor-Scan.
Also, the presence of the Internet is necessary in order to decipher the received error codes and abbreviations. The work is performed in the following sequence:
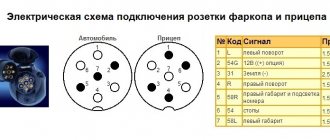
Pinout
The remaining contacts are empty, but their number differs depending on the year of manufacture.
If you plan to diagnose it yourself, then you need to know what the block includes. Pinout is the purpose of all the contacts that are in any connector. We are interested in the OBD pinout.
We will analyze the notation using a diagram. The pinout is as follows:
- Contact “A” is responsible for connecting the ground;
- Contact “B” is needed to connect the L-Line (some cars do not have this contact);
- "M" is needed for K-Line;
- “G” is responsible for controlling the fuel pump;
- “H” is +12V power supply.
Useful videos on the topic
Connecting the ELM 327 adapter to the VAZ 2110 diagnostic connector with your own hands (with photo)
How can you tell if your car is faulty?
There is a special lamp on the instrument panel with the inscription CHECK ENGINE. When you turn on the ignition, it lights up, and until you start the engine, a special program reads data from all systems and components of the car, thus transmitting data to the on-board computer to identify faults.
After you start the engine, the lamp should go out, but if it stays on for another 10 seconds, it means that some problems have been identified and error codes have been entered into the on-board computer programs. Communication with the controller is carried out using the diagnostic block.
CHECK ENGINE control signal on the instrument panel of a VAZ 2110
Factory controller
Most VAZ 2110 vehicles have a “January-4” controller installed. It does not provide feedback. The activation of “CHECK ENGINE” is considered a malfunction detection signal. There are not so many fault detections in such a controller - error codes are calculated starting from the number 12 and ending with 61.
Calculation of codes
Most often, diagnostic program codes are “deciphered” using a special device. However, on VAZs it is not so difficult to do it yourself.
ECU January 4 for VAZ 2110
The diagnosis itself goes like this:
- Connect contact “B”, which has the diagnostic block and “ground”;
- Turn the ignition key to the third position, do not start the car;
- First, the aforementioned “CHECK ENGINE” lamp flashes code 12 three times in a row. It, in fact, does not signal any malfunction, but simply shows that the diagnostic programs are working. On the VAZ 2110 this happens in this order: the lamp blinks briefly once (which should be considered the designation of number 1). After a pause of at least two seconds, it flashes twice in a row (two). So we got the number two. And this is repeated three times so that the driver can understand these signs;
- Now you need to be careful not to miss any faults. After the diagnostic program has declared its serviceability, it will begin to display error codes, if any. In the same way - flashes and pauses.
Installing a new adapter
Modern adapters elm 327 with the OBD-II program (puncture) are suitable for the VAZ 2110 . You can also install them yourself. First you need to purchase an elm 327 and a cable for it. You already know the location of the diagnostic connector. Be sure to study the instructions, which indicate the pinout of the block and the location of each connector.
Connection diagram for ELM327 to 12 PIN diagnostic block
The pad can be removed quite easily. Insert your own cable into each connector of the block, making sure that the pinout of the elm 327 complies with the manufacturer’s instructions. Check that each connector is connected correctly and each cable is in the correct place. After this, the block is installed in its place.
Connecting the diagnostic connector to the block
Fault detection programs for elm 327 can be downloaded on the Internet, many of them in a free version. Now your VAZ is ready to detect errors in various car systems, and you can always download error codes from us.
Connecting the diagnostic connector to the block Connecting the diagnostic connector to the block
Recommendations
Comments 17
It's under my steering wheel. But that's not the point. In most cases, ABS can be seen with the eyes (there is only diagnostics, but I’m not talking about that now). Try removing the sensors themselves from the connection points. 90% - you will find either a broken wire or a broken sensor. The wire can be soldered (only carefully). Broken sensor - only need to be replaced. If this doesn't reveal it, then yes, look for diagnostics. I can say in advance that the procedures described are also diagnosed by diagnostics. Or rather, the diagnostics will show which sensor is not responding, and then a visual inspection in this direction will still be necessary. Somehow... it turns out...
Yes, I fiddled with all the sensors, visually they were all intact, so I went to the electricians. And where is the steering wheel, under the cover? I feel like I’ll have to do a treponation and go through the nerve endings to the connector!
Where the fuses are under the steering wheel is where the trunk is. The diagnostician refused twice, citing the fact that the UAZ vehicles needed a different diagnostic (specifically for ABS). But the drive said - normal, in the same connector. I went to him, I said, what difference does it make to you. I'm crying. (In principle, he had already diagnosed the engine several times) And... I changed the program and everything turned out to be on the same connector. But I have 12, you have 8. Maybe not so. Well, he said, he gave me the right front one. I took it apart (it happened once) but I can’t get it out. Drive again said, WHAT MEANS HE'S SWELLED. And this way and that you need to pull it out. I pulled it out, and the tip became charred and crumbled. Here I think, I rode on long ascents and descents, I probably went too far with the brake (the light came on in the mountains). But nevertheless, it is precisely this sensor that is visually visible, that it is burnt (though when you finally pull it out). But along the way, the drive naturally suggested cliffs, etc. and so on. Not everything turned out to be so simple, but it’s not that simple either. The computer is alive, change the sensor and that’s it (someone gets by by soldering broken wires together)
Read more: Rear suspension x ray
Yes, I fiddled with all the sensors, visually they were all intact, so I went to the electricians. And where is the steering wheel, under the cover? I feel like I’ll have to do a treponation and go through the nerve endings to the connector!
“I’ll have to do a treponation” - I don’t have it. Everything is on routine diagnostics.
Yes, prestige and does not show ABS, there is no such function.
Yes, I fiddled with all the sensors, visually they were all intact, so I went to the electricians. And where is the steering wheel, under the cover? I feel like I’ll have to do a treponation and go through the nerve endings to the connector!
ABS lights up when the front end sensors or fuses are faulty. Have you checked everything correctly? You usually won’t see an over-soldered sensor or an oxidized connector right away.
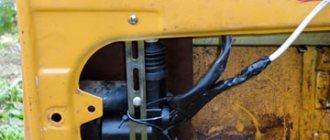
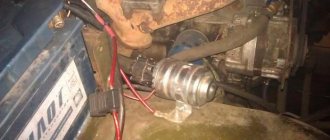
Sometimes it takes several hours to identify faults on a car, but today this problem is easily solved, thanks to the presence of a special diagnostic connector on the UAZ Patriot SUV. What kind of connector is this and what is it for, as well as where it is located, let’s take a closer look.
Location on the floor tunnel, in front of the gearshift lever
Necessary tools, materials and programs for diagnostics
So, what you will need to prepare for a proper vehicle check:
- Diagnostic adapter with cord. When purchasing a device, you need to be sure to select the adapter that will fit your connector, so find out exactly what connector your car uses.
- Diagnostic device. We will describe an example of testing with a laptop. If you don’t have one, you can use a desktop computer, but this is extremely inconvenient, especially since you will need a household outlet to connect it. The best option is a netbook. It can work autonomously, while its dimensions are very convenient for diagnostics.
- Software for checking. In this case, you have a huge choice - you can easily find the necessary diagnostic software on the Internet, there are many options. At the same time, programs have their own characteristics and characteristics. You can give preference to free software - most of these programs are just as effective at finding errors as their paid counterparts.