In recent years, tuning of passenger cars has become very popular. In the process of its implementation, the body structures are primarily subject to modification, which immediately catch the eye and clearly emphasize the individuality of the car owner.
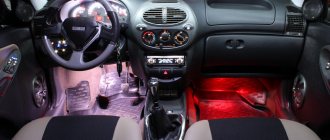
No less effect can be achieved through internal tuning, one of the varieties of which is the use of lighting for the dashboard, upper part of the cabin and in the footwell area.
Quite often, car interior lighting, including its implementation as atmospheric interior lighting, is often done with your own hands. It is used as a means of increasing the efficiency of using products of the domestic automobile industry, such as, for example, the popular VAZ-2110.
A combination of aesthetics and functionality
The interior lighting of a VAZ as its tuning, done by hand, is usually designed by the developer to solve several problems at the same time.
The first of these tasks in relation to the VAZ-2110 is the creation of an appropriate image, which is achieved by using additional sources of varying brightness and color.
As for the functional role played by car interior lighting, its practical achievement is much more difficult. For the VAZ-2110, the presence of additional light sources means that in the dark, very comfortable conditions are provided not only for the driver, but also for passengers. Let's name just a few of them:
- tuning in the form of lighting helps to quickly find various objects, including small ones, both in the handbag and glove box, and on the seats;
- the so-called polite interior lighting makes getting into the VAZ-2110 much more comfortable, by delaying the turning off of the light after closing the door, and gradually reducing the brightness of the standard light bulb;
- illumination of the lower part of the VAZ-2110 interior allows you to quickly detect objects that have fallen to the floor near the feet;
- Illuminated door handles make it easier for passengers to get in and out.
The list of advantages can be continued if desired.
Preparing and connecting wires
Illuminated door handles from the inside.
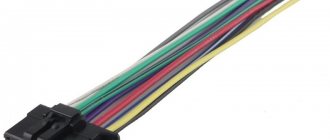
Now let's get to work. First you need to disassemble the door handle. This is done using appropriate screwdrivers. Now take the LED lamp and remove the plastic housing from it. There you will see pins at the end of the lamp that will need to be soldered to the wiring. But before this, it is advisable to lightly clean the wiring and put small terminals on them. This will make soldering much more convenient for you, and the quality of work will be better.
Article on the topic: Organza with a printed pattern - briefly about the main thing
Don’t rush to put plastic plugs on the wires for protection just yet, since in any case you will still have to remove them until the work is completely finished. On the other side of the wires, it is also necessary to lightly strip and put terminals on the ends, but of a larger size.
When doing this kind of work, it is important to consider one important point. As a rule, any door light in a car has two sides: one is the lamp itself that will light, and the other is the part from which the main power will be supplied to this lamp. So this power can come either directly from the electrical part of the car (usually you need to open the box that is located near the steering wheel) or from the door card, if it has direct power (this is often observed in modern car brands).
In the first case, you need to calculate the length of the wires in advance so that it is completely enough to connect the backlight and at the same time for proper placement, so that in the end the wires do not get in the way under your feet. In the second case, small wires are usually used, since their location does not extend beyond the area of the handle. But still, in both the first and second cases, it is advisable to take long wires, since they can always be shortened.
After this, use an ammeter to check that all wiring is connected correctly. If you don’t understand electricity very well, then it is better to seek advice or direct help from an electrician so that in the future there are no unpleasant problems with a possible short circuit.
LED lighting elements
Illumination, including in the leg area, can be created by various sources. Without big problems, you can implement all the varieties of known interior lighting options with your own hands.
Article on the topic: ABS - better with it than without it
The accumulated experience clearly demonstrates that such tuning provides the best results when using single and strip semiconductor light sources to illuminate the area around the legs and other places. This is determined by the fact that:
- they do not require high voltage for their operation and are powered from the vehicle’s on-board network;
- due to the low voltage, semiconductor sources are safe to use, even in the area of the feet;
- sources of this type are economical and do not create a serious load on the on-board network of the VAZ-2110;
- LED strips are very flexible and allow you to go around any contour;
- LED strips are available today in a variety of colors.
It is of no small importance that you can make such lighting yourself and connect it to the car network without deep knowledge in the field of electrical engineering.
Reliable lighting of door handles with your own hands
Finding a door handle in the dark is problematic. It’s much more convenient if there is at least a small ray of light. You can always carry a flashlight with you or fiddle with your phone, but it will be much more practical to install a backlight. Doing it yourself is quick and easy.
Usually we don't have enough light, we need to get home in the evening or open the car. Many manufacturers take these nuances into account and make their products as comfortable as possible, but often the lamps fail, and replacing the mechanism will cost more than designing a new one yourself. In general, do-it-yourself door handle lighting
it's done like this:
- A small hole is made in the right place, near the handle.
- An LED lamp is installed in it.
- Connects to a power source or displays a power button.
Entrance doors
They are mostly sold with ready-made lighting; owners only have to change the batteries from time to time. For self-installation you will need LEDs, mini batteries, wiring, and a button. All this is connected and placed inside. Two small holes are made in the handle to bring the light bulb and button out. It is possible to create such beauty if the door handle is hollow, otherwise it is better to buy a ready-made one.
Not all cars can boast of such a mechanism, so many strive to learn how to independently illuminate the parts of their vehicles. Regardless of the make and model of the car, the process for installing the backlight for the handle is almost the same:
- We decide where the backlight will be located and how it will turn on (with a button, from the ignition, from opening the doors). For the last option you will need a limit switch.
- We think about the color that the owner and others will like. For example - blue.
- We collect materials. Color LEDs, soldering iron with rosin, pliers, terminals, indicator, glue, speaker cable 1 mm2, electrical tape.
- We measure out how many LEDs you need and cut the tape.
- We remove the handles and make a hole on top for the light bulbs, as small and neat as possible. A large hole is not aesthetically pleasing and difficult to reduce.
- Solder the wires to the LEDs (red+, black-).
- We insert the lamps into the holes and secure them with glue.
- We begin the installation by connecting the wires to the main power source. The light should stay on when ignited. If you connect it to the lock, the backlight will be constant, which is not at all necessary. It is very difficult to install a button in a thin car handle. There is an option for the light to come on when the doors are opened, but it is somewhat more complicated and requires precise adherence to the wiring diagram, although it is quite accessible to an ordinary craftsman without special skills.
- At the end of the work, we put the handle back in place and admire the beauty.
It’s easy to do the lighting yourself, but advice and an example from a professional won’t hurt. It doesn’t matter which handle you are going to highlight and which door, the main thing is to be patient, watch the master class (just in case), and do everything diligently and thoroughly. The second time it will probably be faster and better.
Related Posts
- What and how do you make door slopes with your own hands?
- We design compartment doors for a dressing room with our own hands
- Is it possible to hang a mirror on the front door?
- How to make a door from clapboard with your own hands
Some design features
When implementing LED interior lighting with your own hands, you must first decide what and how to illuminate.
Regarding the placement of the tape in the interior of the VAZ-2110, lighting can be done everywhere, but it will bring the greatest benefit in the glove box and in the footwell area, and its benefit for the rear seat is much greater. This also includes the illumination of door handles.
As a decorative element, such tuning is best done on air duct grilles; it looks good as illumination of doors with a logo, as well as illumination of car doors along their perimeter.
The type of inclusion of individual lighting elements, including those in the foot area, is set. The simplest option is to permanently connect it to the on-board electrical network. However, the most functional will be a separate, easily accessible switch, which will turn on the decorative lighting of the door illumination with a logo, or the illumination of the foot area, exclusively at night.
It is impossible to give general recommendations for choosing the color of the glow, except for the obvious provision that it should be in harmony with the color scheme of the illuminated components of the VAZ-2110 interior.
Article on the topic: Which spark plugs are the best - the eternal question of the car enthusiast
Illuminated interior door handles – photo report
— detailed photo report of LED installation; — catalog numbers of light bulbs and prices; — nuances that you may encounter; — photo result;
— supplemented with more nuances and photos (23.10.14)
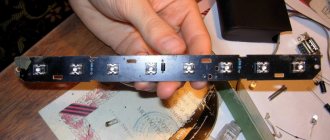
I decided to illuminate the interior door handles. I ordered LEDs from existential.
Price 3135 rub. Cat numbers: left - 3U0919173 - right - 3U0919174
Photos of the interior handle illumination bulbs.
There are already preparations for LEDs on the handle itself. You just need to drill holes or cut with a sharp knife.
I warn you right away, the work is labor-intensive.
The LEDs themselves have a bit short wires, so we lengthen them.
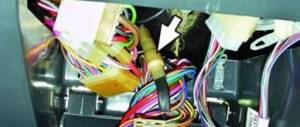
The easiest way to connect wires to button lights. But there is a minus here. When the power windows are locked, the backlight of the handles goes out along with the buttons. For myself, I consider this minus not significant, because it is very convenient even in the fact that if children are sitting in the back, then in the dark they simply will not be able to see where anything is. I can only say one thing about how it feels, it’s cool in the dark.
Nuances - 1
It is important to correctly connect the wires to the button illumination. Otherwise, it may turn out that the diodes will shine at half strength. When you open the doors, the diodes will burn brighter, when you close them they will dim again, and when you press the window lifter, the glass will dull and close jerkily.
I STRONGLY DO NOT ADVISE INSTALLING ANY DIODES ON A SKODA! update from 12/15/2016.
For those who really want to install diodes, read this article first, and then decide for yourself >>
And now, the photo report itself
Result
Nuances - 2
1. LEDs have black and blue wires.
2. Pay attention to the glow of the diodes. I came across the right ones with a blue tint. The left ones shine with a slightly greenish tint, they don’t really catch the eye, but if you look closely, you can see them. There is only one way out. Swap the diodes as I did - with a blue tint on the front, with a green tint on the rear doors. If anyone knows other solutions, write in the comments.
3. We connect the wires on all doors like this: black from diode to brown. On the plug it is listed as number 2. The blue wire from the diode to the gray-blue wire is numbered 6. See the photo below.
It is important not to mix up the wires, otherwise we will get problems such as:
— The diode lights up and does not go out when the low beam is turned off or the ignition is turned off. — The system for adjusting the rear view mirrors is not working. — When the low beam is turned on, the mirror adjustment does not work; after the low beam is turned off, the adjustment begins to work only after 2 minutes. — The diode is not adjustable in tone using the brightness adjustment wheel of the instrument panel.
Also, for those who love the color scheme, you can wrap the diodes in cellophane film with a green pattern taken from the Auchan store and at the output you will get a green glow that matches the color of all the interior buttons.
I decided to leave the original glow because... I prefer it.
After installing the diodes
Examination
1. Let's see if the diodes are lit everywhere. 2. We sit in the back seat and close/open the door, the diode should light up equally. 3. We lower the glass up and down, it should work as usual without brakes. The diode lights up normally. 4.Check the adjustment of the rear view mirrors with the low beams on. 5. We check the panel illumination with a roller; it should work in accordance with the tone of the panel instruments and all illuminated buttons in the cabin. 6.When the ignition is turned off, all diodes should go out.
Collections on the topic:
Diode strip for low beam headlights - Skoda A5 1.6
Do not install these diodes in the DRLs - review from a driver
The indicator lights up dimly after closing the indicator light.
There is a non-standard xenon and DIODES on a Skoda - how to preserve the electronics unit?
Diodes for license plate lighting
Replacing standard lamps with white ones in PTF and DRLs — Skoda Octavia 2 (A5 FL)
Replacing lamps in the trunk of a Skoda with LEDs
I installed LEDs on the DRL and now the lamp fault sensor lights up all the time
Tools and materials used
When implementing any type of interior lighting with your own hands, simple tools and consumables are used.
- The installation tools you will need are pliers, a sharp knife, scissors, and a soldering iron.
- Consumables are considered to be tin and rosin for soldering, one or more terminal blocks, screw-on lugs, as well as a toggle switch or a locking button.
The LED strip is sold by length, so the necessary measurements should be made in advance.
During installation, the individual lighting components are connected to each other by a flexible (multi-wire) cable, the core area of which should be 1 square millimeter. Soldering and contact connection points are covered with electrical tape. A conventional multimeter is used as a means of monitoring correct installation.
Features of LED strip installation
Installation of the LED strip in the leg area and in other places is carried out using glue. When forming the required length of the tape, it is cut with scissors; the cut must be made strictly along the round or oval marks.
Wires are soldered to the pieces of tape, and terminals are installed at the ends. All exposed wiring areas must be wrapped with electrical tape. The installation site of the tape is wiped with any degreasing liquid to ensure fastening strength.
It is necessary to connect the tape to the vehicle's electrical network in compliance with polarity.