Why is valve lapping necessary?
The main purpose of the procedure is to ensure the operability of the valves. Regular failure to grind in can cause the valves to stop functioning properly - they will not allow air and fuel into the combustion chamber. The consequences of this may not be the most favorable: the driving performance of the engine deteriorates, which over time can lead to breakdown.
There can be many reasons for grinding in valves, the main one being long-term use of the car.
Grinding in the valves allows you to achieve maximum tightness of the system. The procedure is carried out not only after the installation of new parts, but also during their long-term operation. For example, a well-carried grinding-in can cope with the “jerking” of a car at idle due to the difference in compression.
Valve lapping video
The review was made by Evgeny Travnikov, who is known to everyone for his YouTube channel Theory of ICE:
When you have finally completed all the work, you can install all the removed parts in reverse order on the car. As for the price for a set of new valves, it is about 1,500 rubles. If you buy separately, you can easily find out the cost by dividing the amount by 8.
As is already clear from the title, we will talk about removing the cylinder head. In the previous entry I wrote that I had a blown gasket under the cylinder head. I started looking for solutions from the experts. But the price tag really upset me. Replacing the gasket (just a replacement, without grinding!) the price starts from 100 American rubles and this is not at a company service, but in the garage of Uncle Vasya (Petya, etc.) who do not provide a guarantee. After surfing the Internet, I found a good video on how to replace it yourself:
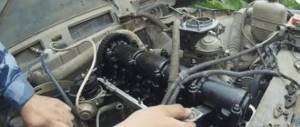
In the end, I decided to change it myself. Of course, I don’t have enough experience (before this I raised my head twice in a Volga 31029), but that didn’t stop me) Luckily I have a second car. Therefore, you can safely put one in for repairs;) Initially, I wrote it down and took photos for myself (so that later it would be easier to assemble everything and not have to look for where the “extra” spare parts came from). But I decided to put it on Drive - it might be useful to someone. So we drive the car into the garage and start removing the cylinder head. Don't consider this an instruction - I'll just write out my sequence of actions.
None 2. Take the miracle product WD-40 and generously water the nuts on the pants fastenings so that they begin to sour. The more time, the better.
3. Remove the battery (terminals with a 10 key, fastening with a 13 key)
Full sizeBattery removed
4.Remove the terminal from the sensor on the air filter:
None
Full sizeDraining antifreeze
How to quickly drain antifreeze is described in the article
6. Remove the throttle cable (unscrew the two fastening bolts and remove the clamp):
Full size Screw the bolts into place so they don’t get lost
7. Remove two plugs from the sensors near the thermostat:
Full size Sensors are marked in red
8. Disconnect the connector to the injectors:
Full size injector connector
9. Remove the clamps and disconnect the pipe to the thermostat: 10. Unscrew the mass from the engine (key 13) 11.
Unscrew the clamps and remove the pipes to the radiator and stove12. Remove the terminal under the thermostat (single):
Full size I don’t know what this terminal is responsible for, I just remove it;)
13. Remove the vacuum pipe: 14. Remove 2 plugs from the throttle:
Full size These are the plugs
15. Remove the single terminal in the area of the injectors:
Full sizeI also don’t know what it is, I’m just filming
16. Unscrew the two head mounting levers on the sides:
Full size This is on the right side, the same bar on the left
17. Unscrew the thing near the pants to make it easier to get to the bolts securing the pants:
Full size This thing lies on the left, and on the right is the head mounting rod described in the previous paragraph
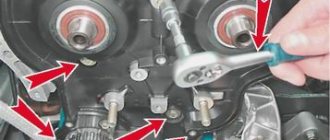
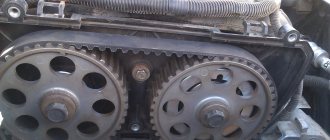
18.Remove the timing case (3 bolts for 10): 19. Unscrew the timing roller with a key for 17 and remove the timing belt 20. We unscrew the pulley (with a 17 key) and remove the pulley, the main thing is not to lose the veneer (in the form of a semicircle):
Full size This is how we unscrew pulley 21. We unscrew the nut on the protection with a 10mm wrench (in the previous photo where the wrench is placed to secure the pulley from turning) and bend the protection22. We unscrew the two fuel hoses (be sure to remember where one is so as not to get confused during assembly)23. Unscrew the 2 pipes near the oil filler neck.
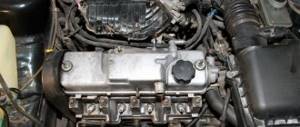
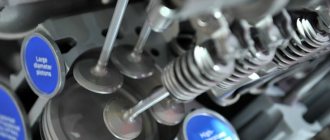
24. Remove the valve cover with a 10 wrench and two nuts:
Full sizeValve cover removed25. We mark the explosive wires and remove them. Continued in the second part;), because photos don't fit
- ladaautos.ru
- 24techno-guide.ru
- zarulemvaz.ru
- www.drive2.ru
Rules and secrets of grinding in
The grinding process is a procedure that can be carried out either independently or with the help of specialists. When carrying out such processing of parts, it is advisable to follow the following rules:
- valves cannot be swapped after grinding in;
- the work uses abrasive compounds of different qualities;
- all parts are thoroughly washed immediately after grinding;
- Before installing the cylinder head, it is checked for leaks by pouring kerosene into the combustion chamber.
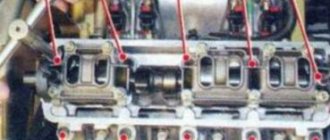
The cylinder head is removed before lapping. Before you begin the procedure, you need to consider several nuances:
- Before dismantling the valves, their springs are removed, this will make it easy to pull them out of the bushings;
- Before the grinding procedure itself, the valves are carefully inspected. If there are traces of defects, they are replaced with new ones. Carbon deposits are cleaned with a metal brush.
Required valve lapping tool
The work of grinding valves is not particularly difficult, but it takes a long time to complete, especially if you do it yourself.
It is impossible to perform them on a car; you will have to partially disassemble the power plant, namely remove the cylinder head.
Therefore, when deciding to grind the valves, you should immediately take care of having a new cylinder head gasket.
The tools you will need to perform this operation are:
- Set of keys and sockets;
- Device for desiccation of valves;
- Device for performing grinding;
- Grinding pastes;
- Rags;
- Kerosene.
How to grind at home correctly
Valve grinding is carried out using several methods. At home, you can use a cutter, but if you don’t have one, you can resort to the manual method.
Tools for lapping work
Two groups of devices are used:
- Tools that clamp and secure the valve to the stem. On one side there is a handle, rotating which achieves the desired result;
Tools for lapping valves can be purchased or made yourself
- The so-called suckers. They are attached to the valve plate and also have a handle. The part is pressed against the plate, and the tool itself rotates around an axis.
Suction cups for lapping valves have different sizes and are selected individually for each make of car.
If there are no special tools, then you can use a regular drill or screwdriver.
In addition to the devices listed above, you may need the following materials:
- diamond or abrasive paste;
- weak spring that can be compressed manually;
- kerosene.
Lapping paste
The lapping paste for work must be of at least two varieties
Abrasive material is one of the main components used in the valve grinding procedure. You can purchase it at specialized automotive stores.
Before work, it is advisable to purchase two tubes of paste - coarse-grained and fine-grained. If it is not possible to buy such compositions, you can prepare it yourself from shavings from an emery stone or paper and grease or a similar substance. The finished paste should resemble sour cream in structure.
Sharoshka
The roller used for restoring valve seats is not always necessary for lapping, but it doesn’t hurt to stock up on it.
Valve seats are restored using this tool. The need for its use is determined by the condition of the saddles. If they have carbon deposits and cavities, chamfer defects (presence of steps or roundings), then a roller cutter is used.
Since the sizes and shapes of the saddles on the VAZ 2106 and VAZ 2109 differ, certain tools are selected. To reduce valve processing time, you can use a drill. For this purpose, the cutter is mounted in a chuck and the top layer of metal is removed. Production is stopped after an even and shiny circle appears.
How to check valve lapping
Upon completion of valve lapping, it is imperative to perform a quality check of the lapping. This can be done using one of two methods.
Method one
The method described below is the most common, but it will not always show the correct result with a 100% guarantee. It also cannot be used to check the quality of valve lapping on engines equipped with an EGR valve.
So, to perform the check, it is necessary to place the cylinder head on its side, so that the holes of the wells to which the manifolds are connected “look” up. Accordingly, the valves will be located in a horizontal plane, and their covers will be located vertically. Before checking that the valves have been ground in, it is necessary to dry the valve outlets using a compressor to ensure that possible fuel leakage from under them is visible (that is, so that the vertical wall is dry).
Next, you need to pour gasoline into vertically located wells (or even better, kerosene, since it has better fluidity). If the valves ensure tightness, then the poured kerosene will not leak out from under them. If fuel leaks out from under the valves, even in small quantities, it is necessary to perform additional grinding or other repair work (depending on the specific situation and diagnosis). The advantage of this method is that it is easy to perform.
However, this method also has its drawbacks. Thus, with its help it is impossible to check the quality of valve grinding when the engine is running under load (gas leakage under load). Also, it cannot be used for engines equipped with a USR valve, since their design implies the presence of corresponding valves in one or more cylinders, through which fuel will flow out. Therefore, it will not be possible to check the tightness using this method.
Method two
The second method of checking the quality of valve lapping is universal and the most reliable, since it allows you to check the passage of gases through the valves under load. To perform the corresponding check, it is necessary to position the cylinder head “upside down”, that is, in such a way that the valve outlets (holes) are on top and the manifold well holes are on the side. Next, you need to pour a small amount of fuel (in this case, it doesn’t matter what kind, and even its condition doesn’t matter) into the valve outlet cavity (a kind of plate).
Take an air compressor and use it to blow a stream of compressed air into the side well. Moreover, it is necessary to supply compressed air both to the opening of the intake manifold and to the opening of the exhaust manifold. If the valve grinding was done efficiently, then air bubbles will not come out from under them even under the load provided by the compressor. If there are air bubbles, it means there is no tightness. Accordingly, the grinding was performed poorly and rework is necessary. The method described in this section is extremely effective and versatile and can be used for any engine.
Lapping Tools
You can assemble a device for grinding valves with your own hands, using a drill, a drill, a hose and two clamps. A hose is attached to the end of the drill, the connection point is tightened with a clamp, and the drill itself is inserted into the drill chuck. The second end of the hose is attached to the valve stem.
A drill with clamps and a hose is an economical option for lapping valves
Such a tool can be replaced with a special suction cup attached to the valve plate and inserted into the drill chuck. When choosing such a tool, the quality of the material from which it is made is checked, since if performed poorly, the work can be constantly interrupted.
The grinding of valves and seats is carried out under certain conditions:
- The process is carried out in both directions.
- To prevent overheating of the belts and saddles, the rotation speed of the drill chuck is set within 500 rpm.