Do-it-yourself adjustment of Lada Granta headlights
- The longitudinal axis of symmetry of the car should pass along line 0 on the screen.
- Vertical lines 1 and 2 are located at equal distances from line 0.
- Distance A between lines 1 and 2 should be equal to the distance between the centers of the low beam headlight lamps.
- Measure the height of the centers of the headlights from the ground - this will be the distance h on the screen.
- Set the hydraulic corrector to position 0 (car with one driver).
- Turn on the low beam headlights and cover the other with opaque material while adjusting one headlight.
- Open the hood and adjust the headlight beam by turning the adjusting screws through the special hole.
The adjustment of the Lada Granta headlights is considered completed if the upper boundaries of the left parts of the light spots coincide with line 4, and the vertical lines 1 and 2 pass through the intersection points E1 and E2 of the horizontal and inclined sections of the light spots.
Let's look at what you need to quickly and step-by-step adjust the head light on a VAZ 2190:
- a room with a flat wall at a distance of at least five meters from the car;
- a Phillips screwdriver or a six-point hexagon;
- tape measure or long ruler;
- weight equal to yours to place on the driver’s seat (a person of your build or 2-3 bags of plaster - cement - the neighbor’s).
During the annual technical inspection, station employees always check the angle of light using a device. If during the work deviations from the established requirements are discovered, then the Granta headlights must be adjusted.
Also, surgery may be required after replacing burnt out lamps. The settings are easily lost when there is strong pressure on the base. You can raise the headlights using the corrector washer located in the cabin. However, if the height of one beam is off, you will have to open the hood and adjust the angle manually.
- The longitudinal axis of symmetry of the car should pass along line 0 on the screen.
- Vertical lines 1 and 2 are located at equal distances from line 0.
- Distance A between lines 1 and 2 should be equal to the distance between the centers of the low beam headlight lamps.
- Measure the height of the centers of the headlights from the ground - this will be the distance h on the screen.
- Set the hydraulic corrector to position 0 (car with one driver).
- Turn on the low beam headlights and cover the other with opaque material while adjusting one headlight.
- Open the hood and adjust the headlight beam by turning the adjusting screws through the special hole.
Your weight is in the driver's seat. The headlight hydraulic corrector is set to 0. The tires are inflated as required from the factory, the spare tire is in place.
The hydraulic corrector straightens the height of the light beam depending on how loaded the car is (on a scale from 0 to 5)
Second, we measure the height from the low beam bulbs to the ground. We mark it on the wall opposite each headlight - this is the upper limit of the light beam.
Third, we retreat down 35mm. and make another mark. For what - shown in the figure.
The headlight light on Grant falls in this shape. The upper edge of the beam has a kink: its upper edge should be equal to the height of your headlights to the ground. The lower edge of the fracture is at the same height minus 35 millimeters
Fifth, use the light adjustment knob to adjust the height of the light. The goal is for the top edge to match our marks on the wall. An example in the picture above.
A long Phillips screwdriver is needed here. You can use a 6mm hexagon.
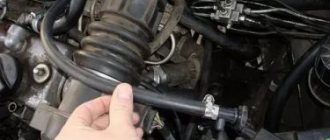
Access to adjusting the headlights on the Grant is not difficult. This connector only corrects the height of the light
Sixth – close the other headlight and adjust the second one.
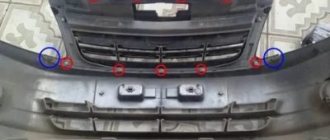
Seventh - if you need to adjust the light from right to left, use long valves located on the headlights themselves.
Turn these knobs to adjust the light horizontally - right/left. If the light is adjusted correctly horizontally, the upper break lines of the light spot will be at the same distance as between the low beam lamps themselves.
To avoid danger for a driver driving in the oncoming direction, you need to adjust the headlights of your car correctly.
There are three effective ways to adjust the headlights of a Granta: adjusting the headlights of a Lada Granta with your own hands, video clips will help you do it efficiently, adjusting the headlights of a Lada Granta by a car service specialist with the necessary equipment.
If you want to save a little on this procedure, you can do it yourself. Lada Granta headlights are adjusted in 4 stages.
The headlights shine too poorly - we improve the low/high beam on the car
Dim headlights have become a big problem for many car owners. Poor lighting on the highway means you can see only part of the objects along the way and there is no chance of normal, confident movement. Poor quality low beams in the city, especially in wet weather, mean the risk of not seeing a pedestrian on the road or not noticing cars driving without illumination. So it’s always worth remembering what the light on the car should be. There are dozens of options for improving the brightness and quality of the light beam from headlights. Today we will look at some of them. Let us remind you right away that we will be talking about halogen headlights, which are permitted by law. Although xenon improves the quality of light, it reduces safety due to significant blinding of drivers of oncoming cars.
If your car comes from the factory with halogen lamps installed in the headlight optics, this is exactly what you need to proceed from. It is interesting that even in this version there are many ways to improve the light beam, its direction and quality. So you should initially try legal methods and forget about powerful xenon and other not the most successful solutions. It's best to use factory type optics, but today we're going to talk about how to improve the factory light. However, many motorists operate a car with poor low/high beams, without even suspecting that the optics were much better from the factory. So, for many drivers, it will be enough to return the actual factory settings of the headlights in order to receive complete satisfaction in terms of the operation of the car’s optics. Let's look at a few improvement options.
Headlight lenses are faded - solves the problem by polishing or replacing
Dull headlight lenses are one of the serious problems for motorists. Yellow glass or a dark inner side are troubles that indicate a malfunction of the optics mechanism itself or a too long service life. Yellowed and scratched glass can be polished if it is smooth using the following options:
- buy a special polish for car glass, do not skimp on this product, otherwise it will not help remove microcracks and various other minor problems;
- prepare the headlight in a garage or other dry place for polishing, wash it and wipe it dry (it is not necessary to remove the optical device);
- Next, apply the required amount of polishing paste to the glass and rub it with a soft cloth over the entire surface; you can first polish a small area;
- then rub the polish into the glass surface with quick circular movements and watch for changes in the appearance of the headlight; the procedure can take quite a long time.
It is often recommended to use expensive toothpaste as a polishing material. In fact, this does not always work, so it is better to buy special products for such cases. Moreover, you can significantly delay the very expensive replacement of headlights by carrying out this operation correctly. Cloudy glass is one of the first causes of reduced light intensity in your car.
What to do if the headlight lenses are constantly sweating?
The issue of headlight glass fogging is also quite complicated. It often happens that the optics sweat, and this greatly reduces the penetration of light during the trip. It is best to check the tightness of all elements of the headlight unit, look for the presence of rubber seals and tightly closed covers. If you cannot find the reason on your own, take the car to a mechanic. Most likely, the headlight will have to be changed (it is better to perform this process in pairs for two optical elements).
Or maybe just change the light bulb to a powerful one?
One of the options for solving the problem of poor light on domestic cars is to install high-quality lamps. And if cars of foreign origin have quite good light bulbs installed from the factory, then our cars are equipped with something cheaper. Almost every buyer has to face this problem. Choose one of the following options:
- Philips X-Treme Vision +130% - a chic version of white light for halogen headlights, there are different bases and beam color variations, the durability is quite long, the light is excellent;
- Osram Night Breaker Unlimited is a new series of light bulbs from Osram, the only problem of which is that the lifespan is too short, the light from the headlights is simply magnificent, all other things being equal;
- KOITO - Japanese lamps that produce the best options for brightness and lighting efficiency; such lamps will help solve problems with low-quality light;
- Philips +30% Dutch origin in cardboard packaging is a discontinued series that shines no worse than the notorious X-Treme Vision, while being much cheaper.
So the quality of light turns out to be quite dependent on the light bulb. And if your car has Osram Standard lamps (which is not the worst option), then how can you count on optimal lighting quality. The best thing to do is go to the store, buy efficient and high quality bulbs, making a really good light in your car. But it will cost some money.
Problems with the generator - the light dims due to lack of voltage
Many car owners drive with poor lighting and do not even suspect that the culprit is not the lamps or the headlights themselves, but the electrical circuit in the car. The first step is to check the generator, which produces a certain voltage during the trip and is the main source of electricity after the engine has been started. If the generator does not work well and does not produce the required voltage, the following troubles are possible:
- all elements of electricity consumption will not work very well, many may not turn on at all due to the lack of normal network operating conditions in the car;
- instead of the required 12V, 8-9V is supplied to the headlights at a constant network load, this can be checked by turning on the headlights with the engine off (if the light is normal, the generator is to blame);
- Also, if the generator malfunctions, fuel consumption increases, since the computer increases engine speed in order to obtain a more or less normal voltage in the network;
- Also, the poor quality of the generator is due to the fact that when you press the gas pedal, all lighting elements, as well as fans and other electrical appliances, begin to work better.
Why is the setting broken?
Light angle adjustments get lost for several reasons:
- after mechanical impact during an accident;
- due to deep potholes, holes, speed bumps and uneven road surface joints;
- due to the installation of low-quality lamps of questionable manufacture.
The angle of the light beam may be lost due to an accidental collision with a deep pothole at high speed. Granta's suspension cannot completely absorb the force of a powerful impact of the wheel on the asphalt, and inertia is transmitted through the body. The headlight reflector suddenly accelerates up or down, the adjustment screw slips, and the light beam shines incorrectly. Frequent rolls over curbs or a high garage threshold can also have this effect.
During the journey, drivers find themselves in different traffic situations, accidentally falling into deep holes or driving over speed bumps at high speed. All this over time disrupts the position of the adjusting screw in the headlight reflector. However, the installation of Chinese low or high beam lamps affects the angle of the light beam.
When should you adjust the light in Lada Granta?
Setting up the headlights of a Lada Granta will not require much time from the driver or the purchase of a stand. All work will take no more than 30 minutes of free time without the use of complex tools.
The final results of do-it-yourself adjustment are no different from professional adjustment on a bench. The cost of carrying out this type of work in a car service starts from 1000 rubles. An official dealer will require about 1500-2000 rubles. The adjustment will not only have a positive effect on road visibility, but will also help you save on a full tank of gasoline or new lamps.
To adjust the headlights, you will need the following tools:
- medium-sized Phillips screwdriver;
- clean rag;
- marker or chalk;
- roulette;
- building level;
- assistant for proper weight distribution.
More on the topic Adaptation of the Dsg 7 clutch: when necessary, diagnostics, how to do it, how often it is needed
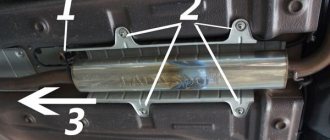
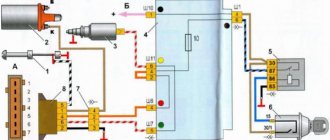
Headlights on Kalina, Priora and Grant have a similar system. One block contains a turn signal, a high beam lamp and daytime running lights. In addition to the cartridge for each block, there is a hydraulic cylinder for the corrector (3) and two adjusting hexagons. One is responsible for the horizontal (1), the second for the vertical (5) direction of the light flux.
Left headlight - rear view. 2, 4, 6 - cartridges for turn signals, high beams and running lights, respectively
How to turn on near or far
The light switch on the Grant is located below the left of the steering wheel - similar to the tenth family.
Switching the handle clockwise gives the headlight and low beam modes.
To turn on long range:
- turn the light knob to the extreme right clockwise - the low beam will turn on;
- push the left steering column switch forward (the one that controls the turn signals);
- your high beam will light up - and a blue headlight icon will appear on the panel - keep an eye on it so as not to leave the car with high beam when it is no longer needed.
This icon indicates that the high beam is on.
From the factory, Granta comes with DRL mode - daytime running lights. This means that when you start the car, your headlights come on.
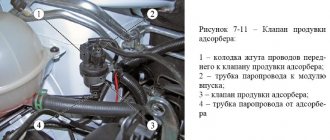
Replacing a hydraulic corrector with an electric one
The electrical corrector is installed in the same way. The hydraulic corrector is removed and electric analogues are installed instead of the working cylinders. Then you need to connect the positive wire to terminal “20”, and short the negative wire to ground. The connecting tubes are replaced with the wires used. The last step is to connect the terminal to the negative of the battery. It remains to check that the electric corrector is working correctly.
Hydro- and electric correctors used on modern cars make it easier to adjust the low beam . Properly adjusted headlights ensure the safety of the driver and passengers.
Hydraulic corrector malfunction
The hydraulic headlight corrector is installed on the Grant from the factory. This device adjusts the headlights higher or lower depending on the vehicle's load.
The corrector control is located under the light switch handle. Position 0 corresponds to a car with one person - the driver.
The more the machine is loaded, the higher the hydraulic corrector value should be.
Principle of operation:
- the handle controls the hydraulic corrector cylinder;
- the cylinder regulates the pressure in the flexible tubes that go to the pushers;
- pushers are installed in the headlights - the higher the pressure in the tubes, the stronger the liquid inside the pusher presses on the rod;
- the position of the rod deeper/further is responsible for adjusting the headlight higher/lower.
Have both or one headlight stopped responding to the hydraulic corrector? Most likely your pusher is broken.
According to the regulations, the entire hydraulic corrector mechanism is replaced as an assembly and cannot be repaired. Price from 400 to 1000 rubles. Order number: 21903718010.
If you want to fix the pushrod, there are two ways.
| Option 1 is barbaric. No further adjustment. |
|
| Option 2 is humane. We return the corrector to full working condition. |
|
Link to a detailed description of the second method with comments.
A corrector kit costs about 700 rubles - it may be easier to replace it
Do you want to replace the hydro with an electric corrector (EMKF)? The process is simple, as there are ready-made solutions from the factory.
Article: EMKF-41. Price 2000-3000 rubles.
To replace, you only need straight hands - depending on the manufacturer of the EMKF:
- dismantle the old hydraulic corrector;
- We install a new corrector control unit in place of the cylinder - we run the wiring according to the instructions;
- we pull the wires through the elastic band along which the hydro pipes went;
- We put the regulators in their standard places in the headlights.
The hydraulic corrector device is simple. It consists of a master cylinder and two auxiliary cylinders for the left and right headlights. All cylinders of the hydraulic corrector are connected by tubes. On the dashboard there is a corrector knob used to adjust the headlights. When you turn the corrector knob, the pressure in the main cylinder changes, which is transmitted through the tubes to the workers. The force acts on the reflector pistons, which changes the angle.
In the electric corrector, the function of transmitting force is performed by motors that receive power from the on-board network. An electric corrector is more resistant to temperature fluctuations than a hydrocorrector, but is much more expensive.
You need to adjust it yourself - there is no automatic setting.
Visual representation of the headlight hydraulic adjustment system
Any replacement process consists of two obvious phases: removing the old unit and installing a new one. To replace the corrector in a Lada Granta car, you will need a 21 key and a so-called ratchet.
Removing the headlight hydrocorrector in the Lada Granta includes the following steps:
- First, remove the adjustment knob (this is done manually from the interior where it is located), and unscrew the nut inside.
- Then, in the engine compartment, remove the cover of the mounting block (it is secured with 4 clips).
- We dismantle the main cylinder of the hydraulic corrector, then remove the working cylinders. This is done by releasing the clamps and then turning the cylinders counterclockwise.
- Slightly loosen the clamps on the hoses (tubes) and carefully tighten the hydraulic corrector tubes into the cabin. First, the seal is pulled out, and then the hoses themselves with the cylinders.
Installation of a new hydraulic corrector occurs in the reverse order:
- We insert the cylinders of the new hydraulic corrector from the passenger compartment into the engine compartment and attach them to the headlight block.
- We close the hole in the shield with a tube seal, insert the hose into the hole and secure it with a nut.
- We put the cover on the mounting block (under the hood) and the headlight hydrocorrector control knob (in the cabin) in their original place.
More on the topic: 3 ways to buy a used car - advice from professionals
If, instead of the old hydraulic corrector, an electrically driven corrector is installed, the procedure will be as follows:
- We install new electric drive mechanisms in place of hydraulic cylinders.
- We connect the positive wire of the electrical mechanisms to terminal “20”, and set the negative wire to ground.
- We install the appropriate wiring in place of the connecting hoses.
To control the operation of the corrector, you need to connect the terminal to the negative of the battery.
The procedure requires some technical skills and is carried out as follows:
- The hydraulic corrector tube is removed or cut with pliers at the very base. In this case, you need to be extremely careful - the liquid contained in the hydraulic system is very toxic;
- We take a self-tapping screw and screw it into the hydraulic corrector module until the “foot” in the module moves to the required distance. The self-tapping screw should be screwed in at an angle, as it will put pressure on the hydraulic corrector piston;
- wrap the resulting structure with electrical tape. Temporary hydraulic replacement is ready!
It should be borne in mind that no matter how you “raise” the headlights on a Lada Granta car, after this procedure you should always check the quality of the lighting system and, if necessary, adjust the headlights.
A malfunction of the headlights on a Lada Granta, such as falling out, at night or in conditions of poor visibility can greatly annoy the driver and significantly reduce the level of safety when traveling. Therefore, if you see that such an annoying nuisance has occurred, be sure to put the headlights in order and “raise” them.
Replacing the hydraulic corrector with a similar device
The reason why a hydraulic corrector may need to be repaired is most often due to jamming of the cylinder or a violation of the tightness of the system: rupture of seals or damage to tubes. In this case, the repair is ineffective; it is easier to replace the hydraulic corrector yourself with a similar device or an electric corrector. The replacement procedures are similar, but have differences.
To replace the hydraulic corrector you will need a 21" socket and a ratchet. First, by unscrewing the nut inside, you should remove the corrector handle to release the corrector master cylinder. The cylinder needs to be removed. Then you need to remove the working cylinders and tubes. Then the entire structure needs to be pulled out through the hole into the cabin. Installation of a new hydraulic corrector is carried out in the reverse order.
Electrical corrector for Lada Granta
Action plan
Summarizing all of the above, we organize the sequence of actions as follows:
- We choose the method of setting up the lighting fixtures (by ourselves, by a service station);
- We prepare the car, check the tire pressure (2.0 / 2.2 MPa), place the Lada Granta at a distance of three meters from the wall (notional obstacle), remove the plug from the back of the headlight;
- We draw the diagram according to GOST, parallel and perpendicular lines;
- We compare the light beam with actual points on the wall;
- We carry out adjustments using hydraulic correctors.
Adjustment diagram
You need to find a flat area with the side facing the wall. It should, in turn, be without corners, protrusions, various irregularities, and vertical. We approach the wall closely, mark the center and central axis of the lamp.
To correctly mark the wall, it is necessary to mark the distance from the lamp to the floor. Then draw a line located 5 cm below the first one. Next, move away from the wall and draw a horizontal line on the wall, which should connect the central points on the lamps. Then we draw vertical lines.
After marking, turn on the headlights and make adjustments so that the angle of the lamp coincides with the horizontal line. And the place where the light begins to rise upward must necessarily coincide with the drawn intersecting lines.
To get the most ideal beam of light, you must tighten the screws that are located under the hood. The ideal option would be when the light is slightly lower than the center mark itself.
Important! The high and low beam beams are adjusted separately. The markings of the wall will be different - the near one is adjusted according to the method described above, the far one should exactly fall on the central marking. In this case, it is better to use special equipment and watch the video of adjusting the headlights on the grant.
To adjust the headlights correctly, you need to prepare the car: completely fill the fuel tank, put the spare wheel in its proper place, and adjust the tire pressure.
Headlights and reflectors must be clean, preferably polished, and not fogged up. It is necessary to install light bulbs of the same size, brand and electrical power.
Then, in the dark, the car is installed on a flat horizontal platform at a distance of 3 meters (or 5-10 meters for other brands of cars, according to their instructions) from the wall with markings applied to adjust the luminous flux. Such test walls (stands) are available at service stations and car repair shops. You can apply this marking yourself.
Adjustment scheme
- We first check the tire pressure, place a load (75.0 kg) on the front seat, squeeze the parking brake lever;
- On the wall (obstacle) we draw a horizontal line at a distance of 550 mm. from the earth. This will be the level of visibility of the driver’s pupils at a distance of three meters from the front bumper;
- We draw a line perpendicularly passing through the center of the light beam for each of the headlights: line 1 and 2.
- A vertical line is drawn down the center.
- We measure the distance of lines 1 and 2, they should be equal. For the objectivity of the data, let’s rock the side of the car and check the accuracy of the beam accuracy restoration, simulating a road bump;
- Using the hydraulic corrector, we complete the headlight height adjustment. Initially, set the lever to position “0”. Experts recommend setting up each of the headlights separately, after covering the inactive one with an opaque material;
- Adjusting the low beam headlights on the Lada Granta is considered complete when the light spots on the wall completely coincide with the horizontal line;
- If necessary, repeat the setup process again.
Adjustment scheme
Adjusting and adjusting the headlight manually
This video from Sergei Gerasimov demonstrates how to adjust the low beam on a Lada Granta.
Loading …
Headlight adjustment (adjustment dials)
Using the thumbwheel, you adjust the low beam horizontally, and using the hex bolt, you adjust the light in the vertical plane. You can raise or lower the beams from the headlights if, for example, the rear of the car is loaded. Ideally, the light beams should exactly match the markings on the wall.
After adjusting the low beam , you need to perform a test drive in order to check the correctness of the adjustment after repair. The light from the headlights should not blind drivers on oncoming vehicles.
How to adjust PTF?
Before the adjustment process, you should take care of the additional load on the car - any object that can fit in the car in terms of dimensions will do. We fill the tank and place the Lada Granta as level as possible with the horizontal road surface. On the surface of a similar wall we draw lines that act as control points. Mark the distance to the center. We achieve a lined canvas with two control points.
After applying the markings, we drive the LADA Granta 10 m away. Next, using a screwdriver, we adjust the screws to ensure that focus is achieved at all control points. Now you know how to adjust the headlights on a Grant. There is nothing complicated about this process.
– accurately make markings on the wall;
– mark the lamps;
More on the topic Is it possible to use fog lights instead of low beam headlights during the day?
– adjust the low beam;
– adjust the high beam.
– take into account the difference in tire volume;
– assess the condition of the springs that are in the suspension;
- load distribution;
- tire pressure.
When the headlights of a Lada Granta have malfunctions, then the lighting angle will be set incorrectly, which will affect the adjustment. Naturally, for proper adjustment you need an electric headlight corrector for the Grant and a vertical, flat wall for the car - with a length of 7.5 meters.
Since each driver has his own preferences, headlight adjustment on the Grant is selected individually. But there are standard values for how to raise headlights on a Grant that you can use for your car.
Recommendations for quality improvement
To properly adjust the low beam, you need to check the body. There should not be any deformations on it, as they can affect the quality of light; the rays from the lamps will shine scatteredly. If the body has flaws, it needs to be repaired. In addition, in order for the bulbs to shine brightly, you need to check the cleanliness of the glass on the headlights. Dust that has accumulated on them can be removed with a vacuum cleaner.
During use, scratches may appear on the glass. In this case, it is not necessary to change the headlight; you can polish the glass surface. If problems are identified with the reflector, it cannot be repaired and should be replaced with a new one. To make the adjustment correctly, the machine must have lamps of the same power and size.
Halogen lamp for car
You can distinguish a car from the crowd using tuning:
- install eyelashes;
- dim the headlights;
- install lensed headlights;
- make lighting from LEDs.
The simplest tuning option is to purchase ready-made eyelashes and stick them on the top of the Lada Granta headlights. You can give the eyelashes the desired shape using a stationery knife. Tuning can be done with eyelashes made yourself. The materials used to make eyelashes can be different; film materials are suitable.
You can buy vinyl film, cut a template out of paper, and then cut out the eyelashes from vinyl. Tuning is done by gluing eyelashes onto an applied soap solution. You can perform tuning with plastic eyelashes.
See:
Tuning - eyelashes on headlights
There are many tuning options used during car repairs. It all depends on the capabilities and imagination of the driver.
Reviews
| № | Positive |
| 1. | Kirill, 33 years old: after buying the car from the showroom there were no problems with optics. Incorrect lighting began after a collision on the highway. I had to adjust it with hydraulic correctors. It’s not at all difficult to figure out the sizes and angles of lighting on your own. |
| 2. | Vitaly, 41 years old: recently replaced the standard lamps with halogen ones, the accuracy of the light beam has dissipated. The regulator in the cabin did not cope with the task, even in position “2”. I adjusted it using hydraulic correctors on each of the headlights. It turned out to be good light. |
| 3. | Vladlen, 33 years old: despite the fact that the body geometry was restored after the accident, the low beam lost its accuracy. Thanks to hydrocorretors, I restored the light beam. |
| 4. | Vasily, 38 years old: I work as a taxi driver, I often drive at night. In general, the lighting of the Lada Grant is good and accurate, but after the repair all the settings were lost. I had to restore it myself using standard hydraulic correctors. |
| 5. | Mikhail, 42 years old: I can say that the lighting quality of the Lada Grant is good, far from ideal, but better than that of the Priora and Vesta. Sufficient for daily needs, those who want to improve performance can install xenon. |
| 6. | Gennady, 44 years old: I work as an entrepreneur, most of the time I drive. The accuracy of the low beam light beam is enough for me; the road and the right side of the curb are illuminated. During all this time I only adjusted it with hydraulic correctors a couple of times. |
| 7. | Valentin, 42 years old: after a major overhaul of the car last year, I slightly adjusted the high beam. The violation may be related to the accident. In all other respects, no comments. |
| Negative | |
| 1. | Victor, 34 years old: I don’t like the standard head lighting, it’s weak and dim. The adjustment doesn't help much. After installing xenon there are no problems, the road and side of the road are always under control. |
| 2. | Alexander, 36 years old: bought the car second-hand, second owner, good condition. I replaced the head optics with xenon, I’m happy with the quality, the clearance is excellent. My advice to motorists. |
| 3. | Konstantin, 32 years old: Lada Granta has a problem with high beams, similar to Priora and Vesta. Nothing has been changed. I installed additional headlights myself. |
Conclusion As for the Lada Granta, a car in the mid-price segment, the lighting is good, it is quite enough for daily use. Anyone who wants to see the road a kilometer ahead should install additional lighting.
Operating principle of the device in Grant
- The corrector cylinder must be controlled using the handle.
- The cylinder is responsible for regulating the pressure in the hoses extending to the pusher.
- The pushrods are located in the headlights. The higher the pressure rises in the tube, the more dynamically the liquid presses on the rod (located in the internal compartment of the pusher).
- The main position for adjusting the headlights is the position in which the rod itself is located.
When the corrector on the Grant is damaged (one headlight does not respond to it), the pusher should be put in order. It is the malfunction of the latter that mainly provokes the breakdown of the entire device. There are 2 ways to repair a pusher. With the first, no further adjustment is provided. To implement this technique you need to do the following:
- remove the damaged pusher from the headlight;
- warm up the pusher hose (which gives greater flexibility), and then remove the pusher from it;
- tighten the self-tapping screw from the side of the hose (you need to tighten it at an angle, since the level of protrusion of the rod directly depends on the depth of tightening of the screw);
- adjust the length of the screw to obtain the desired result.
To work on adjusting the headlights, you need to prepare the tool in advance:
- 6 mm hexagon or Phillips screwdriver;
- a sheet of chipboard 3x3 m or a vertical flat panel made of another material;
- tape measure or long ruler;
- a couple of crayons;
- several newspapers.