Draining antifreeze from the radiator
This must be done on a cold engine, otherwise you are almost guaranteed to get scalded. If you went somewhere before replacing, smoke for half an hour while the engine cools down. We also remember that any antifreeze is an active chemical, poisonous, and at the same time has a sweetish odor that attracts animals and children. To avoid tragedies, you should stock up on tightly sealed canisters in advance, where the liquid will then be drained. For the procedure, you will need a basin, preferably a metal one: some types of plastics (especially food-grade ones) are corroded by antifreeze.
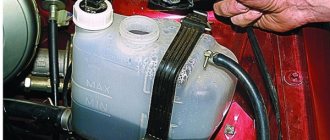
- If your car has engine protection, it can be removed. To do this, 4 bolts are rolled up;
- The next thing to do is open the faucet on the heater. To do this, the stove temperature regulator moves to the right all the way (maximum heating). If you have an automatic air conditioner on board, its knob is also set to maximum;
- Now the controversial point:
the cap on the expansion tank. You will have to decide for yourself whether to unscrew it or not. On the one hand, an open neck ensures a more complete and faster drainage. On the other hand, when drained, the coolant may splash and splash the engine; - A basin is placed under the radiator;
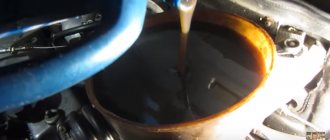
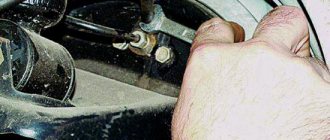
- Look for a drain plug under the hood. It needs to be wound down slowly and sadly: if you hurry, it will gush so much that it will most likely flood the generator - and this is an additional, unnecessary fuss;
- You need to wait 10 minutes until the antifreeze drains to the maximum, after which you can move on to the next stage.
Draining antifreeze from the engine
On a number of cars (in particular, VAZs), the drain plug is hidden behind the ignition module. In this case, before draining the antifreeze, you will have to dismantle it too. This is done like this:
- The weight is removed from the battery;
- The decorative plastic trim (if present) is removed. To do this, the oil fill plug is screwed off and the lining is pulled out;
- The block with wires from the module is removed;
- High-voltage wires are removed from it;
- Using key 13, fasteners are screwed onto the engine crankcase (2 pieces);
- Use key 17 to loosen the last fastener;
- The module is pulled out together with the bracket;
- You can proceed directly to draining the antifreeze or antifreeze;
- The basin moves under the engine;
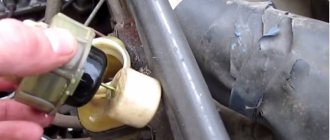
- The found plug is rolled up no less carefully than when draining the radiator;
- The coolant is drained; you need to wait 10 minutes until everything drains down;
- The cork is being wiped. All seals are checked; those that are cracked or deformed are replaced;
- The covers are put in place; if you removed the ignition module, put it in place using the reverse algorithm.
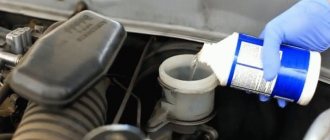
In some cases, it may be necessary to flush the system with distilled water. New antifreeze is poured into the expansion tank in a volume somewhere in the middle between the min and max marks. To prevent airing during filling, the pipe clamp is loosened and the hose is disconnected from the fitting on the intake manifold. Filling is done in portions, you need to act by covering the lid from time to time and pressing through the pipe - these are additional measures against the formation of air pockets.
When it drips from the fitting, the hose is mounted in place and the clamp is tightened. To check, after changing the antifreeze, the engine is started and the heater is turned on full. There is no heat, which means there is still air in the system. The plug must be removed to prevent the engine from overheating. A person who has figured out how to completely drain the coolant will be able to do this without difficulty.
Filling and draining coolant
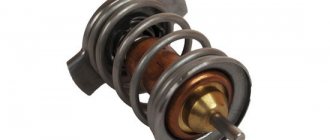
To refill coolant you must:
— clean the plug on the roof of the power compartment from dust and dirt and unscrew it;
— unscrew the steam-air valve of the expansion tank;
— open the heater valve located in the left side niche on the rear wall of the FVU compartment;
— connect the nozzle to the funnel, install the filter;
— insert a funnel with a nozzle into the hole in the expansion tank;
— fill the cooling system with liquid.
The water level in the expansion tank should be between the upper and middle ridges of the control line, which corresponds to a distance of 65 mm from the top edge of the filler neck, and the level of low-freezing liquid should be between the middle and lower ridges of the control line, which corresponds to a distance of 80 mm from the top edge of the filler neck. Screw the steam-air valve into the expansion tank, start the engine, set the engine speed to 800-1000 rpm and after 3-5 minutes. stop the engine;
— check the coolant level and top up if necessary;
- screw in the plug.
To protect cooling system parts from corrosion, add a three-component additive consisting of a mixture of 0.05% sodium nitrate, 0.05% trisodium phosphate, 0.05% potassium chromium phosphate to the cooling system while the engine is running at a water temperature of 40-60 degrees. water (25 grams of each component per 50 liters of water.). Add the additive to the cooling system in small portions.
To drain the coolant you must:
— clean the plug on the roof of the power compartment, the plug in the bottom of the car and the valve from dust and dirt;
— unscrew the plug and the steam-air valve of the expansion tank;
— open the drain valve by pressing it and turning it clockwise until it stops;
— open the heater tap;
— open the drain valve on the water pump by turning the valve handle to position 0 and drain the coolant;
— unscrew the plug;
— unscrew the plug in the gearbox pan, having previously unlocked it, and drain the remaining coolant;
— screw the plug into the gearbox pan and secure with wire;
— screw the plug into the hole in the bottom of the car;
— screw the plug with the steam-air valve into the filling hole of the expansion tank;
— screw in the plug on the roof of the power compartment;
— close the drain valve by pressing it and turning it counterclockwise;
— close the heater tap;
— close the drain valve.
When draining the coolant, the machine must be installed on a horizontal platform.
Cooling system elements
The process of draining coolant from the radiator
In order to understand how and why it is necessary to drain the coolant, you need to have a little understanding of the design of the car and the cooling elements. Also, you need to know how the coolant circulates in the engine and have an idea of the places where it can be drained.
So, let's look at the complete diagram of the engine cooling system and how the coolant circulates:
Cooling system diagram
1 – element in the form of a plug for the expansion tank; 2 – expansion tank; 3 – hose for draining liquid from the pipe; 4 – hose passing between the radiator and the expansion tank; 5 – hose leading from the radiator; 6 – tank to the left of the radiator; 7 – aluminum tube; 8 – plug systems; 9 – tank to the right of the radiator; 10 – drain plug; 11 – middle of the radiator; 12 – casing for electric fan; 13 – plastic wings of the electric fan; 14 – electric motor; 15 – toothed pump pulley; 16 – pump impeller; 17 – camshaft drive belt; 18 – engine block; 19 – pump pipe; 20 – radiator hose with supply function; 21 – heater radiator hose with drain function; 22 – hose supplying coolant to the throttle pipe; 23 – exhaust pipe; 24 – hose for refilling; 25 – heater radiator hose with supply function; 26 – thermostat; 27 – coolant temperature sensor; 28 – coolant level indicator sensor.
Coolant drain options
There are two options for draining coolant from the system. They depend on what operations the motorist intends to perform with the car. So, let's look at both options separately.
Draining without removing the engine
This method is often used to replace coolant in the system, as well as to change cooling elements. The procedure is quite simple. Let's look at how to properly drain the liquid from the cooling system completely:
- We find the cooling system plug on the cylinder block.
Location of the coolant drain plug on the cylinder block
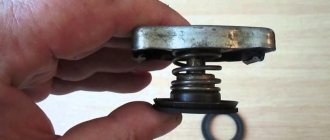
Remove the expansion tank cap
Unscrew the plug on the radiator to drain the coolant
Installation of faucet
Drain faucet
For the convenience of subsequent draining and repair work, you can install a faucet. Moreover, you have already unscrewed the standard plug.
Draining with engine removal
The second method is easier than the first and is used when the engine is planned to be removed. Let's consider the sequence of actions aimed at draining coolant from the system:
- Unscrew the plug on the expansion tank.
- We unscrew the plugs from the cylinder block and radiator.
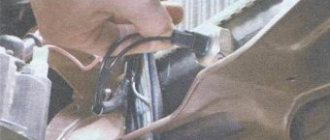
- Next, when the liquid has flowed out, you need to unscrew the pipes leading to the radiator.
- Of course, some liquid remains in the system and must be drained completely. This can be done in two ways: by blowing it out with a compressor or by disassembling the engine.
Why do you need to drain the coolant?
This “slurry” has already served its term
Let's look at the main reasons why you will need to completely drain the coolant from the system:
- Development of a full resource of use . It is recommended to carry out once every 90-100 thousand km. This is due to the fact that the coolant, due to a constant temperature difference, which is its operating temperature, loses its technical and physicochemical properties. After such a mileage, it can no longer effectively provide cooling of the engine and its elements, which can lead not only to failure of the thermostat and pump (most often these are the spare parts that suffer), but also to boiling of the engine, which can have unpleasant and material consequences .
- During engine overhaul . When the engine is dismantled for major repairs, the coolant will need to be completely drained.
- Replacing the radiator will also require draining the coolant completely from the system, but it is done according to a simplified option (the second one, which is indicated above).
- Replacement of other individual elements that will require draining the coolant from the system.
How to Drain Antifreeze From Umz 4216 Block
UMZ 4216 engine - main characteristics and gas equipment
Advertising about Gazelle Business has probably become a “classic” today. At one time it could often be heard. The Gazelle Business is equipped with a UMZ 4216 engine. It can be said that it is a good Russian truck with a good Russian engine that meets Euro-3 environmental standards. At least, a huge share of cargo transportation today is carried out by Gazelles.
All engine modifications have a volume of 2.9 liters, two valves per cylinder. Initially, UMZ 4216 engines provide the possibility of installing hydraulic power steering. Therefore, there are brackets and fastenings for it. Engine power UMZ 4216 123 horsepower.
As the most common Gazelle engine, it was often tested by independent experts. The tests were carried out from scratch, and after the first hundred thousand kilometers the UMZ 4216 engine was disassembled. Before and after disassembly, compression measurements were taken in each cylinder. Based on these data, we can judge that the minimum level is 8.6, the maximum is 10. And this is after the engine has run for one hundred thousand kilometers.
Content
hide
1 Major failures of the UMZ 4216 engine
2 Convenient device for draining antifreeze (not a drop is missed)
3 Replacement of antifreeze and expansion tank cap \ Sable engine 405 euros 3
4 HBO on UMZ 4216 engine
Major failures of the UMZ 4216 engine
The most common failure is a rupture of the intake manifold. According to the manufacturer, the UMZ 4216 engine had an intake manifold made of insufficiently strong steel. In 2010, this problem was successfully corrected. And UMZ engines with a manifold made of high-strength steel began to be installed on Gazelle cars.
The next most popular malfunction is in the cooling system of the UMZ 4216 engine. At average speeds at speeds above 60 km/h, the engine temperature is within normal limits. Once you reduce the speed, the temperature gradually rises and it doesn’t take long for the coolant to boil. But if the Gazelle is stuck in a traffic jam, then overheating of the engine is inevitable.
Convenient device for draining antifreeze (not a drop is missed)
for gazelle and other cars.
Replacement of antifreeze and expansion tank cap \ Sable engine 405 euro 3
Hello everyone, in my Sobol (GAZ 2752), engine 405 euro 3, I decided to change the antifreeze
for antifreeze and expand the cap.
UMZ 4216 engines are equipped with an electromagnetic clutch, which turns on the radiator fan. This clutch begins to work incorrectly and the fan does not turn on. The result is engine overheating. Ways to get rid of overheating:
- Install a copper radiator. Copper conducts heat better and cools liquid more efficiently.
- Instead of antifreeze, use high-quality antifreeze.
- Trick the fan drive - turn it on manually from the cabin. A more convenient option is to get rid of the electromagnetic clutch in the UMZ 4216 cooling system and install an electric fan with the maximum number of blades and a thermal switch.
HBO on the UMZ 4216 engine
In order to save money on Gazelle cars, gas equipment is installed. UMZ 4216 engines even come from the factory with gas equipment installed. When installing gas equipment from a third-party company, the manufacturer does not refuse to provide a warranty.
What are the advantages of installing HBO:
- No deposits in the form of soot in the combustion chamber of the engine.
- Reduction of harmful substances in exhaust gases.
- Increased engine life.
- Saving on fuel. Gas is two times cheaper than gasoline. HBO pays for itself in about 30 thousand kilometers.
Gazelle vehicles with a UMZ 4216 engine are equipped with fourth generation gas equipment. The engine ECU is structurally assembled in the same housing with the LPG control unit. What is the advantage of the fourth generation? The most important thing is that all operation of gas equipment excludes human intervention. The type of fuel is selected automatically by the control unit.
A temperature sensor is installed on the evaporator reducer. When setting the operating modes of the engine and LPG, the response temperature of the fuel type switching solenoid valve is indicated. When the temperature threshold is reached, the gasoline supply stops and the gas supply turns on. Based on the “gasoline” map of the UMZ 4216 engine operation, the LPG control unit is calibrated. Due to the difference in octane numbers between gasoline and gas, the opening time of gas injectors will be slightly longer than the opening time of gasoline ones.
Post Views: 1,399
Frequent situations in which coolant replacement is required
p, blockquote 5,0,0,0,0 –>
The main situations in which a coolant replacement is necessary:
p, blockquote 6,0,0,0,0 –>
1. Antifreeze loses its performance properties
p, blockquote 7,0,0,0,0 –>
During vehicle operation, as a result of oxidation processes, sudden temperature changes, and evaporation, the properties of the coolant change over time. The guaranteed service life of antifreeze is usually no more than 3 years of operation. After this period of operation, it is necessary to replace the coolant.
p, blockquote 8,0,0,0,0 –>
2. Diluting antifreeze with water or other liquid in emergency situations
p, blockquote 9,0,0,0,0 –>
Sometimes, as a result of boiling of the coolant or minor repair work, it becomes necessary to quickly add antifreeze, but there is no suitable liquid at hand. In many cases, drivers use water or a different brand of coolant for these purposes. After which a complete replacement of the antifreeze is required.
p, blockquote 10,0,1,0,0 –>
3. Carrying out repair work
p, blockquote 11,0,0,0,0 –>
If during the repair process it is necessary to drain the coolant, it is advisable to use fresh coolant for refilling, especially if the service life of the previous one exceeds 2 years. In this case, it is necessary to completely remove the old antifreeze so that it does not mix with the new fluid, worsening its performance properties.
p, blockquote 12,0,0,0,0 –> adsp-pro-1 –>
Rules and stages for draining water from the heating system
How to properly drain water from the heating system in a house or apartment? It is necessary to take into account the design features of the heating system and follow the procedure.
Draining the heating system in a private house
The heating system of a private house is usually autonomous and draining does not require any permits or agreements with neighbors. It is recommended to drain the heating system in the following order:
- Disconnect the heating boiler from the network.
- The water in the pipes and radiators must cool completely.
- Turn off the cold water tap.
- Open the air valve.
- Open the valves on the radiator and boiler.
- Connect the hose to the drain valve, which is located on the return pipe near the boiler. The other end of the hose must be lowered into the toilet or a large container if the hose is short.
- Open the drain valve.
- Pump out the water until the pressure gauge shows zero.
- Open the Mayevsky tap and let air into the heating system. The air will push out any remaining water.
- Move the hose to the supply valve, open it and drain the liquid from the upper pipe.
A compressor is needed to drain water from the underfloor heating system. It is connected to the inlet pipe, turned on, and the air supply promotes the movement of liquid in the thermal circuit. A drain valve is installed on the return pipe, which opens to remove water. The compressor increases pressure gradually and stops draining when air is released at the outlet. Heated floor circuits have a small capacity and hold no more than 10 liters of water.
After draining the coolant is completed, the necessary actions to repair or reconstruct the system begin. Or they calmly leave the house for the winter, eliminating the risk of rupture of heating pipes.
Draining the heating system in an apartment building
If the radiators in the home have been replaced with new ones, they are equipped with the necessary fittings. In this case, draining the water is not difficult. This is also possible if there are shut-off valves on the path from the riser to the heating radiator. The procedure in this case is as follows:
- Shut off the fluid supply to the battery by turning the control valves.
- Open the outlet valve at the bottom of the battery. Instead of a tap, there may be a plug, then unscrew it with an adjustable wrench.
- Place a bucket to drain the water or connect a hose.
in an apartment building you need to open the outlet valve at the bottom of the battery.
Difficulties arise if the battery is old, the shut-off valves are missing or painted over. Then the water will have to be drained from the entire system. It is impossible to do this on your own; you will have to submit an application to the management company. A specialist will turn off the tap in the basement and remove water from a certain riser.
If there is a bypass (vertical jumper between the upper and lower pipes of the radiator) in a single-pipe heating system, the course of action is different:
- Open the bypass valve.
- Close the shut-off valve - turn off the coolant supply.
- Open the outlet valve or plug to drain the water.
Important!
If an apartment building is supplied with heat from a closed autonomous heating system, then draining the water yourself is prohibited. This clause is specified in the agreement with the management company. The system must maintain constant pressure, and self-draining can release this pressure, which will lead to heating problems throughout the house. Therefore, you need to call a specialist to drain the water.
Draining the heating system in an apartment or house is a mandatory procedure before replacing parts of the heating system and carrying out preventive maintenance. During the absence of the owners of a private house in winter, the water must be drained to avoid freezing and damage to the system. To simplify this procedure in the future, the old heating system must be replaced, providing it with all elements of shut-off valves.
How to completely drain antifreeze from the engine block
p, blockquote 13,0,0,0,0 –>
In many cars, antifreeze must be drained in several stages. The fact is that the engine cooling system, in which the coolant circulates, has many cavities that are separated by peculiar communicating vessels: pipes, valves, radiators (engine and heater), engine block, thermostat and others.
p, blockquote 14,0,0,0,0 –>
Having drained liquid from one cavity, there is no guarantee that it has been completely removed from other tanks. Technologically, the lowest reservoirs in which antifreeze circulates are located in the radiator of the cooling system and the engine block.
p, blockquote 15,0,0,0,0 –>
Most designs of cooling system radiators provide a special valve for draining the coolant. There is no such valve in the engine block. Its function is performed by a drain plug. It is located on the engine block.
p, blockquote 16,0,0,0,0 –>
p, blockquote 17,0,0,0,0 –>
During the operation of the car, the unit becomes covered with a layer of dust and contaminants of various types. Finding the coolant drain plug on the engine block is sometimes problematic. To do this, you should use the vehicle repair and operation manual.
p, blockquote 18,0,0,0,0 –>
To completely drain the coolant from the engine block, you must:
p, blockquote 19,0,0,0,0 –>
1. Place the car on a flat surface.
p, blockquote 20,0,0,0,0 –>
2. Warm up the engine to operating temperature until the thermostat operates. Let it cool for at least half an hour. In summer, this operation can be skipped.
p, blockquote 21,1,0,0,0 –>
3. If the car engine is hot, you need to let it cool for at least half an hour. Draining coolant when the engine is hot is prohibited.
p, blockquote 22,0,0,0,0 –>
4. Open the coolant expansion tank cap.
p, blockquote 23,0,0,0,0 –>
Some cars are equipped with top drain plugs to make draining antifreeze easier. They create air flow, increasing the drainage speed.
p, blockquote 24,0,0,0,0 –>
p, blockquote 25,0,0,0,0 –>
If your car has such plugs, you need to open them.
p, blockquote 26,0,0,0,0 –>
5. Unscrew the radiator drain valve. If it is missing, you can disconnect the pipe leading to the bottom of the radiator. Care should be taken when doing this, since the antifreeze is in a heated state.
p, blockquote 27,0,0,0,0 –>
6. Drain the coolant from the radiator and pipes to the maximum into a previously prepared container.
p, blockquote 28,0,0,0,0 –>
7. Unscrew the drain plug of the block.
p, blockquote 29,0,0,0,0 –>
8. Drain the antifreeze from the engine block into a container. To completely remove the fluid, you can rock the car and jack it up from different sides.
p, blockquote 30,0,0,0,0 –>
9. After carrying out the above operations, antifreeze may not be completely removed. To remove residual coolant from the cooling “jacket” of the block, you can start the engine for a couple of minutes. The pressure created by the pump will remove residues from the system.
Home → Power plant → Coolant drain
Coolant drain
To drain the coolant:
— unscrew the plug in the bottom of the housing under the boiler drain hose of the starting heater;
— open the hatch covers above the power plant compartment;
— remove the plugs from the expansion tanks , open two taps and three shut-off valves of the heaters;
— place the dishes under the six drain holes in the bottom of the machine body. the coolant into a clean metal container and store it for later refilling;
— open eight taps : two on the heat exchangers, one at the starting heater boiler and five at the heaters.
After pouring the coolant from the expansion tanks into the system, open the filler caps of the cooling systems.
After the coolant has completely drained, close the drain valves and replace the filler caps and expansion tanks.
Close the drain valves according to the instructions on the instruction plates (the instruction plate indicating how to drain the coolant from the front heater is located to the left of the driver on the wheel well, about draining the rear heaters - on the right transverse casing of the rear heaters, about draining the heater, right and left heat exchangers - on the hatch cover of the central partition of the power unit compartment).
If the taps are poorly closed or leaky, water will leak and, at low ambient temperatures, may freeze in the outlet hose. In such cases, clean the hose before draining the water through the hole in the bottom.
If coolant leaks through the drain valve, disassemble it, clean it of scale and lubricate it with lubricant 1-13 or Litol-24 .
If during summer operation of the machine the cooling system for some reason was filled with water without a three-component additive, then when switching to winter operation it must be flushed.
Flushing includes draining the water, filling the cooling system with clean water with a three-component additive, starting and warming up the engines to a temperature of 80-90°C (when the heating system is turned on) and completely draining the flushing liquid 2 hours after stopping the engines.
When servicing the machine, perform the following work.
When KO, check the filling of the cooling system and its tightness.
During ETO , check the condition and tension of the water pump drive belts and, if necessary, adjust the belt tension. This operation should be carried out only during the first thousand kilometers of the vehicle, and then during maintenance No. 1. When pressing each belt in its middle part between the pulleys with a force of 4 kgf, the deflection should be within 11-13 mm.
10/09/2010, 8544 views.
How to Find the Coolant Drain Plug on the Engine Block
p, blockquote 34,0,0,0,0 –>
If the problem of antifreeze drainage occurs on the road or far from the parking lot or proposed repair, you can use the following tips for finding the drain plug:
p, blockquote 35,0,0,0,0 –>
- the plug is located in the lower side of the engine block on a flat surface;
- the plug head is usually made with a 14, 15, 16 or 17 turnkey;
- there are no other fasteners, brackets, or other devices under the drain plug; it is not completely screwed into the block and has a special thread;
- Often the plug is made of bronze to reduce corrosion processes.
adsp-pro-2 –>
Video - where is the coolant drain plug located on the SsangYong Actyon engine block:
p, blockquote 36,0,0,0,0 –>
p, blockquote 37,0,0,0,0 –>