Bleeding brakes and replacing brake fluid on a VAZ 2107 car
We replace the brake fluid on the VAZ 2107 according to the frequency of maintenance (see “Periodic maintenance of the VAZ 2107”).
We pump the brakes of the VAZ 2107 to remove air from the brake system and when replacing the brake fluid. If one of the brake circuits depressurizes, it is enough to bleed only this brake circuit, and not the brake system. The order of bleeding the brake circuits of the hydraulic brake system does not matter. We begin pumping the brake circuit of a VAZ 2107 car from the brake mechanism furthest from the main brake cylinder. To carry out the work of bleeding the brakes on a VAZ 2107 car, you will need an assistant, as well as a special 10 mm wrench for brake pipes, a transparent vinyl tube of suitable diameter, a container for draining brake fluid and fresh brake fluid (see “Operating fluids used on VAZ 2107 cars "). The sequence of bleeding the brakes on a VAZ 2107 car
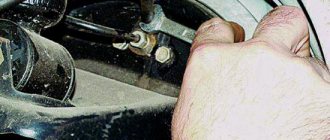
1. We prepare the VAZ 2107 car for operations (see “Preparation of the VAZ 2107 car for maintenance and repair”). 2. Remove the cover of the brake reservoir of the hydraulic brake drive and, if the level is insufficient, add brake fluid to the “MAX” mark into the brake reservoir. 3. Remove the front right wheel from the VAZ 2107 (see “Wheel of the VAZ 2107 - replacement”) and remove the protective rubber cap from the fitting of the brake wheel cylinder.
4. We put a rubber hose on the bleeder fitting and immerse its free end in a container partially filled with brake fluid. We pour the brake fluid into a container so that when bleeding the brakes, air bubbles escaping from the rubber hose are visible. When using a transparent hose, there is no need to pre-fill the reservoir with brake fluid, since the movement of air bubbles in the hose can be visually assessed. 5. An assistant presses the brake pedal 3-5 times and holds it down. 6. Using an 8 mm wrench (10 mm on early VAZ 2107 cars), unscrew the brake bleeder fitting 3/4 of a turn.
At the same time, the brake pedal begins to move, displacing brake fluid through the hose. 7. After the brake pedal has moved all the way, tighten the fitting, after which the assistant releases the brake pedal.
Attention When bleeding the brakes on a VAZ 2107 car, you must periodically check the level of brake fluid in the brake reservoir and, if necessary, add brake fluid.
8. We repeat the operations for pumping the brakes on the VAZ 2107 until air bubbles disappear from the brake fluid coming out of the hose. 9. Remove the hose and put a protective cap on the brake bleeder fitting. 10. We install the previously removed wheel on the VAZ 2107 car. 11. Similarly, bleed the brake mechanism of the left front wheel and close the lid of the brake reservoir of the hydraulic brake system. 12. The rear brake circuit of the hydraulic brake system on a VAZ 2107 is pumped in the same way as the front circuit, starting from the right side of the VAZ 2107. 13. To replace the brake fluid on a VAZ 2107 with a rubber bulb, remove the used brake fluid from the brake reservoir and fill it with fresh one. We pump the front and rear brake circuits of the hydraulic drive until fresh (lighter and more transparent) brake fluid comes out of the fittings of the working brake cylinders.
What kind of brake fluid should I fill in the VAZ 2107 and how much?
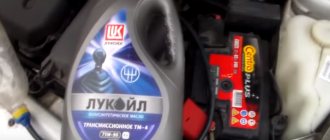
The hydraulic brake system of the VAZ 2107 uses DOT-4 brake fluid. Its volume is 0.382 l. The fluid is topped up or changed not only in case of repairs, but also when the color changes or moisture gets into it. As a rule, on classic Zhiguli cars a complete fluid change is performed every 3 years. The essence of the procedure is to pump fluid through the system.
Brake fluid for VAZ 2107
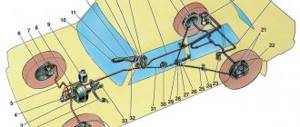
The brake system of a VAZ 2107 car consists of discs, calipers, main and working cylinders, pads, pipes inside which brake fluid flows (hereinafter referred to as TF).
The quality of braking depends on the service life of the fluid, cleanliness, and sediment. The European Motorists Association explains that in 28% of accidents the cause is a faulty brake circuit (BC). The indicator is above the average for the CIS countries and the Russian Federation, among others.
Replacing (renewing) the fluid on your own is not at all difficult, but be extremely careful not to violate the established regulations. Otherwise, you risk damaging the seals and working cylinders on the caliper.
Execution Sequence
1. We prepare the car for operations (see “Preparing the car for maintenance and repair”).
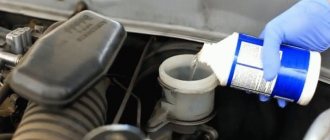
2. When the lid is removed, the liquid level in the tank should be at the “MAX” mark printed on its wall.
Attention! A decrease in the fluid level in the reservoir with a sealed hydraulic brake system indicates wear of the brake pads.
After installing the tank cap with the sensor, the liquid level in the tank will increase due to the volume of the sensor float and reach the lower edge of the filler neck.
3. To replenish the reservoir with brake fluid, unscrew, remove the cap and add fluid to the “MAX” mark.
Attention! If brake fluid comes into contact with body paint, plastic parts and wires, it can damage them. You should immediately remove the liquid with a rag, and if it gets on open areas of the body, wash off traces of the liquid with water.
The brake system of a VAZ 2107 car consists of discs, calipers, main and working cylinders, pads, pipes inside which brake fluid flows (hereinafter referred to as TF).
The quality of braking depends on the service life of the fluid, cleanliness, and sediment. The European Motorists Association explains that in 28% of accidents the cause is a faulty brake circuit (BC). The indicator is above the average for the CIS countries and the Russian Federation, among others.
Replacing (renewing) the fluid on your own is not at all difficult, but be extremely careful not to violate the established regulations. Otherwise, you risk damaging the seals and working cylinders on the caliper.
What brake fluid should be used on a VAZ 2107 car
The design of the TC is as follows: a caliper is installed on each wheel, inside of which there are two brake pads. They compress the disc when you press the pedal. The pressure inside the circuit increases, which is transmitted by the fuel fluid to the working cylinders and pads.
After the driver releases the pedal, the pressure in the circuit is restored, the disc and pads return to their original position. During operation of the machine, due to temperature changes, sediment forms in the liquid, the circuits become clogged, and obstacles are created to the natural circulation of the “lubricant”. Highways require urgent maintenance, cleaning, and replacement of sealing elements.
Cars of the VAZ 2107 family are required to be fueled with DOT-4 class diesel fuel based on synthetic and semi-synthetic bases. Mineral is excluded from use.
Until 1995, DOT-3 was filled into the VAZ brake circuit. Due to low technical characteristics and non-compliance with modern requirements and standards, the third class was excluded.
AvtoVAZ engineers recommend updating the TZ every 45,000 km or three years from the date of refueling, whichever comes first.
The 4th – 6th generation bunkers have one drawback – active absorption of moisture and condensate. This is explained by the peculiarities of the hygroscopic structure at the molecular level. The more water absorbed, the fewer nutrients inside, the weaker the structure.
The “boiling point” of DOT-4 is 250°, after the vehicle has run 60 thousand km. 130°. A low “boiling” threshold is one of the factors creating an emergency situation on the roads, jamming of calipers and working cylinders.
Note to the driver. Do not mix synthetic, semi-synthetic and mineral based fuels with each other. As a result of a chemical reaction, the liquid coagulates, forming a thick, homogeneous mass that will clog the circuit lines.
How to bleed brakes on a VAZ-2107
Sometimes circumstances arise when the system in the VAZ-2107 is unproductive or there is a brake fluid leak (hereinafter referred to as TF).
In such situations, it is necessary to immediately undertake repairs. It’s time to do the work on your own. To do this, you will need to prepare the equipment in advance and study the instructions. The safety of any car, and the VAZ-2107 is no exception, directly depends on the effective operation of the braking system. When problems appear or repairs are made, the brakes need to be pumped. In order for the system to be in good condition, it is important to have knowledge of how damage occurs and what causes it.
Malfunctions of the brake system of the VAZ 2107
The safety of driving a VAZ 2107, like any other car, directly depends on the effectiveness of the braking system. If problems arise with it or repairs are carried out, the brakes need to be bled. In order for the system to always be in good condition, you need to know how malfunctions manifest themselves and what causes them.
Soft brake pedal
The normal state of the brake pedal on the “seven” is one in which there are no jerks or dips at the moment it is pressed and there is no need to make any special efforts. However, as the vehicle operates, drivers may encounter a situation where the brake pedal has a different condition: it may be too soft or too tight. Both phenomena are considered unacceptable and indicate problems with the braking system and the need for prompt repairs. Most often, the pedal becomes soft when the system is filled with air. Sometimes this phenomenon is also called a failure. The malfunction is eliminated by bleeding the brakes, as a result of which air is removed from the system, which could enter it for the following reasons:
- There is too little brake fluid in the expansion tank.
- Violation of the tightness of the braking system.
- Malfunction in the main brake cylinder (GTC). The problem is resolved by repairing the mechanism.
Soft and stiff brake pedal
The normal position of the brake pedal of the 2107 model is when there are no jerks or dips when pressed, and no effort is required. At the same time, during the operation of the car, car owners are sometimes faced with the fact that the brake pedal manifests itself in a completely different way, that is, it becomes too tight or soft. Such manifestations are unacceptable and indicate problems in the braking system. Therefore, prompt repairs are required. Often the pedal becomes soft when the system is too airy. This phenomenon is also called failure. The damage can be repaired by bleeding the brakes, that is, it is necessary to remove accumulated air from the system. The latter could have happened due to the following reasons:
- not enough fuel fluid in the expansion tank;
- sealing in the braking system is broken;
- damage to the brake cylinder.
At the same time, there is a situation where when pressing the pedal it requires excessive force, for which the vacuum booster (VA) is to blame. This mechanism creates a vacuum in the manifold (intake). The fact that the pedal is tight is indicated by a number of reasons:
- the VU air filter is clogged, therefore, it needs to be replaced;
- the VU valve body is jammed; the vacuum booster should be replaced;
- the VU diaphragm is damaged; replacement of the control unit is required;
- wear of the tip of the device; the tip needs to be replaced;
- incorrect operation of the check valve in the control unit; it is worth replacing;
- the seal is broken; the VU or check valve should be replaced;
- damage to the hose connecting the intake manifold and the intake manifold, or the tightening of the clamp in it is loose;
- increasing the size of cuff cylinders in brake cylinders; this happens when using poor quality fuel fluid.
Signs of brake fluid loss of quality
- Increasing the length of the path to a complete stop of the car;
- Pressing the brake pedal requires force;
- The pillbox in the expansion tank changed color from light to dark;
- At the place where the tank is installed, traces of lubricant leakage are visible, the level is below normal;
- The yellow indicator on the dashboard indicates the fluid level sensor in the system.
If one or more signs are detected, stop the car, turn off the engine, and inspect the brake circuit and master cylinder. Subsequent operation of the technical device is unsafe.
Bleeding the brakes: step-by-step instructions
To better pump the brakes of the “Seven” you will need an assistant. One will be under the car and work on the brake cylinders, while the other presses the brake pedal inside the car. The following tools will be useful in your work:
- head for 8 and 10 caps;
- head for 8 and 10, open-end or for brake pipes;
- transparent container for waste;
- hose of the required diameter.
Pumping starts from the furthest tire from the GTZ, therefore, start from:
- right rear tire;
- left rear;
- right front;
- left front.
To bleed the rear tire brakes, go under the car. All work related to the front brakes is carried out after the tires have been removed in advance. Otherwise the procedure is identical:
- Remove the protective cap from the brake cylinder fitting. Loosen the fitting slightly with an 8 and 10 mm wrench.
- Connect the hose to the fitting and place the opposite end into a container.
- Press the brake pedal until hardness appears and keep it pressed.
- Unscrew the fitting half a turn. The fuel fluid will begin to flow out of the hose, the pedal is pressed to the floor. Do not release the pedal until the liquid stops oozing.
- Tighten the fitting and repeat the process until liquid and air come out of the tube.
- Repeat the manipulations with the remaining tires of the VAZ-2107. To bleed the front brake, simply remove the wheel.
- To complete the pumping, close the fitting with a rubber cap. During pumping, you should monitor the fluid level in the expansion tank. It is important that there is no air in the system.
How to bleed the brakes on a VAZ 2107
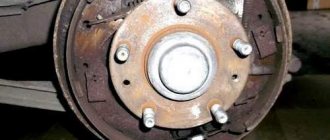
For ease of work and to ensure free access to the brake cylinder fittings, you should use an inspection hole. The design of the front brake mechanisms requires removal of the wheels to bleed the brake system.
Before starting work, it is necessary to fill the brake reservoir to the maximum, and during bleeding, you must ensure that it is constantly filled with brake fluid. If you miss this moment, air will get into the working cylinder and you will have to start work again.
The procedure for each of the 4 working cylinders is as follows:
- Remove the protective cap from the fitting.
- Loosen the fitting using a spanner. If the fitting has not been unscrewed for a long time, significant effort may be required. You must be especially careful not to damage the edges, otherwise the work may become very difficult, even to the point that the brake cylinder will need to be replaced.
- Place the tube on the fitting and lower it into the brake fluid container.
Direct pumping is performed as follows:
- The “partner” sitting in the cabin, at the command of the “mechanic”, presses the pedal all the way.
- The “mechanic” unscrews the fitting half a turn so that the liquid, along with air bubbles, comes out into the container through the inserted tube. The brake pedal “sinks” to the floor.
- The “fitter” tightens the fitting, and the “partner” releases the pedal on command.
The procedure is repeated until no more air bubbles come out of the tube. During bleeding, the end of the tube must be constantly lowered into the brake fluid so that air does not enter the cylinder.
In this way, all four working brake cylinders are pumped. A certain sequence should be followed when bleeding the cylinders. They are pumped “from far to near”:
- Right rear.
- Left back.
- Right front.
- Left front.
After completing bleeding of each cylinder, it is necessary to tighten the fitting and put on the protective cap.
Bleeding the brakes of a VAZ 2107 is quite feasible at home and does not require expensive special tools and devices. No special qualifications are required either. Even a child can release and press the brake pedal at the “locksmith’s” command.
Often, owners upgrade the brake system by installing more efficient, high-quality and expensive parts. However, this does not change the bleeding method in any way and does not eliminate the need for periodic work to replace the brake fluid.
https://youtu.be/Zz5lBYsXajo
Brake hoses: replacement
If the car owner notices smudges resulting from tire wear, it is necessary to change the brake hoses. Technical literature says that hoses installed more than 3 years ago are prohibited from being used. The explanation for this is simple: firstly, rubber ages, and secondly, it is more susceptible to deformation.
In a VAZ-2107 car, brake hoses are located both at the front and at the rear. These components lead the fluid fluid to the working cylinders. Having found out that the rubber component requires replacement, you need to stock up on:
- screwdrivers;
- pliers;
- a set of keys;
- new hose;
- brake fluid.
Replacing the brake hose
- Remove the front tire from the desired side so that there is convenient access to the caliper.
- Unscrew the bolt securing the hose from the reverse side and remove it with copper washers.
- Unscrew the hose in the area of fixation to the brake pipe.
During repairs, washers are replaced with new ones, as they are used as seals. And, as you know, when dismantling old parts, leakage of brake fluid cannot be ruled out.
The rear hose is attached in the same way, the only difference is that the front brake hose is fixed to the caliper with a bolt, the rear one with a nut. You will need wrenches to disconnect the tube and hose. One needs to unscrew the tube, the other needs to hold the nut of the flexible component. When the tube is slightly loosened, you need to remove the stopper using pliers. Having finished dismantling the damaged part, you need to install a new one. At the end of the process, the tank should be filled with TJ, and then the system should be pumped into the VAZ-2107.
Why don't the brakes bleed?
One of the problems that many VAZ 2107 owners face is the inability to bleed the brakes after repairing or replacing the master cylinder. It would seem that a new or repaired part has been installed, bleeding is carried out correctly, but the result is zero. The essence of the problem is that in most cases, when installing a GTZ, tubes and hoses are first connected to it, then brake fluid is poured into the reservoir, and only after that they begin bleeding. However, there is air in the cylinder itself, so you need to bleed it first, and then start working on the brakes.
The fact that there is air in the GTZ is also indicated by the brake pedal, which lies on the floor.
To deal with the problem, you do not need to tighten the fittings on the tubes - just tighten them. After this, pour brake fluid into the reservoir and release the fittings a few turns so that fluid and air flow out of them. Alternatively, to speed up the process, you can wipe the neck of the tank and blow into it to create pressure. After the fluid flows without air, the fittings are clamped and the standard procedure for bleeding the brakes begins.
In addition, a pumping problem can occur when installing a defective cylinder or when a part is incorrectly repaired. If a problematic product is encountered, the fluid is bypassed, which simply flows from the tank to the cylinder and back, i.e. it does not pass further than the GTZ. In this case, the part must be replaced. If the cylinder has been repaired, the procedure will need to be repeated, since, most likely, an error was made during assembly.
In order for the “Seven” brake system to work properly, it is necessary to periodically inspect its elements, monitor the level of brake fluid in the expansion tank, and if it decreases, identify the reason that led to this. Since many problems with the hydraulic brake system require bleeding, you need to know what should be done and in what order - there is nothing complicated in this process.
How to replace brake fluid on a classic VAZ
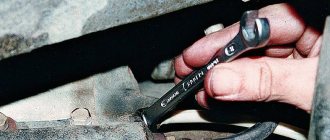
In fact, replacing brake fluid on a VAZ-2107 is a simple procedure. And it consists of just a few steps. Remember. The main thing is attention and accuracy! Among the tools you will need: a wrench for bleeding the brakes, a 20 ml medical syringe. with a tube instead of a needle, a transparent container for draining, a silicone hose of the required diameter and brake fluid. Before you start replacing, you need to try to unscrew the bleeder valves on the brake cylinders (just “move” them out of place). If any of the valves are loose or broken, then replacing the fluid without repairing or replacing the cylinders will not work!
How to unscrew a soured fitting
One sticky fitting can turn brake bleeding or fluid changes into a major hassle involving expensive parts. Here are a few “tricks” that can help when working with “stubborn” fittings.
The worst thing that can happen is that the bleeder valve is bent. After this, the fragment will have to be drilled out, and only an experienced mechanic can successfully perform this work. With this in mind, do not apply too much force to the wrench.
If you fail to unscrew the fitting on the first try, you need to clean the surface around it from dirt and rust, treat it with a penetrating liquid and wait about ten minutes. After that, try again.
Have the edges been torn off? A special key with a cutout and a clamping bolt will help. 8 and 10 mm wrenches are available for sale. A small gas key can also help out in this situation. And again, try not to break the fitting!
With this key you can unscrew the fitting
The use of local heating gives very good results. Take an industrial hair dryer and heat the problem part for a few minutes. Thermal expansion will “stir” the threaded connection and the fitting will come loose.
You can use a hairdryer to heat the part.
The parts that were unscrewed with such difficulty must be replaced with new ones because cracks have already appeared along them, which can lead to breakdown at any moment. Once the problem with the fittings is resolved, you can move on.
Step #-1
You need to suck the liquid out of the tank into a container with a syringe. If the tank is dirty, it must be washed with an alcohol solution.
Use a syringe to syringe the old liquid
Step #2
Fill the fluid reservoir full. Note the volume of fluid added. Then you will need it.
Step #-3
Changing the fluid begins with the right, rear wheel. To do this, open the bleeder valve on the brake cylinder, put the silicone hose on the tap fitting and drain the fluid into a transparent container. Carefully monitor the amount of liquid in the tank. If it goes away, you'll have to bleed the brake system, and you can't do that alone. Therefore, add it periodically. As soon as clear liquid comes out of the hose, close the valve. The contour of this wheel is the longest and most voluminous, so a lot of fluid will be lost.
Step #4
We do the same procedure with the left, rear wheel. The purity of the liquid is clearly visible through the silicone hose.
Step #-5
Let's move on to the front brake circuit. Here, in order to get to the brake cylinder, you will have to remove the wheel. Don't forget to put a support under the car. We start from the right side. This outline is longer than the left one. Do not pour clean liquid into the container. Monitor this through a transparent hose. The method is the same as with the rear circuit: open the valve, put on the hose, drain until the liquid is clear, close the valve.
Procedure for bleeding the brakes
To bleed the brakes on the “seven”, as a rule, 2 people are required: one is under the car and works directly with the brake cylinders, and the second is located inside the car and presses the brake pedal. The following tools are required for work:
- socket wrench 8/10;
- 8/10 open-end wrench or special for brake pipes;
- hose of appropriate diameter;
- container for waste liquid.
Bleeding begins from the furthest wheel from the GTZ, so it is performed in the following sequence:
- Right rear wheel.
- Left rear.
- Right front.
- Left front.
To bleed the brakes of the rear wheels, you need to go under the car. Work on the front brakes is carried out after preliminary dismantling of the wheels. Otherwise the process is the same:
- Remove the protective cap from the fitting of the working brake cylinder.
During pumping, you need to control the liquid level in the expansion tank so that air does not enter the system.
Video: pumping brakes on a VAZ
Replacing brake fluid on VAZ 2101-VAZ 2107
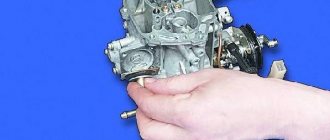
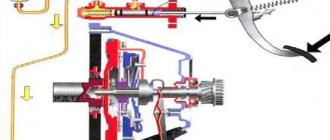
Welcome! Brake fluid - it is mainly part of the braking system, and how would a car brake without it if the brakes are turned on only when this same fluid presses on them, we will explain everything to you on your fingers! In the brake mechanism (Take the front wheel for example) there is a so-called caliper, so inside this caliper there are two brake pads that compress the brake disc when you press the pedal and, accordingly, the brake cylinders themselves, which press on both of these pads, cannot be applied by these pads themselves compress the caliper and move away from them, for this, two brake cylinders are installed in the caliper itself for both of these pads, so when you press the brake pedal to stop the car, the brake fluid passes through the entire system and thereby presses with very great force on At this time, the pads and pads grind against the brake disc and as a result the car slows down.
You already understand that in order for a car to brake, there must be brake fluid in the system, because it puts pressure on the cylinders and thereby rubs the pads against the disc, but over time, after about two or three years, this fluid begins to lose its properties and becomes saturated called moisture, this happens (the liquid is saturated with moisture) no matter what kind of liquid you pour into the system, even if you pour liquid into it, for example, for 3000 thousand rubles. 5 liters, then it will also be saturated with moisture, but just not right away, but after a longer period of time, and after this impregnation the following situation occurs, namely, the brake fluid begins to boil at lower temperatures, for example, the new fluid boils at a temperature of about 250 degrees, aim for it, and after it boils, the car starts to brake worse, and in general, if the brake hoses turn out to be weak, then at this temperature (Although unlikely) they can simply burst, in this regard, the wheel on which the hose bursts stops braking the car altogether !
So, if there is moisture in the system (Typical of old fluid, which is already two or three years old), then the effectiveness of the brakes will remain almost the same, but as soon as the temperature of the fluid exceeds (Depending on what percentage of your brake fluid is saturated with moisture ) aim for 150-200 degrees, then it will already begin to boil, all because of the moisture that will be in it, and as soon as it begins to boil, then the car will stop significantly worse.
Okay, it’s time to finish a little and move on slowly to the replacement instructions itself, so if you don’t know how to correctly change the fluid in the brake system, then read our article; most of the nuances are described in it, and thus, after reading it, you will learn how to change use this fluid in your car and find out what you can and cannot do when replacing it.
Note! In order to replace the brake fluid, you will first need to stock up on: New brake fluid, and also take with you a small hose (This means a small hose) which you will put on the bleeder fitting (If you don’t understand about the hose, that is, why it is needed and all that, then just read this article from beginning to end and you will understand everything), you will also need to stock up on a set of small wrenches, which will approximately contain an “8” and “10” wrench and take the container with you, about 0.5 liters and always empty, but during operation or before starting, pour a little new brake fluid into it!
Summary:
When should you change your brake fluid? It must be replaced every two or three years. In general, before buying a new fluid, be sure to pay attention to all the reserves indicated on the box, because generally when you need to change this fluid, manufacturers still indicate on the box (Mainly on the box they write the expiration date of a particular liquid, after the expiration of this period it needs to be changed), but if you cannot find this box of liquid or have thrown it away, then remember the brand that you poured into your car, for example, “DOT-4” and dial on the Internet there is such a text: “Frequency of replacement of DOT-4” and everything will be written there!
In the event that you have just recently purchased a new (meaning for you) car on the market and do not know when the brake fluid was last changed, then this can be checked, although when purchasing any car it is recommended to immediately change all the fluids, all oil in the system, but still, in some cases, if the fluid is normal, then why just spend money on it if you can roughly understand, in general, any fluid has its own color, for example red, before buying a car, immediately check what kind of brake fluid was poured into the reservoir after answer, go to the Internet and enter the name of this liquid, look carefully at what color it is in the picture and what color is in your tank, in general, if the liquid begins to change its color and no longer becomes red, for example, but black, then this is a clear sign that the fluid needs to be replaced, and the fluid also needs to be changed if sediment appears in it and if it begins to gradually become cloudy.
Changing brake fluid yourself is very easy
Welcome! Brake fluid - it is mainly part of the braking system, and how would a car brake without it if the brakes are turned on only when this same fluid presses on them, we will explain everything to you on your fingers! In the brake mechanism (Take the front wheel for example) there is a so-called caliper, so inside this caliper there are two brake pads that compress the brake disc when you press the pedal and, accordingly, the brake cylinders themselves, which press on both of these pads, cannot be applied by these pads themselves compress the caliper and move away from them, for this, two brake cylinders are installed in the caliper itself for both of these pads, so when you press the brake pedal to stop the car, the brake fluid passes through the entire system and thereby presses with very great force on At this time, the pads and pads grind against the brake disc and as a result the car slows down.
You already understand that in order for a car to brake, there must be brake fluid in the system, because it puts pressure on the cylinders and thereby rubs the pads against the disc, but over time, after about two or three years, this fluid begins to lose its properties and becomes saturated called moisture, this happens (the liquid is saturated with moisture) no matter what kind of liquid you pour into the system, even if you pour liquid into it, for example, for 3000 thousand rubles. 5 liters, then it will also be saturated with moisture, but just not right away, but after a longer period of time, and after this impregnation the following situation occurs, namely, the brake fluid begins to boil at lower temperatures, for example, the new fluid boils at a temperature of about 250 degrees, aim for it, and after it boils, the car starts to brake worse, and in general, if the brake hoses turn out to be weak, then at this temperature (Although unlikely) they can simply burst, in this regard, the wheel on which the hose bursts stops braking the car altogether !
So, if there is moisture in the system (Typical of old fluid, which is already two or three years old), then the effectiveness of the brakes will remain almost the same, but as soon as the temperature of the fluid exceeds (Depending on what percentage of your brake fluid is saturated with moisture ) aim for 150-200 degrees, then it will already begin to boil, all because of the moisture that will be in it, and as soon as it begins to boil, then the car will stop significantly worse.
Okay, it’s time to finish a little and move on slowly to the replacement instructions itself, so if you don’t know how to correctly change the fluid in the brake system, then read our article; most of the nuances are described in it, and thus, after reading it, you will learn how to change use this fluid in your car and find out what you can and cannot do when replacing it.
Note! In order to replace the brake fluid, you will first need to stock up on: New brake fluid, and also take with you a small hose (This means a small hose) which you will put on the bleeder fitting (If you don’t understand about the hose, that is, why it is needed and all that, then just read this article from beginning to end and you will understand everything), you will also need to stock up on a set of small wrenches, which will approximately contain an “8” and “10” wrench and take the container with you, about 0.5 liters and always empty, but during operation or before starting, pour a little new brake fluid into it!
Summary:
When should you change your brake fluid? It must be replaced every two or three years. In general, before buying a new fluid, be sure to pay attention to all the reserves indicated on the box, because generally when you need to change this fluid, manufacturers still indicate on the box (Mainly on the box they write the expiration date of a particular liquid, after the expiration of this period it needs to be changed), but if you cannot find this box of liquid or have thrown it away, then remember the brand that you poured into your car, for example, “DOT-4” and dial on the Internet there is such a text: “Frequency of replacement of DOT-4” and everything will be written there!
Also interesting: Name of color, selection of paint by color
In the event that you have just recently purchased a new (meaning for you) car on the market and do not know when the brake fluid was last changed, then this can be checked, although when purchasing any car it is recommended to immediately change all the fluids, all oil in the system, but still, in some cases, if the fluid is normal, then why just spend money on it if you can roughly understand, in general, any fluid has its own color, for example red, before buying a car, immediately check what kind of brake fluid was poured into the reservoir after answer, go to the Internet and enter the name of this liquid, look carefully at what color it is in the picture and what color is in your tank, in general, if the liquid begins to change its color and no longer becomes red, for example, but black, then this is a clear sign that the fluid needs to be replaced, and the fluid also needs to be changed if sediment appears in it and if it begins to gradually become cloudy.
Note! By the way, car shops sell special testers that are used specifically to check the condition of the fluid, these testers cost about 1000-1500 thousand rubles and if you want to buy it, it will give you more accurate readings, although you yourself can visually determine everything without any tester, but nevertheless, if you have already decided to purchase it, then whether to take it or not is up to you, if you have any friends at the service station, then you can go to them and even perhaps they will have this tester!
Note! To carry out the work of replacing this fluid, you will need to use the help of a second person, so before starting work, ask any person to help you, about 1 hour is most likely enough for you to do the work, and if you already If you previously carried out a replacement, then 15-2 minutes will be enough!
1) At the very beginning of the operation, you will first need to find out what the brake system is, then you will need to understand where the bleeder fittings are located on the front and rear wheels, and finally you will need to find out where the brake system reservoir itself is located, since I know all this information, you will have significantly fewer questions about pumping.
Note! If you want to find answers to all these questions that we described in paragraph 1 above, then carefully read the article entitled: “Bleeding the brake system”, be sure to read the “Note” section for yourself! which comes immediately after the title: “How to bleed the brakes on a VAZ?”, and you will also need to fully read point 2 in the article to which the link is given and view the picture and point 4 and also view the picture!
2) Now let’s move on, after everything we’ve learned, first open the cap on the expansion tank and use a rubber bulb or a syringe to collect all the brake fluid that is in this tank.
Note! Do not completely empty the tank, otherwise the system will depressurize, so you only need to empty it to the lowest MIN mark!
3) Then, when the fluid has been drained to the required level, take new fluid in your hands and fill the reservoir with it to the MAX mark and then close the brake system reservoir cap.
Also interesting: How to change the handbrake cable on a Chevrolet Niva
4) Next, tell your assistant to get behind the wheel of your car and also give him new brake fluid, he will need it to always keep the brake reservoir filled, because if the reservoir is completely empty then you will have problems since the system is completely will depressurize, in connection with this you will pour much more fluid into the reservoir, but in the end you will save the system from depressurization, in general, in order for the brake system not to depressurize, you need to constantly keep its level and not lower it less than 15 mm, miss it a little lower and it will be disastrous, In general, do not lower it below the MIN mark.
5) Now take the wrenches with you and climb under the car, it is best, of course, if your car is standing on an inspection hole, but regardless of where your car is standing, as you already understood by clicking on the link to a separate article, the fact that the front wheels will need to be removed, otherwise it will be inconvenient to bleed the calipers in the front of the car.
6) Then start pumping the wheel that you exactly need, but remember the thing that the wheels are pumped strictly along the contour and not otherwise. How to bleed a wheel (Brake mechanism), you ask? Everything is very simple, take a small hose in your hands and put it on the necessary bleeder fitting for you, then lower the other end of this hose into a container that will be filled with brake fluid in advance, so lower this end of the hose into the liquid so that the system does not depressurized and after all this, tell your assistant to press the brake pedal 5-8 times smoothly and carefully, and on the last press, let him leave the pedal in the recessed position and not release it until you screw the fitting back, we are talking about this fitting now Let's talk.
7) After the entire operation has been completed, carefully begin to loosen the bleeder fitting literally 2-3 turns and you will see how the waste liquid begins to come out into the bottle, which will most likely be black, so when the liquid stops coming out, immediately tighten the fitting and tell your assistant to remove your foot from the pedal, that’s the whole replacement procedure, only you will need to carry it out for all wheels until new liquid flows from the hose into the bottle, for example red liquid, and after it flows, move on to the other wheel and perform this operation again.
Note! This operation can be repeated 5 times on only one fitting, so always watch what kind of liquid comes out and be sure to add new liquid to the expansion tank to the required level!
Important! Each person will carry out the entire replacement in different places, someone will drive into the pit, someone will simply jack up the car and also bleed the brake system, and someone will simply crawl under the car, well, the whole point is that if your rear wheels are hanging out, then before you start replacing the fluid, you will need to do a little work to unlock the pressure regulator of the rear brakes, otherwise you will have nothing to bleed on the rear wheels; it simply won’t work out, in general:
1. To unlock, first take a key in your hands, preferably two, and you need two, and with their help, disconnect the rod from the torsion lever; to do this, hold the head itself with one key and unscrew the nut itself with the second.
2. Then this torsion bar from which you have removed its fastening bolt, simply move it up and using a spark plug wrench (the original key that was included when purchasing the car) support the torsion bar as shown in the photo below, and only after that proceed to the main work on replacement.
Additional video clip: If you do not have an assistant to replace the fluid with him, then by creating a special tool you can replace it alone; for more details on how to do this, see the video clip located just below:
Also interesting: Top 5 scams in car dealerships when buying a car